


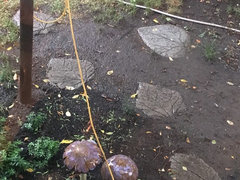
Rhubarb Leaf Stepping Stones
iowagirl2006
15 years ago

Featured Answer
Sort by:Oldest
Comments (42)

Linda Wayman
15 years agolast modified: 9 years agoRelated Discussions
Newbie - What am I doing wrong?
Comments (1)Did you use the 5000 with water and nothing else? Why 5000? Did you work in too cold of an area, like outside or an unheated building? Too wet of a mix can give you crumbly and lots of air bubbles. Weather too cold? I know that 5000 is for working in cold temps but if a frost or freeze get this before it cures it can crumble. It's hard to tell from the pictures but these look a little thin to be stepping stones. You have to watch out when using rhubarb leaves or any thick leaf. The veins can be very large and lead to cracking of your stepping stone if the stones aren't thick enough. Billie...See MoreWest End Tailgater???
Comments (80)Hi All For a while there, it seemed as if I wasn't going to make it. This is definitely going to be the most busy weekend I can remember. I don't really have any pre arranged trades, except for the mayapple, so I think I'm just going to come with most of whats on my list -some divisions from the garden- and drop 'em in the circle. Are there any 'budding' gardeners comming out this year? As I wouldn't mind returning the favour I got last year. Well, I look forward to seeing you all. And yeah...do cover those plants...I always say to wait until june.... List Additions -3 pots of Columbine - deep purple with white center -3 monarda divisons (w/roots) -3 artemesia pots (one large) -a pot with some large lily bulbilis' (year/two from bloom)...See MoreLeaf Stepping stones
Comments (6)I make these all the time. I use fig leaves but any large leaf will do. Use clusters of small leaves or even flowers for a different effect. I use a 5-gallon plastic paint bucket for the form. I slice it with a saw into little hoops about 2" high. I use readi-mix concrete with some extra portland cement powder added for strength. I have left the extra portland cement out a few times but the paving stones are more likely to crumble and break. You can use any flat surface to make the stones. I use some scrap painted plywood. Formica, plastic or sheet metal is also good. Put it on the ground where it won't bend from the weight of the concrete. Put the leaf with the veins up. Arrange the plastic hoop around the leaf. I like to have the stem going to the edge so I squash it down under the rim of the hoop. Plop the concrete in the form. I put a few lumps around the edge first to keep the hoop from moving, then I fill it up. It is important to pound on the concrete to make sure there are no air pockets. I use a trowel but a big stick or flat board works almost as well. The side you see will be hidden when you place the stone so don't worry about the cosmetics of it. Let it sit overnight. The next day take off the plastic hoop. The longer you wait the harder the hoop will be to remove without cutting it. Flip it over and dig out any concrete covering the stem. Don't try to remove the leaf and don't step on it yet. Stack up your stones and keep them wet for a few days. The concrete gets harder every day for years but they should be ready to use in a week. The leaf will turn brown and blow away in a few weeks. A 60-pound bag of ready-mix makes a half dozen or more of these, depending on the thickness of your form. You can also make these with pebbles, marbles, coins and rock salt. The rock salt washes out and leaves little indentations randomly on the surface. (I wouldn't wash it into my garden though!) If you are using river pebbles or money you need to flip the stone when it first turns hard and wash the surface of the stones or money with a wet sponge. Not too much or the stones will fall out. If you wait too long they get harder to wash. Practice on one before you do a lot. I don't use wire mesh but I suppose it will be stronger with it. It seems risky with leaves because you need to pound the concrete down well, especially on the edges and it's possible to rip the fragile leaf with the wire mesh....See MoreHow To Get DH Involved in Tablescapes
Comments (24)Ah-haha (rofl) Oh my gosh this is getting worse!! ha Oh, Jim, too funny. Are you sure that thing's a fern, I'm still concerned that it could be some alien flowerpod that's come to suck out our brains. Looking closer I see those poofballs sticking up and I can feel a Little Shop of Horrors incident coming on! You are sitting there nonchalantly eating your dinner on your slab of concrete and suddenly YOU'RE dinner instead!! :) Luvs~ I didn't even notice the napkin holders. I think you are right. I saw the Trading Spaces with the feathers, did you see the one where they put straw on the walls??? They brought in a bail of hay and put glue on the walls and went to town. I was thinking UGH! I thought the homeowner was going to die! She was sooo disappointed. They also did a grass wall on another one. The HO (that's homeowner btw) didn't like that either. Thanks, bring my allergies right into my bedroom and how the heck am I supposed to get the lawnmower up there? :) ~A...See More
caflowerluver
15 years agolast modified: 9 years ago
alisande
15 years agolast modified: 9 years agomaryanntx
15 years agolast modified: 9 years ago
Chemocurl zn5b/6a Indiana
15 years agolast modified: 9 years agookwriter
15 years agolast modified: 9 years agoiowagirl2006
15 years agolast modified: 9 years agogrammahony
15 years agolast modified: 9 years agonan_ar
15 years agolast modified: 9 years agomcmann
15 years agolast modified: 9 years ago
linnea56 (zone 5b Chicago)
15 years agolast modified: 9 years agoHappy_Go_Lucky_Gayle
15 years agolast modified: 9 years agoivamae
15 years agolast modified: 9 years agomsmarion
15 years agolast modified: 9 years agogoldngirl65
9 years agolast modified: 9 years agoAlice_sj
9 years agolast modified: 9 years agojkayd_il5
9 years agolast modified: 9 years agosusie53_gw
9 years agolast modified: 9 years agojeaninwa
9 years agolast modified: 9 years agojeaninwa
9 years agolast modified: 9 years ago
rob333 (zone 7b)
9 years agolast modified: 9 years agotxblutopaz
9 years agolast modified: 9 years agojuellie1962
9 years agolast modified: 9 years agoUser
9 years agolast modified: 9 years agodittydo2
9 years agolast modified: 9 years ago
ravencajun Zone 8b TX
9 years agolast modified: 9 years agocookie8
9 years agolast modified: 9 years agoChrystalkay
9 years agolast modified: 9 years agopattico_gw
9 years agolast modified: 9 years agojemdandy
9 years agolast modified: 9 years agolukiesyaya
8 years agolukiesyaya
8 years ago
Elaine Tapley
8 years agoCookie8
8 years agomoira168
7 years agoUser
7 years ago
nicole___
7 years agoUser
7 years agoUser
7 years agolast modified: 7 years ago
marylmi
7 years agoUser
7 years ago


Related Stories
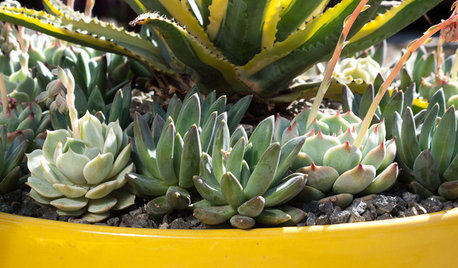
CONTAINER GARDENS3 Steps to Creating Quick, Easy and Colorful Succulent Containers
Take a bright container, add a colorful succulent or two and have a professional, summery design in minutes
Full Story
COFFEE WITH AN ARCHITECT12-Step Program for Architecture
Addicted to architecture? We understand. Here's something that may help ... or not
Full Story
GARDENING AND LANDSCAPING8 Great Ways to Use Landscape Pavers
Today's Stepping Stones Define a Space While Adding Affordable Style
Full Story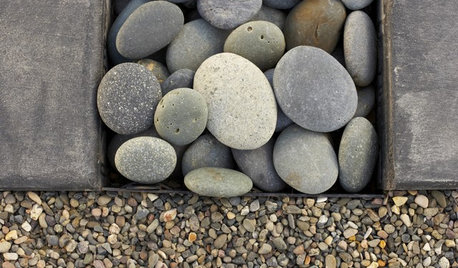
LANDSCAPE DESIGNThe Right Stone for Your Garden Design
Gravel, pebble, cobble and paddle: Stones vary in size and shape, and have different uses in the landscape
Full Story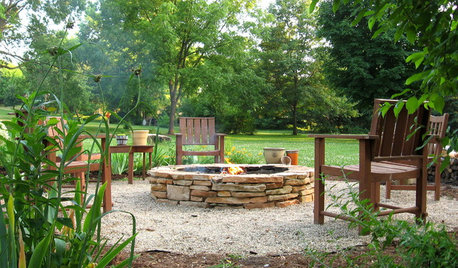
GARDENING AND LANDSCAPINGHow to Make a Stacked Stone Fire Pit
See how to build a cozy outdoor gathering place for less than $500
Full Story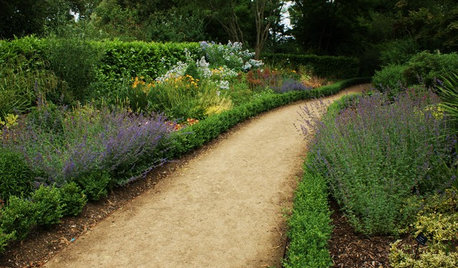
LANDSCAPE DESIGN5 Gravel and Stone Types for a Rockin' Landscape
Give your garden design some textural bam with pebbles, granite, river rocks and other permeable materials
Full Story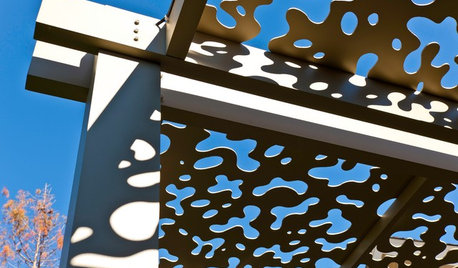
PATIOSPatio Details: A Custom Aluminum Arbor Cools Things Down in Texas
Panels in the roof have leaf pattern cutouts that create dappled shade and a calm, relaxed ambience
Full Story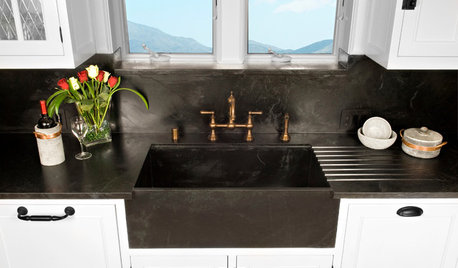
KITCHEN DESIGNKitchen Sinks: Soapstone for Germ-Free Beauty and Durability
Stains and bacteria? Not on soapstone's watch. But this sink material's benefits don't come cheap.
Full Story
GARDENING AND LANDSCAPING6 Ways to Rethink Your Patio Floor
Figure out the right material for your spring patio makeover with this mini guide to concrete, wood, brick and stone
Full Story
GARDENING AND LANDSCAPINGPlant a Pocket Garden
This spring, add a touch of green to garden paths, patios, steps and walls
Full Story

bettyswwa