Shop Products
Houzz Logo Print
rosegarden3

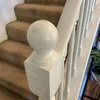
bubbles - how can I fix it?

rosegarden3
16 years ago

Ok I did a search and could not find anything on what to do. So if this has been answered before I'm sorry.

I bought a solid oak table with 4 chairs at a yard sale. The table and chairs are large and solid. The table top was beat up and scratched but the rest of it looks great. So I just wanted to refinish the top. I striped it and sanded starting with 80 and went through to 220. I used minwax stain thankfully it matched great. So then I used minwax poly. I put the first coat on and got a few bubbles, after I sanded it looked good. The second coat I got lots of bubbles. I stirred very slowly, used a natural bristle brush(as the can recommend a natural brush or a sponge brush) I got lots of bubbles so I switched to a foam brush and still got lots of bubbles. So now I have 2 coats of poly on and lots of bubbles. Is there any thing I can do to fix this without striping it down and starting over?

Thanks

Rose

Comments (8)

  • rosegarden3
    Original Author
    16 years ago

    thank you! what grit sand paper do I use, 220?

  • User
    16 years ago

    Depends on what sander---220 is ok for hand sanding. 150 for power sanding(NOT a belt sander!!!!!!!)---but DO NOT press down on the sander. 220 with power sanders---random orbit or 1/4 sheet finish sanders---will clog up rapidly and cause big scratches.

  • linnea56 (zone 5b Chicago)
    16 years ago

    Suggest also you brush slowly: let it flow from the brush. Applying fast always seems to make more bubbles. Make sure after stirring the can that there are no bubbles before applying too. If using oil-based poly I have found it useful to cut it by 1/3 turpentine (real turpentine, not paint thinner). I feel the body is too heavy otherwise. Brushes more easily, dries faster, levels faster, reducing the temptation to overbrush to smooth out. I don't care if I have to add more coats if the result is smoother and dries faster. Not with varnish, just oil poly.

  • brickeyee
    16 years ago

    Practice on some scrap wood.
    It sounds like you may be 'scrubbing' the finish on.
    Clear finishes are usually put down with a single brush stroke in one direction.
    You do not go back over the previous area.

  • reikimaster
    16 years ago

    Depending on what type poly it is... water based or oil based.. you can sometimes cure the bubbles with a heat gun. A hair dryer isn't hot enough and a torch is a bit dangerous, but a heat gun usually works. It expands the bubbles and they break. I've used this on furniture and floors a few times so I know it works.

    In your case though, I'm sure the poly is dry. And so as has been said, sanding is your only choice. Just have a heat gun handy when you reapply the poly. :)

  • robwood
    16 years ago

    I have a quaestion on your original prep sanding. Did you use 80 grit and go directly to 220? If so some of the bubble issues you are having is caused by voids in the wood fiber. I have done a lot of production work and found that bubbles are also common in sealer stages even if you are using a spray gun. The sand proceedure I would recommend if you start with an 80 grit is go to 120, 150, 180 then 220. If the surface area is small enough do the sanding by hand. If not then a hand sander is fine and go from 80 grit to 120 to 180 then to 220. Typicly production will follow the same proceedure. Another trick is to use a sealer with about a 10% reduction with either solvent or water depending on the system you use. If you use a solvent to reduce the material, check the label on the side of the can, there you will find a list of components used to make the product. Select the predominant solvent (i.e. Miniral Spirits, VM&P Naptha, Xylol or Lacquer Thinner. The purpose of additional solvents in the sealer stage or first coat, is to allow the base coat to absorb into the fibers of the wood and allow the air to escape. Another issue with bubble of foaming is that the product is trapping air due to the application method, again a 5 to 10% reduction should eliminate the problem. I hope this offers some additional information.

  • Eric Lam
    7 years ago
    last modified: 7 years ago

    I have spent some money and some time to resurface my
    traditional office desk which already has a layer of stain and poly. It has few
    scratched and peeling, so I need to sand it down and redo the surface. I
    followed all instructions and still having bubble on top of the newly applied
    polyurethane. Finally, I created my own method.

    - Clean up and remove all dust on the surface of the wood,
    in my case, it is the table top of my office desk.

    - Apply oil based polyurethane with stain color with brush; I used the
    cheap $1.25 bristle brush from Lowe's. I chose polyurethane with stain color in
    it. You can choose different color at Lowe’s and it also has gloss and satin
    (semi gloss) choices. Apply a thick layer on the surface of the wood or on my
    office desk in my case. There should be
    many bubbles on the top. Some suggest using heat gun while applying so the
    bubbles pop and disappear, I have not tried that because I don’t have a heat
    gun. I ignore the bubbles there for now. Then let it dry thoroughly after few
    hours or next day.

    - Sand the surface with very fine 300 or higher sand paper
    with an electric hand sander. Sand out all bubbles on surface as much as
    possible. It will scratch the entire surface, don't worry. But do not sand too
    deep, we still want the polyurethane and the stain on the surface. It is very
    difficult to remove all trace of bubbles, I stopped when most bubbles are not
    noticeable. When sanding with electric sander, make sure you sand fully the
    surface, do not sand with an angle off the wood and do not create track or
    ditch on the wood.

    - Clean up and remove all dust on the surface. I use web
    cloth, and then dry paper towel. Let it dry before next step.

    - Now mix the poly (with build-in stain color) with mineral
    spirit in about 5 to 1 ratio. Apply the mixture on the surface again. Do not
    uses brush this time. Use a paper towel and fold it into a square
    2"x2" shape. Then wrap it with a fine cloth, I use silk cloth in my
    case. Use it to apply the mixture on top of the wood surface. The mixture must
    be thin enough so that you can swipe across surface without resistance. Add
    more mineral spirit if necessary. Follow the wood grain and "sail"
    along the surface with the cloth. Make sure the mixture cover entire surface.

    - Now let it dry. The surface should be shiny again. You
    could repeat above step if necessary until you have an almost smooth wood
    surface or table top. The stain in the poly will create darker or lighter color
    on the wood surface, that is ok and that is nice.

    - You are not done. Now mix the oil based fast drying polyurethane
    with mineral spirit and use new cloth and paper towel to apply one more layer
    on the wood. Again, make sure the mixture is thin enough and your cloth is
    fully absolve with the mixture. Apply the mixture to entire surface, you don't
    need to follow wood grain direction this time. You make sure the entire surface
    is wet. After it is dry, you can apply 2nd layer until the wood surface is
    smooth enough for you. Notice that this fast drying poly will deepen the color
    of your surface. The more layer you apply, the deeper the color.


    It takes a few days :-)