


Wobbly pergola
The 8' H x 9' D x 10' W pergola is completed. Hindsight is better than foresight as we all know - that said, instead of cementing 6 x 6's into the ground, I followed Popular Mechanics pergola design and poured the pad first ,and used 4x4 posts anchored to the pad with Simpson post bases. The roof structure consists of notched 2x8's, 2 x6's and 2x4's.
It is wobbly(I would call this a horizontal racking shear force) - if I push on it at a height of 6-7 ft or more, it moves in the direction I push it - not to the point of falling down, but the movement is significant.
Tried:
1) traditional 45 deg. angle bracing at the top where posts and beams intersect - did not prevent racking
2) 1.5 in W x 10" long steel L braces at the bottom corners of each post, secured to the concrete pad with 3 inch wedge anchors - did not prevent racking.
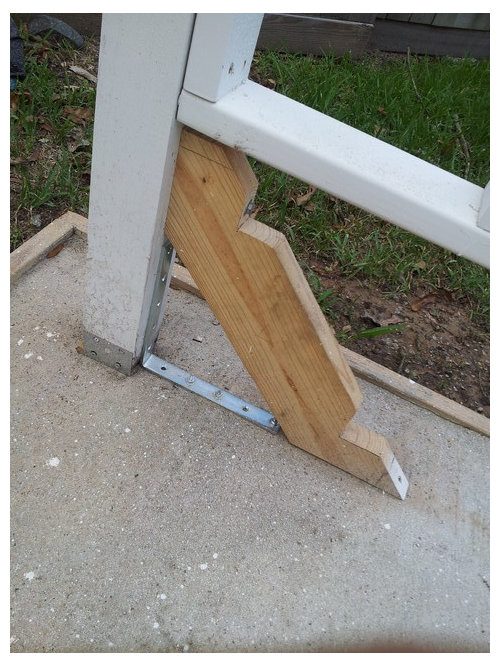
3) a 2x6 diagonal 45 degree brace 17 in up from each post bottom, extending 17 in outward onto the concrete - DID help some, but does not prevent some racking.
Here's my only other thought : build plywood forms 2 ' H x 9 in. x 9 in. around each post with one side left open, enclose the post, fasten the 4th side, and fill it with Quikrete. Since this is a concrete form solution, this is a one way street solution, so I want to be sure this will solve the racking force problem - - The question I have is, will a 2 ft high concrete column poured on top of the pad be as strong as sinking a post into the ground and filling with concrete, the traditional way ? - It seems like it would and should - the only other force factor in a post sunk in the ground is the earth around it.
Don't know if this makes a difference - but - I used 4~4 inch screws everywhere to secure the 2x posts and beams - not the traditional 8 inch carriage bolts.
If using 2 to 4 8 inch carriage bolts at each post and beam intersection, (all the way though the posts), would significantly solve the racking problem, I would much prefer this option rather than getting into building forms and filling them with concrete.
My sincere apologies for the long email - wanted to be as complete as possible. Anyone's help will be greatly appreciated.
Thanks, cr, Kingwood, Tx
Comments (12)
Related Professionals
Newcastle Cabinets & Cabinetry · Watauga Cabinets & Cabinetry · Gardner Carpenters · Ballwin Flooring Contractors · Beaumont Flooring Contractors · Glen Burnie Flooring Contractors · Gretna Flooring Contractors · Lodi Flooring Contractors · Owatonna Flooring Contractors · Swansea Flooring Contractors · Whittier Flooring Contractors · Athens Furniture & Accessories · Bronx Furniture & Accessories · Evanston Furniture & Accessories · North Hollywood Furniture & Accessories
sombreuil_mongrel
9 years agoYou need "knee braces" for your freestanding pergola. Most successful designs incorporate either a stout, rigid, earth-embedded post design or a diagonal member introduced wherever needed to prevent the racking movement.
Caseytoolbelt68
9 years agoI would first try bolts. The very top board would not need one. The other two doubles would get two bolts each at each corner. Use large washers and good sized bolts. Make sure they can handle the latest pressure treated lumber, if that is what you used.
If that doesn't work I'd consider moving the posts off the concrete.
Missing_No_Fingers
9 years agoYour structure does looks wobbly (small legs big top) but fortunately it hasn't fallen and I will add that the leg work is attractive. :)
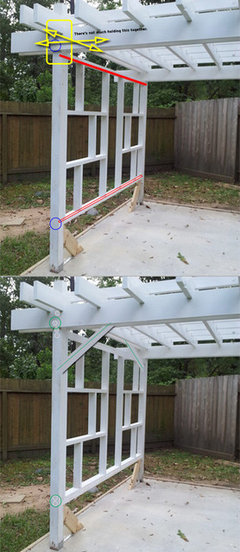
I can see there is little in the way of lateral strength in your pergola because there are only two long thin boards keeping the framing semi-square with little to no bolts holding the legs parallel to each other. The beams look to be flexing already. Of course my opinion is based on a long view of the structure, so a few close-up pics would probably help. Your bolts or screws look too small but hard to tell on those also without close-ups.
Anyway don't waste time pouring concrete as the ground mounts are not the prob. Imagine that your structure should stay upright and not move much at all, even if the bottoms of the posts were not attached to the deck or anything. Think of it being like a 4-legged coffee table where the four legs are NOT mounted to the floor and the table does not flex -- right?.
Notice where I have drawn the lateral supports in red? That is all that is keeping the structure square and the bolts in blue are all that is keeping the whole thing from falling. What size bolts are being used in the BLUE circles.
A few close-ups would help, but I would suggest you add some supports in both lateral directions. At a minimum, try doubling-up the two beams shown in red and bolt those to the legs and each other every 16-24 inches and be sure to use larger bolts, not deck screws to avoid shearing. You should definitely add bracing at the top, similar to what I added in green to make this structure very rigid, especially with the small legs. Also 2x4's are stronger with the 4 vertical and the 2 horizontal.
The bracing that you put on the ground was a good idea, but you really need it at the top, not the bottom. As I mentioned, the structure should stay standing without the deck brackets and braces - those should just be to keep the pergola in the same spot to keep your friends from moving the pergola around the yard as a prank.
If you look at some pergola designs, you'll see many don't have boards below the top, just leg posts.
I hope this helps.
chazrab
Original Author9 years agoExcellent information, "Missing No Fingers"...
I used 4 inch screws everywhere - not carriage bolts or lag screws. If I understood your instructions correctly, I should do the following:
1) add two beams(beams being 2x4's [on edge or flat]) where shown in red and attach with lag screws
2) put 45 degree 2x6 bracing in both directions from each post. The bracing you added looks to be about 2 ft out on the 2x8 and 2 ft down on the post. That would make the brace 34 inches long.
3) Add 2 to 4, 8 inch carriage bolts where the little white circles are at the points indicated in green.The frame between the two 4x4 posts is just made of cut pieces of 2x4's. I made it first, squared it up and screwed it to the insdes of the 4x4's. So in essence, that gave me two "sides" of the pergola. The long and short pieces inside the frame are all attached with 2 1/2 inch screws. It is attached to the 4x4 posts with 3 4 inch screws on each side. I could put 3 six inch lag screws in each frame side to secure it more tightly if that would help also.
Please let me know if I have interpreted your solutions correctly. Am anxious to begin these changes in the next few days.
As a side note, I want this to be a success as much as possible from a structurally rigid standpoint because there is more to it than the pics I sent - I am covering the pad with flagstone and am wrapping each 4 x4 post all the way up to the beams with stone veneer. But before I do all this stonework, I want to try and make this structure as rigid as is possible, and your suggestions in combination with each other sounds like it will be rigid once done.
klem1
9 years ago"those should just be to keep the pergola in the same spot to keep your friends from moving the pergola around the yard as a prank."
Missing No Fingers, your instructions are well stated but the comment about pranking is first class humor while demonstrating the point. Thanks for the laugh.
chazrab
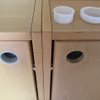
Original Author9 years agoThis image of a column wrapped with Airstone veneer is the very last step of the process in addition to covering the pad with flagstone and installing small indirect low voltage landscape lights between the pergola rafters connected to a timer.
As mentioned, I don't want to begin any of these enhancements to the pergola(which have no bearing on the pergola's structural rigidity whatsoever) until I'm sure I've done everything to make the structure as rigid as possible.
Since I just joined this forum just yesterday with this post, I have to say people all over have been very helpful in sharing their knowledge and experience to help me solve these racking issues, and I really appreciate that.
Thank to Missing No Fingers and all of you for your help.
cr, Kingwood, Tx

Missing_No_Fingers
9 years agoThank you for the compliment. Yes - i think you've got it now and you'll be happy and surprised to see how this will firm up with better bolting and the addition of lateral support.
I recommended doubling up on the horizontal boards (red lines/ item 1) for durability. A child stepping on a single board laying flat like that could cause an injury if the board snaps. Doubling up while placing the boards on edge will increase the strength too. Lag bolts should be fine on those pieces since they are decorative anyway. A simple trick to keep the bottom in place is to place a short trimmer or jack stud (footer) under each end of the bottom board which will take some stress off the lag bolts too.
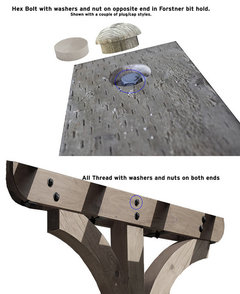
The top of the pergola is where the real strength needs to be, hence, your item # 2. Carriage bolts are not recommended as they would need something to hold them in place, which the wood would not do well (item #3). Use hex or cap bolts or if you like, use all thread rod with fat washers and nuts on both ends. I like all thread because you can cut it flush and it looks "tough". If you prefer the rounded look, you could cover the bolt heads with caps or use a forstner bit and then plug or cap the hole. Given your cool boxy design, the diagonal braces might look nice too without any fancy cutting at all, perhaps just a second diagonal near the ends or on the upside. Creativity is up to you.
Be sure the braces are rigid and that you square everything up before pre-drilling all holes. Also, all bolts should be weather-exposure grade, like hot dip galvanized zinc all-thread.
Be sure to post your updated pics once completed for all to see.

Sai Manoj Suryadevara
3 years agoHi
I read your comments and you sound awesome! Can you please suggest how could I improve this one? The top part is wobbly in this case as well.
Thanks!
Nino Cammarota
2 years agoI was just windering if installing 2 stainless 4mm wire diagonally just under the roof structure and tighten them inwards to bring posts in tight that might strengthen the top structure to stop swaying


chazrabOriginal Author