


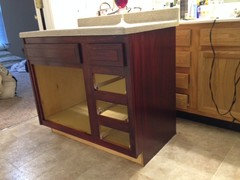
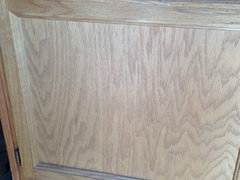
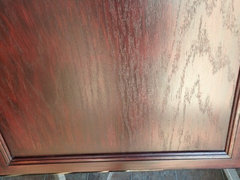
Help...! - General Finishes Gel Stain Kitchen Cabinets Gone Bad!
genga
10 years ago

Featured Answer
Sort by:Oldest
Comments (18)

User
10 years agolast modified: 9 years agoRelated Professionals
Garfield Heights Flooring Contractors · Oak Park Flooring Contractors · Slidell Flooring Contractors · Snellville Flooring Contractors · South Lake Tahoe Flooring Contractors · Stoneham Flooring Contractors · Troy Flooring Contractors · Cartersville Furniture & Accessories · Duluth Furniture & Accessories · Framingham Furniture & Accessories · Los Angeles Furniture & Accessories · Medford Furniture & Accessories · Norwalk Furniture & Accessories · Redmond Furniture & Accessories · Richfield Furniture & Accessoriesklem1
10 years agolast modified: 9 years ago
lazy_gardens
10 years agolast modified: 9 years agogenga
10 years agolast modified: 9 years agorstanny
10 years agolast modified: 9 years agorichardshome
9 years agolast modified: 9 years agotamfam
9 years agolast modified: 9 years agoTamera Pugh
8 years ago
Kimberly McGraw
8 years agolast modified: 8 years agorichardshome
8 years agoKimberly McGraw
8 years agorichardshome
8 years agoKimberly McGraw
8 years agoKimberly McGraw
8 years ago
Nicole Rutherford
7 years agoSharon McNally
6 years ago
Dee Berube
6 years ago
Related Stories
REMODELING GUIDESPro Finishing Secret: Aniline Dye for Wood
Deeper and richer than any stain, aniline dye gives wood stunningly deep color and a long-lasting finish
Full Story
KITCHEN CABINETSKitchen Cabinet Color: Should You Paint or Stain?
Learn about durability, looks, cost and more for wooden cabinet finishes to make the right choice for your kitchen
Full Story
KITCHEN WORKBOOKWhen to Pick Kitchen Fixtures and Finishes
Is it faucets first and sinks second, or should cabinets lead the way? Here is a timeline for your kitchen remodel
Full Story
MOST POPULARRethinking Beige in a World Gone Gray
Gray, the ‘it’ neutral of recent years, has left beige in the shade. But is it time to revisit this easy-on-the-eyes wall color?
Full Story
FUN HOUZZ31 True Tales of Remodeling Gone Wild
Drugs, sex, excess — the home design industry is rife with stories that will blow your mind, or at least leave you scratching your head
Full Story
SELLING YOUR HOUSE10 Tricks to Help Your Bathroom Sell Your House
As with the kitchen, the bathroom is always a high priority for home buyers. Here’s how to showcase your bathroom so it looks its best
Full Story
KITCHEN DESIGN3 Steps to Choosing Kitchen Finishes Wisely
Lost your way in the field of options for countertop and cabinet finishes? This advice will put your kitchen renovation back on track
Full Story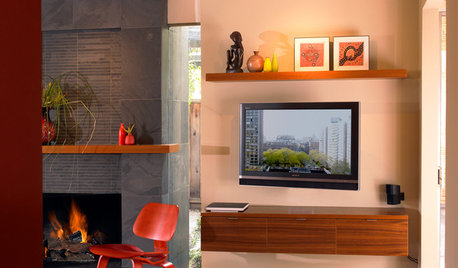
DECORATING GUIDESDecorate With Intention: Helping Your TV Blend In
Somewhere between hiding the tube in a cabinet and letting it rule the room are these 11 creative solutions
Full Story
KITCHEN DESIGNKey Measurements to Help You Design Your Kitchen
Get the ideal kitchen setup by understanding spatial relationships, building dimensions and work zones
Full Story
LIFEDecluttering — How to Get the Help You Need
Don't worry if you can't shed stuff and organize alone; help is at your disposal
Full StoryMore Discussions


sloyder