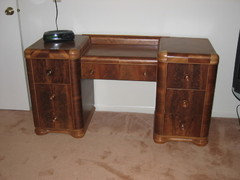
|
| I have an old waterfall bedroom set. My mother in law painted the dresser (because she didn't know any better) blue years ago. It's not a thick layer of paint. Is there a safe and gentle way to remove the paint? I'm trying to avoid a complete stripping unless I have to.
Thanks. |
Follow-Up Postings:
|
| Strippers are so mild now as to be less harsh than sanding. In fact, an orange---environmentally friendly type----stripper may not even work. That leaves scraping with any of several types of scrapers designed for removing paint. Those take an immense amount of elbow grease and can actually pull back muscles---from continually pushing down on the scraper as it is worked. Or sanding. Paint clogs medium grit sandpaper very quickly. The fastest method is to use a coarse grit----40 or 80 grit in a random orbit sander--- the round sander that has stickon sandpaper. That can be very detrimental if the person using the sander does not have some experience. It is very easy to gouge a hole while sanding. That grit paper also makes scratches in the wood, which have to be removed by using finer sandpaper in steps---100 grit, then 150 grit. I seldom go over 150 grit if the wood is to be stained. If stain is not being used, the final sanding is done using 220 grit. So, my advice is to use an environmental stripper first. The more paint you get off before sanding a very good thing. Get most of the paint off by stripping and you can start sanding with the 150 grit paper. The paint left in cracks and tight spaces will have to be scraped out---any number of tools can be used there---I've used a flat screwdriver before. Whatever you have that fits the area and scrapes the paint. |
|
| Thanks for your help. I think I'll pick up a mild stripper and test it out. |
|
| I hear people all the time that want to scrape or sand instead of chemically strip. I know stripping is messy, but it's soon over and does a better job with less risk. "A stripper knows where to stop." A sander or scraper does not. |
|
| Look for a stripper with NMP instead of methylene chloride. Will work with less toxic fumes. |
|
- Posted by sombreuil_mongrel (My Page) on Wed, Jul 4, 07 at 7:01
| The waterfall furniture era was also the start of paper-thin veneer, so be super careful using sandpaper around it. You also have to select your sandpaper wisely. There are papers designed for raw wood and others for paint prep. With the wrong kind, latex paint will ball up and leave a ragged surface, with the right one, it will feather out perfectly. It depends on the crystal shape of the abrasive particles, their orientation, spacing, adhesive and additives. Casey |
|
| One of the cleaner methods for removing paint is a heat gun - like a hair dryer on steroids. It takes a little technique to determine the amount of heating (BEFORE the paint starts to turn brown/black.) But once you get the knack you can do it slowly and continuously down the entire length of a piece. There will be some left in the grain but it can be romoved thru sanding. |
|
| The Waterfall era which would be considered Deco and is most often Walnut does not have thin veneers.We refinish these pieces/sets many times a year. I would strongly suggest staying away from a heat gun. You will at some point in using it, burn the wood. You will also never be able to get the paint out of the nooks and crannies as well as the grain. You should use some sort of stripper like 5F5 . It's a goopy gell like consistancy ,it does a very nice job. Let it do the work for you . You might need to use a brass bristled toothbrush once 99% of the paint is removed. This will allow you to get into the grain and remove that first layer of paint that got deep intot he wood. Sanding with a random orbitla sander with a 220 grit should do the job. You might follow it up by hand with 220 after using the machine. A quick summation is that you must strip the paint off, being gentle is really not a concern.The stripper will NOT hurt the wood. Don't use a heat gun. |
|
- Posted by waterfall_deco (My Page) on Sat, Sep 1, 07 at 11:30
| I'm going to be starting a refinishing project on a three-pc 1940's Waterfall set tomorrow, so this info has been helpful. My aunt had this set in her attic for several years, so there are thousands of tiny bubbles in the finish (not under the veneer). I was planning on using the F5F, but am wondering if I should use something less harsh and/or sand? I was worried about sanding veneer, because I thought it was only about 1/250" thick, but you seem to be saying not to worry as much as I am. I don't have a random orbital sander. Any specific recommendation for the tiny bubble issue? BTW, does it matter if the finish is shellac, varnish or lacquer, for which you can tell I don't know the difference. Thanks for any advice! |
|
|
- Posted by waterfall_deco (My Page) on Sun, Sep 2, 07 at 11:06
| Terrifically helpful, and gorgeous pieces Stocky! I'm looking now and see that my search for refinishing waterfall, even though I had "varnish" as a search word as well, yesterday brought me to this topic of removing "paint". I was so excited with the knowledge evident in these posts that I didn't notice. I'm sorry that I didn't specify that it's only the original clear coat (varnish? shellac?) that I need to remove. However, in that case can I go right to the mineral spirits/paint thinner step, and the steps thereafter that you outlined above Stocky? As 2 follow up questions... - What type of clear finish shall I use? Oil, varnish, lacquer? I see to stay away from water-based finishes and also that shellac can be tricky to work with. (I'm new to this GardenWeb site so should/will also move this discussion about finishes to another forum, but wanted to tap into what appears to be some great expertise on this one!) Again, beautiful pieces Stocky. |
|
| Ok, so no paint, that's very good news and a heck of alot easier for you. Use the 5F5 to remove the old finish. Clean the surface with the mineral spirits Sand What to use for a clear finish is up to you. I spray lacquer via an ( air assisted /airless) syatem. lacquer is the least expensive,hardest,most user friendly finish you can use. You would have to apply it with a brush or sray it out of numerous cans. We can discuss this part after the stripping is done. Leaving the wood bare or raw will not do any harm to the veneer. Remeber to wear a repirator when doing the stripping. It's about $25 from Home Depot type of store. You should do it outside and away from any flames or anything that can spark. Thank you for the nice words on the pieces. I can walk the thru the finishing steps when your ready. |
|
| Hi, I had the same probplem. Ive stiped my night stand down and now im ready to start the finishing stage. But im not sure what stain or clear coat to use or even the color that most waterfall furnituer comes in. Can anyone help? Thanks! |
|
| myles860, Hi, most "waterfall" style furniture is/was Walnut and in my opinon was meant to finished with a clear finish and no stain applied. We spray our finishes ( from a high end type of system) so I'm not a good person to reccomend a brush on finish for ya, but if your only doing a night table you might want to look into a product that comes in a spray can called Deft . It's lacquer in a can. You might need 6-8 cans. IMO The finish will look 100 times better sprayed from a can than brushed on. |
|
| Hi, It still has the walnut venner on it but the moldings on it are not made from walnut its a softer wood thats more white in color. fefor i started it all matched in color. |
|
| Yes, that style and for the most part when you have the beautiful veneers you have "white wood" used for your framework. This was the sort of standard as far as how things were built back in the day, with the exception of the hight quality stuff where the legs and framework would be the same wood as the veneers on the faces and tops. As a layman you are going to have a bit of a tough time trying to get that white wood to match the Walnut. This holds especially true because your using a prepared stain out of a can , whereas in my shop we make our stains from pigment. It allows me to control the viscosity of the stain based on the needed application. |
|
| Hi, Its me again, Ive found something close to the color I was able to mix a sligtly darker stain with it to make the color that was a near perfect match. Tomarrrow ill be breaking out the air compressor and spray gun and applieing my clear coat. Even without the clear coat its looks light years better than what it did when I got it. It has gone form being one of the uglest parts of my bedroom set to one of the better ones now. I almost wonder if i should do the beds now. |
Please Note: Only registered members are able to post messages to this forum. If you are a member, please log in. If you aren't yet a member, join now!
Return to the Woodworking Forum
Instructions
- You must be a registered member and logged in to post messages on our forums.
- Posting is a two-step process. Once you have composed your message, you will be taken to the preview page. You will then have a chance to review the contents and make changes.
- After posting your message, you may need to refresh the forum page in order to see it.
- It is illegal to post copyrighted material without the owner's consent.
- HTML codes are allowed in the message field only.
- No advertising is allowed in any of the forums.
- If you would like to practice posting or uploading photos, please visit our Test forum.
- If you need assistance, please Contact Us and we will be happy to help.

