Shop Products
Houzz Logo Print
franksmom_2010

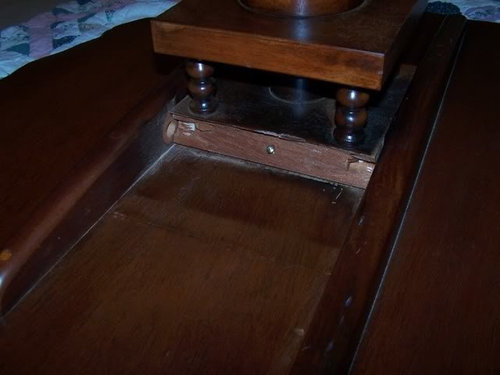
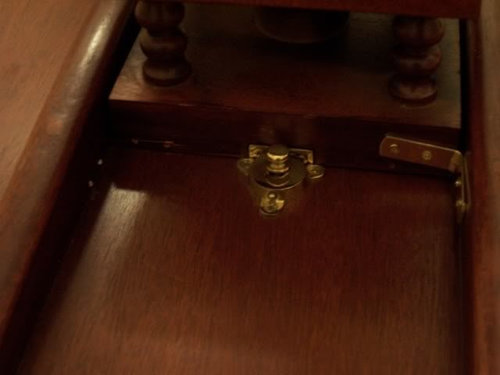
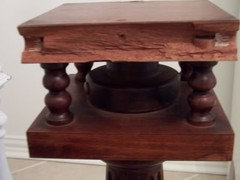
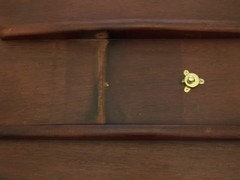
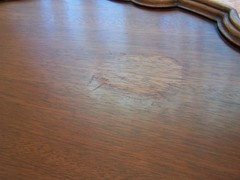
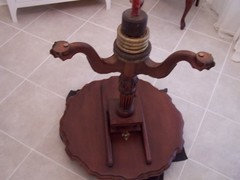
Tilt top table repair

franksmom_2010
13 years ago

Hi everyone! I bought this wonderful tilt-top table at an antique shop today:


Before I bought it, I tried out the tilt mechanism, and realized that someone had screwed braces onto the top that didn't allow it to tilt. I just kind of gave it a once over, figured I'd undo them when I got it home, and paid for it. The fact that I didn't look at it more closely is totally my fault. Still love the table, though.

Got it home, turned it upside down, and here's the mess I found. One side of the top of the birdcage is broken off, and the dowel that the top hinges on is missing. Someone drilled a small screw through the birdcage and into the top to stabilize it on this side:


Here's the side with the original latch. They've drilled a bracket to it to stabilize this side, but they've used tiny brass screws that aren't doing much (table top still wobbles.) You can see on the left where there was another brace, but the screws have broken off at the heads one one side, and there's small splits on the top of the birdcage at the screw holes on the other side.


I'm just sick over this! It's a really lovely vintage table, and seems like it was well made. Any ideas how complicated this will be to fix? I'd think you'd need to remove the birdcage from the pedestal, take it apart, and replace the top piece, then re-assemble it with a dowel. Is this going to be a huge, expensive repair, or am I looking at less than $100?

If a proper repair is going to be cost prohibitive, is there another way to stabilize the table top without causing much more damage?

The table top has a small area of wear to the finish, and the edges are losing their finish, so I assumed I'd have to refinish the top, I just didn't think I'd have to rework all of this!

Comments (24)

  • Jon1270
    13 years ago

    I don't know exactly how these are built, but it looks like it would be easy enough to remove the screws and bracket so that you can detach the base from the top and get a better look at the situation. If it turns out that a full repair is more work than you want to tangle with, it will probably be fairly easy to reattach the leg in a rigid, non-hinging sort of way.

  • franksmom_2010
    Original Author
    13 years ago

    Hi jon1270! I'm pretty sure that if it was all intact, then there's a dowel that runs between the two apron pieces, and through the birdcage. It locks in place with the brass latch seen in the thrid picture. I'd think to get the dowel back in place, you'd also have to remove one of the apron pieces.

    I guess the bigger question, is if it were perfect, what would it be worth? If it were properly repaired (with the top refinished) what would it be worth? I know it's not an antique, but rather a vintage reproduction. How vintage, I have no idea...the construction is all dowel and glue joints, but the floor glides in the bottom of the feet are plastic. As far as I can tell, it's all solid wood.

    I'm leary to use anything to attach the pedestal to the top that would involve drilling or screwing into the top. If the top splits, then I'll have a much bigger problem. The one solution I did think of was the sand down the top of the birdcage and the bottom of the tabletop where they meet, and just glue them together. I'd do that after I refinished the top.

    Also, any ideas what that wood is? I'm thinking it's mahogany.

  • Jon1270
    13 years ago

    Huh, I replied earlier but it looks like something went wrong with that.

    I understand how it's supposed to work. What I don't know is how that (broken) top part of the 'birdcage' is built. In the first picture, it looks as if there's a veneer jutting out over the broken area, so I'm thinking it might be built up from multiple parts rather than a single slab. In any case, I still think you should take out the screws and bracket so you can separate the parts and see exactly what's going on. You'll be throwing out all of that junk hardware anyhow.

    I do think it's mahogany. Can't help you with the value.

  • franksmom_2010
    Original Author
    13 years ago

    OK, here's lots of pics. More clues to the age of the piece:


    Here's the damaged area. It does look like a solid piece of wood with a veneer on it. I can see the edge of the veneer in places.


    And here's the bottom side of the table top:


    You can see the darkened wood where the top of the pedestal used to cover it, and where the dowel would go. It looks like I'm missing about 3" worth of wood.

    And after a better look in better lighting (and cleaning), it looks like I don't need to refinish the whole table top, just this area:


    What are the chances that the finish is poly, and that I could carefully sand that area with fine sandpaper, clean it with mineral spirits, and use a wipe-on poly to fix it?

  • Jon1270
    13 years ago

    The broken part is not an easy fix. If you have a local furniture repair shop, you might ask them to give you a quote on the repair and compare that to whatever you estimate its value to be.

    The finish is not going to be poly, but that's a good thing. Lacquer is more likely, and easier to repair. But this is getting into Bobsmyuncle's territory.

  • franksmom_2010
    Original Author
    13 years ago

    After some reading, I think you're right that the finish is most likely laquer. I have one of the old George Grotz books, and read up on repairing the finish. I would clean with mineral spirits, then brush on laquer thinner to reamalgamate the finish and spread it to cover that bare spot? I hope bobsmyuncle stops by with more info...

    Yes, the more I look at that damage, and think of the possible ways that it could be fixed, I'm sure it's going to be difficult and expensive.

    That being said, any thoughts on my idea to just glue the two pieces together? I'd sand down to bare wood on the bottom of the table top and the top piece of the pedestal, glue and weight it down to dry. I usually use wood glue, or white Elmer's for repairs, but would you use something like Gorilla glue? Would I also need to patch on a pice of wood to add the 3" that I'm missing?

    This table is going to get infrequent use.

  • franksmom_2010
    Original Author
    13 years ago

    I don't have any lacquer thinner handy, but do have denatured alcohol, so I did a test, and a drop of alcohol on the finish left a white mark, but didn't soften the finish, so another indicator that the finish is lacquer.

  • brickeyee
    13 years ago

    "I would clean with mineral spirits, then brush on laquer thinner to reamalgamate the finish and spread it to cover that bare spot?"

    The spot is actually pretty large to try stretching from the rest of the finish to cover it.

    Test on the back with lacquer thinner to make sure it is lacquer.

    Deft clear wood finish is brushing lacquer with a very light color (barely yellow).

    It is not hard to work with, and can produce very good results.

  • franksmom_2010
    Original Author
    13 years ago

    Brickeyee, I would be brushing it on just over the damaged area, or over the whole tabletop? Thick or thin? Multiple coats?

    I have zero experience with lacquer. I'll make a trip to Home Depot later today and pick up the thinner and look for the Deft. I think I saw Watco at Lowes the other day, too.

  • bobismyuncle
    13 years ago

    The big problem with the spot on the top of the table might be restoring the color. That would be one of the major challenges with a spot repair.

    There are "strippers" or "refinishers" known as ATM (Acetone, Toluene, Methanol), basically one formulation of a lacquer thinner. Homer Formby became a rich man selling lacquer thinner as furniture restorer (and thinned varnish as tung oil). This would be the "smear it around approach." But I'd probably want to add some more finish (lacquer or shellac) once I'd reamalgamated the finish.

    Or just bite the bullet, mask off the top, strip it, and refinish.

  • franksmom_2010
    Original Author
    13 years ago

    Thanks so much! I actually have a can of that in the garage...I just used some on another table a few weeks ago, with ok results. Tip- use a brush, not steel wool. If I go that route, and want to add another coat, any opinions on the spray lacquer (in a can)or brush on?

    Again, any opinions on how to fix the issue of how to secure the top to the pedestal? Is my idea to glue just a bad idea?

  • Jon1270
    13 years ago

    If you cleaned the parts down to bare wood, the glue plan would probably work well enough. Use as much weight as you think you can get away with to apply clamping pressure. Standard yellow wood glue is fine.

  • brickeyee
    13 years ago

    "Standard yellow wood glue is fine."

    Hide glue would be preferred, even liquid hide glue.

    It is at least reversible if needed.

    I would make one try and using lacquer thinner to spread the existing finish, then use some toning lacquer to fix the spot and put another coat of lacquer over the entire top.

  • franksmom_2010
    Original Author
    13 years ago

    Thank you, thank you, thank you!!!

    Everyone has given really helpful advice. I was starting to wonder if I had totally thrown away my money on this table. I'm starting to feel like it can be saved, and I'll have a wonderful functional piece when I'm all done.

    I'm going to work on the top finish first, and when that is all dried and cured, will work on the gluing project.

    After a quick internet search, would Titebond liquid hide glue be appropriate? I really like the idea of a reversible repair.

  • brickeyee
    13 years ago

    "Titebond liquid hide glue be appropriate"

    Better than yellow glue by along shot (stronger also, with no creep).

    I use it for smaller jobs when I do not want to wait for the glue pot to heat up.

    The table is in good enough shape to be worth some effort, how much is up to you.

    I have some mahogany in the basement that is 48 inches wide and 18 feet long (5/4 thick).
    A square has already been cut off the plank and turning started for a Philadelphia style tilt top.

  • franksmom_2010
    Original Author
    13 years ago

    Brickeyee, that table sounds like it's going to be fabulous!

    So, I've been shopping. I have lacquer thinner, a new clean brush, and a bottle of Titebond liquid hide glue. That glue was a chore to find, and I bought the only bottle available in 20 miles!

    I've decided to do the glue part first. I figure *just in case* something happens to the finish during all of that, I can redo it all in one step.

    I've been thinking out how best to weight the whole thing while the glue dries. I don't want to put excessive pressure on either that piecrust edge or the legs, so plan to turn it upside down, with the center of the table on bricks or books, or something to elevate it (protecting the top surface with an old towel or rags), then use a stack of books, bag of rocks, DH's weights, etc. right in the center of the pedestal. I'm going to poke around the garage and see what I can find that's small and heavy.

    When the glue is all dried, I'll work on the tabletop. I may need a cocktail before I get to that...I'll try the one pass with the thinner and see where it gets me. Oh, and I was happy to see Deft lacquer in brushing and spray form at every hardware store I went to today!!

    Everyone has been so helpful, and I'll be sure to post pics as I progress. Thanks again!!

  • brickeyee
    13 years ago

    "that table sounds like it's going to be fabulous! "

    It better be, the piece of wood cost over $2,000 (but should yield at least 3-4 tables).

    The big problem is getting my low speed lathe up and running again.

    The diameter is co large you need to use low speed on the perimeter, but than be able to increase it for a good cut near the middle.
    It gets a little hairy with a ~48 inch disk rotating at anything but the lowest speed.

  • sombreuil_mongrel
    13 years ago

    Brick, stand to the side, not in front of that monster. It will contain many Newton metres of energy when spun. You could always use a router to dish out the tabletop, What if the wood begins to react while being dished? It may want to turn into a potato chip on you, then what? I guess that's why these things were never made out of walnut, just mahogany, the least prone to react.
    Casey

  • Jon1270
    13 years ago

    Aww, 4' isn't so bad if you're conservative about it.

    I was a foundry pattern maker for 9 years, and one shop I worked for had a lathe that could handle 11' between centers, a 6' diameter over the bed (the biggest I ever did) or a 12' diameter faceplate on the outside. For the latter, you had to remove a trapdoor-like panel so that the faceplate and turning could rotate down into the recess in the floor.

    I never saw a lathe accident, but I did hear stories. Shortly before I was hired at that shop, the owner himself had glued up an 18" deep by 5' diameter segmented blank on a faceplate, and didn't allow the glue to dry before beginning to turn. Not long after he started the lathe, the blank exploded. It took out every fluorescent light in line with the faceplate, all the way across the shop (a distance of 50' or so) and a chunk so large that it took 4 people to carry went through the corrugated steel roof and landed in the parking lot. Fortunately the owner had stepped aside to check the blueprint when the thing came apart.

    Most of the guys who'd worked at the shop when that happened preferred to avoid the lathe altogether, which is a shame. Big turnings are fun.

  • franksmom_2010
    Original Author
    13 years ago

    You guys be careful out there! Wood can kill!

    OK, so we've got progress! It's definitely lacquer, and it definitely has a brownish toner in it. I used the lacquer thinner to remove the finish on the birdcage top and table bottom. Sanded with 120 grit, then cleaned up with mineral spirits. Let it dry a few hours (I know, just in case) then rigged up this:


    I have a layer of bricks, a round piece of plywood slightly smaller than the top, a soft piece of cloth, then the table. Thick-ish layer of glue, all weighted down with about 30 pounds borrowed from DH. It's warm and humid today, so I'm letting it dry overnight before I touch it. Probably overkill, but I don't want to mess it up.

    When I work up the nerve, I'm fixing the top. It's supposed to rain tonight/tomorrow morning, but Tuesday it's supposed to be 82, not as humid and not as windy.

  • brickeyee
    13 years ago

    The setup uses a couple of jack shafts and an old DC motor for good speed control.

    Most of the frame is welded up from 3x3 inch 1/4 inch wall steel tube, then bolted down to the floor very solidly.

    The wood is very stable, showing no signs of warping after sitting around being checked about every month for the better part of 9 months.

    I have done this all before, and actually have considered making a gantry hanging from the ceiling to hold a router, and then spin the wood under it by hand on some bearings.

    It would probably be safer overall, but I have the frame for the lathe already from previous work making LARGE turned columns (separate headstock and tail stock that are aligned and bolted to a concrete floor at the length needed).

  • kare123
    12 years ago

    I just picked up a very similar table. Mine has a plate that says Kittinger Furniture Co. Mine works fine but has damaged molding on the top. I picked it up anyway because the base was in perfect shape and looked well made. But don't know what to do about repairing the missing molding edges on the top.

  • Cheri Coussan
    3 years ago

    I'm trying to refurb a Kittington Furniture Reproduction. I am a newbie and didn't research before I just started sanding the top. Anyway, haven't decided my approach on the top, but I lost the dowel that goes through the slat opening. Any ideas for how to find a replacement? I barely remember what it looked like and mad that I've misplaced after several moves. (I'm not a woodworker.)