Shop Products
Houzz Logo Print
bostonoak

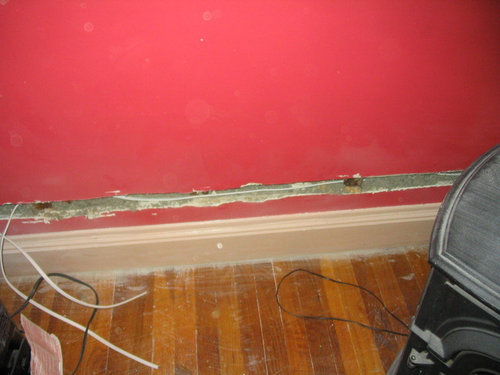
Patching walls after new electrical wiring

bostonoak
9 years ago

I recently had new electrical wiring installed in my condo.

New outlets and switches have also been installed.

The next step is for my electrician to patch up the narrow openings he created in the walls to fish the new wiring. He plans to use plaster. But before he does this, he plans to use some kind of backing then a spray foam. The plaster will then go in front of the foam.

I'm one of those anal people who likes to get feedback before a project like this.

1) Has anyone ever done this type of work?

2) Does the method explained by my electrician make sense?

3) If so, what would you suggest for a backing before the foam is sprayed on?

4) What type of foam would you recommend?

5) Or is there a totally different way of doing this?

Any feedback will be highly appreciated!

Thanks.

I'm attaching a photo of one wall opening after the new wiring was put in. In the next post will be a photo after insulation was put in (It's too bad that I cannot seem to post 2 photos in the same post).

Comments (15)

  • bostonoak
    Original Author
    9 years ago

    Photo of wall opening after insulation was put in.

  • llaatt22
    9 years ago

    Your questions seem to be about building codes.
    Do you have the permits and approvals required?

  • jakethewonderdog
    9 years ago

    What he's proposing is fine. I have used a different method where I put drywall mud on a wall, embed paper drywall tape, then pull the tape off and place it over the channel. It works great. Of course I still had to finish it off after that. I've used drywall mud and paper joint tape to fix plaster cracks and such and it works well. Forget the fiberglass tape, cracks telegraph through it.

    Hey, just a tip for people who do this: If you can pop the baseboard off, you can often channel behind it and not have the plaster repair issue.

  • bostonoak
    Original Author
    9 years ago

    I'm really grateful for your feedback.

    When you say "embed drywall tape" does this mean you push the mud in a little bit with the drywall tape? Then you spread the plaster in front of the drywall tape so that it's flush with the rest of the wall? Just trying to understand you clearly.

    If my understanding is correct, what's your method if the narrow opening in the wall has a large void below it (as opposed to behind it)? With some openings there isn't a piece of wood immediately below them.

    Again, I really appreciate your response.

  • jakethewonderdog
    9 years ago

    What I was saying about using drywall tape:

    It sounds funny, but it's kinda like paper mache.... a drywall guy showed it to me as a way of patching holes, etc. Works great around outlets and switch boxes too when they get too big because plaster breaks off.

    The idea is that you get drywall mud on the tape. The easy way to do that is that you smear 1/4" thick mud on the wall anywhere (you will have to clean it off later). In this case, make the mud smear several feet long.

    Pull off several feet of drywall tape and put the end of it at one end of the mud you put on the wall. Then draw your drywall knife down the tape, pressing enough that the mud pushes ahead of the tape and removes any air, but not so hard that you push all the mud out from under the tape.

    Peal this tape off the wall, it should now have a good backing of mud on the back of it with no gaps. Apply the tape to the area where the plaster is missing. You should have about 1/2" of tape on each side of the gap or more. If the gap is too large, place one piece of tape on the top of the gap and another on the bottom, overlapping. If what you have is a hole, you can place several short pieces to completely cover a hole (such as a miss-placed outlet box opening).

    Draw your mud knife tight over the tape and eliminate excess mud between the tape and the plaster and let it dry.

    Don't forget to clean the mud off the wall from the earlier steps.

    Once the tape is completely dry, you will be surprised at how well it will support a finish coat of mud. Top coat it, sand it and paint.

  • bus_driver
    9 years ago

    One assumes that the drywaller with the tape trick was seeking to do the job as quickly as possible with as few visits to the job site as possible. If the patched area is bumped gently at some point in the future, it is likely to break.
    I prefer to have more joint compound behind the tape-- which requires multiple applications with appropriate drying times before the tape is applied. Takes several days.

  • jakethewonderdog
    9 years ago

    Bus Driver,

    I can assure you I've used the technique many times successfully. It does not have the same strength as 1/2 in drywall, but neither does it break when gently bumped.

    It's not appropriate for every hole or repair, but it's a great technique to know.

  • bostonoak
    Original Author
    9 years ago

    I'm posting a new photo which is better in terms of showing the challenge that I face.

    I'm still trying to understand jakethewonderdog. I'm slow with these sorts of things.

    As you can see from the photo below, there quite a bit of empty space between the studs and below.

    Just trying to make sure that I come up with a method that really works for my situation.

  • jakethewonderdog
    9 years ago

    Ok, looking at that photo, here's what I'd do:

    I would either

    1. tack some of the salvaged lathe to provide a backing or
    2. cut a strip of 3/8 or 1/2/ " thick drywall (perhaps 1.5" wide) and nail up as backing (probably 3/8" thick drywall)

    Which ever you use, be careful not to nail/screw into the wire.

    Then mud and tape. It will take you several coats to get it smooth.

    That's probably too big to use the method I described earlier.

    Again, don't use fiberglass tape, it will telegraph any cracks... use paper tape.

    If you are doing this yourself, get the drywall mud in the 5 gal plastic pails - don't mess around with small tubs of spackling compound.

  • weed_cutter
    9 years ago

    What Jake said and I will suggest that the first and possibly the second coat of joint compound be the setting type bought dry in a bag. It cures much harder than the ready-mixed stuff. Personally I'd use the 90 minute setup type. Use the pre-mixed type as your finish coats as it is much easier to sand.

  • toolbelt68
    9 years ago

    Aren't you suppose to have metal plates on the 2x4s to protect for nails being driven into the wire? Did this job get inspected???? If not, sure hope your insurance covers it should something go wrong.

    Why not just remove the top piece of shoe molding, cut the drywall down to it then install a larger strip. You would then mud it up the same as if you were joining to 4x8 sheets. Reinstall the strip of molding, sand and paint. More work but a much stronger patch.

  • weedmeister
    9 years ago

    This isn't drywall. It is plaster lath.

    I think I would put the metal plates over the 2x4s to protect the wires. I would think about glueing the wood lath strips down rather than nailing (construction adhesive).

    You could probably also use wire mesh (like chicken wire but smaller). But that can be a pain to work cut to size.

  • jakethewonderdog
    9 years ago

    I'm not sure the metal plates are called for in old-work. To apply them correctly would require removing more of the plaster and lath.

    You don't want to make this a bigger opening, as Toolbelt68 suggested, it's completely unnecessary.

    The cable is in the center of the 2x4 space, it's not in an area prone to nailing. You can tack the lath or screw drywall with short screws and not go into the wire.

    Do not use fiberglass screen tape. Simply use paper drywall tape.

    WeedCutter's suggestions about 90 minute setup time compound is good if you can work quickly. Otherwise use regular multi-purpose compound and coat it several times allowing it to dry completely between coats.

    This post was edited by jakethewonderdog on Mon, May 5, 14 at 16:57

  • cold_weather_is_evil
    9 years ago

    >> 1) Has anyone ever done this type of work?
    >> 2) Does the method explained by my electrician make sense?
    >> 3) If so, what would you suggest for a backing before the foam is sprayed on?
    >> 4) What type of foam would you recommend?
    >> 5) Or is there a totally different way of doing this?

    Consider this concept: push crumpled newspaper into the wall cavity as a backing for the foam. Squirt spray foam in next to form a barrier (that sticks to the paper and everything else inside the wall cavity) to prevent the next stage's mud from sliding down inside the wall. Some foams dry very fast.

    Everything the electrical guy uses after the foam will be dry mix plaster. The pre-mixed stuff is for production work and homeowners, not someone who wants to finish today and go home for supper on time. If he uses painter's mud it will set beyond the working stage in five minutes and to the now-we-can-cram-more-mud-in-the-hole stage in maybe ten minutes. You have to work fast with it.

    The rest is just details anyone would be able to deal with.

    Some people would pull the baseboard and others would make holes instead of a long "slit". This guy would seem to be comfortable enough with his plastering skills to do it this way which admittedly LOOKS horrendous.

    I'm impressed with this guy's idea. Let the guy run with it.

    This post was edited by cold_weather_is_evil on Mon, May 5, 14 at 17:27

  • cold_weather_is_evil
    9 years ago

    PS: No chicken wire needed. No wood lath needed. No nails. No plates. No screws. No papier-mâché. No weak airy patch just waiting to break if bumped. No difference between plaster-on-lath and drywall. With good quality plaster on lath there's no need for tape if done right; it will key behind the wall.

    And ice cubes can slow down that five minute mud a bit...