


Quick question about glazing
franksmom_2010
13 years ago
Related Stories

MOST POPULAR8 Questions to Ask Yourself Before Meeting With Your Designer
Thinking in advance about how you use your space will get your first design consultation off to its best start
Full StoryREMODELING GUIDESConsidering a Fixer-Upper? 15 Questions to Ask First
Learn about the hidden costs and treasures of older homes to avoid budget surprises and accidentally tossing valuable features
Full Story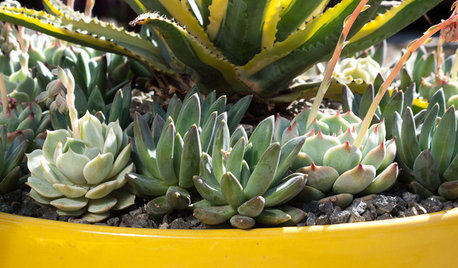
CONTAINER GARDENS3 Steps to Creating Quick, Easy and Colorful Succulent Containers
Take a bright container, add a colorful succulent or two and have a professional, summery design in minutes
Full Story
LIFEA Quick Downsizing Quiz for the Undecided
On the fence about downsizing? We help you decide whether that fencing should encircle a mansion or a mini trailer
Full Story
GREEN BUILDINGConsidering Concrete Floors? 3 Green-Minded Questions to Ask
Learn what’s in your concrete and about sustainability to make a healthy choice for your home and the earth
Full Story
REMODELING GUIDES9 Hard Questions to Ask When Shopping for Stone
Learn all about stone sizes, cracks, color issues and more so problems don't chip away at your design happiness later
Full Story
EXTERIORSCurb Appeal Feeling a Little Off? Some Questions to Consider
Color, scale, proportion, trim ... 14 things to think about if your exterior is bugging you
Full Story
PAINTINGWhat to Know About Milk Paint and Chalk Paint — and How to Use Them
Learn the pros, cons, cost and more for these two easy-to-use paints that are great for giving furniture a vintage look
Full Story
ARCHITECTUREThe Truth About 'Simple' Modern Details
They may look less costly and easier to create, but modern reveals, slab doors and more require an exacting hand
Full Story
GREEN BUILDINGLet’s Clear Up Some Confusion About Solar Panels
Different panel types do different things. If you want solar energy for your home, get the basics here first
Full Story
paintergirl94
franksmom_2010Original Author
Related Professionals
Lorton Furniture & Accessories · Memphis Furniture & Accessories · Topeka Furniture & Accessories · Highland Park Furniture & Accessories · North Hollywood Furniture & Accessories · Caledonia Interior Designers & Decorators · Concord Painters · Decatur Painters · Manchester Painters · Round Rock Painters · Coatesville Painters · Davie Painters · Lilburn Painters · Mastic Painters · Melrose Painterspaintergirl94
franksmom_2010Original Author
paintergirl94
franksmom_2010Original Author
kraftymom
franksmom_2010Original Author
paintergirl94
franksmom_2010Original Author
paintergirl94
franksmom_2010Original Author
luvstocraft
franksmom_2010Original Author
phonegirl
paintergirl94
franksmom_2010Original Author
franksmom_2010Original Author
paintergirl94
franksmom_2010Original Author
phonegirl
paintergirl94
luvstocraft
franksmom_2010Original Author