Shop Products
Houzz Logo Print
loribee2

Sea Serpent Step 4: Neurosis

loribee2
13 years ago

Please tell me all the mortar isn't going to dry, crack and fall off:

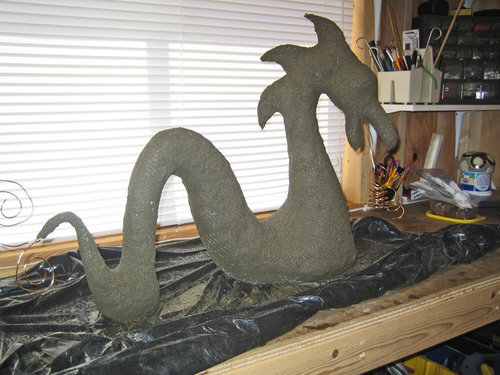
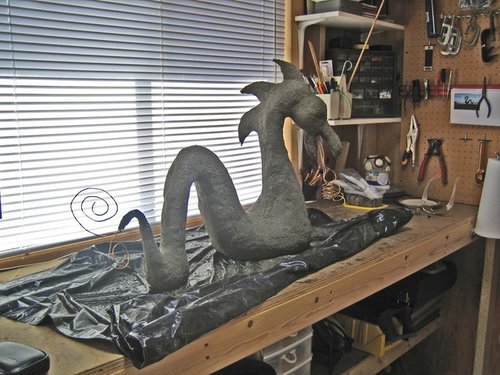
I also made what I think is a mistake. I decided to do the top first, wait for him to harden and cure, then do the bottom. But now I don't know that I can lay him on his side without something breaking.

Ugh, this is the part where I start agonizing about everything!!

I've misted him good and have him covered where he will sit overnight. But I'm not sure how solid that tail will firm up. It wants to move. I'm almost thinking about casting a large oval, filling it with concrete and setting him on top of it so he's got a base. That would keep the two "ground" pieces from shifting and he'll remain good and solid. Or will I be pleasantly surprised in a few days when he's cured up a bit that he'll be hard as a rock and won't budge an inch?

This is the part I hate about never doing this before! LOL

And, boy, did he get heavy! I don't know why, but I thought he'd end up like paper mache or something. He most definitely is going to weigh a few pounds when he's done.

This was fun to mortar, though. I'm IMMENSELY happy I started him as tightly crunched newspaper. I never had to worry about the mortar falling all the way through. Unless I'm making something large where that's impractical, I think I'm going to stick with my newspaper core on these types of things, because it did pay off in this step.

So, will one of you wonderful women of experience tell me everything will turn out alright? LOL

Comments (24)

  • Calamity_J
    13 years ago

    He Is SOOO WONDERFUL!!!! I am speechless! You will be shocked at how he will firm up! You are definitely gonna be addicted to working with this medium!!!heh heh!

  • nanatricia
    13 years ago

    OMG You did a great job !!!!!!!It looks great and yes it will harden up fine.

  • loribee2
    Original Author
    13 years ago

    Thanks! And thanks for the reassurance. I am already starting to get a little hooked. It was a lot of fun covering him yesterday, even with the "I don't know what I'm doing" nerves.

  • Calamity_J
    13 years ago

    Insert Star Trek theme: "To Boldly Go, Where Loribee2 has not gone before!!!"heh heh!

  • loribee2
    Original Author
    13 years ago

    Armature. The final frontier. LOL

  • wackyweeder
    13 years ago

    It will get so hard you will wonder why you worried about it, LOL. and it looks fantastic!!!!

  • loribee2
    Original Author
    13 years ago

    Grr, well I'm afraid I never gave myself the chance to wonder. If there were a day for me to screw this project up, today was it.

    I decided he really needed to be sitting on a base. The good news is that this gave me an opportunity to try a technique I've been wanting to try for a while. It involves using plywood and flashing to create a custom mold:

    That part went really well. But then I needed to attach some sort of rebar type thing to the bottom of my sea serpent so he'd be strongly cast into the base. I decided to attach strips of hardware cloth to the bottom of him that would sink into the concrete base and secure him there good and tight. This step would have gone beautifully if I hadn't covered him with mortar yesterday. Unfortunately, in the process, he started cracking and pieces started falling off.

    It was this very bend in the tail I was concerned about. Of course, if I'd given the concrete time to cure, it probably would have been just fine. But my obsessive-compulsive nature when it comes to projects just wouldn't let me leave well enough alone. Grrr...

    But he's sitting on his new custom-formed block. I sprayed him down good with water and covered him with plastic. Luckily, I have to work M-F so I will be forced to leave the poor guy alone! heh

    From a structure and design standpoint, I am glad I put him on a base. And I'm also glad that I finally tried making a custom mold. That part was actually kinda fun. I just wish I'd done the base first then coated him with mortar after. Live and learn.

    Also, I wish for my first project, I'd started with a design that was easier!! It was supposed to be a little butterfly on a stick. How did I end up with a giant sea serpent again?? LOL

  • Calamity_J
    13 years ago

    AWESOME!!! Great Job! I always do the same thing...thus the Star Trek theme,> not gone there before!!!

  • texaswild
    13 years ago

    To quote my favorite chef on the Cooking Channel - Jaime Oliver - "Oh my Lordy Lord". I am in such awe of this being your first project w/o having had a one-on-one class in how to do it. Your mold making is another awesome task. You beat all. Re the crack, the same thing happened on the tail of the Panther that Riana made. She wrapped that area w/fiberglass and re mortared it. That's my suggestion. I like the fiberglass screen sold at Lowes - much cheaper than ordering from a mosaic site. OR, you can use the fiberglass netting made for dry wall work. On weak areas, you could also use three layers of the mesh. For example - on my front fountain, for the tub/basin, I used three layers and several layers of mortar, and when I filled it, there wasn't a leak. Way to go, LORI: You're now a pro in Riana's technique - I'm soooooo impressed.

  • nanatricia
    13 years ago

    You are just like me always thinking of thing after HA!! You are doing great!!! I have wanted to do some of that kind of molding also.

  • loribee2
    Original Author
    13 years ago

    Thanks Slow and Nana! Maybe a dumb question, but who is Riana? I have studied and studied a book by Sheri Warner Hunter, but she doesn't go into extensive detail on armature. She simply covers the basic steps. I'd planned on making a slurry, going over the whole thing with the slurry then adding a second coat of mortar where I need it, including patching the areas that have cracked. Do you think I need the fiberglass screen? And if so, how would I attach it? Do you think it would stick to a slurry?

    I'll feel much more comfortable with the thing now that it's stuck on a base. I only wish I'd done that piece first, then mortared the whole thing after the base had cured. It would have been sooo much easier. Ahh, what I'd give for hindsight! LOL

  • texaswild
    13 years ago

    LORI: Riana is the artist who taught KLINGER, CALAMITY and me in her workshop in Puerto Vallarta five years ago. She's our idol in concrete sculpture. I went to PV in February solely to see her again and to mosaic a sculpture she made three yrs. ago for Sam, the owner of the Hacienda Mosaico. Attaching her website for you. Your sculpture is something that could easily have come out of one of her workshops. The screen - I would wrap a piece around the area in question, attach it w/a bit of tape, and mortar over it. It'll stick. Your idea to go over the whole thing w/a slurry is exactly what Riana does in some instances. Another hint I gave to Riana on the finishing slurry is to use an old paint brush, dampened to smooth out rough spots. Riana makes her own mortar by using two or three parts sand to one part Portland cement, and she uses silica sand. Since I can't get silica sand here, I use the mortar mix, and w/the paint brush, I smooth it to make it accept the mosaic better, even though my dish shards are very conducive to mosaicing textured areas.
    Riana's website

  • loribee2
    Original Author
    13 years ago

    Wow, what an awesome website! Thanks for the link. (And I'm almost certain I recognize some of those student projects, heh). I will have fun looking at all the pictures. So many inspirations!

    I like the idea of drywall tape and will go get myself some after work today. It would be wonderful to take a class and get some instruction in person. Though you and the other wonderful artists here have been a great help and support! I can't thank you enough for walking me through this project!

  • Calamity_J
    13 years ago

    Loribee2: this is such an inspiring pc!!! It is just Over The Top!!! I wanna make one for my pond now!!! I think it would go way better than a seahorse...thinking moats/castles/pond serpent...heh heh! But alas, too much hardscaping in the yard to do to get to play stuff anytime soon, so I shall live vicariously thru you!!!heh heh! (Till I get to Slow's and see what we can get up to!!!)

  • texaswild
    13 years ago

    My dear LORI: You don't need a class - you are already a pro at this technique. I can't believe how beautifully you've created something so magical w/no class. You're very talented. I can't WAIT to see the mosaicing start. CALAM - you already volunteered to work on a fountain surround extension - you're committed!!!!!!, and I'm soooooo grateful, and looking forward to it all - anxiously. I DO have a couple days sightseeing planned.

  • loribee2
    Original Author
    13 years ago

    You are both too nice!

  • lfm85
    13 years ago

    Good Morning Ladies,
    I am new to the forum and am in love with, in awe, and inspired with all of your works! I have mosaiced small projects for about 8 years with stained glass being my favorite tessarae. I am now embarking upon quite a large project and would love you advice on a few things!
    I have never done a project involving concrete sculptures like this Sea Serpent or the many other amazing things you ladies have done. I have read Sherri Hunter Warner's book Creative Concrete and have read your posts about Concrete.
    My project is a mosaice totem sculpture consisting of 5 seperate pieces with polystyrene shaped as the substrate. It is a 2-D sculpture with each piece being around 18"wide by 18" tall. The pieces will be various things like a rectangle, heart, cross, dove, sphere each with a 2" pvc pipe in the middle. Each piece will slide over a 1 1/2" steel pole that will be cememented into the ground when completed. This is a project for my children's school garden and will remain outside year round in the cold winters of Michigan! ( we had 1 1/2" of snow 2 days ago!)
    Sorry this is soooo long!
    My questions: I plan to wrap each piece in self-adhesive AR tape, then apply the concrete. I am unclear if I should use Fortified thinset mortar or the Pre-mixed Commercial Grade Mason Mix? I know that I should put one layer on....then cover with plastic and let sit overnight.
    Do I then put on another layer? I won't be doing any sculpting since I already will have my shape.
    Do I use the Mortar for my adhesive? I have done this with other outdoor projects. Lastly, do I also grout with the fortified mortar? I need these pieces to be able to withstand all sorts of weather!
    I look forward to your input and guidance! :)
    Thanks!
    Lynn

  • texaswild
    13 years ago

    Welcome to a wonderful forum, and a very creative playground. I don't know what AR tape is, but I can answer a few questions, giving you my experience w/outside sculpture and other projects. If I were working your project, I w/DEFINITELY use fortified thinset. My favorite is Mapei brand - Ultra Flex II, which is a polymer-modified professional grade mortar. I buy it at Lowes. I w/use that for applying to your taped sculpture, then another layer of the tape, then a second coat of Ultra Flex. To make a smooth application, use a dampened paint brush after applying. Then, you're ready to begin mosaicing. You use the Ultra Flex for adhesive - it's a very sticky and wonderfully strong adhesive. You don't NEED to use it as grout, but in this case, I don't think it w/hurt. What I'd do probably is mix half mortar and half grout to ensure adhesion and for a stronger structure. I use the gray mortar, and use different shades of charcoal or gray for grout. I like to use the black grout as my colorant. I can picture what you have in mind for the totem. One of my mosaic books has such a totem, and I always meant to make it but nevr did. Hope this helps.

  • loribee2
    Original Author
    13 years ago

    I've always admired those totems and would love to make one some day! As for your questions, I'll let the more experienced artists here reply, as I've never tackled a project that big. But good luck on your project! I hope you'll post pictures as you go. We'd love to see them!

  • lfm85
    13 years ago

    Thank you so much slowmedown, for your quick response! The AR tape I am thinking of using is the drywall fiberglass mesh. I thought this would be better to apply to my substrate since the polystyrene will already be in the shape I want it to be.
    Do you suggest using the dampened paint brush to apply both layers of mortar?...and do you put the mortar on at first with gloved hands and then smooth it out with the brush?
    Also, once our project is mosaiced do you suggest sealing it? IF so, any particular kind?
    The link below is a sculpture done by Sherri Warner Hunter...our project is very similar to this, but with different shapes...more of a relegious theme.

    I absolutely love all of the things you have done!! My next project will be to make flower sculptures like yours for my garden. The deer have literally taken over my neighborhood and these will be my deer-proof flowers! haha

    http://nashvilleforfree.com/2009/09/26/art-after-hours-thursday-oct-1st/finer-things-gallery-sculpture-by-sherri-warner-hunter/

  • texaswild
    13 years ago

    WHAT a darlin totem. I love her work - also have one of her books. I figured the AR tape was something similar to drywall mesh - good choice. You could even use regular mortar mix as your first application, but I find it pretty textured, even after I sift lots of the aggregate. That's when the wet paint brush really is a handy tool. My last application of the Mapei mortar was w/a pallet knife to a planter I'd mortared w/mortar mix that still needed some strength cuz I had used hardware cloth instead of the diamond lath. Hardware cloth isn't as strong and doesn't take the mortar as easily w/o stuffing the object w/paper. Then I used the wet paint brush and smoothed it out. You might try a small sample of both on a small square of your taped foam to get the feel of both. Either is fine, but the Mapei mortar is finer and w/give a smoother finish for your totem. I LOVE the stuff, and buy it by 50-lb bags. IMO, sealing is not necessary. Since this is a cement-based mortar, it doesn't need sealing. However, on my inside mosaics, I use a glossy sealer - Tile Lab - to make the grout prettier. If there's a glossy exterior sealer, that w/be the only way I'd seal a garden sculpture. It's just not necessary to ME - other than cosmetic. My idol and teacher of the metal lath/concrete, is Riana daRaad, never seals her concrete sculptures. I think I posted her website in this thread. Check it out.

  • lfm85
    13 years ago

    Ok then, I think that I am ready to go! I will definitely use the Mapei mortar. Thank you so much for your input! I will post photos and ask more questions as I go along.

    Loribee- this may seem like an elementary question, but I don't have a web photo album and I can't seem to figure out how to post a picture in the text of my message like you did with your Sea Serpant?
    Your post on the Sea Serpant was perfect timing as I am just about to begin my project. I can't wait to see your project completed! :)

  • loribee2
    Original Author
    13 years ago

    Thanks! I'm glad it helped. I upload my pictures to PhotoBucket. It's a website that lets people upload photos for free. Once you've created an account and uploaded some photos, it will give you a box under the photo that has HTML source code. Copy the line that's in the HTML source code box and paste it into your message here on the forum.

    Good luck on your project!

  • lfm85
    13 years ago

    Great! Thanks so much.
    I will give it a try. I am excited to get started!
    Will post pics of my progress.

0
Sponsored
Dave Fox Design Build Remodelers
Average rating: 4.9 out of 5 stars49 Reviews
Columbus Area's Luxury Design Build Firm | 17x Best of Houzz Winner!