Shop Products
Houzz Logo Print
jally1

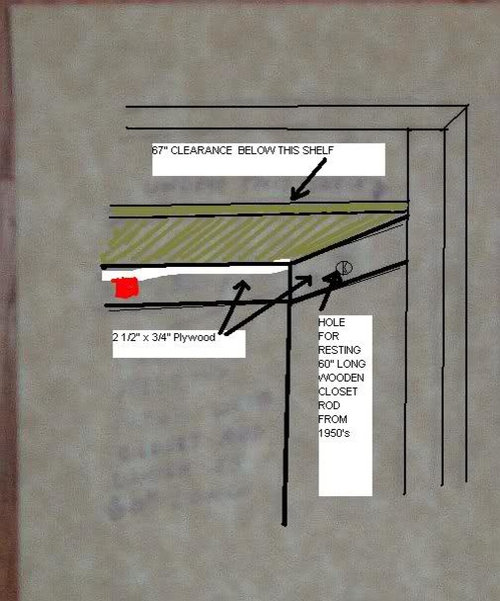
repair my collapsed closet rods

jally
12 years ago

I have this old 1950's closet (rough partial diagram below).

Years ago, my dad had drilled a hole in a plywood plank and inserted the old-fashioned wood rod into the hole.

Reason:

To add another shorter rod below, to give more room for hanging tops & skirts.

But just yesterday, after the closet became overburdened with clothes, the wooden rod bowed so much (like a bow & arrow), to the point that the rod exited from the holes which were supporting it, resulting in tons of clothing collapsing. Not only that, but the plank which my dad had suspended from the main rod (to act as a support of the lower/smaller rod), splintered & broke from the fall.

I now want to suspend another plank from the main rod, to replace the splintered one, but primarily:

I want to be sure the main rod is better supported this time.

So i'm considering screwing in Eyelet screws (or maybe an L-shaped corner brace), and screwing it into the area which I depicted in RED. And then looping vinyl-coated wire clothesline several times thru the Eyelets and around the main closet rod in order to brace it so it should never bow again.

Here's my rough sketch, so if anyone can suggest the best way to go about this, such as which eyelet screws for the 3/4" plywood that's built into the wall, & how many of them to get, and how to find same, or if there's an easier/better way, i'd appreciate it!

Comments (25)

  • graywings123
    12 years ago

    You don't mention how wide the closet is, but have you considered using a metal rod and metal side brackets?

    Here is a link that might be useful: Ace hardware closet rod

  • jally
    Original Author
    12 years ago

    I did state that my 1950's wooden rod is 60" long, and that's the width of the closet (and why I want to brace it).

    Why should i bother with installation of metal rod, when I already have the wood holes & rod? I even have a

    but it requires all sorts of tools and major install job, so i'm leaving it in storage.

    I'm just a mid-aged flabby female with near-zero carpentry experience, just trying to get by, so i'd appreciate tips compatible with my old-fashioned situation...

  • jally
    Original Author
    12 years ago

    P.S. how do I know the Ace rod wouldn't require just as much bracing if not more?

    After all, the old-fashioned wood rod is not hollow, it's sturdy & flexible - granted it bends, thus requirement for bracing.

  • sierraeast
    12 years ago

    You can get cheaper versions of these at most any hardware store. You should be able to cut your existing rod to fit these once mounted then DONT OVERLOAD YOUR CLOSET ROD! If your existing rod is bowed to bad, you can get them there as well. The big box stores sell them by the foot, you cut your own right there at the store.

  • sierraeast
    12 years ago

    Forgot the link

    Here is a link that might be useful: rod brackets

  • brickeyee
    12 years ago

    You can also just bend the rod to put it back in places.
    A section of 2x4 and some wedges do the job.

    The wooden rods were normally installed at the same time the end supports were fastened to the wall.

    Cutting an opening into the top of the support on one end (upwards from the existing hole) will also allow the rod to be dropped in.

    You can also add a tie-in from the rod to the shelf above to support the rod.
    The down side is it blocks easily sliding hangers past the support.

  • GammyT
    12 years ago

    If you look at hardware stores where they sell the wooden rods, in the same section, they sell what your Dad forgot.

    http://hardware.hardwarestore.com/28-458-closet-rod-brackets.aspx
    from that link look at the shelf support brackets.

    These are cheap and designed for the job.

  • brickeyee
    12 years ago

    "If you look at hardware stores where they sell the wooden rods, in the same section, they sell what your Dad forgot."

    Holes in the wooden support plates are often a better option since the holes placement can be at the desired place and the wood plate provides plenty of places to fasten to studs.

    The metal brackets need to have blocking if they are not over a stud (and even then you may need some blocking if you want all the screws to bear weight) or put weight on the wall material.

    Even molly bolts cannot carry all that much load in drywall, and only slightly more in two or three coat plaster walls.

    You could add metal end cups to the existing wood strips though.

  • graywings123
    12 years ago

    Oh, I see it now, you put the length of the rod in your diagram.

    Why should i bother with installation of metal rod, when I already have the wood holes & rod?

    A metal rod would be stronger and wouldn't bow, and metal brackets attached to the plywood should be stronger than holes drilled into the wood.

    Brickeyee, it seems to me that the 3/4 inch plywood that Jally's dad installed would act as the blocking to mount the bracket for a metal rod. There is no need to be looking around for a stud behind the plywood.

  • brickeyee
    12 years ago

    "You could add metal end cups to the existing wood strips though."

    RIF

    "it seems to me that the 3/4 inch plywood that Jally's dad installed would act as the blocking to mount the bracket for a metal rod. "

  • graywings123
    12 years ago

    So we agree that metal end cups will work for either a wooden pole or a metal pole without the need for blocking because of the 3/4 inch plywood.

    A wooden pole will require a middle support to minimize the bowing. A stainless steel 1-1/16 inches, 6 foot closet rod won't bow and won't need a support. The one below costs $56, but my MIL buys inexpensive 10 foot steel pipes in Home Depot and hangs them from chain in her basement for extra clothing storage. I believe HD will cut it to length for you.

    Here is a link that might be useful: example of a metal closet rod

  • jally
    Original Author
    12 years ago

    Hi again! First to grammy - your link didn't work for me.

    Secondly, here's pics which hopefully finally explains the story - also read the captions on both pics (you may need to zoom in - sorry).

    btw, re: Home Depot, I don't have a car, i'm very busy w/mold all over my house (which is how the closet got overloaded due to transfer of stuff during cleanup yada yada), and I already have the wood pole, which i hope to brace as per my captions on below pics.

    So.... while i'm cognizant of, and very much appreciate, the above suggestions, I welcome any further feedback based on below pics & captions. Hope it's not too overly melodramatic for some readers but, if you'd just know... (in other words, while pics may be worth 1000, all the nuances of individuals' experiences are worth 1,000,000. But nobody who hasn't experienced my brand of luck could expect to understand)

    FOR 3RD CAPTION - SCROLL ALL THE WAY TO BOTTOM

  • jally
    Original Author
    12 years ago

    P.S. if interested in one of the more comical nuances, in midst of my nightmare:
    my darling BIL (who BTW helps zillions of people & is spread very thin, never a minute is he not busy)...
    ...was practically sure (though i perplexedly pointed out to him the illogic), that you need to keep all the concentric saws inside the grooves, and somehow magically the correct sized hole will be sawed.

    He tested it on junk wood, and sure enough (while nearly burning out the motor on his ancient/spare drill) it resulted in alot of concentrically sawed holes!

    On the other hand, he's very sharp & on the ball about many things, including handy stuff, that i don't grasp naturally. It's like there's clusters of blind spots spread thru society, similar to how one autistic may be affected by A,C,D,G while another may have A,B,F,G,H.

  • graywings123
    12 years ago

    How about ordering this through amazon.com

    Here is a link that might be useful: Rubbermaid closet organizer

  • sdello
    12 years ago

    FYI, as shown, the "free" end of your shorter metal rod below is really hung off of the main rod above and is really hurting the capacity of the main rod.

    When you hang stuff on the lower road at least half the weight of the clothes on that rod pulls down on your plank to the main rod, which is in the middle (worst place for bending) of the main rod. As the main rod bends under the weight, it lowers the end of the metal rod, tilting it and causing the clothes to slide towards the plank...which in turn puts more load on the plank.....until the whole thing falls down.

    A quick solution is to put a new wood support under the plank to the floor. The metal rod and the main rod will now be supported on the floor at that point and you won't be hanging as much off of the main rod, so you should see a huge improvement.

  • brickeyee
    12 years ago

    "Here is a link that might be useful: Rubbermaid closet organizer"

    Just order exactly what you need from a hardware supplier.

    Knapp & Voigt makes the standards (the wall part) and brackets in a number of styles with different weight ratings.

    A kit is very likely to have some things you do not need, and be missing others you might want.

  • jally
    Original Author
    12 years ago

    First of all, sdello, I also had thought of your idea, but I'm no carpenter - having just begun either sawing or drilling this month in my "old age" and with very arthritic fingers plus acute fibromyalgia.

    It's a great idea, though, if I can figure out how to do it!
    That would mean I wouldn't need to saw off above the hole to raise the plank,
    ...nor would I have to do what I depicted by the blue arrow in below pic.

    Graywings & brickeyee, those closet organizers are great ideas, and I'll take it into consideration for another closet, or if i ever get to escape to normal living quarters ;-)

    For now, that suggestion leads me to a question I had about my current closet (if I don't go with sdello's suggestion, which i'm mulling over as well):

    I'm concerned that the right-side and right-rear parts of the overhead shelf supports aren't secure enough to bolster my rod, because I barely see any nails fastened there. As for hammering in more nails, I'm unable to discern (by knocking on the wall) which part of wall has beams, and which is hollow.
    (by the same token, how could i install a Rubbermaid or KnappVoight organizer, which also requires the ability to discern where beams in walls are?

    SECOND FOLLOWUP QUESTION IS CAPTIONED IN BELOW PICS:

  • graywings123
    12 years ago

    That looks like an excellent pole. Why not buy closet rod supports instead of drilling holes?

    If the overhead shelf support has held up this long, I would not be concerned that it is not attached well enough to the wall.

    But, how do you find out where the studs are on a wall? They usually are 16 inches apart on center on a normal wall. I use a primitive method of finding studs. The drywall is attached to the studs with nails or screws. I hold a magnet against the wall lightly and sweep my hand around until the magnet finds a nail or screw. Then I measure 16 inches right or left and look for another nail with the magnet.

    (by the same token, how could i install a Rubbermaid or KnappVoight organizer, which also requires the ability to discern where beams in walls are?

    You can install an entire closet system without attaching to the studs. A hang rail goes across the top of the closet and is attached to the drywall at regular intervals. The standards hang from it vertically. It's a plus if you can attach the hang rail in one or more places into a stud, but it's not required.

    Here is a link that might be useful: Closet rod supports

  • jally
    Original Author
    12 years ago

    There don't seem to be too many rod supports for 1 3/8" rods, but in any case, I think a center support (either suspended from above, or below) is a better idea for avoiding sagging, than end supports.

    Interesting re: the magnet. When I tried it with regular magnets it didn't work, rather only a neodymium magnet worked. Not only that, but there's another single/shallow shelf way up high, above the shelving you see in my pic. so I was able to tell from the upper strips supporting that high-up shelf, that some nails were missing on my lower strips, so I was therefore able to know where to bang in 2 more nails as added support for the pictured shelf.

    I'm still mulling over strategy, and ready to take a break for awhile.

    Also, now that i've spent hours on those holes in the longer metal rod, i'm wondering if there's an easier way to fashion an end stop, rather than again twisting wire hanger every which way.

  • graywings123
    12 years ago

    Yes, there is an easier way to fashion end stops - buy them at home depot for $2.47

    Here is a link that might be useful: Pole sockets

  • jally
    Original Author
    12 years ago

    Interesting - say I can get them at a local store, can they be screwed over the holes which are already built into the sides, and then could my existing wood rod be inserted into the deeper hole (made up of 1950's hole plus the metal pole sockets?

    Re: the lower/shorter rod, i may have figured out an easy way with supplies i already have. Some layers of silicone from a silicone oven mitt which i'd stripped for another experiment. That can raise the rod within the lower hole, and masking tape can hold the silicone strips in place.

    Then I'd thread my vinyl/wire clothesline thru the tiny holes and tie that end.
    My clothesline is pictured in below link.
    I'd screw in an eyelet screw into the vertical plank above the rod-hole, then thread the other end of the vinyl clothesline thru the eyelet hole, then tie that end.

    Re: the 60" rod, i might:

    (A) wind the clothesline twice around the rear plank of the 2-plank-shelving overhead.
    Then tie that.

    (B) Then wind the clothesline around the 60" rod on each side of the vertical plank, so that the ties are sorta "hugging" the vertical.

    (C) Then tie A+B together as a center rod-support.

    Here is a link that might be useful:

  • graywings123
    12 years ago

    Interesting - say I can get them at a local store, can they be screwed over the holes which are already built into the sides, and then could my existing wood rod be inserted into the deeper hole (made up of 1950's hole plus the metal pole sockets?

    The pole socket surround probably is not large enough to fit over the existing hole. One of the two sockets is open at the top to allow you to lay the pole in, so no, you can't make use of the deeper hole.

    You are making this a lot more complicated than it needs to be. You don't need clothes line and oven mitts to put up a rod.

  • jally
    Original Author
    12 years ago

    One local store had a 6' metal rod, including holders for approx. $11, while another local store had a 5' metal rod for approx. $6, and another $2 for corresponding holders.

    Neither of those rods looked as sturdy as my wooden one. I know they probably have sturdier ones elsewhere, but it wasn't convenient for me, and anyway, I wouldn't have known how to work around the existing built-in holes.

    I finally got my closet put up again, though the rod is still sagging (and the overhead shelf is bowing downward as well. btw, I also see a crack in the rod (along the grain).

    Here's the pics:

  • greg_2010
    12 years ago

    Masking tape will fall off sooner or later.
    Masking tape is fine for children's arts and crafts projects to hold two pieces of paper together, but it has no place in carpentry.

  • jally
    Original Author
    12 years ago

    Judging by world news, I think the world will turn upside down before the sooner or later comes to pass :)

Sponsored
Bella Casa LLC
Average rating: 5 out of 5 stars17 Reviews
The Leading Interior Design Studio in Franklin County