


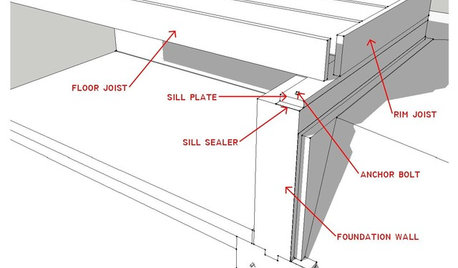
Reinforcing floor...
I am redoing my kitchen in my 1988 house but I have a sag in the floor where the range, cabinets and a bathroom is located. Not much of a sag, but enough for me to notice. On the opposite side from that sag, across the main center joist, was another sag where the main stairs is located to the second floor. I basically doubled up the joists, and added some supports to the basement cement floor, along the basement steps. Doubling up joists alone didn't remove the previous sag...
Now, I plan on putting a new wood floor in the kitchen, and a new but much heavier range. So, I can double up the joists, but some of the sag will remain.
Is it possible to put in lolly columns and a beam in the center, or near center of the floor joists span to remove the sag? It wouldn't run the whole house, but only under the floor experiencing the load from the range/bathroom. Also, must the lolly columns have a foundation under the cement floor, which would require me opening the cement floor up (which I don't want to do). I would use anchors in the cement floor to position the lolly columns. I was planning on using about 3 lolly columns over 10" feet supporting a 10' 4 2x10" beam.
It is a normal basement cement floor, 4-5" thick.
TIA
Comments (58)

adamfrisbie_yahoo_com
18 years agolast modified: 9 years agoI read with great enthusiasm an earlir suggestion to use a steel strap on a joist to control deflection. I have two problem areas in my own home that may be helped by this. Both problems are deflection oriented in that they meet the "code" but I don't like to be on a trampoline floor.
1. I have a 9.5 inch LVL (2 ply, or 3.5 wide)that spans 17 feet. It and another just like it help to control the load from two valley jacks and reduce the overall deflection of an I-joist (12" oc xX 17')atic floor. Prolblem is I chose the 2ply based on load and in fact should have used a 3 or 4 ply. ....."the forum" mentioned that a strap would be like "placing a massive beam" under a joist, ..How massive?
I have access to 3" X 20' strips of #10 steel. how much stiffer might it be?2. The valley rafters are 2X8 X 20' (10/12 pitch)and are a bit undersized. (i didn't build it) Could I use this technique on the valley rafter to reduce the load to the valley jack?
My other ideas on the valley rafter were to:
1. "on edge"sister a 2X6 to the 2X8 using plywood gussets to create a 2X13?
2. create a cable truss with cable attached on each end and blocking in the middle of the cable span.A flitch beam could be done easily...
Any thoughts on this would be greatly appreciated.
AdamGalroc
Original Author18 years agolast modified: 9 years agoThis weekend, I started working on raising the floor. The floor is sagged about 1/2-5/8" in its 12 foot span. About 7 to 8 joists are sagged. I decided to go with 3 lolly columns and a hoziontal beam (4 x 2x10"). I might still go with the metal straps, but only after leveling the floor and letting it set for a while.
It took alot of force to slowly move the joists back to level again.
If I decide against the metal straps, what is the basic layout of a footing? Are the footings supposed to be 2' x 2' with 2' deep with rebar every foot or so?
Renting a jack hammer the best way to go, or can I do it with sledge hammer?
Related Professionals
Warren Kitchen & Bathroom Remodelers · Westminster Kitchen & Bathroom Remodelers · Three Lakes General Contractors · Country Walk General Contractors · Highland City General Contractors · National City General Contractors · Stillwater General Contractors · Joppatowne General Contractors · Lawrenceville Painters · Cottage Grove Painters · Gurnee Painters · Ladera Ranch Painters · Maitland Painters · Santa Clarita Painters · SeaTac Paintersdac_in_ontario
18 years agolast modified: 9 years agoThis is a very interesting thread, for a bouncy floor in my home. Brickeyee, does the metal strap have to run the entire length of the joist? If not, how close to the end (or how much of the middle) is reasonable? Also, what type of screws should be used with the #10 steel straps?
Thanks!
dac_in_ontario
18 years agolast modified: 9 years agoWoops, sorry, brickeyee, two more:
1) How far apart should the fasteners go?
2) What do you suggest if you eventually need to install a drywall ceiling onto the bottom of the joists? Won't the steel prevent nailing of 1x3 wood "strapping" to which drywall ceilings are affixed? (In my area, builders generally nail 1X3 wood "strapping" perpendicular to the joists, to which they screw dryall ceilings.)
Thanks again.
hotzcatz
18 years agolast modified: 9 years agoAloha Galroc,
If it is functionally and asthetically okay you can put the new thickened footings on top of the existing concrete floor. Saves having to cut into the existing floor.
A concrete saw might be a nicer way to cut the concrete since it would limit the amount of cracking.
Just my two cents,
Cathytomesh
17 years agolast modified: 9 years agoDid anyone try the metal straps? What type and how many
fasteners did you use? Did you strap every joist? I was
thinking of strapping every other joist to see if that would
be sufficient.Thanks
Tomthumbtack
17 years agolast modified: 9 years agoA lot of great advice has been posted about reinforcing floor joists. My problem is smaller in scale but still irritating. I have a bouncing floor under the front-load washing machine in my laundry room. My house is built on an easily accessable crawl. Can I add pieces of bridging between the joists to firm up the floor to prevent the washer from twisting and moving out of place? Thanks!
DNT1
17 years agolast modified: 9 years agoMan I read bricks post with interest and to tell you the truth I do not think the strap would do a darn thing laying flat and fastened on the bottom of the wood joist LOL. Someone please try this and report back ASAP. Is he pulling our collective legs??
brickeyee
17 years agolast modified: 9 years agoSome attention to detail is required to make steel strapping work.
The fasteners should be at least 3 inches long into the bottom of the joist.
The hole for the fastener should be no more than a few thousandths over the shank size of the fastener (any more allows the wood to move that far before the strap is loaded).
Straps do not have to run full length (support to support). I usually stop them a few inches short just for ease of installation.It takes planning to get everything in correctly.
Faster holes should be the next larger number size drill bit than the screw shank. They should also be offset from the center of the strap about 3/8 of an inch so they do not all line up perfectly and produce a wedging action to split the joist. Correctly sized pilot hole should also be used. Hardened screws are not desirable. Just like a nails the soft steel has more ability to deform before fracture than a hardened fastener.
The straps are fastened with the 2 holes closest to the center to the joists.
A lifting beam is then placed in the middle and jacked until the floor is level (double and triple 2x at least the size of the joists usually works well). Slow lifting (1/8 inch per week) works best, but very old wood may have so much of a set you would need to wait to long for it to straighten. You can repair these problems by sistering a new joist to the upper half of the old and using the new wood to cerate the floor plane. Depending on span this may even be enough to stiffen the floor (it does require the old floor deck to be removed though).
After the floor is flat, the remainder of the fasteners are installed.
For residential work screws on about 8 inch spacing are pretty decent.If you need wood to fasten a ceiling to you can rip 2x4s in half and fasten them to the side of the old joists so they are just proud of the steel and fastener heads. Cut them into sections to work around cross braces and other obstructions. If you are careful you should only loose about 1/4 inch of headroom.
I guess dnt1 has never calculated the stress in an I-beam and why the top and bottom webs are so critical.
You could also analyze a wooden i-joist. You put the wood only at the locations it is required. Top and bottom flanges. The moment of inertia used to compute the bean stiffness puts a premium on material at maximum distance from the axis of rotation. The cross section of the flange times the distance of the centroid of the flange (middle of a square shape) from the middle of the beam is the number.
No call backs on the many jobs I have done this way.
If there is headroom to spare 2x lumber flat on the bottom does the job also.dcweflen
17 years agolast modified: 9 years agoI have a similar problem with a newer home. I have a room 13.5 feet wide with 2 by 10 floor joists that is bouncy. Am I correct from what I read here that I could nail or screw a 2 by 4 or 2 by 6 sister joist onto the bottom sides of the joists to stablilize them? I have wires running down the middle of the joists that makes it hard to sister a 2 by 10 to them.
brickeyee
17 years agolast modified: 9 years ago"... I do not think the strap would do a darn thing laying flat and fastened on the bottom of the wood joist LOL"
It is a tension member. All you need are enough fasteners to transfer the tension load from the bottom of the joist to the steel.
If you want to try the calulatins yourself, compute the moment of inertia of the resulting joist withthe steel converted into an equivalent dimensioned piece of wood based on the ratio of Young's moduls for steel to Young's modulus fopr wood.
The equivalent wood member is pretty darn big.chrisecks_comcast_net
16 years agolast modified: 9 years agoBrickeye,
I have a similar floor sag issue under the washer/dryer. So, for fasteners for the steel strap approach, 3 inches long, but what diameter/size? Are we talking construction screws? How do I know if a screw/bolt has been "hardened"? I'm imagining the fasteners can't be too big given they're going into a 2x whatever joist.
brickeyee
16 years agolast modified: 9 years agoNails are actually a very good idea, with holes in the steel just a few thousandths larger then the nail diameter.
Conventional round head wood screws can also be used, #10s about 2.5 inches long are a good compromise between the metal loading and the wood compression.
Lag screws (even 1/4) are a little large for a 2x member.
'Hardened' screws (self drilling) should never be used for structural applications.
Unlike softer steel nails and screws they break instead of deforming under overloads.
Notice how a nail or conventional wood screw will bend a good deal before actually breaking when you try to pull it out.
A hardened screw will bend slightly, and then simply break.By supplying multiple redundant fasteners in wood and nail construction, a system very tolerant of large short term overloads, and longer term smaller overloads is created.
Floors sag, but remain safe for use.
potzie77
16 years agolast modified: 9 years agoI konw this is a bit of an old post but maybe Brickeye's still around. I pretty sure that gas actuated nail (HILTI) are hardend but they would be a tight fit in the steel and save alot of time. Do you think it would sufficient?
jdrexx_yahoo_com
16 years agolast modified: 9 years agoWow, what a great read.
My question is the same (I have to stiffen some joists I believe) but the circumstances are different. I want to use my attic for storage but want to eventually put a finished room up there so I wanted to do the stiffening now for the future prior to putting down the floor. So my two story colonial has an attic where the "floor" joists are 2x8s at 16"OC. Most of them have a span of just under 12'6". If I am reading things right, what I have found that the longest span for a regular floor like this should be 11'6"... So I need to stiffen things up. I researched just sistering on more 2x8s or even 2x6s on one side but then someone mentioned sistering 3/4" plywood (sturdI floor ripped into strips) glued and nailed onto one side. I found somewhere that someone said that a 7" strip of plywood on edge is stronger than a 2x8. Is this true? My thought,at this point, is to by 4x8 sheets of 3/4" strudi floor and rip 7 strips out of each piece and then glue these strips to one side of in the middle of each joist and attach with pneumatic nailer with 2" ring shanked nails. Can anyone vouch for the validity and effectiveness (and code compliance) of this scenario? Your help is VERY much appreciated.
jamy
15 years agolast modified: 9 years agoI just wanted to chime in here and say how well the steel strap suggestion above fixed my problem.
I followed Brickeye's instructions to the letter, and was a bit skeptical at first, but now my Laundry room floor finally feels like it's on iron girders! The house is only 13 years old but for years the Laundry room floor has been pretty shaky during the spin cycle. We recently replaced it with a ceramic floor and at the time added plywood to the floor surface fastened well with screws which stiffened it up a bit. But the main floor (in other rooms even) still shook when an unbalanced load was spinning, and seemed to be worse in the past couple years. After googling the problem, and learning about joists as much as I could, I checked the basement and found that the electrical work done for me some years ago had really done a job on 2 of the joists directly below the washer. Although the joists were only about 9' long, the holes drilled through them had been drilled too close to the bottom chord, and one on each joist was right around 1 3/4 from the bottom , pretty well weakening the bottom of the 10 x 2's. It looked like he also removed the centre blocking on each joist and never replaced it, so I had a little warping going on too. On a spin cycle you could actually feel the joists shaking from beneath. Shame on me for not knowing more back then and insisting on better workmanship, which I paid a lot of money for.
When I saw this thread on reinforcing floors and read Brickeye's comments and advice, I realized that I also was only thinking in terms of how to shore up a tightly compressed joist from the top or sides (sistering, etc), and pretty well had never thought just how the joists were working. That is, compression at the top chord, neutral in the middle for the most part (that's why it's ok to drill there if you have to drill anywhere) and tension at the bottom. Lose strength in tension (by drilling holes out of spec of the joist for example lol) , and don't matter how well the joist is fastened at the top, on loading it can fail easily if the bottom chord is weak relating to tension, it cracks, gets weak, floor vibrations/shaking, and in the end, fails. At least thats what I got out of all the research. Luckily there were no cracks in my joists so going with the steel strap idea seemed to be the best way to improve the strength of the joists in my case, and I'm glad I did. I couldn't even think about sistering unless I wanted to get into major electrical work, and there wasn't enough headroom to be adding to the bottom of the joists as I had read elsewhere.
As I installed the straps I used 3/4 pipe clamps (from another thread I found on warped joists) and straightened them even though they were only out a smigen, just wanted to get the straps on straight so started from the middle and used the clamps as I installed the strap moving outward.
There wasn't much if any sagging in the joists , but I did prop them enough to take some of the weight during installation of the 2 straps, which I got fabricated at a local steel shop for about $40, with holes drilled as instructed by Brickeye. I laughed because when I ordered them, the chap knew exactly what I needed which led to a conversation about how he had done this before for others and that it had fixed their problems too.
I used the #10 Round head wood screw as above instead of nails, and asked for as tight a tolerance as possible regarding the holes to the screw shank. He found that 3/16 was tight for my screws, and I had to actually work the screws into the holes, so I guess they were tight enough. I also pilot drilled according to the screw manufactures directions on the box, 7/64th in my case. One thing I also did was drill the pilot holes so the screw would load easier, by drilling it just slightly towards the outside of the hole (away from from the center of the joists I mean) as I started installing from the center, don't know if that helped or hurt, but thought it would probably give me good loading from the get go.
After all the screws were installed, I dropped the prop so to speak, and put the ol washer go into an extended spin cycle with a heavy load.
You have to be here to believe it. The joists are solid as rocks, although you can feel some small vibrations at the peak of the spin cycle with a hand right on the joists, there is no vibration felt even 10 feet away like there used to be all through the ground floor of the house. No shaking of the floor anywhere. I also had to rebalance the feet of the washer because it started bouncing like it was on concrete, and threatened to damage the new ceramic floor, I guess because the joists weren't absorbing (and transmitting) the shock like they used to.
So that's my story on the strap solution. The hole thing only took about 3 hours and I went slow to make sure I covered all the bases. Cost was about $60.
I know this was long, but wanted to drop in and thank you for this great thread. I would never have attempted this repair without you, and especially to Brickeye for his solution. You rock!
arturo_enduro
13 years agolast modified: 9 years agoThis is a great post. I love the steel strap idea. Not sure it will work for me though, want to see if anyone has any suggestions. I have a 100+ yr old house with full length joists in the basement across a timber beam. In the back of the house, on a short section of the beam (front end of this section is pocketed into the chimney) two of the joists were butchered by past plumbers and/or mechanics. The bottom of the joists have been cut on either side of the beam -- up to 1/3rd of the way up the joist, and between 2-4" wide. Additionally, one of them has had a lot of its mass cut away above the beam for some reason. There are no pipes running thru any of the spaces any more.
I could glue and thru bolt 3/4 plywood reinforcement on both sides of each joist, but would love to run steel strapping on the underside of the joists, across the timber beam. The problem is getting them in there -- I don't think I can pound them into position without doing more damage to the joists or the straps.
I have lallies and could jack the joists high enough to sneak the 1/8th inch straps under the joists. I have a couple of concerns I'm thinking about though.
First, there's no notable sag in these particular joists, so it seems to me jacking them could cause undue stress to these damaged joists. On the other hand, it would put tension across the tops, wouldn't it? And the tops of them are in better shape (though one of them has some epoxy filler in its top that's about 1/3rd of its width and 1/2" to 1" deep).
Second, if it would be OK to jack them up an 8th of an inch, I can't think of any tricks for jacking close to the beam and still being able to slide a 72" strap underneath the joists. So I'll need to position the lally pairs at least 72"+ apart (I'm assuming I should jack from both sides of the beam).
What do you think? Should I just go with the plywood and forget the strapping?
While I'm here, does anyone have any thoughts on using restoration epoxy on surface cracks in the beam? Thinking about it while I have access thru the sub floor above...
thom_w
13 years agolast modified: 9 years agoLong post, but I have to share my experiences with Brickeyees strapping solution. I have recently finished stiffening my floor with great results.
Some background info: I recently bought a house built in 1932 here in San Francisco. A lot of the homes here are what people call Marina style, which given the small widths of the urban lots, are usually 25 wide and span from property line to property line; like a townhouse except with no party walls. The first 5 of one side is taken up by a stairway to get to the second level which is the living level. The ground level is usually a garage in the front and spare rooms in the back.
Anyways, the floor joists run the 20-25 width of the homes with two beams that cut the span into 1/3rds and run from the front of the house to the rear. A popular thing to do here is to widen the original garage doors, which are rather quite narrow, (+/-7w.) to better fit modern width cars. Trouble is that the two beams that run the full depth of the houses usually post down on either side of the original garage door.
So this is where I come in. I bought a house in which the previous owner widened the garage door sometime in the past decade or two. In doing so, he removed the two beams for the depth of the garage and did nothing to replace the structure. So I have a living room and dining room in which the 10" deep joists span roughly 19 from wall to wall over the garage. While the floor was not sagging, (probably due to the strength of the old growth 2"w. joists) it was quite bouncy. Any rhythmic movement would get the floor going, so no dancing, workouts, etc
The garage height below is 7 to the bottom of the joists, so I did not want to choose a solution that would reduce head height. Also, there is quite a bit of wiring/plumbing running through the joists that would make sistering a bit difficult. When I ran across Brickeyees strapping solution, I read up all I could on the idea and went for it.
I first bought the fasteners which were non-hardened #10 by 3" pan head screws but with a Phillips head instead of a slot so I could drive them in easier with a drill. I also made sure that the shank of the screw was larger than the threaded part. These were a special order item from a local bolt/screw supply house. I had the strap design figured out by then so I knew how many to order, which in my case were roughly 800.
I had a local metalworking company make up the steel straps, which were 1/8" thick x 2"wide (to go on 2" wide joists) x 19 long. The length was a couple of inches shorter than the joists and stopped just before the supporting walls. I had the screws sent to the metal shop so they could measure the shank of the screws and drill the holes to be as tight as possible. Based on Brickeyees recommendation that the outer 1/3rds of the straps have more fasteners than the center 1/3rd, so I had the straps made so the holes are 8" apart in the center and 4" apart on the ends. The holes were staggered 3/8" from the center line of the strap, so 3/4" total stagger. I had 18 of these straps made. Cost was $50 each strap, which I think is fair given the length of the straps and the labor to measure and drill all those holes, but I didnt compare or get estimates.
I went to the local lumber/hardware store to buy some screw jacks or lolly columns to jack up the floor and one of the employees there said that I could borrow his, which were these 100 year old cast iron screw jacks. Cool. I used a 10long 4x6 post to act as a temporary jacking beam. The 10 long beam was easier to handle and so I did the floor jacking in two sections.
I found the center of the joists and the straps and put them up with only the center two screws in place. I then put the temporary beam up and used the jacks to lift it so it made contact with the joists. Because this is an older house, the height of one joist to the next is not that uniform. The floor above is flat, but there were some differences from one joist to the next and thus varying height gaps from the joist to the temporary beam. I hammered in wood shims to even the playing field so the temporary beam would lift all joists in unison. Because my floor had no sag, I just lifted it enough to, in the end, pre-load the straps. I did a little test; before jacking the floor, I temporally held up one strap with clamps and marked on the joist where it ended. Then I measured it after I jacked up the floor 1/4", and over the distance of 9 from the center to the end, the strap moved 1/16". Wow, such a tiny amount of movement for the fasteners to transfer their load of probably thousands of pounds between the steel and the wood. Would this work? I had roughly 25 fasteners in that 9 distance, each rated for shear strength of 300 pounds, so it seems to work out mathematically, but well see.
Anyways, like the previous poster mentioned, I pilot drilled the holes biased to the outside (away from the joist midpoint) to help preload the fasteners. The pilot drill diameter was the recommended size from the screw manufacturer for the type of wood Im going into. Since the joists are old growth lumber with tighter grain, the pilot hole size was the one for hardwood. And a good thing too, the screws were tight, too tight in fact, and I kept stripping the screw head. After another call to the screw manufacturer, they recommended either using a tapered drill or stepped pilot drilling, (for the shank and for the thread). Given the depth of the screw at 3", a tapered drill bit would not work, so I had to pilot drill twice for each hole, one for the shank and another for the thread. Damn, that added a bit of time to my work. But I was able to get into a rhythm and I was able to complete one 19 long strap in one hour. So the whole floor took a weekend and a couple nights after work. Oh yeah, one thing that really helped, was messing with the clutch of my drill to come up with an optimal setting that would not strip the head of the screw but yet be able to sink it all the way in.
After removing the temporary beam, I tested the floor; and WOW, it was a lot stiffer. Most of the bounce was removed and dampened, and I could jump on it without a lot of rebound. My wife said that it was like night and day. Now, understand that not all of the deflection was removed, but that was understandable given the span of 19. Needless to say Im definitely happy with the results. I may still address the long span by adding some structure in the future for my own peace of mind, but I have to say that this solution was very successful.
Thanks Brickeyee.
brickeyee
13 years agolast modified: 9 years agoIt is a simple but elegant solution.
If you ever need to put drywall on the area that has straps, just fasten some 2x2 9I rip 2x4s in half) to the side of the joist and sticking out just below the straps.
This gives a surface that you can fasten drywall onto.
I just fished a friends house that wanted a marble floor in the foyer.
We had to fasten more lumber flat on the sub-floor between the joists also.
The stone guy came in, jumped on the floor and said "Good to go."
littleman77
13 years agolast modified: 9 years agoWow, five years and going strong on this thread. Brickeye, I'm not an engineer but I understand statics and I've got kind of a twist on your steel strap. Do I get the same benefit from attaching 2x4 centered on the flat to the bottom of a joist in the same manner as your steel strap (a la bottom chord of an engineered joist)? I can sacrifice 1.5" in my basement, and I would think the dimension lumber is cheaper than steel strapping, plus it gives me a nailing surface for an eventual ceiling. I'd prefer to sister my existing (overspanned) 2x8s with notched 2x12s, but I'd have to pull a ton of Romex out of the way first. A field-laminated bottom chord seems like it would be cheaper and faster. Floor is reasonably flat and level, I'm just looking to take the spring out of it.
janv
13 years agolast modified: 9 years agoIs it possible to reinforce a 4x8 wood joist with perforated steel strip about 1/12 inch thick and 1.5 inches wide ?
Actually, I wanted to ask if the steel strip can be narrower than the joist.Thanks
brickeyee
13 years agolast modified: 9 years ago"Do I get the same benefit from attaching 2x4 centered on the flat to the bottom of a joist in the same manner as your steel strap (a la bottom chord of an engineered joist)? "
This also works just fine.
It is not as stiff as the metal strap (think of the ratio of the Young's Modulus between wood and steel) but works when you can afford to give up some head room.
"Actually, I wanted to ask if the steel strip can be narrower than the joist. "
The steel has such a huge strength advantage it will work.
twosocks
13 years agolast modified: 9 years agoBrickeyee, I like you steel strap idea- simple and elegant. I am an Mechanical Engineer by education and have a good deal of repect for the profession but have not seen a Strength of Materials book since college about 30 years ago.
I ran the numbers (I do remember a few), combining the Moment of Inertia and Young's Modulus (E=30 for steel and 1.3 for pine) it looks like the 1/8" strap on a pine 2X8 would increase the stiffness by better than a factor of 2.
However, I would much prefer to do this from the top down. In other words, remove the flooring above, not the ceiling below. I had the ceiling, which is ornate plaster with mouldings, repaired a few years ago- big $. It would be much cheaper and easier to pull up some fir flooring above the joists.I calculated that by adding (2) 1/8" x 1 1/2" straps on either side of the bottom of the joist would increase the stiffness a little more than the single strap along the bottom edge. However you mention in one of your posts that buckling will dominate and fastener placement and design are critical. Bear in mind than drilling a tightly fit lateral hole thru the bottom of the joist, close to the ceiling top, would be difficult if not impossible. I would appreciate your thoughts.
brickeyee
13 years agolast modified: 9 years ago"I would appreciate your thoughts."
I'm thinking about it (between designing particle radiation tests for semiconductors).
brickeyee
13 years agolast modified: 9 years ago"I calculated that by adding (2) 1/8" x 1 1/2" straps on either side of the bottom of the joist would increase the stiffness a little more than the single strap along the bottom edge. However you mention in one of your posts that buckling will dominate and fastener placement and design are critical. Bear in mind than drilling a tightly fit lateral hole thru the bottom of the joist, close to the ceiling top, would be difficult if not impossible. I would appreciate your thoughts."
Flitch beams avoid buckling problems by sandwiching the metal plate between two pieces of wood.
By the time you add enough through fasteners to make the wood and metal share the load as designed, buckling is rarely an issue.The closer to the bottom you can get the better, but fastening a metal plate under a pieces of 2x near the bottom of the joist would likely go a long way.
If you do not have any sag to remove you do not even need to worry about jacking before strengthening.
Some 1/4 inch bolts with fender washers bearing on the wood (helps spread the load) on each side with self locking nuts would probably do well.
To keep all the holes as tight as possible I would use a powder actuated driver to fasten everything at each end, then drill 1/4 inch holes and install the bolts.
The less slop between the bolts and the wood and metal the better.
Having to actually drive the bolts through with a dead blow hammer is NOT a bad thing.
jmhjgh
13 years agolast modified: 9 years agoBrickeyee, How to you feel about using metal strapping on a wood floor truss? Our trusses are 14" deep and made out of 2x4 material. I would like to stiffen the trusses and was planning on adding 1/2" plywood to one side of the truss, but it would not be a continuous piece because of ductwork, wiring, etc. The strapping sounds like a much better idea.
brickeyee
13 years agolast modified: 9 years agoI would cover the sides with plywood before trying anything else on a 2x4 type truss.
They are likely already at a design point that may not have much margin.
Even if the plywood is not continuous it will add significant strength in this application.
You will need a pretty good pile of screws though.
You are creating a shear membrane.jmhjgh
13 years agolast modified: 9 years agoI was planning on trying 1 side first. Jack up the floor to take some weight off, glue, and send a bunch of narrow crown staples in. Do you think the screws would be better? Thanks again.
dfcc_fran_gmail_com
13 years agolast modified: 9 years agoBrickeye I am facing the same problem jmhigh. I have engineered floor. 12' I-joists with a 1 1/2" deep X 2 1/2" wide top and bottom flange. Called 300's. They span a 34 foot room with a 12 " steel I beam at 16 feet and are 16" o.c. , So the longest span is 20 feet with an island in the middle. This section of the floor is very bouncy.Won't break as the floor meets minimum code. I hate that word "minimum code". I even had a rep out here because of the amount of floor bounce. He showed me a lovely chart with levels of customer satisfaction outlined. My floor met the very basic needs of the homeowner. There are four levels above that. Great if I had known there were options. When I ordered the floor I said" I want a great floor". The sales guy igonred me, never showed me the satisfaction chart. So I got the cheap floor even though I was willing to pay the difference to get better. The rest of the house is 100 years old and the floors are rock solid. Of course the open span of 20 feet is the issue. Had they put the joists closer together or used a 400 with a larger flange etc might have worked. Couldn't add more depth at the time as this is an addition and it had to match up. The building suppliers' guy who engineered the floor was a 20 year old computer whiz kid. His solution when I went back was to use blocking. Which if you follow the i-joists recs on that is a joke. But I did my own version with plywood and blocks at great loss of time. It helped some and the rep even said it was the best blocking he had seen but it actually has the least result for the time it takes. Way down the list in possible solutions. Should have got the rep out in the beginning. Now I have two rows of blocking down the centre which doesn't allow me to span the entire length of the beam without interruption. In other words I would have a break in the plywood or OSB side support right in a line across the floor. Brickeye suggests this isn't a big deal but obviously it would be better if you could go right across the side and offset the joints on the other side. Also I think the question of using staples and glue is a good one. Would that work? I would think the glue would do most of the work. Too many fasteners may weaken the flanges. I have had every solution thrown my way. It seems sistering pieces of plywood or OSB to the sides is the most popular. Here are some others.
1) Sheeting and gluing the entire underside with 5/8 " plywood or 7/16 OSB to create a monolithic box seemed next popular.
2) Glueing and screwing 2X6 at 45 degree angles to the underside was another idea to spread the deflection to different parts of the neighbouring joists.
3) Gluing a 2X4 to the bottom flange of the I-joist to beef up the load area on the bottom of the I-joist.
4) Putting another beam across. Not practical as the floor has in floor heating, have to cut out pockets in the basement wall and don't want a huge beam over my pool table.
I don't know what to do. The first solution involves pulling all the insulation out of the floor (rec room sound proofing ) cutting around wires etc to glue and attach sheeting to the sides. If that is the best that's what I'll do as it has cost me so much time already. If one or a combination of the other ideas will work I would go with that as I wouldn't have to undo insulation work.? Can this work or help just doing a section in the middle of the span where I assume the most flex is? Do any of the other solutions offer an easier fix. If I were to use steel how do you attach it to the underside of a wood I -beam flange? Sounds good on a solid 2X10 or something but on an I-joist? I mean if you drill in the middle you hit the OSB web. I you glue and screw a 2X4 to the bottom flange one could at least screw to the outer edges . Again using PL 400 I would think the glue would do a lot of the work so how far apart should you put the screws. Brickeye did say in one blog that gluing to the bottom could cause issues and then in a more recent blog said that would work. Brickeye which is it? Don't get me wrong your instructions seem to be very useful just looking for clarity here because this I could do easily if it really helped. I understand that with these I-joists you can really weaken them by putting too many fasteners in those 2X3 flanges so that's why I asked how far apart to fasten. I'm thinking 2X4 glued to the bottom to beef up the joists and then glue and screw the I- joists across the bottom with sheets of 7/16 OSB. Lot of work but if it worked I'd probably go for it.
This is just a mess that should not have happened. Call me frustrated but at this point because I've wasted all this time and energy to give up and have a bouncy floor would just add insult to injury. When things aren't done right in the beginning it just snowballs. Perhaps codes should be referred to as just Damn Good rather than Minimum. What a "sad, quick fix , faster is better and who gives a darn" world we live in. What ever happened to quality and craftsmanship. For a few extra bucks up front when the floor was built my rec room would be done and I would not have been obsessing over this problem for all this time. Having never dealt with I-joists I should have done more research and not relied on the assumptions of a 20 year old kid with a computer design program. I have always lived in old houses because they are made of solid wood not glue and wood shavings. Call me "Frustrated" Help!
brickeyee
13 years agolast modified: 9 years ago"Call me frustrated but at this point because I've wasted all this time and energy to give up and have a bouncy floor would just add insult to injury. "
This was a common probel whenthe 'enginerred' joists came on the market.
Joist span is set as a deflection based on span under the design load.
!/360 of the span for deflection is a common limit.
The problem is that it does not account for how 'bouncy' a long span can end up, while still limiting the load deflection to 1/360 of the span.
The engineered joist companies pretty quickly came out with stiffer joists with lower deflection, 1/540 and 1/720 should be used for the longer spans.
It is NOT a structural issue, but how the spring is perceived.
I think I would be inclined to tray and add plywood to box in the sides of the I-joists.
If things slow down at work I might have time to run the calculations, but it IS going to stiffen up the joists, how much is the question I do not have a ready answer for.
ecugt_wangstang_hotmail_com
13 years agolast modified: 9 years agobrickeyee,
If you are using the metal strip solution to add strength to floor joists by attaching the metal strips to the bottom, narrow face, of a 2x10 or 2x12 joist, do you need to be concerned with what metal you using for the strips and coatings for the screws? I'm just curious to know if you should use stainless or galvanized or aluminum or regular old sheet metal and if you'd be better served to use decking screws with the pressure treated wood safe coatings. My concern would be long term corrosion issues and trapping moisture between the metal and the edge of the joist which might cause degradation of the wood.Thanks!
brickeyee
13 years agolast modified: 9 years ago"My concern would be long term corrosion issues and trapping moisture between the metal and the edge of the joist which might cause degradation of the wood."
Not a problem inside the finished envelope of a house.
If there is that much moisture around you have a lot worse problem than a few sagging joists.
dccc_fran_gmail_com
13 years agolast modified: 9 years agobrickeyee
Thanks for the feedback. Looked at it again today and it is a pile of work to take out everything between joists , plus I have heating ducts running down several
so I doubt if I can get plywood on both sides of every beam and at about 4 feet from the end of the 20 foot span I run into return air ducts hanging below ceiling so I can only cover 12 feet of the sides and not in continuous fashion because of the blocking. Wondering if gluing on another 2X3 to the bottom of joist and then gluing and screwing the ceiling with plywood (as I described in 1) and 3) of first e-mail) would be worth the effort. I read that adding additional depth to the bottom flange was good because it's under tension which would help reduce movement and the skin of plywood or OSB would act to creat a monolithic box beam effect. Thoughts? Thanks for your time.Francis
jon229
13 years agolast modified: 9 years agoThis is a great thread, lots of good info.
I have a kitchen floor bounce problem I hope to get some ideas on fixing.
My 60 yr old house has a 16 ft span under the kitchen, using 2x9 on 16" centers. I figure the span is about L/280, depending on the wood type (I think it is DF). Now that I have an island in the kitchen I get the rattle of glasses and a bit of a bounce when walking in the area of one end the island (didn't notice this before the island was installed). Below is a basement with ducting running tight across the joists. I don't think I have sufficient room to do the metal strapping technique, I do have room to do a beam across most of the area.
A 4x6 beam will just fit between the ducting and a gas line. To see if I could get *any* improvement, I put a temporary 2x4 across the joists and 2x4 stud's below each joist (so it looks like a stud wall). I had a dramatic improvement in the bounce. But I do not want to lose the space to a 'stud wall' so would like to put a 10 ft 4x6 beam to support 8 of the joists. It would not quite be at midspan nor support the entire area below the island due to ducting and furnace location. But based on the improvement with the temp stud's I think it will be sufficient for my needs.
My questions are:
is a 10ft 4x6 supported by a post at each end sufficient or is 10ft too much distance for a 4x6 with only a post at each end? I only have 3.5 inches between ducting & gasline.
Are 4x4 posts sufficient size?
And if not, what should I use instead?
the floor is concrete, I don't know how thick, but at least 3in based on looking at a sewer cleanout at a different part of the floor. I was planning on putting a concrete pier under each post, not so sure how I'm going to make it so the pier doesn't 'walk'. I don't want to dig out the concrete for the pier unless absolutely no other solution.
Thanks, Jon
jamy
12 years agolast modified: 9 years agoWow, doesn't seem like 2 1/2 years have passed since I tried Brick's steel strap solution for my laundry room floor and it is still solid as a rock in there!
I recently noticed a lot of vibration in the dining room, dishes clattering in the china cabinet and seems to be getting louder over time LOL. So, I am going to do the same thing for the dining room floor joists. Problem was that I forgot how to! So glad this forum still exists. Came in today for a quick review and this time next week I will have a solid dining room floor.
Special thanks again to Brickeye for this solution... I remember how long I looked for something that worked for me the first time.
All the best
Jamycaseypilot_hotmail_com
12 years agolast modified: 9 years agoBrickeye,
If you are still here I would appreciate your input on being able to drill 2x10's for 3 inch pvc if they have your steel strap on the bottom. the old house was built in the 1920's and some of the joists have been butchered pretty badly. Trying to strengthen the floor in order to put a bathroom back in to this space. Is the sheer strength of the joists at the end of no concern as long as the joists are not compromised near the ends? Does the steel strap just have to cover the area below any notches that have been cut into the joists? Thanks for the help.

Tomas B
7 years agolast modified: 7 years agovery happy that I've found this thread. @Brickeye, I'd buy you a beer or few if you are in Vancouver, BC.
Brickeye, what do you think about the following method of enforcing existing joists:
http://cottagelife.com/wp-content/uploads/2013/02/Bouncy-Floor-1-to-4-3.jpg
I'm thinking, since my joists are sagging, and bouncy (2x10, 13.5' long, 16" on center), I could raise them up a bit over flat level (1/8 to 1/4"?), then attach the strap the way it's shown in the picture, and after removing support wall should put that strap under tension? Not an engineer over here :-)This wouldn't work with the method you described - attaching strap under the joist requires joist to be as flat as possible, so that attached tension strap has the shortest distance between joist ends, correct?
farhaddiy
7 years agolast modified: 7 years agoThank you Brickeyee and all of you for all these usefull information ,
we have a bouncy floor too that I like to fix it , it is not bad at all but I want to fix it and make it better myself .
Could you please complete all of these usefull information with a picture or schematic so DIY people like me have better understanding of the subject .
Some things simple like IKEA instructions or even something simpler will be very helpful and appreciated.
Thanks.
Farhad

Cody Harding
7 years agoInterested to hear anyone's thoughts on Tomas B's proposed option. I've encountered this several other places as a suggested method.
I have some concerns, but it would work best for my application. Does anyone have experience with this method?bagofchips
6 years agoThom_w, if you got your ears on: thx for the real-world "I did it!" post - VERY helpful details you gave. Who in SF did your strap fabrication? I'm in Mill Valley and need to do this & get bids on the straps. (Thx anew to Brickeyee too, great information on a couple threads. -- I had been researching this ad nauseum and thought I'd found every approach out there, and yet this one is pretty darn cool.)
thom_w
6 years agoI'm here. I used Bayshore Metals in the Bayshore industrial area in SF. 244 Napoleon St. They charged me $50/strap but they are probably more now, as that was over 7 years ago. If they still remember what a pain in the *ss it was to drill all those damn holes, they'll definitely charge more.
As I said in my post, it really helped a lot. Most of the bounce is gone, but some still remains. This solution will not cure all ills, but in my case, a really nice improvement, but nothing will fully cure this issue until I address the fact that i still only have 10" deep joists that are spanning 19'.
Since you are in the SF Bay region, if you would like to see them in person, let me know.
Bonnie Cohen
5 years agolast modified: 5 years agoWhat an amazing discussion! Now that I understand how joists actually work, I understand why/how the steel strapping works. I am so grateful to brickeyee for taking the time to explain all of this! I have trampoline mid-floor in a 2 storey house, limited ceiling height in the bottom storey, and am limited in how much weight I can add to the bearers of the joists, too.
I thank everyone who came back to tell how it worked out for them, using this model. I'm going to study this discussion carefully, and apply this to my situation.

Daniel Howland
5 years agoBrickeye, 10 years ago I successfully took the bounce of my 14x27 kitchen/dining room using the 1/8" x 1.5" x 12' steel plates method, fastened to the bottom of the floor joists. The floor actually had up to a 3/4" dip running along the center and would have ruined the ceramic floor I was planning to install. I searched long hours trying to find a solution that did not involve sistering floor joists as I had installed the plumbing & electrical in the center of the joists when building. Trying to add sister joists over the heating ducts is problematic since these need to be the same length as the originals. I used 16d galvanized nails and drilled the off-center holes 8" apart. I also pre-drilled the nail holes into the joists and hammered each one home before pre-drilling and nailing the next one (note: I pre-drilled the steel before installing for ease and template). The floor ended up rock solid with no bounce. I am now doing the same fix on my 18 month old house where the GC did not install any bridging (warp) and the bounce is significant when people walk from room to room. I have 30+ some joists to shore up and expect the same results as 10 years ago.
Daniel Howland
4 years agoIf 18 gauge is equal to 1/8” plate steel. You need to make sure the total Length is 12” or less than the total length of the joist. Also drilling the holes are just off center is important. Galvanized nails work as long as the pilot hole drilled into the bottom of the hoist is less than the diameter of the 16 penny galvanized. Be careful of using screws they May strip if too much torque is applied. Nice to see this blog is still going after 11 years since I first found it.
Jerry Myroup
4 years agoThanks Dan, so you're saying 18 ga would work. The strapping I'm thinking about buying from Home Depot already has holes in it... it's a 200 ft roll.
This has been a very interesting and informative thread. Kinda wish we knew how many people go the metal strapping way versus scissoring the joist.Daniel Howland
4 years agoDo Not use roll strapping. Only cold forged plate steel will work. Look to your local Alro Steel supply, or similar. The plate steel will come in 12 foot lengths and does not bend. Drilling is challenging but should be done with a drill press for accurate holes.
Jerry Myroup
4 years agoSteel plate... hmmm, this doesn't sound like it'd be an inexpensive way to remove the bounce. Ughhhh.
Jerry Myroup
4 years agoHi Dan, I assume the purpose of the steel bar is to put tension (preventing the center of the joist from deflecting when waked upon) so the load is transferred back to the ends of the strap. Wouldn't 16 or 18 ga do the same or is there something else the 1/8 plate is doing?


glennsfc