

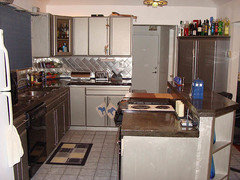
My project: pouring concrete countertops Over existing tile
Inspired by several projects featured online such as this one, I decided this would be a great way to renovate the kitchen for less expense and labor. The existing tile countertops would be a nightmare to remove they have 1" thick 30 year old concrete as a bed, thick porcelain tile. I hated the bump dingy-white tile, the wide grout lines and the busy look of the grout as well as the impossibility of even just wiping crumbs off.
Keep in mind I am comfortable with the idea of these not turning out pro-quality, I did not expect them to. But I do want a smooth level surface for ease of cleaning, and I do need to fix some mistakes.
*So please don't laugh at my results, or tell me I should have done it all differently, it's too late now! Support and advice for my plan on fixing my mistakes would be appreciated. I don't think it is beyond help! The main reason of my post is just to document my progress, I do have a plan to fix the issues you see here.*
So, that said I couldn't just do it the easy way and use self leveling concrete like the people in the blog did. Everyone says that concrete will peel and crack, is not strong enough, etc. So I had to try and make my own improvements, and chose Rapid Set Cement-All all purpose building material/non-shrink grout.
I chose it because it can be used for applications from featheredge to 4" thick and has very high strength. The final thickness on most of the counter would be about 1/2" but some areas thicker and some thinner.
I did also purchase the "flow control" additive which helps the concrete flow into shapes and reduce the amount of water needed (plasticizers etc). I used it for one batch where I got the leak, I think it made the concrete flow TOO easily, though the mold. So I am wary of using that again for patching the edges, even though it adds yet more strength.
In retrospect it would have been much much easier to use one of those self leveling products, but I always have to make things hard on myself. I have never used concrete of any kind before, so it was a bit of a learning experience. For example I bought 50lb bags and it says to use 3-5 quarts of water per bag. It also sets in 10 minutes so I bought the retarder to give myself more time, but it was still less than 30 min. But no way could I mix and carry an entire bag in a bucket, I had to do half bag at a time, so measuring was inaccurate as I had to estimate half a bag of volume (why can't they translate 55lbs into volume for us?).
The first batch I did not mix well enough I was afraid of over mixing and ended up with some lumps. But overall that area did turn out one of the best! The next batch I used too much water tried the Flow Control additive as well as the retarder and had a tiny leak in the mold, there was a river of concrete running down the front I had to stop up with another board. Then I started getting better with the consistency of the mix, and was afraid to use the Flow Control again.
However in several spots I didn't get the concrete down into the edges well enough and will have to go back and patch those spots. The thicker mix worked better overall but I guess it didn't get down into the edges.
The biggest mistake I think I made was over-troweling in the area around the sink. I thought I was "getting better" at troweling and wanted to make it perfect so I kept at it too long, and the area around the sink is the worst part - all rough and with a fine powder on the surface from being over-worked after it had begun to set I guess. I kept misting with water to be able to work it. I will have to go back today and do a thin overlay on the top and try to level out the entire sink area.
I also was doing this alone and did not have enough hands and time to keep misting the concrete while it set so there are clay-like hairline fissures in some areas, but I think I can live with those once sanded and sealed they are tiny and will just add texture.
So I guess today I will be making a really stiff batch to patch the edges where the concrete didn't get down into the molds (too bad because the parts where it did ended up great) and try to level out the area around the sink.
Or maybe I should chip out some of the edges, put the molds back on and pack the concrete down into them - since the edges look so nice and clean with the molds I will never get that with a trowel.
I plan to keep using the same product because although it is difficult to work with, it does have a nice finish and very strong when done.... but I am certainly open to suggestions!
The embarrassing mid-way point photos:
before (painted walls down to where the new backsplash will go)
{{gwi:1594608}}
{{gwi:1594612}}
removal of the old sink and backsplash
{{gwi:1753873}}
pics of the "during" where I am today:
Old tiled-in sink removed, new sink installed in a plywood section with building paper over, pvc pipes for the faucet knockout, and foam plug for sink.
{{gwi:1753875}}
edge molds built
{{gwi:1753877}}
{{gwi:1753879}}
I didn't get any photos during the pour because I was SO busy and filthy!
Here is after the initial set I removed the top boards and left the lower on for support for now, also since some areas need patching it will keep the edge straight.
{{gwi:1753881}}
this was where I started the pouring, it's actually one of the better areas although least level.
{{gwi:2048910}}
this is the section where I used the Flow Control and had a major leak through the mold. Fortunately I planned to completely sand down and paint the cabinets next weekend that's why I didn't protect them. But this scared me off of using the Flow Control additive for the rest.
{{gwi:2048912}}
On the right the first area that did not get concrete in the edge - maybe the leak also made me wary of pressing too much into the molds, I don't know!
{{gwi:2048914}}
the dishwasher area turned out the best I think. I had unscrewed the dishwasher and pushed it back a couple inches to attach the molds across. We needed to run the DW so I removed all molds and pulled it back out to run last night. {{gwi:2048916}}
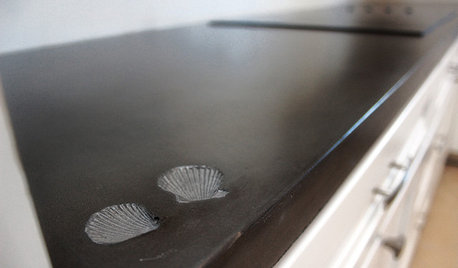
My biggest mistake area - over troweled, sink plug was too big though I want to bullnose here so I guess I will do that by hand with the edging trowel and make a smaller plug that fits all the way inside. Totally neglected the front edge in my concern about the sink area. What a mess :(
{{gwi:1753882}}
and the last part I did - the surface was pretty good but edges again no good.
{{gwi:2048918}}
This post was edited by tinan on Mon, Feb 18, 13 at 12:42
Comments (34)

doug_gb
11 years agolast modified: 9 years agoA couple of thoughts:
#1. I'm not sure that the cement on the counter top is thick enough.
#2. By going over tile - any joint in the tile (that moves or cracks) can telegraph through the concrete.
#3. If you have uneven spots on the counter top, that will cause standing water.
I think you should rip out the counter tops, install the proper underlayment, and then pour a new top. Also get a new sink - and size the opening appropriately.
If you want to keep what you have, I'd say you could install some hardwood edging. Make sure you use polyurathane on all four sides, before attaching it to the edge.
Tmnca
Original Author11 years agolast modified: 9 years agoHi doug_gb,
#1 - the concrete is meant for overlay/featheredge from "0 to 4" thick" so it's supposed to be good at any thickness.
#2 the tile is laid over a 1" thick bed of concrete, so the total thickness of concrete is quite thick and the tile will not be moving, with that thick bed underneath. Also cracks are something I am prepared for, with a concrete countertop.
#3, well I plan to level it out with another layer, but I don't dump water on my countertop anyway and if I spilled would wipe it up, so I am not sure how standing water would be a concern. With the existing tile the same thing would have happened as it was bumpy and had a raised lip on the edge, presumably to contain spills...
I definitely don't want wood edging, I like the edges of the concrete which give the appearance of a thick slab.
The sink IS new, I just installed it, that's why I showed pics of the old one being removed. I guess I forgot to post a picture of the new one not covered by the plug. The old sink was tiled in so tile around the sink had to be removed to get it out.
{{gwi:2048919}}
Related Professionals
Henderson Kitchen & Bathroom Designers · Midvale Kitchen & Bathroom Designers · Mount Prospect Kitchen & Bathroom Designers · New Castle Kitchen & Bathroom Designers · Woodlawn Kitchen & Bathroom Designers · 93927 Kitchen & Bathroom Remodelers · Pinellas Park Kitchen & Bathroom Remodelers · Toledo Kitchen & Bathroom Remodelers · Trenton Kitchen & Bathroom Remodelers · Pooler General Contractors · Athens General Contractors · Bowling Green General Contractors · Ewing General Contractors · Livermore General Contractors · Panama City Beach General Contractorshosenemesis
11 years agolast modified: 9 years agoTinan, I think you should put the piece of support wood that you had on the bottom back on, then paint some concrete glue on the tiles in front of the sink, then trowel on more concrete, smash the front board on, and let it set up. You can just mix some up and trowel it over the areas that have small gaps as though it was grout, then when it is set but not too dry you can carve it down with a sharp pointing trowel or putty knife. Be careful not to knock it back out- it will not stick well. If you decide to chisel some off so that you can put the forms back up to repour the front edge, be sure to knock off some of the top too, so that it will have something to grip to. You can sand out the surface with a regular orbital sander. I don't know how well those edges will hold up, since they are so thin, and concrete does not stick well to shiny tile. But it looks great where it's finished on top and over the dishwasher.
Tmnca
Original Author11 years agolast modified: 9 years agohosenemesis, thanks - that is exactly what I just finished doing! I put the lower support back on (I only have removed that one because I needed to to get off the one by the dishwasher... the others I had not removed).
I made a very thick mix, so thick I nearly burned out the drill (stronger with less water) and used the cement-all's instructions for using as a repair material... wet the existing surface and then apply the new material. I pressed it in hard with the trowel, working it into all the irregular areas, then smashed on the board again and screwed it in. Since it is intended for repairs even on vertical surfaces and ceilings, I hope that it will bond well to the surrounding material and stay in place. It is very very strong already (the finished parts) not fragile or flaky at all.
The smaller holes were easy to fill with the putty-like concrete. I also made a new smaller sink mold, this time added plastic lawn edging to make a smoother edge, and poured in a thick mix with the plasticizers (for better strength) around it.
I am leaving the molds on overnight and keeping the patches areas moist so it cures longer which will make it stronger. The manufacturer says it reaches 4500 psi after 3 hours, and will then continue to get stronger over the next few weeks.
Once the new repairs are set, I need to sand down the rough edges and even out some areas of the surface, I guess I will need to wet sand it. I don't want it polished, just smoothed. Then according to the manufacturer it can be sealed after just 16 hours, so I'll probably do that this week.
At the very least if it still doesn't come out well, I can tile over top of the new flatter surface with nicer, smoother tile (I did consider granite tile) using smaller grout lines. I'd be happier with that than the old tile.
Then next weekend, painting the cabinets and putting in the backsplash subway tile, cabinet pulls, and done!
Tmnca
Original Author11 years agolast modified: 9 years agoIt's looking better with the missed parts fixed -they didn't come out as nice and smooth as the molded ones, but hopefully sanding will fix.
I am still very unhappy with the sink area, I might have to build another mold and add more material to level things out. I thought I would try wet sanding by hand first. The wet/dry sandpaper was torn up in no time though.
Molds all off, there are some dripped parts to chisel off.
{{gwi:2048920}}
This side turned out very nice, I think.
{{gwi:2048921}}
COncrete still wet from wet sanding
{{gwi:2048922}}
I used some plastic lawn edging taped to the foam to make the sink opening more crisp, but need to round it down and the right side of the sink lip is still a bit exposed. I don't know if I can fix that now. It may be less noticeable if sanded rounder.
{{gwi:2048923}}
Any advice on wet sanding with an orbital sander? Maybe I need to start a new thread for that.
Tmnca
Original Author11 years agolast modified: 9 years agoI spoke to tech support from the cement company, I am going to add a thin overlay layer on the countertop on the sink side where things came out rougher. It may have been because I had used the mixing bucket for several small batches and the later batches were "contaminated" by partly-set cement, causing it to set even faster and create rough and lumpy textures as opposed to the area I poured first. I don't know how people deal with concrete contamination other than using a fresh clean bucket or mixer for every single batch (I did use 3 of them).
This product is meant as a repair material and if super strong even in thin layers, so I am going to wet down the existing rough surface (no primer is needed it will bond strongly to itself) and make a new batch in a new bucket using the plasticizers and lots of set control to give me time, and add a thin layer to level out what I have there.
I hope that in the end I'll be pretty happy with it, and that my posts will be helpful for anyone in the middle of a DIY project who starts to wonder "what have I done"?! :)
on_greenthumb
11 years agolast modified: 9 years agoI've been eyeing DIY concrete countertops myself........this gives me some thoughts and some tips on what does and doesn't work. Thanks!
Tmnca
Original Author11 years agolast modified: 9 years agoI did the repair overlay today, I made the mixture (in another new bucket) with the same amount of water but then added plasticizer to make it pancake batter consistency. Also used a lot more set retarder to give me more time. I wet the already-cured concrete until it stopped absorbing moisture, then poured on the topper mix, it went on nice and smooth and I leveled out the dips and smoothed the rough areas like icing a cake. It looks way better now!
I still need to sand the edges where the concrete wicked up the form, and along the edges where I had to patch with the stiff mix. I bought a set of diamond-grit hand sanding pads on Amazon, these are the right tool for the job I tested them out a bit already.
So, it's on its way to looking like an OK concrete countertop for a first-timer! I'm going to use an acrylic sealer because I can't afford epoxy or anything fancier right now.
Now to paint the cabinets and put in the backsplash tile...
renovator8
11 years agolast modified: 9 years agoAll I can think of is the poor guy who has to take all of this out.
Tmnca
Original Author11 years agolast modified: 9 years agoRenovator8, really I don't give a crap about whoever has to take it out some day - there was already 1-2 inches of concrete under the tile to begin with so adding a 3/4" layer hardly matters. It was already going to be a mess to remove which is why I chose not to.
*I* had to deal with taking out the tiled-in cast iron sink, set in concrete under tile. Also the crappy paint job on the cabinets which was already peeling off and could be scratched off with a fingernail. So I'll keep my sympathy for myself, since this is my house and I'm living with it!
I installed the new faucet today and got the cabinet frames and drawer fronts painted (after sanding everything down Friday and priming), next is the cabinet doors, and finally the backsplash tile.
hosenemesis
11 years agolast modified: 9 years agoYou move fast, Tinan. I wish I had half of your ambition.
Have you chosen a backsplash tile? Weren't you thinking about a light blue and white color scheme?Tmnca
Original Author11 years agolast modified: 9 years agoThanks hosenemesis, I have to pack all the work into weekends since my job in biotech keeps me really busy, but I had a 4 day weekend last weekend to get a lot done. Last year when we bought the house, we had to rent an apartment for a month during our sale/buy transition and I had to complete most of the renovation in less than 2 weeks, so we could move in and not pay any more rent on top of our mortgage. So I left the kitchen alone other than flooring as it was functional, but now it's the oldest and yuckiest part of the house! I've learned a lot with practice and with the support of GW and other forums, and even youtube(I learned flooring install!).
Yes I think I will do white subway tile. I found some pretty cheap at HD, $1.83/sq ft so not bad. The backsplash will make a big difference it looks so wrecked up with the old tiles removed and that big messy strip.
Here are some updated pics with the concrete after some light sanding with the diamond hand pads, painted cabinet frames, and the faucet installed.
I want to do a bit more sanding and then seal the concrete next week. I also wanted to live with it a bit before deciding whether to leave it natural or stain it, but I think it will be au natural I like the light color. It will look a bit darker with sealer, of course.
I hope this gives some other DIY's courage - that projects often do look much worse before they look better... I think mine is definitely starting to look better.
{{gwi:1594625}}
{{gwi:1594624}}
the blue tape is holding on a tiny strip of trim that I added to cover the gap around the new range hood which fits slightly differently than the old, I used liquid nails so the tape will hold it until it's set.
{{gwi:1594626}}
Tmnca
Original Author11 years agolast modified: 9 years agoThe countertop is done and sealed now, I think it came out pretty cool. This weekend is backsplash tiling time...
{{gwi:1703870}}
{{gwi:1755505}}
At some point in the future I might do some more sanding and re-seal, but it's functional and pretty nice now.
annzgw
11 years agolast modified: 9 years agoI like it the darker color and can't believe the work you've put into the project.
Only thing I think you may regret is setting the sink edges in the concrete. If you ever need to replace it you'll have to destroy your counter.hosenemesis
11 years agolast modified: 9 years agoI love it. That color is much richer and prettier with the sealer. I also like the variable color at the edges of the countertoop. It looks knarly- it's so thick!
I also like the new hardware on the kitchen cabinets. I think the pulls would look good on the drawer under the sink too- were you thinking of putting one there?
Is that a pass-through into the family room?
I look forward to seeing the tile. Are your going to go with a white grout, or something with a little contrast?
Renee
Tmnca
Original Author11 years agolast modified: 9 years agoThe sink is porcelain with a 25 year warranty, so I am hoping it will be good for a long time. I did debate whether to top mount, but I just love being able to wipe things into a sink. Besides I thought it might be difficult to get the concrete perfectly smooth and level enough around the sink and pressure points might form and crack the sink if top mounted. So I decided to take the plunge and concrete it in. However I think it could be removed in future if I'm careful, with a mortar saw the concrete could be cut to the edge of the sink and removed, then replace with a top mount or a larger section cut out for apron front etc.
I just did the backsplash today, but I backed out on the tile. I added up the cost for the 4-sided kitchen, once I added the grout, adhesive, tip nippers and cutter, and all the little extras, it was going to come to almost $300 even with the cheapest 23 cent subway tile.
I have been trying to keep the project under $500 total, the sink was $100 and the faucet just under $200, concrete and supplies just under $100, hardware $60 and paint $50, so the tile would have put the project way over my goal.
So, I decided to use beadboard wallpaper, which I will paint to match the cabinets. It looks pretty good, and will be easy to remove if I want to go ahead and do the tile in a year or 2 (they claim it removes in full strips). I primed the area first and sanded it smoother. The wallpaper was $19 for a 55 sq ft roll, and did not need any extra tools or accessories (it is pre-pasted) and I have lots of paint left to use on it. So it's keeping my project mostly on budget.
I finished reinstalling all the doors today, realigning the uppers was a pain - those huge slab doors made of MDF are *heavy*!
Tomorrow is chair rail install and paint the 'beadboard', then I'll post the "finished" pics!
MongoCT
11 years agolast modified: 9 years agoYou'll have better luck smoothing things out using diamond pads.
I know you're not looking for criticism, be it constructive or otherwise, but for future DIYers I would have recommended removing the lipped tiles at the edge. If not removing them, then at least scoring or abrading the tile glaze with either a diamond blade on an angle grinder or even 36-grit on a belt sander.
Regardless, it sounds like you enjoyed your project, and for some folks, that's what its all about.
Tmnca
Original Author11 years agolast modified: 9 years agoThanks mongoct - removing tiles would be a lot of very messy work since they were embedded into concrete underneath. The concrete is quite secure over them, the tiles were textured/bumpy and the concrete type I used is not a regular concrete it is an all purpose repair material that adheres extremely well even to vertical surfaces, and it cures very very strong. I don't think I'll have a problem with strength. I did end up sing diamond pads - hand pads.
I'm done, hurray!
BEFORE
{{gwi:1594602}}AFTER
{{gwi:1753867}}BEFORE
{{gwi:1594605}}AFTER
{{gwi:1753868}}BEFORE
{{gwi:1594603}}AFTER
{{gwi:1729388}}BEFORE
{{gwi:1753869}}AFTER
{{gwi:1753870}}BEFORE
{{gwi:1594606}}AFTER
{{gwi:1753871}}- 5 bags of Cement All concrete mix, trowel, bucket, pine boards for molds and mixer attachment - $80
- Ikea sink - $100
- Delta faucet - $190
- Paint and primer - $70
- Hardware from Amazon (knobs) and Home Depot (pulls) - $60
- beadboard wallpaper $19jeniferkey
11 years agolast modified: 9 years agoHere's ours 10 years on. Ours were lighter before the sealer, but the epoxy really darkened it up. We did the entire kitchen, so poured over plywood and forms. We left one counter as butcher block and the rest was poured in place.
hosenemesis
11 years agolast modified: 9 years agoBrava!
Thank you for posting the follow-up photos, tinan. It turned out great. Jenifer, it's nice to see how the concrete holds up over time.amanda-ca
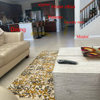
10 years agolast modified: 9 years agoThank you for this post! It was very informative with all of your "fixes". I am looking to do this in our new home as well, but have been timid. Here's a pic of our kitchen as it looks as the previous owner had it. I can't stand grout on a kitchen counter! Wish me luck!
amanda-ca
10 years agolast modified: 9 years agoThank you for this post! It was very informative with all of your "fixes". I am looking to do this in our new home as well, but have been timid. Here's a pic of our kitchen as it looks as the previous owner had it. I can't stand grout on a kitchen counter! Wish me luck!
 PRO
PROJoseph Corlett, LLC
10 years agolast modified: 9 years ago"All I can think of is the poor guy who has to take all of this out."
I've been that guy.
Tinan:
I've got to give you credit.
Tmnca
Original Author10 years agolast modified: 9 years agoPeople, did you not read the part where the concrete is only about 1/4" thick? "All I can think of is the poor guy who has to take all of this out." ...it was already a bed of an inch or 2 of concrete with chicken wire embedded and tiles set on top of that.
Friends had the same 80's tile countertop and are having their whole kitchen re-done, demo took a day and made a big mess of course - the concrete bed and tile gets broken up with hammers and saws and hauled away.
Me adding a 1/4" of concrete to the top of this already 3-4" thick setup is not going to make ANY reasonable difference to some future renovations. So, will you let it drop?
ABAKER123
10 years agolast modified: 9 years agoSo you did not remove any of the tile? It appears you used wood on the front and sides of the counter.
I want to do this over glazed tile in the bathroom. Any suggestions?
Tmnca
Original Author10 years agolast modified: 9 years agoNo I did not remove the tile except around the sink to remove the old sink. I built forms from wood but the wood on the front was removed after the concrete set for a couple hours and the wood underneath removed the next day. Here is a photo of the concrete in the pass through window after I removed the front mold part. I left the wood underneath to support the overhang until the concrete reached near full strength the next day. You can see some leakage on the right I had to chisel away later.
{{gwi:1753881}}
If you do this, I highly recommend caulking all the molds - I only did some areas because I thought I had screwed the soft wood tight enough but I was wrong, the resulting leaks caused all my problem areas. I should have caulked all the seams on the wood molds and I would not have had the problem.
The counters still look great after months of use, BTW!
here are some pics of the molds:
{{gwi:2048926}}
{{gwi:1753877}}
{{gwi:1753879}}
{{gwi:2048927}}
Big mess caused by leak- made painting the cabinets later a lot more work to sand off all that gunk. The leaks also created air gaps in the mold area I couldn't see until the concrete was set, I later had to hand trowel a thick mixture on those areas to repair it. It will never look as smooth as the mold-formed areas.
{{gwi:2048928}}
My plan for next spring is to tile the backsplash if budget allows - the beadboard wallpaper is serving its purpose for now but tile will look nicer.
doitgirl
9 years agolast modified: 9 years agooh yeah...I've been living with my ugly red tile that is the color of dried blood for almost 10 years.I've learned how to use power tools and have refaced the cabinet doors. Now I want to concrete over my tile..Your post was very informative..the problem I have is the sink is very old and porcelain. I think I may be able to apply bender board and caulk around the edge of the sink (would only be the sides and front) so that i wouldn't have to remove the sink. My house is a hundred years old. The kitchen was probably updated in the 50's. what do you think? Your counters really look good
- PRO
Joseph Corlett, LLC
9 years agolast modified: 9 years agodoitgirl:
Resolve the sink issue before you do your countertops. You always want to plan for reverseability or replacement. I don't like the caulk idea.

Lou
8 years agoI know this post is a few years old now, but I followed it here (via Pinterest) as I'm thinking of concreting over my countertops. Houzz: can you tell me why I can't see most of the pictures on this post? I can see none of the original post, and only 3 pics in other people's replies. Is there an expiration date to hosting these pictures? (I'm signed in, so that can't be the problem.)
 PRO
PROSombreuil
8 years agoOn the old Gardenweb site, embedded pics were linked-to, not uploaded here, so if anything happens to the target/source file at Photobucket or Flickr, etc., the link is broken, then no pics.

Rusty Empire
8 years agoTinan: any chance you could post some follow up pics of this project so we can see how well it has aged? Thanks a bunch!


hosenemesis