Shop Products
Houzz Logo Print
odessaquilts

QOD - Nov. 5, 2009 - Bindings

odessaquilts
14 years ago

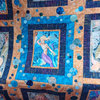
Do you cut, fold, press, and sew your own bindings? Do you buy them pre-made?

How wide do you prefer to cut your strips/how wide is the finished binding showing on the top?

Do you prefer the binding to match some of the fabric in the quilt? Or do you want your binding to be neutral (like muslin, or black, or a solid)?

Tell us about your binding preferences and why you like it that way.

Comments (24)

  • poldiceann
    14 years ago

    I have never been sure how wide bindings should be so i just put what i think - sometimes i use 5 inches and the one i am using at the moment is 3 inches, so when it is turned over it will only be about 1.5 inches all round.
    I like to try and use one of the fabrics in the quilt at the moment i am doing a random log cabin so the sashings and binding are a dark brown.

  • barbara_in_pa
    14 years ago

    I never buy premade binding. I cut my fabric for bindings 1 1/8" and fold, but do not press, as I find that this helps 'ease' on to the backing for the final stitching. I sew the raw edge on the fabric 1/4" from edge by machine then fold and hand sew to the back. This makes a very narrow finished piece, a bit less than 1/2 inch showing on completion.

    Depending on the effect I want and my fabric choices for the quilt, my backing will match the binding to blend with the quilt front. If it is scrappy I will sometimes use strips of the left over fabric to go along with the pattern. Sometimes I use another color on the binding to give my project a 'finished' look that I want.

    What I do sounds complicated doesen't it!! But it works for me!

    Barbara

  • grammyp
    14 years ago

    I cut, fold, press, and sew my own bindings. I cut my strips 2.5 inches and sew 3/8's from the edge. The color(s) depend on the quilt, but I rarely use white or muslin.

    beverly

  • jennifer_in_va
    14 years ago

    I cross-cut my binding strips (rarely bias) 2 3/8" wide, fold in half and press. I trim the backing/batting a hair (techinical term, here) larger than the top. I stitch the binding to the front of the quilt using a 3/8" seam allowance and hand sew it to the back side. The finished binding is very full and maybe 3/8".

    My bindings usually are a fabric already in the quilt or backing, rarely something different.

  • calliope
    14 years ago

    I was wandering through one of the fabric chain stores and found bindings especially for quilts. (cough, cough.....clearing throat) That meant the price on the package more than quadrupled over bindings found in the notion department.

    I bought a little binding cone for about five dollars, and bindings are easier and quicker to just make than running to town to buy.

  • karpet
    14 years ago

    I almost always use 2 1/2" wide strips, sew 1/4", and it comes out to about a 3/8" binding. Found out the hard way that I have to do the mitered corners different if I make a wider binding, and am learning the hard way that a 1 3/4" binding comes out like piping!

    Here is a tutorial from another forum on how to do continuous bias binding - it does make a lot!
    Karlene

    Here is a link that might be useful: Binding tutorial

  • karpet
    14 years ago

    Here is one more tutorial on how to join binding ends together.

    Here is a link that might be useful: joining ends of double fold binding

  • geezerfolks_SharonG_FL
    14 years ago

    I do like Beverly, and will make a note to try Jennifer's 'hair' technique next time.

    Sharon

  • itsmesuzq
    14 years ago

    ~Sigh~ Bindings are my biggest challenge. I always struggle to make the binding reach the back side after I've sewn the front side. Of course I know it's my own fault for not making exact measurements in the first place. ~LOL~ Anyway, I always read everything I can when "binding" and "mitered corners" comes up on this forum and I just wanted to thank you for taking the time to answer this question. (For many of you quilters I'm sure it's easy because you've done it so much.) Oh, I will try Jennifer's technique next time and I liked the tutorial with pictures on how to join the strips.

    To answer the color question I really like a black binding or a dark color coordinating with the quilt I'm making. I want something that frames the quilt and helps the colors to pop!

    Susan

  • odessaquilts
    Original Author
    14 years ago

    Karlene, those are wonderful links to have at hand. Thank you for posting them for us!

    I use the "magic square" formula myself, and I generally will cut my binding strips a minimum of 3-1/2" wide, which finish off to be 1-1/2" showing on the top. I like a nice wide "frame" for my quilts, especially bed quilts. The magic square sheet that I had a long time ago provided the size square to cut and then depending on how wide you cut the strips, what your yield would be. Took a lot of guesswork out of the process. I keep a copy of it in one book; woe is me if it ever gets lost!

    There is something about making my own bindings that is soothing ... the project is nearly done ... it can be mindless, once the cutting is accomplished ... after the binding is attached to the front by machine, I can sit and hand-sew the binding to the back and then I am finished.

    There have been times when I prefer to put prairie points on a quilt instead of a binding, though. For instance, if the top is made of a lot of triangle shapes, it just screams for prairie points. They're really fun, too. And if I am doing a quilt for a child, prairie points give them something of interest to look at and play with.

    But, honestly, is there anything more satisfying than putting that last stitch into your binding and being able to see your myriad of hours of work, fuss and frustration in its completed state? A sense of accomplishment, puffed-out chest, and yet sadness at having to come to grips with all of the other projects waiting for me to get to them, too.

    I smile just thinking about it.

    Odessa

  • jck1210
    14 years ago

    I cut, fold, press, and sew my own bindings. I cut my strips 2.5 inches and sew 3/8's from the edge. The color is usually one of the dark colors from the quilt as I like a nice clean edge. On a few occasions I've done the binding with multiple fabrics from the quilt or especially a table runner and it really gives a pretty finish.

  • toolgranny
    14 years ago

    Very timely question. I just finished a binding last night so my mind is refreshed.

    I cut strips 1-7/8" wide, fold double, and sew 1/4" seams so finished binding, hand sewn on back is 1/4". I like them narrow. I always make my own. I only use bias if the binding is curved or scalloped.

    I use Sharon Schamber's method of folding binding in half and glueing with a fine bead of clear school glue (that's the harmless one) to the edge, ironing it down to set glue and then stitching. I get less wave that way and her method makes a nice, flat edge. I do each side one at a time, stopping at the corner for the mitering.

    I usually use contrasting fabric but sometimes same if it should not be as visable and the border is the frame instead of the binding.

  • User
    14 years ago

    I have a BIG problem with bindings that I'm sure someone out there has a good answer to: Even though I pin the layers together and make sure they are even all around, and I use the walking foot to sew the binding on the front, I have a problem with the layers getting uneven by the time I reach the end of the first side I've sown. I don't know how many times I've had to rip it apart and start over again. I don't have any problem with mitering the corners, making the binding, anything else, just this. I've tried different settings on the presser foot, etc., just a struggle every time. Everywhere that I have looked on the internet that discusses this problem always says to use the walking foot, but I already do that. So anyone out there had the same problem and solved it?
    Other than that I usually cut the binding 2.5 inches wide, straight grain, and try to use a color that is in the quilt, preferably a dark one. I did, however, use a plaid on a multi-color scrap that I hadn't included that particular fabric in the quilt once and it turned out really nice. I sew the turned binding on the back by hand.

    Rita

  • toolgranny
    14 years ago

    I sometimes run a machine basting stitch all around just close to the edge. It holds things secure. You might try that on a scrap and see if it works better. I don't use a walking foot at all but I know a lot of people like them.

  • love2sew
    14 years ago

    One great question and I need some advice on doing a wide binding.

    I do like most of you, cut my binding WOF 2 5/8" and sew a 3/8" seam. This gives me a well filled finished binding. I sew my joining seams at 45 and do the angle seam as well where I join my ends. Occasionally I do the bias cut binding and it finishes off very nicely. Rita, I think your binding is shifting because you are cutting on the straight of grain. Try one cutting your strips WOF and when you sew it on, give it just a very slight tug so you won't have a rippled edge.

    How do I do a wider binding that would finish at maybe 1.5" and be filled. Do you sew the binding on before you trim back the batting and backing? I always trim before I sew the binding. My problem is I never have anything to fill out the binding.

    On quilts, I usually match the binding to the outside border. I also like using a pieced binding from leftovers, I think they look really nice. Wall hangings I vary them just using whatever looks good.
    Thanks for all the good info everyone.
    Jeane

  • jennifer_in_va
    14 years ago

    Jeane,
    If you want a 1 1/2" finished binding, that is 1 1/2" showing on the front, try this for math: Someone double check my math here!

    For a double-fold binding, you'd need to cut your strips 12" wide. Fold in half lengthwise, wrong-sides together and sew to the front of the quilt 1 1/2" from the edge of the quilt. Flip to the back and sew down by hand, machine, whatever.

    For single-fold binding, you'd need 6" strips. Place right side down to the quilt top and sew 1 1/2" from edge of quilt. Fold over to back, turn under raw edge of binding and sew down. (You may want to press your folds first)

    To get full bindings, you can trim your backing & batting slightly outside that of the top's edge. I sometimes leave 1/8 - 1/4" of batting showing.

    Does that make sense?

    Rita~ Binding tends to stretch regardless of which way you cut it. [It stretches most when cut on bias, stretches some when cut length of fabric, least when cut WOF] I don't pin my binding down before sewing. I start in the middle of one side and head to the first corner, aligning the binding and pulling slightly as I work. I mark where to stop for the mitre and lockstitch when I get to my mark. I stop, cut threads and get the mitre ready to turn the other way. And keep moving along in that fashion, holding the binding as I go. Maybe without pinning, it'd fit into place better?

  • mary_c_gw
    14 years ago

    I always make my own French-fold (double) binding. The stuff in the packages is not only expensive, it's also absolutely crappy.

    The width I make depends on the quilt. Sometimes I want a frame, other times I prefer the binding to disappear into the borders.

    My most often made binding is cut from crosswise strips, seamed diagonally. The strips are 3", and I get about 1/2" showing on each side of the quilt. I do trim my quilt a bit beyond the top to make sure I get a full binding, but I stitch the binding 1/4" from the quilt top edge.

    If I make a baby quilt which will be washed frequently, I do use a bias binding. They are stronger and wear better, because there are no long threads in the fabric sitting on the fold.

    I also use bias cuts if I make a multi-colored binding. I sew staggered strips together, press the seams open, and then cut the strip set on the bias. I did make a bunch of photos of the process for a local quilt shop, if anyone is interested.

  • User
    14 years ago

    I appreciate all the tips on the binding, and to tell you the truth, I don't recall whether I've cut the binding strips lenghtwise or crosswise. It's actually the two layers of the quilt that get crooked. I know, it doesn't make sense at all. I've tried leaving the excess batting and batting on and trimming it even after binding, and I've trimmed it before binding, and still the same problem. I will try basting it before-hand like toolgranny suggested to see if that works the next time.

  • magothyrivergirl
    14 years ago

    Mary - I am interested in your pics!! I just returned from a very long class on nothing but bindings. The class covered different techniques - alot of time spent on bias, French-fold (Yea). She also covered prairie points and the different corner treatments, & scallop edge binding. It was a great class, very low keyed & I like this instructor. I hope I can remember what I learned. Since I am new, I don't have a favorite way yet, but I can tell you in other sewing, I have always been a make your own bias tape double fold gal~so it is safe to assume that is where I'm headed in binding quilts.

  • mary_c_gw
    14 years ago

    Magothyrivergirl, I'll put it together tomorrow, but I'll start a new thread for it. It's a fair number of photos, so it'll take me a while to organize.

  • lola99
    14 years ago

    2.5 inch strips, press the seam, machine sew 1/4 inch on front side, hand stitch the back.

    I didn't even know there was such a thing as store bought binding!

    If I remember correctly, Mary C had some of the neatest bindings. I remember a quilt where she changed the color of the binding and it matched perfectly to the change in the border. I was very impressed. I'd like to see any additional pictures that you have Mary.

  • nanajayne
    14 years ago

    I cut, fold and sew my own binding. It depends on the quilt which color but usually the same as the border. As the border is usually cut on the lengthwise of the the fabic, I like that for the binding, fewer seams. I cut the strips anywhere from 2-2 1/2" but frequently 2 1/4". I fold in half or slightly off center (this allows for a single layer on the front seam. I sew 1/4" seam with the binding sewn to the front rolled to the back and handstitched. I use binding clips (like hair clips) to hold in place. I usually begin in the middle of a side leaving a strip unsewn so I have it free for closure. I mostly use my regular foot. It makes for a narrow binding which I like.
    I have in the past and still may use the serger to attactach the folded binding to the quilt. A perfect 1/4 " seam and trims. The only problem it can be a bit of a challenge to miter the corners well. It works well on small things and offers a firm edge.
    Jayne

  • User
    14 years ago

    I do an unusual binding; I learned it in a QAYG class at my LQS. It's a seamed binding w/ a front & a back (I think it's called a Reversible Binding). The teacher gave credit to the woman who developed the binding, sorry I don't recall her name.

    It's cut 1.25" for front & 1.75" in the back; those pieces joined together by 1/4" seam, pressed & then applied to the front edge by machine & turned & hand sewn on the back. No miters, it's applied top & bottom, side to side. etc. So the seam is hidden at the fold & I particularly like doing 2 colors or even both background colors (front & back) so that the binding just blends in, rather than framing things. I find it especially classy to have a nicely pressed, flat binding w/ a color change in that fold/seam. Very cool. It finishes about 1/2" wide on either side. Perhaps I'll try to take some pics this wknd if I can get close up enough.

    I too particularly enjoy this part of the process, sort of conclusion time as I assemble the binding, I'm studying how the quilt appears in its almost finished state & enjoying the feeling of completion & accomplishment.

  • buteau3rd
    14 years ago

    After I trim the excess backing and batting even with the quilt top, I serge the edge before I sew the binding on. This seems to keep the edge firm.
    Marge

0
Sponsored
Castle Wood Carpentry, Inc
Average rating: 5 out of 5 stars1 Review
Custom Craftsmanship & Construction Solutions in Franklin County