


My partially completed Ipe deck, I got some questions...
jjd95
13 years ago
Sort by:Oldest
Comments (16)
Related Stories
EXTERIORSCurb Appeal Feeling a Little Off? Some Questions to Consider
Color, scale, proportion, trim ... 14 things to think about if your exterior is bugging you
Full Story
KITCHEN MAKEOVERSSee a Kitchen Refresh for $11,000
Budget materials, some DIY spirit and a little help from a friend turn an impractical kitchen into a waterfront workhorse
Full Story
KITCHEN DESIGN9 Questions to Ask When Planning a Kitchen Pantry
Avoid blunders and get the storage space and layout you need by asking these questions before you begin
Full Story
MOST POPULAR8 Questions to Ask Yourself Before Meeting With Your Designer
Thinking in advance about how you use your space will get your first design consultation off to its best start
Full Story
MOVINGHiring a Home Inspector? Ask These 10 Questions
How to make sure the pro who performs your home inspection is properly qualified and insured, so you can protect your big investment
Full Story
ORGANIZINGPre-Storage Checklist: 10 Questions to Ask Yourself Before You Store
Wait, stop. Do you really need to keep that item you’re about to put into storage?
Full Story
SELLING YOUR HOUSE15 Questions to Ask When Interviewing a Real Estate Agent
Here’s what you should find out before selecting an agent to sell your home
Full Story
DOORS5 Questions to Ask Before Installing a Barn Door
Find out whether that barn door you love is the right solution for your space
Full Story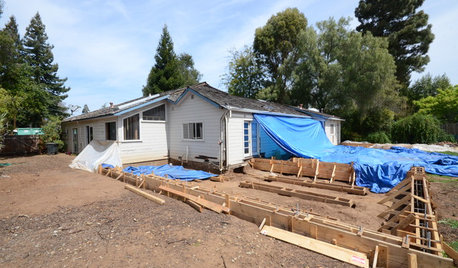
REMODELING GUIDESSurvive Your Home Remodel: 11 Must-Ask Questions
Plan ahead to keep minor hassles from turning into major headaches during an extensive renovation
Full Story
GREEN BUILDINGConsidering Concrete Floors? 3 Green-Minded Questions to Ask
Learn what’s in your concrete and about sustainability to make a healthy choice for your home and the earth
Full StoryMore Discussions


salmon_slayer
tdaver
Related Professionals
Draper Decks, Patios & Outdoor Enclosures · Estero Decks, Patios & Outdoor Enclosures · Lebanon Decks, Patios & Outdoor Enclosures · Converse Home Builders · Newark Home Builders · Buenaventura Lakes Home Builders · Cottage Lake Flooring Contractors · New Orleans Flooring Contractors · Pearland Flooring Contractors · St. Louis Flooring Contractors · Tucson Flooring Contractors · Westlake Flooring Contractors · Dale City Siding & Exteriors · Dumont Siding & Exteriors · Puyallup Siding & Exteriorsdeck.builder
weedyacres
sierraeast
weedyacres
funyellow
weedyacres
funyellow
john_hyatt
jjd95Original Author
brooklyndecks
john_hyatt
jjd95Original Author
john_hyatt
Mags438