


New Pool in Louisiana
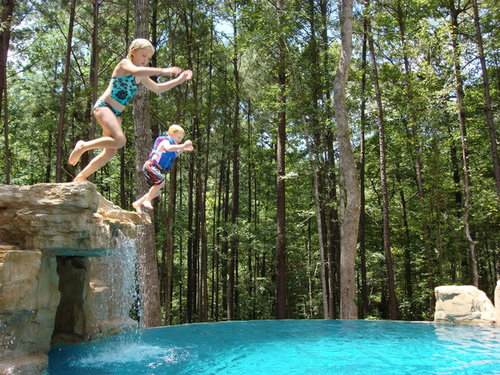
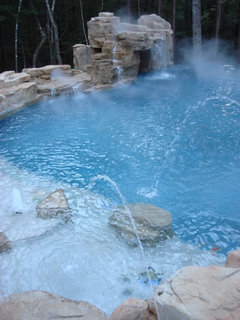
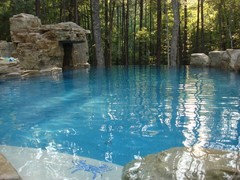
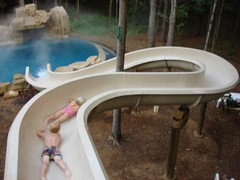
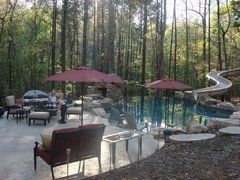
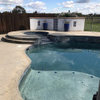
Wanted to share a few pictures of our new pool. It has been a wet summer here in NW Louisiana, but the pool is finally providing family enjoyment after 4 months of delayed construction.
Still a lot of work to be completed with landscaping and slide installation but at least we can cool down between outdoor work sessions.
This forum has provided wonderful information since we started our pool design a year ago and has continued to be our primary source for information during the construction process.
The kids love their new pool!


Comments (176)

trhought
Original Author11 years agolast modified: 9 years agojscozz...Thanks for the kind words about our pool and glad to help with your design. Sorry for not responding earlier...we've been out of state vacationing for the last week.
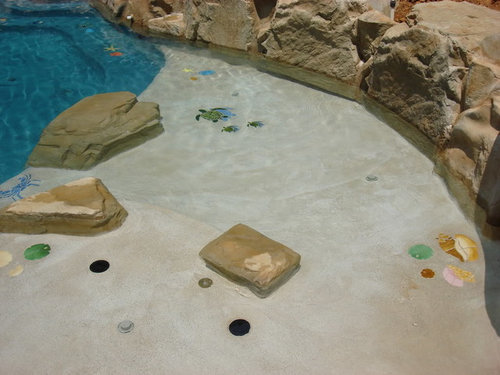
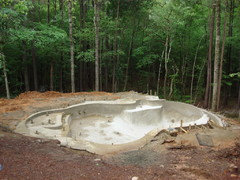
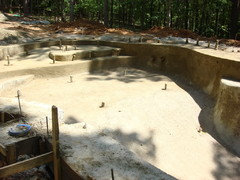
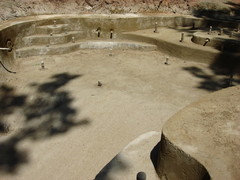
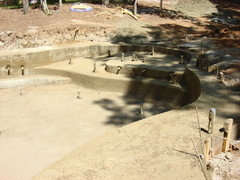
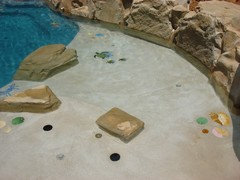
Here's two pictures of the beach/sun-shelf area of our pool...one showing the gunite shell and another showing a different perspective of the "beach" after water fill.
The one showing the gunite shell will probably help most with visualizing the design.
We originally wanted a zero-entry beach but, after doing some homework, decided against it. Mostly due to the stories we heard related to animal and bird use of the beach area creating messes if you know what I mean.
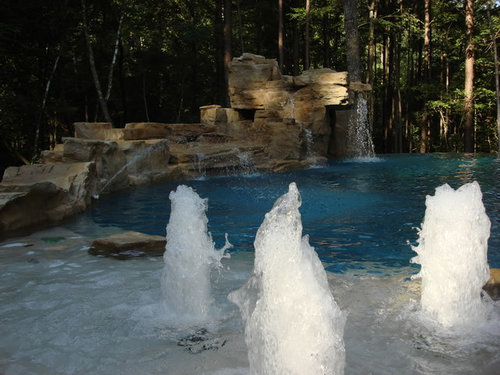
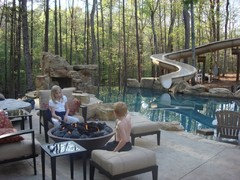
Instead we did what I call a hybrid beach and sunshelf design. The sunshelf is about 3-4 inches deep and incorporates a semi-circular beach entry that goes from 4 inches depth to 18 inches depth in a 15 foot arc that has a nice gradual slope while not taking up so much linear space. The "beach entry" transitions into an 18" water depth seat that is about 20 feet long and runs the full width of the beach/sunshelf area. There's also 3 pool returns located in the back of the seat area that blast jets onto the swimmers backs when the filter pump is turned on high speed. A nice feeling when sitting on the bench enjoying the scenery.
Hope this makes sense and I can take more pictures from different angles if it will help...of course, with water in the pool. Unfortunately, the gunite picture below was the only angle I had of the beach area before water fill.
Regarding costs, I think costs vary widely depending on geographic region. Plus, we did save a considerable amount by DIY'ing all of the electrical, some of the construction (boulders, fog, pirate ship and waterfall lighting) and GC'ing the decking.
Hope this helps.
trhought
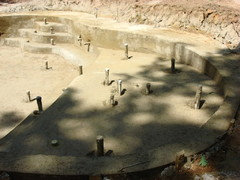
Original Author11 years agolast modified: 9 years agojscozz....just found these additional pics of the gunite shell...Hope this helps.
Related Professionals
Reading Landscape Architects & Landscape Designers · Milwaukee Landscape Architects & Landscape Designers · Lakeland Landscape Contractors · Medford Landscape Contractors · Cliffside Park Landscape Contractors · Dunwoody Landscape Contractors · Goodlettsville Landscape Contractors · Northbridge Landscape Contractors · Twin Falls Landscape Contractors · Forest Hill Landscape Contractors · Ferguson Landscape Contractors · Gaithersburg Decks, Patios & Outdoor Enclosures · New York City Decks, Patios & Outdoor Enclosures · Redmond Decks, Patios & Outdoor Enclosures · Scotts Valley Decks, Patios & Outdoor Enclosuresjscozz
11 years agolast modified: 9 years agotrhought,
Thank you for the pics. That helps me visualize it a lot better! A couple questions:
1) You said the baha shelf is 10'... is that just the flat part or the entire shelf including the sloped part? Is the flat part enough for a couple beach chairs?
2) I saw you said you chose a mini aggregate in the Pebble Beach River Rok. I got sample of a few colors from SGM and they said there is only one aggregate with the River Rok... they said there are two sizes with some Diamond Brite colors. My wife is concerned with the Pebble Beach river Rok ripping up kids bathing suits when they sit on it... I want to make sure I get the smoothest possible River Rok install on the beach. Any details on how you specified it for your contractor?
3) Are you happy with the Diamond Brite on the rest of the pool? I was considering River Rok Blue opal... but the cost difference is not small... just curious if you are happy with your decision or would have done all River Rok?
4) Are all of the rocks around the pool, including the waterfall structure, real rock or is some of it gunite? If real, do they actually notch the rocks to sit on the edge of the pool?
5) I have been looking for lighting for my cave that will be built. Could not use pool lights since they need to be under water. I was told by PB to look at fiber, I like the idea of regular low voltage landscape lights better... was there any code issue with 12V near water or in wet areas?
Thanks for your help!
Jeff
trhought
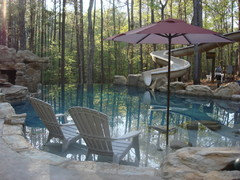
Original Author11 years agolast modified: 9 years agoJeff....the shelf/beach area is basically a 10 foot radius, so the shelf is 10 feet and the beach at the widest and deepest part is also 10 feet. The shelf accommodates 2 chairs easily with room for 2 more. Below are pictures of the shelf with two chairs in place.
At the time we built there was a mini pebble and standard pebble size available for the River Rok. I remember bringing both home from the PB to help with our decision on which to choose.
Both were smooth to the touch and should not rip bathing suits. We chose the mini pebble to help achieve the sandy beach look we were after...the standard pebbles would have looked more like a pebble beach.
The diamond brite has been fine...no regrets with this decision. It is smoother than the river rok which is probably a good thing for the sports end of our pool with volleyball and basketball activities.
All the rocks are from a company called RicoRock. We were selective on the look we wanted and the RicoRock products appealed to us most. They're engineered rocks that are designed to withstand pool environments while at the same time looking like real rocks. They're made from molds of rocks found in South Dakota and we toured their factory in Orlando to touch and feel the product first-hand before making our decision. All their boulders and waterfall kits can be purchased with or without notches. Most of ours were ordered with notches for around the pool except for a few that were submerged on flat surfaces in the pool. Below is a link to their website for more details.
Lastly, our PB recommended using low voltage lighting which influenced our decision mostly. The alternative was fiber optic, but that just seemed too dim for what we wanted to do with our lighting effects. Plus, the low voltage lighting was readily available locally with many different options to fit our specific needs. No code issues with 12V.
Hope this helps.

njnspool
11 years agolast modified: 9 years agoI love your pool! I am wondering if you could tell me if that is a particular stamped pattern? I really love the look, and I have seen that look at hotels, but when I do searches on the web for stamped concrete patterns, I usually see brick, or paver, or soemthing else like stone, never that look before. Any help you could offer would be appreciated!
Thankstrhought
Original Author11 years agolast modified: 9 years agonjnspool...Thanks for the kind words about our pool.
The contractor we hired had two different rock texture mats to choose from.....one was a deep texture and the other was a regular texture. He also had every other texture you mentioned above.
We choose the regular texture for ease of cleaning while still looking like real rock. He also had the different animal tracks already.
I guess we were fortunate, as his company does a lot of the nearby hotels and casinos and he already had these specialty textures in his inventory.
That being said, the company that makes the rocks around our pool also sells rock texture mats for custom waterfalls and decking.
Below is a link to their website. The texture mats are towards the bottom of the page.
Hope this helps.
jscozz
11 years agolast modified: 9 years agotrhought,
Are you happy with your 4" of water in your shelf area? We were planning 6" but now considering 9"... so you can sit in a low beach chair and have more than just your feet in some water... but, more water means bigger drop from coping into pool. I am not sure if an extra step would be needed or not.
Also, since there is no longer any mini-river rok aggregate, I am considering just using diamond brite on the shelf area... SGM has said it will be OK if above the water line when winterized. Looks like Pearl may be closest to Pebble Beach, but less black aggregate in it. I have never seen diamond brite in person yet. Would it have a nice look on a shelf (texture wise), from your experience?
callie8799
11 years agolast modified: 9 years agowow- it's been almost 5 yrs and I still "drool" over your pool pix. are you still enjoying it?
trhought
Original Author11 years agolast modified: 9 years agoJeff...the 9" water depth would likely require a step to ease entry into the pool for those who are not familiar with that first big step.
We're happy with the 4" depth but this depth was chosen to maximize pool functionality year round.
Our pool is not closed during the winter and the sunshelf is still functional at the 4" water depth. The shallower the water depth, the warmer the water is when the sun is shining which is a lot during the winter down here.
With the 4" water depth, the water is comfortable to soak your feet and turn on the beach bubblers for a relaxing foot massage, even in the winter. A deeper water depth would probably not be as comfortable in the winter due to colder water and more body submersion.
During the summer, the 4" water depth is ideal for sunbathing and relaxing fully prone on ones back with head still above the water. It is also good for those visiting who do not have swim suits but still like to sit in the water with their sandals or bare feet in the water.
For those who like to sit with some of their body submerged, the beach entry transition area is ideal for this as it allows the chair to be placed at any water depth 4" to 18" depending on needs.
Regarding the diamond brite, yes, it will be fine in un-submerged applications as our negative edge pit has some areas that are un-submerged frequently and we�ve had no problems for 6 swim seasons now.
As for the texture, it all depends on what you want. Ask your PB for a sample of the pearl and submerge it in water to see what it would look like. Our diamond brite in the main pool is smooth with very small pieces of aggregate that show through sparsely. I would say the aggregate to plaster ratio with diamond brite is about 10% aggregate on the surface. By comparison, our river rok on the beach is about 80% aggregate and 20% plaster.
Hope this helps.
callie8799...Thanks for stopping by and for the kind words about our pool. Absolutely yes, the pool is still providing smiles and helping build memories for our family and friends and will continue to do so for years.
jscozz
11 years agolast modified: 9 years agotrhought,
I think it looks like, from one of your pictures, that your PB took the shelf river rock over the rounded shelf/step edge and then transitioned to the pool DB color on the vertical section with a cold joint and no tile in between? Am I seeing that correctly? Do you happen to have a picture that shows that? I am trying to figure out teh best way to go between my two DB colors off a baha shelf. And since the baha shelf will have about 3" of shelf color under the coping, there is a point where the pool wall transitions from shelf color to pool color also. Hard to visualize the best way to do that.
trhought
Original Author11 years agolast modified: 9 years agoJeff...there's a 1" transition tile. We chose a tile that had a mixture of both blue and beige speckled together to "blend" the transition between the beach and the midnight blue. The transition wraps all the way up to the rock line or tile line in your case.
That being said, I've seen some builders on this forum that do not use a transition tile and run both colors together somehow in a wavy pattern. Kelly, at Atlantis Pools in Houston, is one of those builders that has posted pictures on this forum showing this transition right after plastering before water fill. It was a pretty cool effect and one I wish we would have known about before building our pool.
Hope this helps.
patlynn94
11 years agolast modified: 9 years agoHi trhought - your pool is absolutely phenomenal!! My husband and I are just in awe at your attention to detail and unique design. What great memories your children will have. We live in Southern CT and have a 50+ year old inground gunite pool that we have spent the last three years renovating. It's an L shape and about 20'x40' and the "L" part being a 1 foot wading area. We are now at our last stage - replastering. We saw in a different blog that you use diamond brite midnight blue with added onyx color. We too are leaning toward quartz over pebble and we like the darker blue colors. We are trying to decide between tahoe blue and midnight blue. We also have many trees around our pool and get full sun on the pool from noon - 3 pm. Shade all other times. We ended up heating the pool (propane) so that we can enjoy it longer throughout the day and the seasons.
Some questions for you:
1. Now that it has been several years, how has your midnight blue aged? Is there any mottling or streaking?
2. As much as we try, we always end up with leaves, acorns, and other nature debris in our pool especially when we take off the cover in late spring. I know you mentioned that you don't cover your pool, but if you have any leaves in it over the winter, does it stain the quartz finish and if so does the midnight blue "hide" the staining?
3. (I know someone also asked this) but is the midnight blue too dark for the deep end? We have a 9' deep part - can you still see the bottom of the pool - would it be an issue with seeing kids or the bottom of the pool for cleaning?
trhought
Original Author11 years agolast modified: 9 years agopatlynn94...Thanks for stopping by to visit our thread and for the kind words about our pool.
We love the midnight blue with onyx. It's not too dark at all. People swimming even at the bottom of our 8 foot end can easily be seen.
The mottling and streaking has actually gotten better over time. The mottling and streaking is usually caused by the plaster "cream" that comes out of the mixture when troweling the plaster onto the shell when it's being applied. The mottling and streaking can be removed via an acid wash right after plaster. We opted not to do this as we kind of liked that look that went along with the natural pool theme we were trying to create.
As the pool has aged, the cream is starting to wear away. That tells me we probably extended the life of our plaster by a few years by not removing this top layer of plaster immediately after it was applied. This is our theory anyway...your mileage may vary.
Regarding stains from leaves and acorns....yes, the stains will still show on the midnight blue. We don't get staining in the main pool because the floor system is always moving stuff around down there. However, in the negative edge pit, where there are no floor cleaning heads, I do notice stains if the leaves and acorns are left for a few days.
That being said, the stains in the negative edge pit fade with time and higher concentrations of chlorine help speed the fading process.
Hope this helps.
patlynn94
11 years agolast modified: 9 years agotrhought - thanks so much for this feedback and helping us understand how the midnight blue ages over time. We were able to see a midnight blue pool locally in our area today and really liked the color. We're still deciding between midnight blue and tahoe blue. Need to make up our mind soon. Thanks again!!
Chris
11 years agolast modified: 9 years agoWow, just wow...!
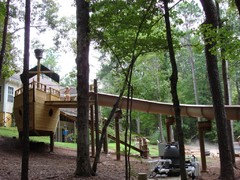
It's stunning, and the pirate ship and slide are just way too cool! :)jscozz
11 years agolast modified: 9 years agotrhought... I see your slide was from SlideScapes... did you look at other companies like Dolphin? Just curious how they compare? Any complaints with the SlideScapes product?
trhought
Original Author11 years agolast modified: 9 years agojscozz....yes, it was between Dolphin and Slidescapes for our slide.
We knew we wanted a 32" open flume design for the speed and fun factor, plus the deep sides gave us an extra sense of safety.
Back in 2006/2007 when we were doing a lot of homework, these were the only 2 companies that offered a residential 32" open flume design.
Other waterslides do not compare to this type of design, they are both slower and not as safe due to the shallower flume design.
Our decision between Dolphin and Slidescapes actually evolved over time. There were many phone calls and designs that were shared back and forth with each company to get the shape exactly how it needed to be to go around trees and meet up with the pirate ship.
At the time, Slidescapes seemed more willing to work with our design while offering good advise to keep it safe.
We have no regrets and after 6 swim seasons, the slide looks the same as it did when we opened it.
There was a modification I had to make as mentioned earlier in this thread. The water nozzles were too small as originally designed which placed the water stream out about 2 feet on the start surface. Think about 160 gpm exiting a 2" nozzle vs a 3" nozzle as an illustration of what was happening. This required the rider to scoot out on the slide to reach the water before sliding could occur.
The original design had two 2" nozzles and after my modification, it now has two 3" nozzles. This idea came after talking with Slidescapes, so I think their designs today probably have the 3" nozzles as standard.
From the pictures I have seen on the internet of the Dolphin slides, they look identical to the Slidescape slides. I would not be surprised if they're manufactured in the same plant.
Hope this helps.
grannysmith18
11 years agolast modified: 9 years agoYour pool is just breathtaking! Wow, wow, and wow!
Clearly it's been great for your kids, but just wait till you get to the grandparent stage. My grandkids regularly have pool parties for their friends at our house and nothing could make me happier.
So my question is, how do you clean it, and how often does it need to be cleaned? Our pool is free form, but basically around 42 X 20 feet and we use an Aquabot, which does a nice job, but we still have to do some "manual" cleaning in the nooks and crannies. How do you manage?
trhought
Original Author11 years agolast modified: 9 years agohelou....Thanks for the kind words...yes, we're looking forward to the later years and entertaining grandkids.
I just seen your other post regarding acorns and now your question here. Most of the floating debris ends up in the negative edge pit which is easily cleaned with a leaf net each morning before going to work...about a 5 min job.
We also get acorns that drop into the pool plus those that roll down the slide into the pool. Most of them end up in our pump basket as we have a Paramount floor drain that was designed to handle bigger debris as part of the floor cleaning system.
In the spring, there is usually 2 or 3 acorns that were too big to fit into the mouth of the drain and I pick those out manually.
We love our floor cleaning system...it always keeps the shallow end spotless as most debris ends up in the deep end and eventually the pump basket. Another benefit of the floor system is that it always keeps the acorns and leaves moving around on the floor until they end up in the main drain. This avoids any stains on the plaster.
Hope this helps.
jscozz
11 years agolast modified: 9 years agotrhought, thanks for the details on the slide... ours will be about 28 ft. About 6' drop from top to bottom. I would love to do two changes in direction (bank right then left then into water) but with only 28 ft, I am guessing that a plain old single 90 deg bank right will give me the fastest ride. But not sure how much speed is lost in two banks with these large 32" slides. From your experience with yours, if you had just 28 ft to work with, what would be your best (most fun for kids and adults) path be?
trhought
Original Author11 years agolast modified: 9 years agojscozz...the speed actually is about the same all the way down the slide. The curves are also sloped so the angle of descent is constant throughout the entire length. Actually, the curves feel like you are going faster because of the g forces around the corners.
Because of the g force effect, the more curves the better and the longer the curves, the better. Also, transitioning from a left turn immediately into a right turn also feels fast.
So, that is how we ended up with our design. A 90 degree right turn followed by a 180 degree left turn immediately followed by a 90 right turn that finally flings the rider into the pool.
This pattern also fit nicely with the existing trees and location of the pirate ship relative to the pool.
We went through probably 15 design iterations before settling on the final design. We started with a length of around 32 feet and ended with a design that was over 70 feet after working with Slidescapes to maximize the fun factor while meandering through the trees.
Some things I learned while working with them...each section is 5' in length. This is true for both the straight sections and curved sections. Also, a 5 foot minimum straight is required between each transition from turning in one direction to turning in the other direction. Slidescapes would not permit anything less than 5 feet between transitions.
Also, the angle of descent was mandated by Slidescapes to avoid sliding over the edge of the slide during the turns. The angle of decent seemed shallow to me on paper, but the slide is wicked fast in reality. The longer the slide, the smaller the angle. So with our 72 foot length the angle was only about 12 degrees...pretty shallow right. But very fast nonetheless.
Having said all that, a 90 degree turn will take 2 sections so will be 10 feet in length. A 180 degree turn will take 4 section and will be 20' in length. A transition from one direction to another will add another 5 foot straight section to avoid whiplash.
So, you can start to see what type of ride can be designed with a 28' length. A sweeping 180 degree turn will take 20 feet, leaving 8 feet leftover split between the entry tub and exit flume. A 90 degree would take 10' leaving, 18 feet for split between entry into the turn and exit out of the turn. Lastly, 2 90's with a direction switch would take 25 feet, leaving 3 feet split between the entry and the exit.
For the 28 foot length, I would rank each design below...the first design delivering the most enjoyment due to g force sensation.
1. Two 90 degree turns with a direction switch
2. One 180 degree turn
3. One 90 degree turn
4. Straight 28 foot runThe speed will be the same for all 4 designs, but the g sensation will be drastically different.
Hope this helps.
wordie89
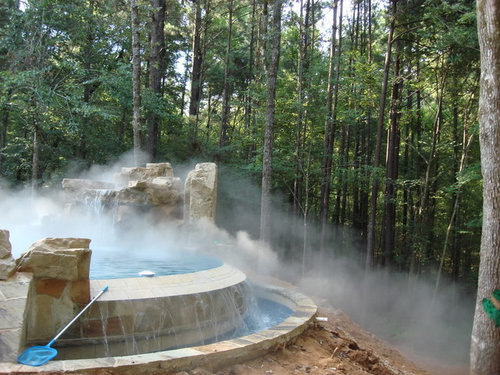
11 years agolast modified: 9 years agoFound this post looking for confederate jasmine. What a fun way to spend the morning, looking at the pics. Love your project and pinned a couple pics to pinterest (not the ones with your children). I've enjoyed it even though my pool will remain unadorned (I am really liking the fogger!!!!)
You've been so generous with your information and experience. It's really nice and speaks to the nature of this community.
I think your user name must be inspired by either "thought" of this and thought of that OR trh OUGHT to do this and ought to do that ----- as in a honey do list. Either way, impressive project, lucky family and so glad to hear that you are enjoy it so much of the year. Have a great season in the pool!

Nate Talley
9 years agoHow is the rico rock holding up? We are building and wondering if it will hold up to the elements.
trhought
Original Author9 years agoNate. Thanks for checking in. Been awhile since I've been on the forum. Sorry for not responding earlier. The rico rock is doing great. I'll try to take some pictures when all this rain stops. We've had salt water ever since opening 8 years ago and haven't had to do anything to the rock except brush the coping twice a year. Hope this helps and if there's any specific questions I can help with just fire away.
ml504
9 years agoFirst off I'll echo the comments on an awesome setup! I am about to install a similar slide that was purchased used in sections. Can you go into more detail on what you did to fit each section together? Also, what did you use in joining the sections or was it just regular silicon? Any advice or information would be greatly appreciated.

Wendy Baldwin
9 years agoThis is, literally, the coolest pool I have ever seen. Color me green with envy!
trhought
Original Author8 years agoml504.....Thanks for the kind words about our pool. Each section is joined by stainless steel bolts that go through holes that are drilled through the flanges of each section where they meet. Before placing the sections together, adhesive weatherstripping that comes in rolls (about 1/2" wide and about 12-15' long) needs to be applied to the inside of one of the flanges the entire length of the curved joint (180 degrees). The weatherstripping should be about 1/2" from the slide surface. Inside this 1/2" gap, apply polyurethane caulk. The weatherstripping forces the caulk to squeeze out onto the slide surface when the 2 slide sections are placed together. Place the bolts into each of the holes in the flange (about 8 bolts total) and tighten to squeeze the caulk out even more making a watertight seal. After about 24 hours of cure time, take a razor and cut the cured caulk flush with the slide surface and you're done. Hope this helps.
Wendy....Thanks for the compliment about our pool. It's still providing tons of fun after all these years. We recently added a 350' zipline off the pirate ship adjacent to the waterslide deck that goes through the woods and over a creek while zipping past all the trees....what a rush!trhought
Original Author8 years agolast modified: 8 years agoHere's a video of our zipline in action after work tonight.......wahoo!
trhought
Original Author8 years agoWendy. Thanks. Yeah, a lot of what's in our backyard has been inspired by things we've done and seen while on vacations over the years....just on a smaller scale. Next up on our list is a trail through the woods for off-road vehicles while zipline action is happening overhead. The trail will be adjacent to the creek in places with wooden guardrails and bridges where needed. Lot's of time planning and creating to pull it all together.
ml504
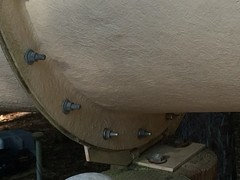
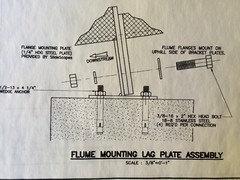
8 years agoThank you for the info. If it wouldn't be too much trouble could you take a close up picture of one of the mounting brackets and how it attaches to post? If not I completely understand, I'm just trying to piece this slide I got from scratch with no instructions at all.
trhought
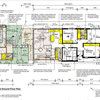
Original Author8 years agoml504. No problem. I found the installation instructions and prints to help visualize how the flume sections attach to each other and how
mounting is accomplished. Here's a few pics. Hope this helps.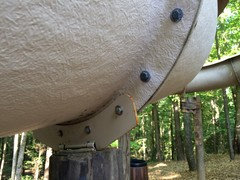


cpartist
8 years agoOmg. When I come back in my next life I want to come back as one of your kids. How awesome is that pool for all ages.
trhought
Original Author8 years agoSuecoyne. Thanks. Always glad to help fellow Garden web (now Houzz) visitors!
cpartist. Thanks for stopping by and checking out our pool. It has been enjoyable and we're thankful for the memories of a lifetime. Spent most of this weekend in the pool with our kids and their friends building more memories.
rmverb
7 years ago100k for that pool is a great deal. I'm not doing anything near that elaborate and I'm hoping to be under that.
trhought
Original Author7 years agormverb....yeah. It was a while ago and surely the costs have gone up since 2007.
Still enjoying our pool after all these years....especially as the temps begin to rise this time of year.
Hope all the best for your new pool and hang in there during the construction process.
cpartist.....yes, the kids are now grown enough that they have impromptu get togethers at the pool with friends.
It's relaxing to come home from work and sit by the pool enjoying a cold unit while watching them play.
Matthew Eichner
6 years agotrhought,
Thanks for sharing all of this information with the group - it is inspiring. I'm just thinking to begin a pool design process in the coming year, and this has been an education! Curious - is there a way to share photos of the outcome and plans? I see a lot of links in the discussion here, but they all come back as "Please update your account to allow 3rd-party sharing" rather than actual pictures (?).
Thanks again!Matt.
trhought
Original Author6 years agoHey Matt. Thanks for the kind words about our pool. Below is a repost of some of the pictures. The old photo links are being held hostage by Photobucket unless I pay them an annual fee....not going to happen. Hopefully, these show up OK using photo hosting from Houzz.
The last picture was from this morning after all the unusually bitter cold and snow we've had the last few days down here.
Hope this helps.

trhought
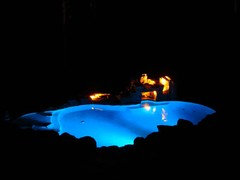
Original Author6 years agoOh....almost forgot....the snow pics. The first from a snowfall we had in 2010 and the last pic from this morning....note the large icicle from the waterfall in the last pic.


summersrhythm_z6a