This was just one of those nagging ideas that lurk in the mind. The castle project list probably has multiple items that are non urgent and non essential. Things we would like to accomplish, someday.
For whatever reason, the kitchen floor, with simple vinyl self-stick tiles, had inched its way toward action. When shopping for other supplies, I found myself in the sheet vinyl flooring section, checking designs, materials, and costs. Suddenly, reality set in. This looking was wasting time. Like, I was going to buy something today, and put it down tomorrow?? NOT!!
The floor itself should be the starting point. And, being aware that there were some challenges ahead. It was already maxed out with 3 layers of vinyl that had to be removed. And obvious that the boards were not level, even 3 layers of tile won't hide that fact. Thoughts emerged that a new subfloor may be needed.
Let the project begin. Didn't realize at the time that this would entail living on your knees for the next 3 months! Tile removal was the first step. A flatbar got under the original layer, and it was pried up, piece by piece. Here's the starting point, and the first glimpse of the wood underneath.
Not a totally easy task, but eventually all the vinyl was removed. NO, the process did not leave a nice, clean, bare wood floor. Chunks of felt backing and old glue dotted the floor. Now you can see some of the gunky mess on the wood.
It would have been easy to stop now, and cover up this crap with plywood/luan. But no, the Old Fixer chose more work. Sanding this goop off was out of the question, it would have ruined a machine. Research discovered liquid "Adhesive Remover", by several manufacturers. This stuff did work, but a tedious, laborious effort. It had to be put on and allowed to soak, the longer the better (this was ancient, HARD glue). Picking, scraping and scrubbing got the gunk off. Then rinse up the sticky mess. I was only able to do 6 sq. ft. per day. This is the wood, after adhesive removal.
So far, so good. Now, the obvious challenge that the boards were not level. Can't put something new over an uneven surface. It was off to rent a Drum Sander. Some of you may know that ungodly heavy machine, with various grits of sandpaper attached to a rotating drum. Don't turn it on and leave it in one spot - it will grind a hole into the basement! Drum Sanders are effective, but tricky. Take your time and learn the technique, before you ruin your floor, or the machine, or injure yourself. And be prepared for a dusty MESS. The bag catches most (which I dumped in the garden), but you'll have fine dust in every room in the house. This is a Drum Sander.
It was quite a bumpy, bouncy process, hitting those uneven boards. But the heavy grit did fast work in various directions, eventually getting things level. Then you switch to the finer grit to smooth out the surface, and hope for minimal sanding marks.
Look at the sander picture again, and you'll see the amazing wood floor that began to emerge. This wood hasn't seen daylight in 100 years!
The disastrous project was finally showing signs of success. The messy part was over. While the wood looked nice, it was far from perfect. There were gaps in the boards, and some water stains. But it was flat. Ideas filled the head -- what to do next? Having new sheet vinyl installed over the now flat surface would be nice. Ceramic Tile was out of the question. I don't really like it, and it's an extremely cold surface in this neck of the woods. How about keeping a wood floor in the kitchen? But neither do I care for that light wood look. Thinking was boring, time for action.
DECISION MADE. STAIN AND POLY THE WOOD FLOOR!
The defects mentioned would become part of the "character" associated with an older home. This is probably a simple pine wood. I chose a medium Oak stain, and went to work. Application was easy, being sure to do a whole row of boards and avoid overlap, dark spots. Take a look at the staining in process.
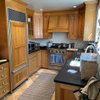
Ready for the final step. I chose an Oil based gloss Poly. Wanting to apply 3 coats, this part would also be a challenge. Doing the entire floor at one time was not possible. My kitchen is the most active room in the house. And, the only pathway to the bathroom. Appliances & furniture were never moved out, only slid back & forth to work around them. A plan was devised on how much to do, which area to do, and when to do it. The poly needed time to dry, permit the recoat, and still allow activity/movement in the kitchen. The sequence was successful. Here you can see part of the beautiful gloss finish coat. Look at the floor, not the mess!!
Note the center unfinished part under the table, an area saved for last.
After 3 months, the knees finally got a break. But, with projects complete, it still takes a while to clean up your mess and put things away. Sanding dust was found in the tiniest corners months later.
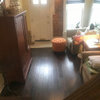
My own feelings? Yes, there were doubts about having a wood floor in a kitchen, especially this wood. Plus, I am an amateur at performing most projects. Nothing is ever done to perfection -- but adds that special look known as "character". It's better to do something and fail, rather than do nothing and succeed. This turned out to be an excellent decision, and I am thrilled with the results. The wood floor is a perfect addition to the kitchen. Durable and easy to maintain, this old wood is beautiful. No problems at all, and I even have Captain Chairs with wheels rolling on it.
Hope you enjoyed my kitchen floor project. If it has sparked any ambitious ideas, you have my sympathy. Along with congratulations in accomplishing a tremendous task.


jmc01
weedyacres
Related Professionals
College Park Kitchen & Bathroom Designers · El Sobrante Kitchen & Bathroom Designers · Hillsboro Kitchen & Bathroom Designers · Queen Creek Kitchen & Bathroom Designers · Terryville Kitchen & Bathroom Designers · Creve Coeur Kitchen & Bathroom Remodelers · Honolulu Kitchen & Bathroom Remodelers · Payson Kitchen & Bathroom Remodelers · Pico Rivera Kitchen & Bathroom Remodelers · Port Orange Kitchen & Bathroom Remodelers · Baton Rouge Architects & Building Designers · Rocky Point Architects & Building Designers · South Lake Tahoe Architects & Building Designers · Town and Country Architects & Building Designers · Syracuse Architects & Building DesignersoldfixerOriginal Author
lazy_gardens
oldfixerOriginal Author
Joseph Corlett, LLC
function_first
Acadiafun
mary52zn8tx
oldfixerOriginal Author
sapphire6917