


Window Restoration to expensive in Central NJ?
I fell in love with and was able to buy my first older home a little over a year ago. It's a colonial home with plenty of old home character. Every contractor that has walked in and noticed the windows tells me I need to replace them with new windows so my heat doesn't escape. They never ask if my attic is insulated, but they're all dying to get rid of my windows so my heat bill will be lower. I show those contractors the door.
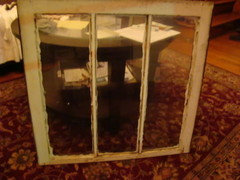
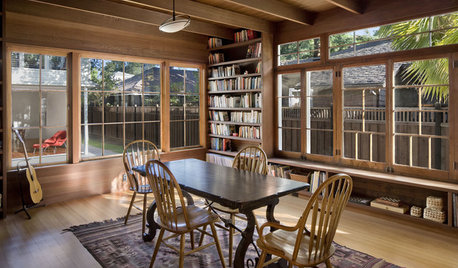
Getting the windows restored is definitely on my list of things to get done in the near future. They're not in terrible shape now and I'd like to have it done before they are. Below is the most recent quote I received based off of pictures I sent:
"We can strip the paint off the windows, repair, re glue joinery, re glaze, prime, paint and re install with zinc perimeter weatherstripping for $875 for the double hungs (one set: 1 upper and 1 lower sashes). We'll also strip the parting beads of paint and re install. Clean/polish and re install pulls and handles.
$685 per set of casement windows (one pair) with the same work as outlined above."
I hope you can see my dilemma. I think the price is outlandish based on what I've read the cost should be (including posts on gardenweb regarding prices). This is the second quote that I've received like this.
Could someone please suggest an alternative?! I'm looking at window restoration companies...maybe I should be looking for woodworkers? or painters? I don't have any confidence in my ability to do a job like this myself.
Thank you!!

Comments (32)

magsnj
Original Author10 years agoSorry....I meant the subject to be "Window Restoration too expensive in Central NJ?"
antiquesilver
10 years agoFor the work involved, that's probably not a bad price. Realistically, do it yourself, one window at a time although your windows don't look that bad from the photos. How old are they?
Related Professionals
College Park Kitchen & Bathroom Designers · Owasso Kitchen & Bathroom Designers · University City Kitchen & Bathroom Remodelers · Feasterville Trevose Kitchen & Bathroom Remodelers · Idaho Falls Kitchen & Bathroom Remodelers · Idaho Falls Kitchen & Bathroom Remodelers · Kuna Kitchen & Bathroom Remodelers · Paducah Kitchen & Bathroom Remodelers · Sweetwater Kitchen & Bathroom Remodelers · Middlesex Kitchen & Bathroom Remodelers · Gibsonton Kitchen & Bathroom Remodelers · Glens Falls Architects & Building Designers · Seal Beach Architects & Building Designers · White Oak Architects & Building Designers · Nanticoke Architects & Building Designersmagsnj
Original Author10 years agoIsn't it similar to the amount of work that was in the attached post for more than double the price:
Here is a link that might be useful: Schroad's 2011 gardenweb post
This post was edited by magsnj on Mon, Aug 5, 13 at 22:00
katy-lou
10 years agoSimilar to what we paid in Denver. It is alot of work but worth it - although your windows look in really good shape. We
Have ones that needed new members milled.magsnj
Original Author10 years agoThank you liriodendron. I did get my own edition of Terry Meany's book and read it about 4 months ago. Having extremely limited ability, I'm really worried about taking a window out and ruining it. Maybe I'm thinking they're more fragile then they are?
schroads
10 years agoI saw that I was mentioned. The company that I used in 2011 did a great job on 6 windows. I tried getting them back in 2012 and 2013, but they would not come. I checked their website and they are doing larger scale institutional buildings with residential work limited to large Philadelphia mansions--not my craftsman four-square.
I found another guy who did some work. He did everything except the weatherstripping for $350 for a double hung. I think he charge some incremental fees for new chains and pulleys. I am in Camden County and the guy is affiliated with a local hardware store. Not sure if he would go to you though. Totally depends upon what central jersey means--Bordentown in Burlington County or Bernardsville in Somerset County.
geller
10 years agoThis is an entirely doable project, but as said above, it takes time and is seasonal. The windows are not that fragile. I've been doing this, and I strip the frames and the sashes in the spring and fall when the windows are open. I then can take out the windows and finish the job with the storm windows down. Removing the parting bead can be annoying because of where they are nailed, but the muntins are the most tedious part, because I can't use a heat gun, only chemical stripper. Alternately, I can take out the glass and be more aggressive, but either takes time, and glass breakage is a problem. I wish there were a US source for Mighton products, which have great window hardware.
liriodendron
10 years agoGlass is fragile, and you will break more than you want as you get the hang of it. I'd start on windows that already have modern glass, rather than old wavy-glass ones, if you can.
The whole rope and cable thing can be complicated in the abstract, but it's not so hard when you're standing looking at it. I don't have a lot of experience with it as most of my wondows don't have that feature - just sash pins and sticks.
You should spend some time this winter reading extensively on John Leeke's site about window repair. I'd even go so far as to suggest you purchase some old salvage windows and rehab them over the winter just for practice,. That way you'd know what you're in for in the craft aspect just on the sashes before attacking your own set of window frames.
I have no idea of whether you are male or female, but window restoration is one of the old-house repair chores that can be down equally well by either sex. Some of the more burly old-house jobs require more strength and size than many women have. But not so windows.
From the looks of the picture you posted you don't have any emergencies, so take your time.
John Leeke also runs window repair workshops at his place in Maine (and occasionally elsewhere) for those who want hands-on training from an expert. I occasionally toy with the idea of going but usually when he's running it I'm shoulder deep in work on the farm. I highly recommend his books.
L.
Here is a link that might be useful: John Leeke's website with great old house discussion groups
magsnj
Original Author10 years agoThanks Schroads! I live in Monmouth County so it'd probably be too far.
I'm honestly not afraid to tackle things after I've been shown how to do it, but I'm completely worried about ruining these windows and for $350 a double sash I'd prefer someone else to do it.
I've been researching doing the windows myself for a year now. I've seen John Leeke's site as well as Bob Yapp's site and vidieos. I think I saw that John Leeke is having a workshop in Maine in March (I think).
The thing that frustrates me so much is that $875 per window seems unreasonable. It's probably one of the reasons, along with new window marketing, that you see so many older homes with new windows in New Jersey which is sad. Several resources have said that restoration should cost less than new windows, so while I thought it may be slightly more in NJ considering cost of living, I did not expect it to be well more then double.
PS. According to Bob Yapp, men and women are not equal at window restoration. He says the girls in his voc-tek class are far superior then the boys. ;)
sombreuil_mongrel
10 years agoA handyman with very low overhead could make a little scratch at that price, but a restoration GC with overhead can't; it a break-even price; sorry to say but windows are incredibly labor-intensive, and eat up shop space while they are apart.
I see you have storms; that would be a nice way to do them yourself one or two openings at a time, the storms will keep the house basically secure.
We did two building's worth of reglazing last summer, over 550 panes of glass out and back in; our price was about the same as yours and we lost some money.
Caseymaryinthefalls
10 years agoAfter a lot of searching, we found somebody to fix some of our worst broken glass last fall. Even though he was recommended, the work was so so. I got Meany's book for Xmas and have started on the windows this summer. Six months ago I didn't know how to take the sashes out, now only removing the parting bead scares me. If I, a fifty something woman can do this, anybody can. I am finding that my glazing is better than the handy man's and am redoing a lot of his work.
Windows in decent shape are not that hard to reglaze and repaint. There is just a lot of wait time if you want to do a good job. I have found that a half inch square sash brush makes the painting easier.

Circus Peanut
10 years agoI've got a Maine price sensibility, and I actually find that quote rather steep for the job you describe, with the good state of the windows you show. Around here it wouldn't be much more than $350/window. However, your windows do have a lot of paint on them that needs breaking (the sash stops look to be painted on tightly, for instance), so that does add to the cost.
You can do it yourself! I taught myself every bit of the process, with the help of Terry Meany's and John Leeke's books (and John's site), and not only rehabbed the remaining old windows but tore out the P.O.'s hideous vinyl replacements and restored them with new old sash. If you have any manual dexterity at all, it's very accomplishable -- can you knit? sew?
We've also found that our own work is generally superior to the handyman's -- surely not superior to a real window restorer, but better than anyone we can afford to pay. The true advantage you have as the homeowner is TIME. You can afford to take however long you need for each step of the process.
If you have a recycling center or salvage shop anywhere nearby, you'll have ample access to more old wavy glass for the times it's just inevitable that a pane breaks. Our recycling center (=city junkyard) has a whole area for glass where folks dump loads of the older wooden windows; free for the taking. Craigslist is also an excellent source for these.
We bit the bullet and decided to remove all the glass and start fresh with nice clean-scraped sash, and I don't regret it. I found it actually much easier to do this than to try to keep the glass set while stripping the muntins.
The one skill that still eludes me is cutting old glass to replace broken panes. It's frustrating since I'm a fairly capable DIYer but I just can't seem to get the hang of it. Luckily there's a stained glass studio in the neighborhood and I can pay them a buck or two to make the cuts for me. :-)
As luck would have it, our new old house is literally around the corner from John Leek's place, so I can stroll by and chat with the master when I need to. He's really friendly and approachable and his forums are active sources of excellent feedback when you begin your project - they will cheer you on and offer invaluable advice on things like methods and tools.
A few things I've learned make all the difference to me:
- real putty: Sarco Multi-Glaze is amazing stuff, much superior to the dap version.
- a point gun: saves you from breaking tons of panes with hammer slips.
- a dedicated workspace (ideally separate from living areas, like garage, basement or shed) where you can safely leave off whenever you need to.If you do decide to approach the job, you can post a new thread here (or on Leeke's forum) and folks will give you lots of specific advice for your unique window situation.
magsnj
Original Author10 years agoThank you very much circuspeanut! I can crochet, so maybe I can restore my windows. :) I'm more then a little worried but it looks like I'm going to have to bite the bullet. Currently I have 3 of 4 bedrooms painted (it takes about 10 days to paint each one properly with all of the prep) so maybe I'll hold off on the last one and use it as my "workshop".

chucksmom
10 years agoI can't crochet or knit. If I lose a stitch, it's gone forever LOL! Redo windows? Easy even for my 64 yr old body-been there and done that. Just time consuming. There are also replacement window tracks that tighten up the windows, replace the parting bead and the ropes, springs. Worked great in my former house. You need to develop an attitude. If MEN can do it, how hard can it be?????
columbusguy1
10 years agoThe only thing I can add is that using a hammer to install glazier's points is nuts. :)
When I removed all the diamond-shaped and triangular clear glass in my cottage top window (I wanted stained glass in there instead), the points I found had a lip on them which allowed me to use a screwdriver or the end of my putty knife to push them into the sash. The 'lip' didn't interfere with reglazing the muntins, and were easy to push in without much force. The completed window looks nice, and I like the effect of the three colors of glass better than the boring clear stuff since all I saw was a busy tw0-lane street.
I was going to do my matching dining room bay central window, but without the ease of a porch to work from, I haven't gotten around to it yet...and the redbud tree I planted now blocks the view of the side street and the white bungalow house on it's other side. :)
On a side note, I broke none of the small panes removing them--used a screwdriver or putty knife to remove the glazing--but I did break some of the red glass cutting it to fit! The pale purple and thicker pink-white swirl glass cut without a single problem though!
s8thrd
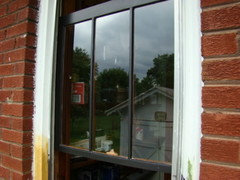
10 years agoCould somebody please explain to me why old windows need "rehabbing" and precisely what this means? I ask because we have similar, but slightly older, windows, and it never dawned on me that work was necessary on them. As with the window pictured by magsnj, we have the typical mid-century metal storms, and the heat loss doesn't seem that much worse than what I've experienced with new double-pane windows.
If a sash cord is broken or the window doesn't move well, that's something that needs fixing, but, other than that, why exactly is a window "rehabbed"?
We do have a bank of big, single-pane wood casement windows to which storms cannot be added outside (without looking really bad), and to which they consequently were never added. Those windows leak heat incredibly, both through the single-pane glass and around the edges, and we need to do something about them. I could caulk around them (we never attempt to open those anyway) but I doubt it would help all that much as long as we still have single-pane glass. (So far I've been putting up that plastic wrap each winter, a lousy recurring job, and it doesn't always stay up.) Is there some "rehabbing" that addresses this problem?
sombreuil_mongrel
10 years agoAllow me to explain. Over time, subsequent coats of paint build up to such a thickness that they impede movement of the sash. The original linseed oil putty dries out and allows water between wood and glass.
Weatherstripping can get bent and is often a victim of paint build-up as well.
Deferred maintenance happens, and things deteriorate quicker.
Some windows are in a state where it is more efficient to completely remove all paint and putty, remove the glass, and start from bare wood. That is a full rehab. Simple, but requires a bit of planning and it's labor-intensive, but worth it IMO. As someone who both lives in an old house and does window work at times as part of my job, I place a high value on the merits of window rehabbing.
Caseymaryinthefalls
10 years agoHave you considered interior storm windows? And yes, we caulked the heck out of everything that doesn't move. It really helped.

bungalowmo
8 years agolast modified: 8 years agoI know this is an old post, but restoring your windows is part of old house living. Doing mine too. Here's my first attempt.
This is the same sash!
Before...too many paint coats, putty drying & cracking out...
After:
Used heat gun, putty knives, linseed oil, Sarco Type M putty (bought Here go to bottom of page), palm sander, oil based primer for outer (painted) side, and SW Caviar paint.
(yes, this is the same side of the same window)
Inside...stripped & 3 layers of Amber Shellac:

bungalowmo
8 years agoI also rehung the window weights & put a little note in the weight pocket in case anyone ever got in there!
Got sash chain & some new copper weatherstripping from Kilians
http://kilianhardware.com/sprinbronwea.html
My builder used the "head & sill" weatherstripping down the sides of the channels too...insane to get the sash out & back in. I replaced with the 1 3/4" springbronze. SO much easier!!!
I'm also a lady in my 50's. If I can do it...you can too. Removing all the needed wooden pieces is sort of like a puzzle. Take photos if you need to as you're taking things apart, just put back in reverse order.
You'll be SO happy you did it yourself. Takes time, but worth it. With initial investment of tools & paints & such, about $20 per window...give or take.

kats737
8 years agoWell done!
we got a quote in Chicago for $400 to strip and rehab one double hung window (paint, not stain). Soooo we spent a summer stripping and refinishing all our kitchen woodwork. It was a long process but so very rewarding!cookingofjoy
8 years agoWe're in the middle of other projects, and windows are on next year's to-do list, so I haven't read yet, but I'm hoping you can help with a question.
When you're rehabbing the windows like bungalowmo's, when do you refinish the trim? I'm in the process of refinishing the rest of the trim, and I'm wondering if it makes more sense now to do the trim (while the walls and floor are a mess). Is most of the interior trim removed when removing the window?
bungalowmo
8 years agoI did not remove my trim. I removed all the sash parts & then took a scrubby sponge with rubber gloves & dip in denatured alcohol to clean up old shellac. When I got the alligatored finish off & the dirt, I began the process of brushing more shellac onto the outer trim.
If you have painted trim, you may likely have shellac underneath. You can either repaint, or use a heat gun to bubble up the paint & remove, then clean up shellac & add more.
The great thing about shellac is that, a new coat brushed onto the old will actually mix with the old & blend together.
It's also all natural https://en.wikipedia.org/wiki/Shellac
bungalowmo
8 years agoI would refinish the trim while you have the window sash out. Cleaning up the trim work can be a bit messy where it meets up with the walls. Be ready to touch up, or wait to paint until after sash are completed.
cookingofjoy
8 years agoThanks! That's exactly what I was wondering. Right now it's all just alligatored shellac. I've done some of the base trim and door frames, but I've not gotten to the windows yet. Even with trying to tape off sections and with plastic, I am incredibly messy. I've found that the floors were shellac, too. We're getting wiring updated, and we haven't done the floors yet. So wiring - patching - trim - floors. I'm trying to be messy in order :) This is very helpful!
bungalowmo
8 years agoGotcha! Denatured alcohol can clean up 99% of the mess. Get good rubber gloves. It gets a bit messy. Also...not sure why, but the alcohol gets really cold when you're using it!! You can take rags & just soak them good & swipe in the direction of the grain. When you're down to a smooth, clean layer of shellac, you're ready for a fresh coat.
Most times, at any big box, you will see the Amber color. You can buy different shades of the flakes online & mix them with the denatured alcohol for a different shade.
You can see in this pic, my trim was done in Amber, but they did all my doors in Garnet!
Check online for different shades of the flakes. If you go that route, wait to mix until you're ready to do it all. For instance, if you were doing the doors, clean them all up, mix a gallon (for example) of the shellac & do it all at once. Mixing can be tricky & you want the same, even mixture throughout. Either that, or document your mixture %'s so if you need to mix more, the next batch will be the same shade as the first.
Make sense?? :0)
 PRO
PROLinda
8 years agoAs the veteran of a few shellac cleanup projects, here's my comments
If you have any large globs of shellac or any flaking, use a blade or scraper to knock off anything that will pop off easily.
We had good luck spraying the surface with denatured alcohol from a spray bottle (windex bottle) and covering it with clear plastic to keep the alcohol from evaporating while it went through the thicker layers of shellac. We used the plastic from storm window kits as we already had it available and it was clear enough to judge progress without complete removal. The denatured alcohol will destroy the sprayer after a while so be prepared with another - some mister type spray bottles just don't spray enough to work well.
Removed trim can be sprayed down and rolled together and then unroll and remove one piece at a time for cleaning.
Dollar store scrubby pads work well for removing the initial grimy mess before you switch to steel wool and then rags. Smooth textured rags work well, like old tshirts or bed sheets. Garage sales and thrift stores are a cheaper source than the bags found in the paint department.
The important thing to remember is that you don't want to remove all of the shellac. when you remove paint, removing the whole mess is the goal but here the goal is removing the grimy surface mess without losing all the old finish. Make the final wipedown with a smooth cotton cloth soaked in alcohol and you can get a nice smooth surface finish.
Use ordinary denatured alcohol (blue can) for the cleaning but if you mix shellac yourself, buy the green version of the product (white/green can)
Shellac is a mess and can be difficult to remove from your fingernails...I certainly understand why shellac manicures are all the rage!
cookingofjoy
8 years agoThanks for the advice! It's helpful to see the two colors in your picture, too. In some rooms it looks like we have amber, and those are really in nice condition still. I'm not going to touch those except to wipe clean (probably with mineral spirits?). Then there are others that are old garnet. Some of that still looks good, but most of it has alligatored so badly they're just little black bumps of shellac (picture below. the trim taped off on the left has been done already. The second pic was the stairs in progress). It feels so much cleaner to be able to see the wood! Even with the drips on the walls and floors. The doors are all pretty bad. I'm hoping to try what you did with your trim, Linda, next summer. Thanks for the tip on the different alcohols. And no kidding about the fingernails! I feel like I'm very thematic for Halloween.

cookingofjoy
8 years agoAlso thank you for the advice to do the finish all at once. So far I've just been doing two coats of clear. Then I'll wait til the end to do all of the garnet at once. Otherwise I'd definitely end up with very differently colored trim!


liriodendron