


What to do with lead paint?
(Cross-posted from the Paint forum....)
We recently had the paint in our old house tested and discovered that (not surprisingly) the paint on our trim is very high in lead.
We're now trying to decide what the best course of action is, and I was curious to hear from anyone who has or has had lead paint, and what path they've followed. (We've done all the research and know there are various schools of thought on whether it's better to remove it or let it be....just wondered what people's personal experiences have been!)
We have a 1915 house and we do know our original oak and elm trim was originally bare and has a layer of shellac at the very bottom, so the paint strips very easily dry (something we will not be doing again now that we know there's definitely lead!) Presumably this also means it would strip fairly readily with heat, although that has its own set of concerns wrt the lead. I don't know what implications the shellac has for chemical strippers, though we have a bottle of Soygel I may experiment with.
Broadly, would you (or did you!) simply maintain/repaint the trim so that it's not flaking or strip the woodwork? If you stripped lead paint, what method did you use?
We do not currently have young children in the house, but will in the not-too-distant future---hence the concern. I know any work with the paint needs to be completed well in advance.
Thanks---any and all experiences and stories appreciated!
Comments (52)

brickeyee
14 years agolast modified: 9 years agoUnless you want tp strip to return to the clear finish (shellac) prime and paint.
To avoid contamination it is usually far easier to remove the wood work to a separate location that can be protected from stripping residue.
A heat gun will not normally liberate lead vapor, though a torch will.
kudzu9
14 years agolast modified: 9 years agoIs the existing lead paint already covered over with one or more coats of non-lead paint that is in good shape (not flaking or dusting) so that the old lead paint is locked in? If so, I would be tempted to leave much of it alone unless it is really easy to strip off the old paint safely. I am very cautious about environmental pollutants and toxic compounds, and lead is not a good thing. However, I also know that removal of things like lead and asbestos can actually increase the risk of exposure if not done exactly right.
Having said that, I would consider removing lead paint (even if it's painted over) from any bedroom that a child would be in. Kids can pick up lead from chewing on window sills and rubbing molding and trim.
Finally, one advantage to removing it all is that some day, when you sell the home, you will not have to report on the disclosure form that the house contains lead paint, and that could be a selling point.
Here is a link that might be useful: EPA - Lead in Your Home
Related Professionals
Cuyahoga Falls Kitchen & Bathroom Designers · Midvale Kitchen & Bathroom Designers · Redmond Kitchen & Bathroom Designers · Cherry Hill Kitchen & Bathroom Designers · North Druid Hills Kitchen & Bathroom Remodelers · Beach Park Kitchen & Bathroom Remodelers · Blasdell Kitchen & Bathroom Remodelers · Galena Park Kitchen & Bathroom Remodelers · Joppatowne Kitchen & Bathroom Remodelers · Eufaula Kitchen & Bathroom Remodelers · Central Islip Architects & Building Designers · Corpus Christi Architects & Building Designers · Doctor Phillips Architects & Building Designers · Holtsville Architects & Building Designers · Parkway Architects & Building Designers
SaintPFLA
14 years agolast modified: 9 years agoFor me, I'd rather get rid of it than have 8 inches of paint build-up on all my wood work and spend my life repainting. Plus, once it's gone, you don't have to maintain or deal with it anymore. Especially since you do not have children currently, this would be a great time to do a project like this.
Don't forget, smalls pet are at the same risk level as a child for lead poisoning.
Peel Away 7 and Peel Away 1 has worked like magic for me for removing lead based paint in my house. It has very little odor too in comparison to regular paint stripper. It's not cheap, but it lasts for quite a few applications.
It's a tough decision...good luck with whatever you decide. Food for thought, not diminishing the risk at all, but many of us grew up in old, lead-painted houses and had no issues.
 PRO
PROChristopher Nelson Wallcovering and Painting
14 years agolast modified: 9 years agoagree, "many of us grew up in old, lead-painted houses and had no issues." On the other hand, we might also have been geniuses, but the lead paint dumbed us down to normal!
Also, maybe we sat around all day eating the window sills and floor moldings and just don't remember!karinl
14 years agolast modified: 9 years agoWe live in a 1905 house where the mouldings have multiple layers of thick paint applied badly - drips abound - and where the profile of the trim is partly obscured by the paint. The casings and baseboards were, however, part of the reason why we bought the house (for me at least) and so not stripping them was never an option. Even if we repaint, they have to be stripped. Because we renovated extensively before moving in, we removed all the mouldings we could, and have been reinstalling them as we get them stripped over an (ahem) 16-year period. As this time coincided with the raising of our children, you can imagine there were times when no mouldings went up for years at a time, and just as well considering the lead likely present - nothing like stripping paint all day and then cooking dinner for your kids. The look of untrimmed door frames is one you can live with, but it is frustrating - so is cleaning house where there are no baseboards (overall, cleaning an unfinished house is a frustrating proposition).
The point being, stripping trim is not a trivial job. I do it mainly because I am addicted to old wood and can't abide the sight of long-hardened and painted-over paint drips and fuzzy moulding profiles.
How you feel about how it looks now is a key parameter in what you decide. Some people in our area just paint it over and they seem to be happy, balanced people! Also, it matters what is underneath - can you still get mouldings like this? If so, the value of stripping them is debatable. And if you do it, and decide to remove them to do the work, you can damage some pieces in the removal process (for this reason, we have reinstalled all our mouldings using round-head brass screws, so that for repainting and repapering they are easily removable without risk of further damage).
By the way, that PeelAway sounds rather good - thanks for mentioning it. We use EZ-Way but I may try that, if I can get it in Canada.
KarinL
Billl
14 years agolast modified: 9 years agoWhat to do with lead paint really depends on the condition it is in and the use of the finished product.
If you have crown molding in great condition with no chipping or pealing, I think the best bet would just to keep it painted. The problem is contained and unlikely to hurt anyone.
If you have lead paint on something that moves - like a door or window - I would definitely strip it. Eventually, those areas are going to wear down and the lead will be released into the room. Same goes for stair rails or anything else that gets a lot of use.
The rest of the trim is a toss up. If it is good shape - both in function and appearance - I'd leave it painted. If it is pealing already or has already gotten that gloppy look from too many paint jobs, then I would strip it.
cjra
14 years agolast modified: 9 years agoAt least 4 layers of lead paint here. We initially tried chemical strippers which just led to a gooey mess. Including Peel-A-way which every one swore by but was awful for us. Then we dry scraped a few which worked but obviously not a good idea.....
Now we remove each trim completely (and window), and take it to a place that strips them. They use a water based solvent which works well.
Our goal was to stain the original wood, so stipping was the only way to go. On the baseboards, because they're too hard to remove, we just paint over.
btw - lead paint is only a problem if it's creating lead dust or being consumed in some way. So, if it's chipping, that's a problem. Biggest problem is windows - every time the wood rubs against other wood painted with lead paint, you're creating lead dust.
- PRO
Christopher Nelson Wallcovering and Painting
14 years agolast modified: 9 years ago(for this reason, we have reinstalled all our mouldings using round-head brass screws, so that for repainting and repapering they are easily removable without risk of further damage).
Wow!
brickeyee
14 years agolast modified: 9 years ago"for this reason, we have reinstalled all our mouldings using round-head brass screws"
It would seem you are not very concerned with appearance.
I cannot think of any customer I have ever had that would want trim fasteners showing that badly.
karinl
14 years agolast modified: 9 years agoIt's not that I don't care what things look like (and sorry to be blunt, but that's a stupid remark to make about ANYONE who strips paint off anything), it's that I care too much.
I don't want to damage either the wall/wallpaper or the mouldings if I want to remove them, for work on either the wall or the mouldings themselves. If I repaper or repaint, as I'm doing right now in my son's room, I don't want to work just up to the mouldings and stop. Previous owners had butted some 7 layers of wallpaper up to the mouldings - they only had half their profile left when we moved in!
Why have your clients never asked for this? If they're hiring you, it's a safe bet they've never put a prybar against a plaster wall and watched it crumble AND the moulding crush and split while they pulled to remove the unreasonably large and plentiful nails that were used to install them a hundred years ago, plus a few apparently hammered in for good measure in the interim by previous owners.
Also, if they hire you, they are probably getting the whole job done at once. Since we are DIY, we work in stages. We can put trim pieces up as we get them stripped and enjoy them already while we make decor decisions or until we have time to finish a room. We have put stripped mouldings up where the wall isn't done, and we have put up mouldings before we know how we are going to finish them. Because we do care about how things look, we prefer not to look at exposed door and window frames where we don't have to.
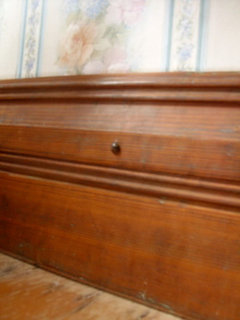
The door moulding below, for example, is not yet finished, and the wall needs repainting (and, germane to this thread, this is a door that needs stripping - it's the bathroom door, and trust me on this, it's hard to find a stretch of several days where you don't need the bathroom door so you can take it outside and strip it). And the piece of baseboard shown below has served 16 years in a hard-use area. It'll need a re-spiffing soon (and so will the floor). It's no sweat to do any of this because the moulding is screwed on. Visible beside the door frame is another door frame that needs stripping - we didn't take it off as it is connected to a bunch of wainscoting and a chair rail on the other side. Yup, we have lived with all that old paint - it's chipped as much as it's going to, and the door fits loosely so I doubt too much dust is being produced, plus it was painted at least once with "modern" paint. But it would be interesting to know our blood levels of lead after 16 years.

We used round-head screws because it is a cleaner finish than countersinking, plus it suits the age of the house better. Slot screws look more authentic than Robertson too, though we ran out of slots and used Robertsons on the shampoo alcove (built into the stud spaces) above the bathtub, but that's not original anyway. In almost all cases the screws can be evenly spaced around the frames; in only one case did they need to be spaced differently on different sides of a window. Being brass, the screws have tarnished and blend in pretty well except on the light painted surface. On the pine wainscoting (which was new when installed, not stripped, and I don't like but it was all we could get back then), they actually function as a feature - or so we like to think. Again, what I like is that no wood needs to be destroyed to change this panelling when the urge hits us.


It's harder than you'd think to photograph trim - you can't show a window frame without showing the horrendous aluminum frame windows installed by a PO, and you can't show a door frame without showing the untidy room beyond it, unless there's a door in it. So this is the stuff I can show. All of it stripped, by the way, but mostly before we found the effective stripper we are using now. This was mostly done with those "safe" strippers - you know, the ones my husband likes to say are so safe, they're safe on paint.
I'm not here to say that the screw-in option is right for anyone else - it just works for us.
Sorry for the topical detour.
KarinL
artemis78
Original Author14 years agolast modified: 9 years agoThanks, all, for a lot of great suggestions! We did try a small section with a chemical stripper (Soygel) which took the paint off but very, very messily. Decided against stripping that room, as we suspect some of the trim there is damaged/replaced (it originally had a built-in that was removed).
So we still have one room with a lot of trim that I'm waffling on---we may try the heat gun and see how that goes.
Question, though---I like the idea of sending things out to be stripped, especially the windows, which are painful to do. But what do you do about the hole where the window belongs while it's out being stripped (since I presume places don't do same-day jobs at this)?
cjra
14 years agolast modified: 9 years ago"Question, though---I like the idea of sending things out to be stripped, especially the windows, which are painful to do. But what do you do about the hole where the window belongs while it's out being stripped (since I presume places don't do same-day jobs at this)?"
Cover it with wood. We have a few window-sized pieces of plywood (+ some insulation board) that we put up in place of the windows. They're usually out for months at a time - doesn't take that long to strip, but once stripped we have to reglaze, sand, paint....all which takes awhile when you're working only weekends on it and have other projects.
Our trims - or rather trim spaces - we either leave just open (stuffing something in the bottom to have some semblance of insulation...) or if longer term, cover with the pink insulation board. No, it's not pretty, but it suffices. Well, except when the cat decides the pink board is a good scratching post. :(
On a different note - why on earth did they use the gigantic 6 in nails 100 years ago on a 1 in thick piece of pine?!
- PRO
Christopher Nelson Wallcovering and Painting
14 years agolast modified: 9 years agoOn a different note - why on earth did they use the gigantic 6 in nails 100 years ago on a 1 in thick piece of pine?!
and why SO,SO, many???
growlery
14 years agolast modified: 9 years agoLead is something that you need to consider, but not freak out about. For one thing, you can go broke fighting it if you try to replace everything in your house or hire a professional.
Sending things out gets expensive. And even good places can occasionally seriously damage parts and lose original hardware. So if you can learn to do it yourself, the right way, it helps. And you need to learn to dispose of your trash (a hazardous chemical waste!) properly too.
I would contact your local environmental and health authorities for their best information on how to do all this safely. I always think this is better than getting information on topics like this off the Internet (although the EPA link is a good start).
If you have lead paint in your house, you also need to consider that you have it in your yard, so you should get a soil test, and consider growing any vegetables in raised beds.
But, as I said, don't freak out. When the kids come, simple things can keep lead that is around from getting into them. Good housekeeping (sweeping, washing down windowsills & surfaces) and handwashing, washing blankets and toys and anything kids drag around on the floor and then might put in their mouth. You may not be able to reduce the lead in the environment to zero, but if you can keep them from transferring as little into their mouths as possible, you'll be in good shape.
And this is free, within your control and something you'd do anyway.
fandlil
14 years agolast modified: 9 years agoA long, long time ago, I owned a 6-apartment house in New York, built around 1920. One day, I got a citation from the NYC building inspector for "lead paint." I went to the apartment in question. The lead paint was apparently in the ceiling, which was in good condition except that there was a chip in the paint about the size of a half-dollar.
Before, I could decide what to do, the City of New York did it for me. They covered the entire ceiling with sheetrock and sent me a bill for the work. I protested, and they cancelled the invoice after establishing that the building had no other violations -- in other words, I was not a "slumlord."
Lead paint is very difficult and expensive to remove. I sold that house shortly after that episode.
brickeyee
14 years agolast modified: 9 years ago" 6-apartment house in New York, built around 1920. One day, I got a citation from the NYC building inspector for 'lead paint.'"
You should have demanded to see the lab test.
Lead paint use lead acetate (AKA 'sugar of lead' for the sweet taste it has) as a gloss improver and hardener.
It was not very common in wall (or ceiling) paint, but was in the gloss paint used on woodwork.Lead oxide pigment is actually very stable and not a problem.
artemis78
Original Author14 years agolast modified: 9 years agoThanks again---and yes, we did contact our local lead control center first. (They were actually the ones who did the testing---free, woohoo!---and provided the "here are your choices" booklet outlining the pros and cons of stripping v. repainting v. replacing.) We did also have our soil tested at the same time, and were excited to find out that it contained relatively little lead (in the range considered normal for older cities, and in the safe range for both gardening and children's play). We were already growing leafy greens in raised beds and will probably stick with that, though. Overall we were highly impressed with the local lead poisoning prevention agency (which operates at the county level here in California).
brickeyee
14 years agolast modified: 9 years ago"It's not that I don't care what things look like (and sorry to be blunt, but that's a stupid remark to make about ANYONE who strips paint off anything), it's that I care too much."
The round head screws in the trim look horrible.
Like someone who had no idea what finish carpentry should look like.
Stripping is not a common enough thing to worry about using screws on trim.
It is not that hard to pry trim off, pull the nails through the back, and then refinish it if really needed.For clear finishes matching wooden plugs or putty make the fasteners pretty much undetectable.
figgysmith
14 years agolast modified: 9 years agoFrom experience, Peel Away is terrible to work with, especially for windows and window trim/sills.
It's difficult to neutralize properly when you have to remove 7 or 8 layers. Ours didn't neutralize properly and softened the wood.We used it in the baby's room to remove paint from 2 windows and to this day the new paint bubbles. These were original 200 year old windows that were had as a rock.
I now subscribe to the 'paint over it' method for the 32 other windows in the house that have one layer of lead paint. I did have a company called Window Master restore the windows and they scraped the window when they replaced the glass. In hindsight, I would have had all the windows manually scraped when they were refinished and paid the extra money.
karinl
14 years agolast modified: 9 years agoWell it's nice to have a frank outside opinion. What your best friends won't tell you, eh?
Thanks to others for the additional comments about Peel Away; maybe I'll reorder EZ Way after all.
KarinL
concretenprimroses
14 years agolast modified: 9 years agoI lived in a victorian mansion years ago that had round screw heads in the woodwork. I always wondered about why, and they were old, I think original cuz it was not renovated tho in fair condition. Like Karin's I think they looked fine tho curious.
We have enormous amounts of lead paint out front in poor condition. Porches up and down out with stick balusters. Its going to be a real project. (already did the other sides of the house) We'll be laying down drop clothes all over the front garden (so we are waiting for fall), hiring some professional help and handing out masks! I'm really dreading it, but I'm holding on to the idea that the house will look so nice when its painted.
Glad to hear others had a hard time with Peelaway. I thought I screwed it up. Tried it on the back door trim just today and yesterday since that woodwork is looked at so much more often so I wanted it to be smooth. It did soften the oak a lot, and the paint didn't come off in a layer. Now not sure what to do with the front door trim. Scrape the heck out of it I guess.
Kathy
Debbie Downer
14 years agolast modified: 9 years agoYou know - if it is really as easy to peel off as you say(i.e. comes off in big sheets with a razor scraper) I'd just get in there with proper protection (respirator, Hepa vac, etc.) and just get 'er done. Yes lead dust will result but spraying as you work keeps it down and then washing all surfaces afterward gets it all out. Like most other household hazards, if you know what you're doing you'll be OK.
If it doesn't come off easily then I might not bother to remove it - that would suggest to me that the paint was embedded more into the grain instead of sitting on top as an outer layer and the results might not be worth it.
BTW,what type of wood is it? If you're not a serious wood lover it might not be worth the effort. You can always come back to it when the kids are in college LOL
cbrooks_ecostrip
14 years agolast modified: 9 years agoNo one has mentioned using low infrared heat to remove lead-based paint. There is lots of info on the web about it.
artemis78
Original Author14 years agolast modified: 9 years agoThanks---I am leaning towards just biting the bullet and tackling it in the living room, where the woodwork is in better condition! We'll see. We think the wood is quarter-sawn oak and possibly elm panels. The woodwork itself seems to strip nicely; my bigger concern is how to deal with the windows, which are also coated in layers of paint. Ugh. I'll update if it turns into an interesting project!
Jane_the_Renovator
14 years agolast modified: 9 years agoWe sent a lot of our antique molding off to be dipped.
That said, the biggest problems with the antique moldings were
* prying it off the walls
* pulling all the nails out. I'm with Christophern--WHY all the enormous nails?
For the newer moldings, we installed them with either tiny little finishing screws, or brass roundheads like karinl.
I'm with her--why set myself up for all that work in the future whenever I want to paint? Roundheads! It might also be a European style. My British handyguy suggested using brass roundheads on the first rooms we redid.
cbrooks_ecostrip
14 years agolast modified: 9 years agoI don't know who told you heat guns are safe and torches aren't. Both are equally bad and release lead gases. EPA and HUD prohibit both for good reason. Dipping really strips out the natural resin in your valuable old wood and even messes up the glue in the joints of old windows. So do lots of chemicals. Speedheater is low heat and safe.
I agree to get all that lead paint out of your future kids' rooms...before you get pregnant!
karinl
14 years agolast modified: 9 years agoYes, given the big nails apparently the people who built our old houses had no idea what finish carpentry should look like either :-) Glad to hear I've got company in the roundhead department! And I'll have to look into finishing screws. The smallest screws I've seen (#4) are also too short to get through the moulding.
We had one piece dip-stripped just to see what would happen and it did damage the wood as far as using a stain finish was concerned. Whatever my husband used (Watco maybe?) was absorbed unevenly and the finish is now very patchy. Perhaps it depends what they dip it in.
I didn't realize that heat guns release lead vapour, thanks for pointing that out. I gather it might be a matter of temperature, but who measures that as they work? What I don't like about heat gunning is that the stuff you scrape off becomes brittle as soon as it cools and so you are dealing with chips by the time you take it off the scraper.
KarinL
Here is a link that might be useful: NY Dept of Health on lead paint removal
concretenprimroses
14 years agolast modified: 9 years agoI'm thinking of getting an infra red "gun" even though expensive. There is so much to do with the double porches on the font of the house. It doesn't heat enough to turn the lead into gas.
kathybrickeyee
14 years agolast modified: 9 years ago"...big nails apparently the people who built our old houses had no idea what finish carpentry should look like either"
How big?
While life has gotten a lot easier with smaller diameter nails available in longer than 'standard' lengths, 12d and 16d finish nails were often used to reach solid wood through 3/4 inches of basebaord and another 3/4 inches of plaster, plus at least 1.5 inches into the solid wood.
You are now up to a nail 3 inches long.
While the baseboard may be partly resting on plaster grounds, no decent carpenter was going to bet on hitting the grounds, and the grounds were often poorly fastened anyway (a few 8d commons to hold them up long enough to work the plaster level with them).
Since nail size and length are tied in the common 'penny' system, you ended up with 16d finish nails for baseboards and trim.
sombreuil_mongrel
14 years agolast modified: 9 years agoShow me a heat gun that develops 1800 degrees, and I'll show you a heat gun that can release "lead vapours". You only need about 600 degrees to loosen paint over shellac finish. One-third the heat required to vaporize lead.
Caseyportland_renovation
14 years agolast modified: 9 years agoI'm late to this party, but thought I'd weigh in. We just spent the last MONTH stripping paint from our house. We didn't bother getting it tested, but it's a 1910 bungalow, and we are virtually guaranteed that one (or probably more) of the many many many layers of paint was lead.
We've probably tried every paint removal technique in the book, so I thought I'd give a run down.
1. Infrared (aka silent paint remover) heat. This technique worked really well, but is slow and still can leave a gummy residue. Some of the paint came up great, but in other spots left a gross tacky mess on the surface of the wood. We never figured out what made some of the paint come up easily, and other parts to be so messy. Sometimes the top of the same doorframe would come right up, and the bottom was really stubborn. In the end, it is still the best, fastest method for removing paint, but don't expect that you won't need to follow it with some of the other methods. I think someone mentioned that the quartz tubes are delicate. The tubes held up fine with normal use, but I did accidentally drop it once from four feet up a ladder (whoops) and one of the tubes obviously broke. I ordered a replacement online for about $30, so it wasn't too bad. The SPR is expensive, but I think it was worth it. The other benefit of the SPR is that it only heats to about 300 degrees, whereas lead vaporizes at a much higher temperature so it is safe for lead paint. I did a bunch of research, and was happy to finally be putting my degrees in biophysics and biochemistry to use. :)
2. Chemical stripper. I tried a couple of different brands, and "ready strip" was by far my favorite. It is a thick paste and clings to vertical surfaces well. It is also "environmentally friendly" -- it's still a caustic, noxious chemical, but supposedly less so than some of the others like peel away and rock miracle. The thing that I liked MOST about ready strip was that it dries so when you go to remove it, it comes off in sheets, that sort of have a play-doh like texture. We would usually do one pass with the infrared heater (SPR), and then on pass with ready strip, and then be ready to sand. I also tried "multi-strip" (made my the same company, but it stronger, for getting through more layers of paint). Multi-strip did strip more layers, but stays wet and gluey for days, and is just an awful mess to remove and clean up. We used this only for the corner areas where the SPR couldn't reach. Again, chemical strippers might be cheaper than the SPR individually, but the SPR removed 10+ layers of paint all at once, whereas sometimes we'd have to use 3 or 4 applications of multi-strip in the corners where the SPR couldn't get to; buying all those buckets of stripper can really add up.
3. Sanding. I would not recommend this for lead paint, or unknown types of paint that you suspect might be lead. We did do a fair bit of sanding after we had already removed all of the paint with the SPR and/or chemical stripper. After all the stripping, the wood still had quite a bit of color from the old original stain, but unfortunately, the color was really uneven and mottled, so we had to sand the stain away and get down to the naked wood.
4. Dipping. My favorite way to strip paint. Unfortunately, as a few people have pointed out, it can be !*^^&*$##@ hard to get the window casements and doorframes off the old plaster w/o damaging it. The actual doors were easy to remove from their hinges and send out for dipping, and we gutted our bathroom entirely, which meant the window casements had to come down, so those when out to get dipped, but 90% of the rest of the wood stayed firmly nailed in place and we had to painstakingly strip the paint ourselves.
5. Paint over it. We did this for a lot of the baseboards, because it was just going to be too much of a PITA to strip them. Bending over baseboards and dripping chemicals tripper all over the floors is not my idea of a fun time. And after spending nearly 6 weeks stripping paint from everywhere else in the house, I was done. Add that to the weeks I spent stripping wallpaper, and priming and painting over the existing paint sounded like a great option. Obviously, it's not an ideal solution, and when the painful memorize subside, I might be ready to tackle a stripping job again in, oh -- about 10 years.
Finally, my best advice to anyone thinking about stripping paint is DON'T DO IT!!! Just kidding (sort of). Really, just be prepared for how awful and labor intensive it is. I got suckered into stripping by looking at everyone's BEAUTIFUL before and after pictures. What they really should have is 1 before picture, 1 after picture, and 1,985 pictures of each of the "during" steps it takes to get there. Of course I'll just leave you with a before and after, because I was too busy stripping and cursing to document the process:
before -- the sections that have been stripped have just had one pass with the SPR:

after -- after SPR, multiple rounds of chemical stripper, and 3 rounds of sanding.

brickeyee
14 years agolast modified: 9 years agoWhile I love old full thickness moldings and woodwork, when it is badly encrusted with paint it is often easier to remove it and replace.
You can get ANY pattern reproduced for enough $$.
When you factor in the time spent trying to strip, the material costs, the risk from the waste, etc. a set up charge from a lumber yard to run off some molding starts looking reasonable.
I have plenty of shaper cutters and can usually make up any of the old patterns.
A small run (like a door jamb) only takes a few hours.
For a large batch (like baseboard for a whole house) I go ahead an pay the setup charge, then purchase what I need and a some extra.Sometimes things are not what they appear.
Lots of old tall baseboard is a plain piece of wood with a cap molding (ogee, ogee hook, etc.) on top.The same for those thick door moldings.
They are NOT a single piece of wood.reyesuela
14 years agolast modified: 9 years agoI really don't think any screw in woodwork would be original to a Victorian house. Putting in screws involved predrilling by hand first, and it was not an installation technique that any Victorian would have used. It's almost certainly a later "remuddling" because the trim seemed loose to someone.
karinl
14 years agolast modified: 9 years agoFunny you should bring up the screws again. It wouldn't surprise me either if they weren't original in the case mentioned, although drilling and screwing was certainly being done in furniture construction and I'm sure it could have been done in finishing carpentry. Maybe it was an early resident fussy about getting the wallpaper right. Everyone who's lived in my house unfortunately seemed happy to paper up to the edge of the moulding - and often over it.
The question of removability wasn't considered by builders. They weren't thinking ahead a hundred years in the lifespan of what they were building. But lack of removability is what plagues "remuddlers" like me.
Today I was plagued by trying to remove the panel moulding from a door that I'm stripping. It was an absolute b**** to remove. Invisible finishing nails, driven right into the corner, making it impossible to know which way to pry first, when I could even get a scraper under the piece to pry at all. And risking damaging either the door or the trim no matter what I did.
I'm not sure how I'll attach it when I put it back in after stripping, but it sure as heck won't be finishing nails.
KarinL
slateberry
14 years agolast modified: 9 years agoI've heard that having a good dietary iron and calcium intake can help prevent lead uptake. Consider starting supplements before you start working. I believe the slot in your hemoglobin that lead fits into is also a slot that iron can fill. If most of the seats in the house are taken by iron, it's harder for lead to find a place to sit down.
This does not mean you can pop iron pills and then expose yourself to lead willy nilly, but at least it helps.
Also calcium supplementation interferes with the absorption of iron so taking the two supplements together can have a bit of a cancelling effect. If I needed to supplement both, I alternate days so they don't meet up too much in the gi tract. I suppose calcium chelates lead as well, which is likely why it's recommended for helping to reduce lead absorption.
inox
14 years agolast modified: 9 years agoThanks for mentioning Silent Paint Remover.
Here is a link that might be useful: Silent Paint Remover
inox
14 years agolast modified: 9 years agoHere is an interesting controversy, which came to my attention in an Amazon comment about the Silent Paint Remover:
Here is a link that might be useful: Speedheater Infrared Paint Remover

Circus Peanut
14 years agolast modified: 9 years agoSince this thread is eternal, I'll chime in with my experiences. Like portland_renovation, I stripped all original fir the trim in my 1922 bungalow. (In the other Portland.) We did not specifically test for lead, but assumed it was present.
1. Silent Paint Remover. Shelled out $350 for this infrared baby via the internet. It did work to remove layer by layer of paint, but it was too hard to control the heat and ultimately too slow for our taste. Mainly, though, it produced some serious vapors we were very unhappy with. Awful even with a respirator. And too easy to scorch the wood with a second of inattention (we're proficient DIYers, but this was fairly tricky).
The most useful job the SPR did was the removal of nasty gunky old linoleum glue on the kitchen floor. For this, it was brilliant. For paint, not so much, in our experience.
So we sold the SPR on eBay and on the advice of a painting pro friend, turned to:
2. Peel Away 7. This stuff was fabulous. I see that others have had trouble with neutralizing the residue after stripping, and wonder whether they weren't using one of the stronger formulas (1 - 6) not meant for wood? Peel Away 7 neutralizes with plain water. Some areas took 2 coats. The key to success with PeelAway is to cover and tape all painted areas (block all air access) and leave it overnight. In some cases we needed only one coat, others took more. But on the whole we were extremely happy with it and with the lack of odor/scariness involved. Just save up your shipping boxes so you can use a sheaf of stiff cardboard as a gunk collection palette as you go along the trim.

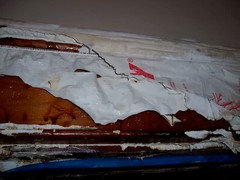
Despite the ease of PeelAway (see above pix), some first layers of original paint were really obnoxiously stubborn, leading us to discover:
3. Milk Paint Remover. Takes some sanding afterwards, but was the only thing on earth that we found to remove milk paint. We got ours from the Real Milk Paint Company at a local art supply store. It certainly convinced me to use milk paint on any future painting projects where I want durability. :-)
bella_ciara
14 years agolast modified: 9 years agoWe're fairly irresponsible about lead at our place. We're working on the exterior that is entirely covered with layers of lead. We're stripping the woods down to bare to get the clarity of the details back not for the sake of removing the lead. We strip with a heat gun and sand as we please without masks or anything. Like I said we're completely irresponsible about it. Ya gotta die from something and I'm guessing that chances are higher from a traffic accident, 30 years of smoking, or the fat in fast food than a little bit of house paint lead. :)
We live in a small town that bulldozes lead houses every time they get a chance. Lead in the air isn't a community concern. If you think about it, anyone over about 35 probably grew up in lead covered houses. If it was SO awful, we (and our parents, grand-parents, and so on) never would have made it.
inox
14 years agolast modified: 9 years agoAnd now, a few words from your government:
To protect against this risk, on April 22, 2008, EPA issued a rule requiring the use of lead-safe practices and other actions aimed at preventing lead poisoning. Under the rule, beginning in April 2010, contractors performing renovation, repair and painting projects that disturb lead-based paint in homes, child care facilities, and schools built before 1978 must be certified and must follow specific work practices to prevent lead contamination.
Here is a link that might be useful: Renovation, Repair and Painting
brickeyee
14 years agolast modified: 9 years ago"Under the rule, beginning in April 2010, contractors performing renovation, repair and painting projects that disturb lead-based paint in homes, child care facilities, and schools built before 1978 must be certified and must follow specific work practices to prevent lead contamination."
It does not apply to homeowners, and is part of the EPA continuing to chase after lead despite drastic reductions in blood lead levels following the removal of lead (lead tetra ethyl) from gasoline.
Brought to you by the EPA, that forced billions on schools to remove asbestos rather than allow encapsulation.
inox
14 years agolast modified: 9 years agoHere is a link to an article with some facts about lead poisoning:
Here is a link that might be useful: Lead Poisoning
reyesuela
14 years agolast modified: 9 years ago>Brought to you by the EPA, that forced billions on schools to remove asbestos rather than allow encapsulation.
Who thinks that dioxins are such a problem that pulp mills should be shut down....but water treatment facilities producing many times the amount are just fine.
reyesuela
14 years agolast modified: 9 years agoAnyone who is decent at cutting in can pain a wall without getting paint on the trim, buts like they can paint the wall and ceiling different colors.
It's not usual to put wallpaper under wainscoting. You should stop it at the wainscot. If there are too many layers, then you peel off a few or all and start over. I just don't see the big deal! I'd only remove trim for some types of flooring--and not everyone would do that.
kudzu9
14 years agolast modified: 9 years agoreyesuela-
You need to be clear on the facts before you criticize. If you were familiar with EPA's Asbestos-in-Schools rules, you would know that EPA does not have the authority to arbitrarily force schools to remove asbestos. I am familiar with the program, and I can tell you that the only removals that have occurred after asbestos was identified in schools were done because of independent decisions by the school districts involved in light of the hazards that were identified.Here is a quote from a set of EPA FAQ's:
Is the school district required to do anything about asbestos-in-schools?
Yes. AHERA, or the Asbestos Hazard Emergency Response Act, was passed by Congress in 1986. AHERA requires public school districts and non-profit private schools to inspect their schools for asbestos containing building material and prepare management plans which recommend the best way to reduce the hazard from any asbestos that may be present. Options include repairing damaged asbestos containing material, spraying it with sealants, enclosing it, removing it, or keeping it in good condition so that it does not release fibers. The plans must be developed by accredited management planners and approved by the State. The school authority must notify parent, teacher and employer organizations of the plans, and then the plans must be implemented. The school district must also perform periodic surveillance of asbestos containing material every 6 months in its schools. AHERA also requires accreditation of abatement designers, contractor supervisors and workers, building inspectors, and school management plan writers.How unreasonable does that sound? I know it's tempting to tell stories about mindless government bureaucrats, but please dig a little deeper next time before repeating urban myths.
Here is a link that might be useful: Asbestos-in-Schools Program
kudzu9
14 years agolast modified: 9 years agoreyesuela-
Sorry...I see that I actually should have directed my asbestos-related comments to brickeyee, since you only quoted him. I know he thinks EPA is always misguided, so I probably can't persuade him of anything about this...brickeyee
14 years agolast modified: 9 years ago"I see that I actually should have directed my asbestos-related comments to brickeyee, since you only quoted him. I know he thinks EPA is always misguided, so I probably can't persuade him of anything about this..."
And that is the changed recommendation from the original ones.
The EPA admitted years ago they screwed up the asbestos issue in schools.
They have since gone on to screw up water quality and damage copper pipes by not listening to their own in house corrosion experts.
The changes they made also caused a lead problem in Washington, DC water when the Corps of Engineers put them in effect at the water treatment plant.
Adding back orthophosphate reversed the lead problem created by making the water clean enough to become aggressive.
But kudzu9 thinks the EPA is god...
reyesuela
14 years agolast modified: 9 years agoLook, I was poisoned by arsenic for 9 years. I and two others were the only kids in my neighborhood to live there more than 5 years and NOT experience some form of longterm impairments as a result. The EPA did hog-freaking-wash about the contamination, even though they knew years before we moved there that there was a serious problem. When the company finally began to get into real trouble, they let Elf Atochem ship it records to its mother company France to dodge a subpeona, let them play fast and loose with statistics to hide illnesses, and eventually dropped the suit for lack of evidence--you know, since the eyewitness testimony of previous employees and managers of illegal dumping means nothing and since all the records were now in FRANCE. The EPA could prove contamination, but they didn't feel they could prove that it was Elf Atochem and not the company that owned the factory in the 1950s who did it. And no, it was never cleaned up.
(A friend of mine got a blood test funded by the company to determine arsenic contamination--there were all sorts of other things hinky about this test, too, but that's another story. The phlebotomist leaned over while the doctor was out of the room and whispered, "I'm sorry. It's not my fault." Makes you wonder just where those samples went, huh? Ten years later, I got a settlement check--less than $250. I wonder how many people Elf Atochem killed.)
I'm all for regulation that improves health, but there's not one time in which my life has been impacted by the EPA that they haven't screwed their jobs up.

worthy
14 years agolast modified: 9 years agoLove those bright brass round head screws for the trim! Of course, one could use trim head screws, in which the head disappears into the wood and the trim is still easily removable. Or, though it's probably sacrilege, the unobtrusive heads could be filled. But that would not be authentic.


kudzu9