Shop Products
Houzz Logo Print
kindred_ny

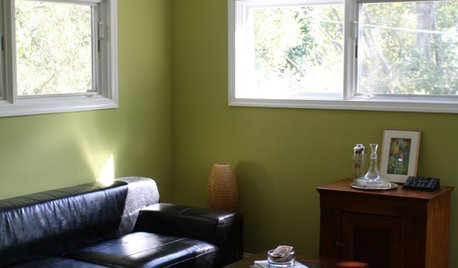
HELP!!! What have I gotten myself into???

kindred_ny
12 years ago

OK, so I discovered that the trim in my house was painted by the people who owned the house about 50 yrs ago. Since it was originally NOT painted, you guessed it, I have decided to strip the trimwork, oil, shellac and maybe varnish it. I started on the basement doorway, and 8 hours later I still have green paint in the grain of the wood.

Some questions...

1) I've heard people mention a very good heat stripper. Would someone please give me the name and approximate price range?

2) I've used a "friendly" paint stripper, but it's not working well. There's still paint in the wood. Should I use a 0 grade or courser steel wool to wash it after using the stripper? I'm using 0000 grade now and it's not really touching it.

3)I have heard one should avoid sanding the wood if at all possible, to retain the patina. Is this correct?

I feel like I've just taken on a hurculean task. There are 8 windows and 5 doorways in my downstairs, and the first door is only 1/4 done (with paint still stuck!). ANY info to help this job go easier and faster would be SOO much appreciated!!! I want very badly to bring back my home's intended beauty. She just looks blah with white painted trim. THANKS!!!

Comments (25)

  • kindred_ny
    Original Author
    12 years ago
    last modified: 9 years ago

    And I forgot to mention the 8" baseboard around most of the downstairs! lol I think it's finally happened. I have officially lost my mind! :)

  • John Tebbs
    12 years ago
    last modified: 9 years ago

    I use a Porter cable heat gun that I got at Lowes for about $40. It works well for me, but I can't tell how it will work for you. Depends on the wood species and paint composition you have. 40 bucks isn't a huge investment to find out....

  • mike_kaiser_gw
    12 years ago
    last modified: 9 years ago

    50 year old paint is likely to contain lead and that might limit you choices in removal methods.

    Here is a link that might be useful: Lead Paint Removal

  • mainegrower
    12 years ago
    last modified: 9 years ago

    If the trim is an open grained wood such as oak - and that's what it sounds like - a heat gun or chemical stripper will not remove paint embedded in the grain. The only solution is lots and lots of sanding. Once that's done, the kind of finish you propose will not look as good as it would have if it had been applied to unpainted trim from the start - all the sanding will inevitably glaze the surface.

    Only you can decide if it's worth the time, effor, mess and expense , but if it were me, I'd resign myself to painted trim.

  • karinl
    12 years ago
    last modified: 9 years ago

    It's been my mission to remove about 8 layers of paint from all of our trim, and it can be done to varying degrees in different ways. Search this forum for discussions of paint stripping; there have been lots. To answer your several questions I'll just describe our process:

    Rough strip the thick layers: this can be done with a heat gun (inexpensive but may release lead fumes and can start fires), an infrared paint stripper (Silent Paint Remover, expensive but probably safer at least with respect to lead, but can also burn wood), or with various chemical methods. We've just gotten the IR stripper, but have previously used both the heat gun and chemicals. We're very pleased with the IR unit.

    Of note here is whether you can work outdoors - that is to say, whether you have removed the trim to work on it or not. We removed almost all our trim and have done almost all that (outdoors), but finding the time/opportunity to work on the stuff we left up is.... eh, not happening. On the other hand, if you work outdoors it is seasonal work - fall and spring. Too cold in winter, too hot in summer. Another downside is that trim can be damaged by removal. But working flat rather than upright and trying to protect floors: for me, priceless.

    Our chemical paint stripper of choice is EZ Way, something we found at a trade show years ago and that you have to mail order from Washington State. We like the liquid; the semipaste is awkward, I find. But other off-the shelf strippers do work for this stage, including those with methylene chloride, which is one ingredient I've avoided from the outset. I've also tried several of the friendly stippers, and they work too - eventually. You have to find one that will stick to vertical surfaces if you are working in place.

    With the EZ way, I dip shop cloths in it, wrap it over the wood, cover it in plastic, and wait an hour or so. Other chem strippers too will benefit from being covered with plastic - but not all.

    There is usually an interim stage of getting the bulk of the colour off, and then there is the final stage of getting it out of the pores. This is usually - apply stripper, wait, use 3m scrub pads and later cloths, and just keep going until it's all out. You need a LOT of pads and cloths - the aforementioned blue shop towels are good, and later just plain paper towels too, but strong ones.

    A toothbrush is also a very useful tool at this stage, rather than your steel wool.

    The reason we like the EZ Way is most evident at the end, which is where most strippers need a clean-up with a different rinse - water or I think paint thinner. EZ way needs no separate clean-up because it evaporates, and you can keep going with it until your pores are as clean as you like. Before we discovered EZ Way we adapted to still seeing traces of the paint! That's an acquired taste, and I'm here to say, you can live with it and it is still better than trim covered with the old paint.

    It will happen that you strip wood and find it doesn't look that good (bad grain) or that you can't get the final colour out. In that case, you might decide to repaint and then I still find it worth stripping because the multiple layers of colour totally conceal the moulding profile, and in our case, old paint drips are all over the place and I can't stand them.

    I think something called Kutzit might be similar to EZ Way but I'm not sure. Key point is to look for something that doesn't require water or other clean-up to get rid of stripper residue.

    Plan to do this over a period, possibly of years. I am NOT going to tell you how many have elapsed for us! Maybe do one opening at a time, so that if you pause, it is bearable to look at for a while :-)

    Oh, and sanding... I don't think we have ever sanded unless we have applied filler to the old nail holes or other damage. I assume it's all lead paint, for which sanding is contraindicated. It wouldn't be the patina so much as the profile I'd be afraid of damaging, and the wood was finished to start with so should not need it for smoothing. EZ way does not raise wood grain so that's another advantage.

    Karin L

  • kindred_ny
    Original Author
    12 years ago
    last modified: 9 years ago

    I don't think it's oak. The PO's that painted said it was "ugly wood, chestnut or something". It's very grainy. but seems to be closed grain. Think I will try a courser grade steel wool first.

  • Marvin Forssander-Baird
    12 years ago
    last modified: 9 years ago

    I can completely empathize with you. I have so much to do that I decided to go for a faux bois finish on mine that I will do myself. Lo and behold, my son was stripping some spots out of curiosity and it was originally done in a faux bois!

  • lavender_lass
    12 years ago
    last modified: 9 years ago

    You know, a nice creamy white trim can be quite beautiful...just in case you decide it IS too much work.

    Otherwise, keep thinking how lovely all these wood trim and moldings are going to be, when you finish. And you'll be able to enjoy all your hard work, every time you walk into your home :)

  • dirt_cred
    12 years ago
    last modified: 9 years ago

    In 1965 my parents bought a 1936 craftsman bungalow with lots of oak woodwork that had been finished "blonde" - the filled finish that makes it clear the wood is oak but otherwise is a lot like paint.

    Ultimately, I believe she got all the finish off with a combination of lye in water and a wire brush. I don't recommend the approach - my mother is not a patient woman - but it doesn't look bad thirty-some years later.

    Years before that she enlisted all the kids over the age of about 6 in stripping 9 layers of paint from the woodwork in another house. We used the heavy duty chemical that would have been most available in the late fifties-early sixties. The name Zip-strip comes to mind but I could be wrong. I'm amazed that any of us are still alive! (Mom is 88 and healthy - takes no medications.)

    Finally, woodwork at Geo.Washington's mansion at Mount Vernon is finished faux bois in important, public spaces.

  • brickeyee
    12 years ago
    last modified: 9 years ago

    If you decide you want to strip, you might also consider removing the wood to a more convenient location (like sawhorses with plastic sheeting underneath).

    It is not as hard as it might appears to remove trim without damage, pull the nails through the back side, clean it up, then just install it again.

    After spending hours on hands and knees trying to strip trim in place, it is a lot easier on you and the trim to remove it.

  • lazy_gardens
    12 years ago
    last modified: 9 years ago

    Definitely use a coarser steel wool to get the paint off.

    0000 grade is for gentle cleaning of gunk off finishes.

  • antiquesilver
    12 years ago
    last modified: 9 years ago

    Zip Strip has been my go-to paint stripper for the past 25 years & I highly recommend it.

  • brickeyee
    12 years ago
    last modified: 9 years ago

    Zip Strip Premium is a classic methylene chloride paint stripper.

    They work VERY well, but can be dangerous.

    Use them with a LOT of ventilation.

    Outside is best.

    Inhaled methylene chloride fumes attach to the heme in your blood that carries oxygen preventing it from working.

    Tie up enough heme and you pass out, just like with carbon monoxide.

    Have a heart condition and you may die.

    It is really nasty stuff, best used outdoors.

  • roarah
    12 years ago
    last modified: 9 years ago

    In my house, after stripping all our doors I became pregnant and stopped stripping with the intention to start again after the baby. Well five years later, I have decided I quite like the look of the dark doors with white trim, molding and windows. Historically many homes from the twenties had dark stained doors with white trim, so maybe start with the doors and see if you want to continue later with the woodwork. Good luck and I too used a cheap heat gun from HD with great results.

  • slateberry
    12 years ago
    last modified: 9 years ago

    I'm scared of heat guns--vaporizing lead paint, igniting the back side of the wood you're working on and burning down the house? No thanks!

    I tried methlyene chloride stripper, and that was slow going, even though it was supposed to be the fastest of any chemical stripper.

    For my latest project, I borrowed a speedheater (aka silent paint remover) IR stripper from a friend. They cost $400. Ooof! Compared to anything else I've done, it's a dream to work with, and I'd like to have my own. But the price...$400, for one tool with no moving parts? A metal cage, some quartz bulbs, and a switch? Seriously, a huge chunk of that money must be going into marketing and liability insurance. They should try Geico or something.

    Then I found this post:

    $40 for parts, fun assembly with the kids, and you're good to go. Even better, see how he has his switch off to the side where it won't overheat and burn out? This is an improvement over the speedheater; my friend has had to replace his switch twice already.

    Here is a link that might be useful: diy Quartz paint remover

  • brickeyee
    12 years ago
    last modified: 9 years ago

    "I tried methlyene chloride stripper, and that was slow going, even though it was supposed to be the fastest of any chemical stripper. "

    The typical directions opn MC stripper are woefully inadequate.
    You really need to cover it after application to prevent evaporation (MC is very volatile, boiling point 103F with a high vapor pressure, 47 kPa at 20 �C).

    The 'wax' and other additives claimed to be present do not perform well enough to be effective (they only make clean up harder).

    Even a simple layer of Saran Wrap over the stuff speeds it up nicely.

  • Debbie Downer
    12 years ago
    last modified: 9 years ago

    For me the deciding factor would be - is there enough shellac as the first layer on the wood. If so, then some sort of heat removal makes that first layer melt and the layers on top slide off really easily. f not - I would seriously think about painting - either cream or go the other direction and go dark (saw a pic recently of a house with this dark warm almost black charcoal color for the trim/wood that was stunning. It looked both modern and reminiscent of Victorian dark wood at the same time.

    You could be have paint in the grain because the shellac was sanded off or wore off prior to painting. In that case the paint might have gone into the grain then, and be literally impossible to remove.

    OR... sometimes the chemical method is really sloppy and it could be the residue got in the grain as you were scrubbing it off. In that case if you use heat to remove most or all of the paint first, then you wont have htat problem -g oood luck.

    BTW, Ive sometimes removed paint knowing I would be painting it over. If there's a lot of lumpy layers and paint drips then it can be worth it to have a nice smooth clean surface to paint over.

    Who told you chestnut was "ugly"? That's kind of a strange opinion.

  • tinker_2006
    12 years ago
    last modified: 9 years ago

    I can tell you what you've started is MASSIVE! I have almost completed stripping a 3000 square foot home, 6 french doors, 20 doors, and about 40 windows (which we ended up paying for someone to do the windows). 1 year later, I'm still working on it and I have worked this like it was a full time job, with overtime - literally, it has been almost 7 days a week, 8+ hours a day, and I did this to paint it fresh, not stain it!! It's monumental, but now looking at it, it looks beautiful. Trouble is - once I started I couldn't stop, because the good stuff looked so good, and the other stuff - terrible, plus... the previous owner slapped on latex over oil and it was peeling everywhere. GOOD LUCK!!

    Oh, I used a homedepot heat gun, I think it was the $40 Porter's gun.

  • southerncanuck
    10 years ago
    last modified: 9 years ago

    I worked briefly for a furniture restoration guy in High School. For the last bit of deeply imbedded paint in tight grain such as Oak, he would hit the wood with water from a garden hose. This opens the grain. Then he did a final stripping while wet. I sure would think twice knowing what I know now about wood and water, but it works.

  • maryinthefalls
    10 years ago
    last modified: 9 years ago

    While it seems that we had a pretty easy stripping job because the original and moldings had been heavily shellaced, I still spent many, many hours to do a piece (door frame, window, door...). Since some of my trim had been replaced with modern paint grade pieces, I knew from the start that I couldn't stain all the woodwork in a room. My solution was to look at each room and come up with a logical plan as to what would be stained and what would be painted white. I like the mixture we now have.

  • seydoux
    10 years ago
    last modified: 9 years ago

    Lots of work! We are doing one room at a time, but we will be painting it in the end because that was what was done at the time the house was built. We are stripping it because after 200 years, a great deal of the detail is no longer visible form the layers of paint. We do do most of the work with a heat gun, if you notice the safety requirements are that you use only low heat to avoid vaporing the lead. One thing that no one has mentioned is good scrapping tools. My daughter went out and brought back a $16 scraper. I was ready to kill her, but it turns out that it takes the wood clean with no dust and we can get into the little crevices. So buy some good ones! You will need to replace them. I have resharpened the dining room one twice now and I think I will have to buy another after this time. Just be careful as the tools are sharp and can gouge if you are not careful!

  • kindred_ny
    Original Author
    10 years ago
    last modified: 9 years ago

    Wow! I have re-visited this post after being away nearly 2 years. Thank you all for the incredible advice. I have still not finished, as my SO moved in and complained about the smell of the friendly paint stripper I was using. (I work all day with it and don't smell a thing!). I have begun working at it again, and have stripped all the cabinets in the kitchen, too. They are slab style so it was easy. I mixed gunstock stain and poly and finished the doors and drawer fronts. They turned out so PRETTY!!!!! I still have to finish sanding the cabinet boxes and stain/poly those. I am still thinking I will be shellac-ing the trim.

  • vjrnts
    10 years ago
    last modified: 9 years ago

    Kindred_ny, how about some pictures? I have miles of painted woodwork and every time I think about stripping them I feel faint. Maybe you'll inspire me!

  • dirt_cred
    10 years ago
    last modified: 9 years ago

    Do not think I am making recommendations here, I'm absolutely not. I have a story about my family's adventures in paint stripping to share that might just make some of you feel better about the wood stripping work you are facing.

    From 1954-65 we lived in a 1911 house. The stairway and all the oak woodwork were painted. Eventually we would count 9 coats of paint. There wasn't a lot of fine woodwork, no built-ins or anything like that, just the stairway with rail and balusters 3 doorways and 6 windows including one picture plus and additional 3 piano windows.

    We had more kids than money so mom got us all involved in stripping all that paint. I couldn't have been more than 12, probably a lot younger and the rest of the kids were 3-8 years younger than I. We got it done! Counting 9 coats on that stairway! Pretty sure we used Strip-eze. DO NOT remember gloves.

    That house just flipped for $197k and I'm still shocked. Unfortunately, the pictures that were on the real estate site went away as soon as the house sold. I don't think I have any of my own.

    In 1965 we moved to a bigger, again 1911, Craftsman bungalow with a built in buffet and entry wall of bookcases, a sunroom with 12-16 windows, colonnades, an 8' buffet and more windows and doors. This wasn't just painted, every inch of it was BLONDED in the style of the 1930's - I think that means both paint (or a paint-like substance) and grain filler. Apparently this was a much more serious job because mom tackled it with LYE and a wire brush. I don't even know exactly how she used the lye, I remember liquid and a lot of brushing, all in situ. By now I was in high school and not about to get involved. (She's 90 and too sick to ask even if she would remember.)

    She ended up doing that house in two segments, she left the bookcase wall for several years after the first effort.

    I guess what I'm trying to say, is: it could be harder?

    (I never liked the way my parents finished their woodwork - with just stain, fairly dark - like a dark walnut, I think, and no finish after that.)