


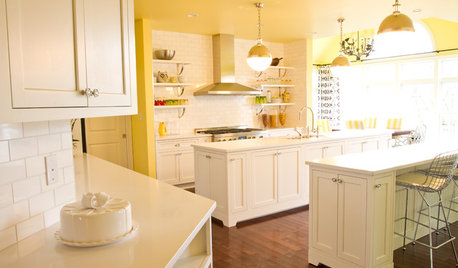
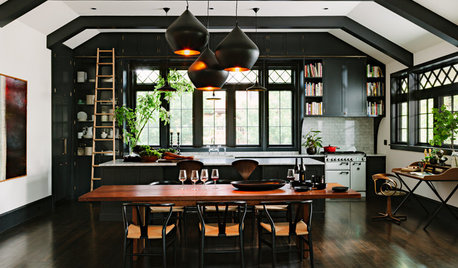
I love my prep sink!
Forgive me for bragging, but I love my prep sink. It is close to my refrigerator, range, and ovens, and has 66 inches of counter space and two drawer stacks beside it:
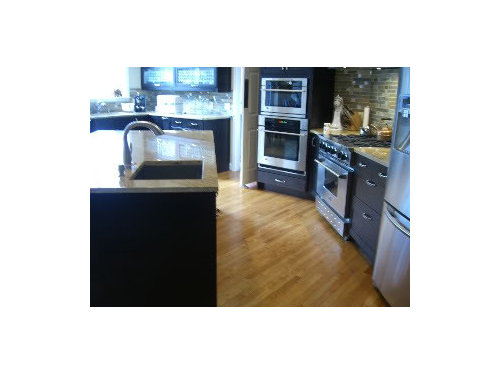
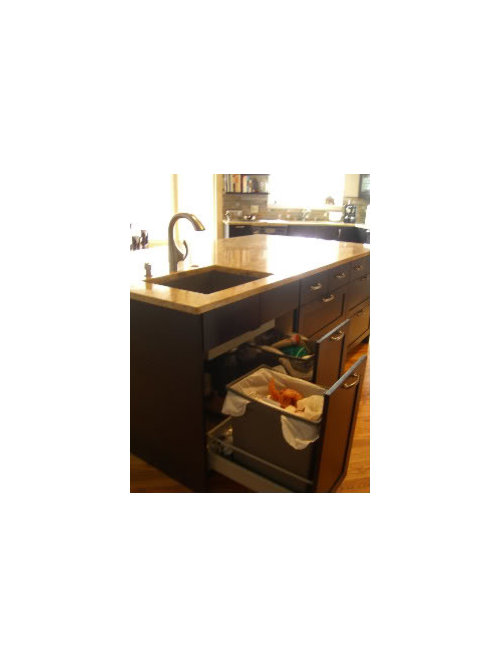
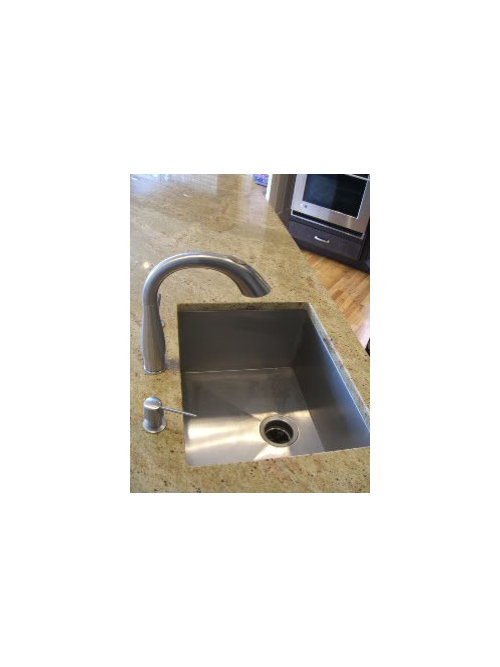
What makes it really special, though, is how much my GC was able to fit into a 30" sink base for me. I have a 16x21x10 zero radius sink, a compact disposal with airswitch, a Never MT, and two 8-gallon trash pullouts. The trash cans (Ikea) come with a dividing mechanism, so when warm weather returns I can separate my non-recyclable trash into compost stuff and dump stuff. We were able to do all this with just millimeters to spare, but we did it! The trash pullout set-up is a modification I learned from Ikeafans.
The only sacrifice I had to make was that we had to flip the orientation of the zero-radius sink in order to fit the plumbing in the space between the trash cans. But I have grown to like it this way (water hits the drain better), and wish I had turned around my main sink, too. My GC is my hero!
Comments (35)

rhome410
15 years agoCongratulations! Don't you love it when something works as well, or even better, than you'd planned and imagined? You get this silly little thrill just because something WORKS. :-D
kelleg69
15 years agoThanks for posting. I hope to get a trash pullout under my sink too. I think I will send this post to my KD.
Related Professionals
San Jose Kitchen & Bathroom Designers · Wesley Chapel Kitchen & Bathroom Designers · Terryville Kitchen & Bathroom Designers · Adelphi Kitchen & Bathroom Remodelers · Linton Hall Kitchen & Bathroom Remodelers · Newberg Kitchen & Bathroom Remodelers · Phillipsburg Kitchen & Bathroom Remodelers · Prairie Village Kitchen & Bathroom Remodelers · Parsippany Cabinets & Cabinetry · Prior Lake Cabinets & Cabinetry · Reading Cabinets & Cabinetry · Red Bank Cabinets & Cabinetry · Wyckoff Cabinets & Cabinetry · Bloomingdale Design-Build Firms · Oak Grove Design-Build Firmssnowyshasta
15 years agoThat looks great, and I'm impressed how much fits in there! Your space looks similar to ours (we're almost done...) so I'm looking forward to liking mine as well as you obviously do. I was waffling on a prep sink vs. clear island, but like you I have fridge and range near the sink and ovens in a corner. We didn't get all that much under the sink, though, so congrats!
rosie
15 years agoWhat a great can-too-have-it post! It's always fun, as well as very worthwhile, to see what can be accomplished by thinking out of the box.
jnjmom
15 years agoWow - that's neat! I'm going to check into dividable trash system. BTW -- what's your granite??
rnest44
15 years agoMorton5 beautiful kitchen (love the floor) and great prep sink! May I ask a question? My island will only have a prep sink but the whole thing will be a slightly smaller scale then yours. I plan to place it in the center of the run rather than at the end. Mine is a two cook kitchen so one person could prep on each side of the sink. What was your thinking on prep sink placement? (Okay, that was 2 questions.)
morton5
Original Author15 years agoBudgeteer, here is a pic of the cabinet innards:
Each pullout is a deep drawer, with a cabinet door affixed to the front. The wood divider in the center is screwed to the bottom of the cab, and a drawer glide is attached to each side. The other drawer glides are attached to the sides of the cab (so there are 2 glides per pullout, just like a regular drawer). My cabs are frameless (Ikea). You can see that my carpenter had to jigsaw out a bit of the divider to allow the plumbing to fit. He also had to clip the back corner of the right drawer to allow room for the disposal cord. Key to getting this arrangement to work was having the plumbing waste pipe placed as far back in the cabinet as possible. Also, you must have a single bowl sink. There is about 3" of dead space behind each drawer, so that is where the plumbing waste and supply pipes and Never MT are. I still had room for soft close on the left pullout, but not on the right (waste pipe interfered slightly). The 8-gallon trash cans I use are about 3" narrower than the width of the pullout, so that they can clear the disposal. Surprisingly, I don't find that they move around-- the pullout operates smoothly. It is really great having both trash and recycling right by my prep sink.Jnjmom, the granite is Madura Gold. I absolutely love it, which kind of surprises me because I did not consider myself a granite lover when I embarked on this project. An extra bonus is it really hides dirt-- though that can be a problem, too!
Owls4me, thanks for your compliment about the floor, we had the floors patched and refinished as part of the remodel. We used Minwax golden oak stain and 3 coats of oil-based poly. They were prefinished unstained floors before, and they look so much better now that they are stained. I love the color, the grain is really enhanced, and color and grain together are very kid-friendly and easy to keep good-looking. As for sink placement, I placed the sink off-center for several reasons. Most importantly, I wanted a large span of uninterrupted work space. Another factor was that my range wall is not symmetrical, so a centered sink would have highlighted the lack of symmetry. Finally, I have two seats opposite the prep area at the left end of the island in the photo below; I did not want to reach over a sink to serve diners. The paint job should be finished this week, and then I'll post more pics.
HTH, and good luck!
rhome410
15 years agoWow...your kitchen looks so great!
Owls4me, I hope you and Morton5 don't mind me butting into your question about sink placement, but I also have my prep sink on the corner of my island and love it. I wanted to add that I love how the sink can easily be used from either the side or end of the island, creating 2 separate work areas that access the sink without interfering with each other. I placed my faucet at the corner of the sink so it is out of the way, but still easy to reach from either direction.
budgeteer_s
15 years agoThanks for the picture and explanation. Plumbing sure looks streamlined. Morton5, you mentioned how you resurrected your old floor. My kitchen remodel changed everything except the oak floors. A wood floor guy told us that ours may be sanded and re-finish only once since the wood is thin. However the price is not cheap and at the price point of getting brand new tile floors. Our wood floors extend to the dining and living rooms. Did you do the refinish procedure yourself? If professionally done, what price did you pay for this refinish procedure? Was it messy? We are about done with remodel and hate to start with the dust again.
morton5
Original Author15 years agoOurs is/was a Bruce prefinished hardwood floor. The planks are I think 3/4" thick, they are not engineered. I hated this floor. In it's original state it had a pinkish cast, and worst of all it had big bevels between each plank that collected gunk. We had had them refinished once, about 6 years ago, but went with el cheapo guy, and it showed. The finish was almost off in the kitchen, everyplace else was okay but not great looking, the shoe molding job was terrible. I was ready to tear out the floor in the kitchen, but decided my legs could not take a tile floor. Got two bids this time from the most reputable refinishers in town, and they ended up being within $100 of each other. Sorry to report that it was very expensive-- thousands of $ to do the entire ground floor but I'm afraid that neither company said how many sq. ft it was, so the actual $ are not that meaningful. Also a huge PITA to move furniture around and wait for the floor to cure. Dust was not so bad because we opted to have them use a dust containment system (also expensive). I suggest you get a second bid and opinion. Also, maybe you could just do the kitchen and put some sort of finishing strip to visually separate that floor from the DR and LR.
josie724
15 years agoMorton, it really came out beautiful. I'm amazed at the way your GC used every millimeter of space under the prep sink. It's nice to hear there are gc's out there willing to spend the extra time to make the job perfect.
ncamy
15 years agoDo you think that I could do something similar under a bar sink? I wouldn't have a disposal so I actually should have a little bit more room. I wanted to utilize the space under the sink for liquor and larger bottles. If it pulled out with the door then that sure would be convenient!
rnest44
15 years agoMorton, I have the same Bruce floor and it in the same yucky state that yours was originally! I am so excited to see your finished product as our dining room, living room and front foyer/hall are all being refinished during the renovation. We are pulling out the kitchen b/c our kitchen is expanding into the great room. Who knew your post about a cool prep sink and space usage could help me tweak my plan?! Is this a cool forum or what!
rhome and morton, thanks for the info on prep sink placement, it's moving back to where it was and now I know why I had it there in the 1st place. I needed the reminder.morton5
Original Author15 years agoncamy, the pullout is just a deep drawer with a door front attached, so I think it would work well for bottles. The ease with which the pullout can be accomplished probably depends a bit on what type of cabinet you have, though. I have frameless (Ikea) cabs, so there was no face frame to interfere with the pullout. The glides attached to the sides of the cab and to that dividing piece under the center plumbing.
I think it would be great to have a pullout underneath a bar sink. I have some liquor bottles stored under ours, and I usually have to arm myself with a flashlight and get on my hands and knees to dig out the tonic water.
mamadadapaige
15 years agoI have prep sink and trash pullout envy. You are right that your GC is a hero... can't believe how much is in there. Your kitchen is GREAT!!!!!!!!!
budgeteer_s
15 years agoI too have the Bruce flooring, even have the same bevel dust/gunk gatherer. I am glad to see yours turn out so beautiful and now know I have that option. Thanks for sharing the info and letting me go OT.
Back to the subject again, like I said your kitchen is to die for, but your prep sink rocks!
morton5
Original Author15 years agoThank you, gwendelen, it is Jeffrey Court's Fire and Ice and has been used by a few people on this forum. If you do search on Fire and Ice you should be able to see it in several kitchens.
gwendelen
15 years agoThanks so much for the information. All the kitchens look great with this tile. How nice everyone here is to share their wonderful ideas!
plansrus
15 years agoLovely kitchen, and a very similar color scheme to the one we're considering. May I ask about your ovens being set at an angle at the end run? We're considering something similar to better integrate the ovens into the rest of the kitchen (ours are also at the end of the run of cabinets and at the end of our kitchen). Are you pleased? Does it make access to the ovens easier?
Thanks!morton5
Original Author15 years agoThanks, plansrus. The 135 degree angle was in my old kitchen, and I did not change the position of that wall, because the rest of the house floorplan worked fine. I find that access to the wall ovens is fine with the angle, but I don't think it's much easier than not having an angle. Plus, having the angle makes laying out the kitchen a whole lot more difficult. For example, we had to very carefully position the island so as to have adequate aisle space between it and the wall ovens at the corner. Also, generally when you have angles you either have dead space or difficult-to access storage. I wouldn't do the angle unless architecture required it. I was glad to put away my protractor at the end of the kitchen project.
staceyinmaine
15 years agomorton5, that's SO GREAT!! I'm about to order my cabinets and I think I will have them leave off the hinges under the sink cab. We had IKEA cabs in our last kitchen and I know the hardware is good quality.
Could you confirm that this is the product you used for the deep drawer:
http://www.ikea.com/us/en/catalog/products/40107080It looks like I can just add that to the sink base and attach the door to it, if so. It's a lot cheaper than the rev-a-shelf ones that our cabinetmaker uses, so we'll just DIY this.
Did you consider this one (which would leave the doors on hinges and just pull out?)
http://www.ikea.com/us/en/catalog/products/20110743or even this:
http://www.ikea.com/us/en/catalog/products/70110745If so, did you not like them in person? (Unfortunately our closest Ikea is over 3 hours drive!)
anyway- awesome kitchen. Great job!
morton5
Original Author15 years agoHi Stacey. Yes, that is the 15" deep drawer you need, if you are using a 30" sink base. If you have a 36" sink base you need an 18" deep drawer. You also need the wood piece that screws down to the bottom of the cab, also known as the drawer partition, article 900-492-43. When you install, you will need to cut off about 10" at the back of this wood partition, so that you have enough room on the partition to install the drawer glides, but plenty of room behind it for the sink plumbing. My carpenter had to jigsaw a bit off the top, too, as you can see in the photo. You will also need the Ikea 8 gallon trash cans, which you can buy right in the kitchen department (they don't need to be on your order). I find 8 gallons is plenty large-- I empty every other or third day, which I would do anyway to keep odors down.
The advantage of doing your pullouts this way is that to toss anything out, you have one motion-- pull out the deep drawer/cab front. If you have the slide-out cans (the other product you listed), you have to open the door, then pull out the can. That said, the slide out cans are nice-- they glide smoothly. They also leave quite a bit more room in the cabinet than the deep drawers, so if plumbing works are in the way, that would be the way to go.
If I were 3 hours away, I would get both options. I would try to get the pull-out to work, and if I just couldn't make it happen, I would do the slide out. In all likelihood you'll be making a return trip anyway. You have to be really careful with your plumbing to make it happen-- mine operates smoothly but the clearance is literally millimeters. That said, if you are careful on the placement of the plumbing (centered, as far back in cab as possible), you should be good to go.
I don't know much about that suspension thing, the last product you listed. I think you put it on the door and either hang a bag or maybe a small can goes there. Personally, I would want the 8 gallon can, which I don't think can hang on the door.
I used a 24" high door for my pullouts, but some folks use a 30" high door. I was worried the taller door would warp over time, and also didn't want to see the underbelly of the sink when I operated the pullout.
Also, the disposer is a compact Badger disposer, the smallest I could find (we are on septic, so it is just used for the odds and ends I don't scoop out of the sink).
Also, I doubt this set-up would work if you have to connect a dishwasher to the disposer-- not enough space. You might be able to put in one trash pullout, though, on the side away from the DW.
I learned how to do the pullouts from the wonderful people over at Ikeafans. Here is the link. Good luck!
Here is a link that might be useful: Ikeafans trash pullouts
shelly_k
15 years agoMorton, I love your kitchen! I especially love your cabinets and granite! What finish and cabinet style is that from IKEA?
Thanks!!
morton5
Original Author15 years agoThank you, shelly_k, the cabs are Tidalholm black brown, an oak shaker-style. The grain on the center panels and on the side panels runs horizontally, so it's a bit contemporary-looking, but could also look well in an Arts and Crafts-type kitchen, I think. It is a door style exclusive to the U.S., and it is not featured in the Ikea kitchen catalog, nor in their online kitchen inspiration slideshow. My doors/drawer fronts were all made in Italy so I feel like a got an Italian kitchen at a bargain price! I thought the doors looked a bit smudgey in the store, but with a little Pledge on them I don't have any fingerprint problems.
staceyinmaine
15 years agoThank you!!
That is super helpful. We'll be careful installing the plumbing (husband is doing it) and see what fits. I am an avid gardner and composter, so I'd love to be able to put compost down there rather than my countertop bin.I am so impressed with the Tidaholm black!! I did not know that it was an option at all, since as you said it'd not in the catalog or on line. I wanted shaker style, but not the broad-framed style (Adel) that Ikea has. And I didn't like the lighter Tidaholm in the catalog. I was all set to order my cabinets tomorrow from Glenwood. Maybe I will have to reconsider!
Thanks again- and great job!
Stacey
morton5
Original Author15 years agoStacey, those 8 gallon trash bins come with a divider attachment, so in theory you could sort your trash 4 ways with 2 pullouts under the sink. When warmer weather comes, I will put in one of the dividers so I can put the compostable stuff together.
shelly_k
15 years agoMorton, I don't live near an IKEA. Nearest is about 4 hours away (Minneapolis). Could I still order these cabinets?
That is exactly the style I'm looking for in my kitchen (DH loves dark cabinets, a bit on the contemporary side too).
Did you or your hubby install them? We are not handy by any stretch so we would need to have someone else install them. Not sure how much additional that would cost.
Are you happy with the quality? Feel like they will last? I'm new to IKEA cabinets, so pardon all the questions. Are they much more inexpensive, than say, going to a kitchen specialty place and picking a mid-grade cabinet? ( know that is a general question).
Thanks for answering all my questions!
morton5
Original Author15 years agoHi, Shelley. I live 10 miles from my Ikea, and I spent a LOT of time to-ing and fro-ing to the store before and during our reno. I thoroughly inspected the store displays before I took the plunge. Once I saw all the advantages of frameless cabs, I was hooked. My husband was skeptical, but he is very happy with the result. I love my Ikea cabinets. I am very happy with the quality, and do feel like they will last. The cab interior is made of particle board, which some folks avoid, but it was not an issue for me. All the hardware is made by Blum. The warranty is for 25 years, so Ikea stands behind their product. I love all the storage options Ikea has, and I really liked the transparency of their pricing. I would say that I paid about a third to forty percent of what a mid-grade cabinet with all the bells and whistles would have cost. I assembled the cabinets myself (which I enjoyed, once I got the hang of it), and edgebanded them, which eliminated any contrast between the doors/drawers and the interior birch boxes.
We used a contractor to install the cabs, and his carpenter did a great job. The skill of the carpenter can make quite a difference to how well these cabs look installed, but I think that applies to any cab. Lots of people install their own Ikea cabs with terrific results.
I think it would be really tough to take on an Ikea kitchen when you live so far away. Ikea is not known for high-touch customer service-- that is partly why you save so much. I might consider it myself, but only because I've gone through the learning curve of doing one kitchen. I'm honestly not sure if Ikea would drop ship an order. They do deliver stuff, but I think that you have to go to the store to purchase. I schlepped everything home in my SUV. The delivery charges add up and eat into your savings.
Maybe go with another ready-to-assemble company, like Scherr's, that is used to shipping orders? At one point I was considering putting Scherr's doors on Ikea boxes. They have a good reputation and were nice to deal with. Only problem I had was that their turn-around time on sample doors was about 3 weeks-- and I could see that it might take a few iterations to get the door you like. They have drawings of the doors on their web site but there is no substitute for seeing a door in person.
One last thing-- Ikea has a planner you can download, and make a 3d drawing of your kitchen. The planner will price out all the cabs for you. That can be a good baseline to use as you look at other cabinet companies.
Good luck!
birdman_2009
15 years agomorton5
A beautiful kitchen you have there!!!!
I am going though a kitchen remodel myself and was wondering...what are the dimensions of your island?? My island will be 48inches X 96 inches in dimension...wondering if the 16 inch X 21 inch 0 radius prep sink would be too large for my island.morton5
Original Author15 years agoBirdman, sorry for the late reply. My island is 48 inches wide x 90 inches long (cabinetry dimensions), so I think you have plenty of room for a 16 x 21 inch sink. I love having a big prep sink.
Sumod
2 years agoM Miller, I agree, but I was hoping others would be kind enough to suggest based on their implementations of the idea.


budgeteer_s