


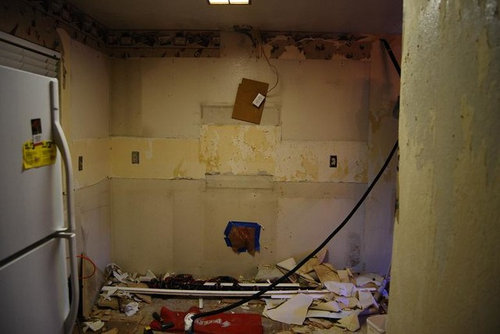
PoorOwner's kitchen remodel
PoorOwner
15 years ago


Sort by:Oldest
Comments (54)
Related Stories
KITCHEN DESIGNModernize Your Old Kitchen Without Remodeling
Keep the charm but lose the outdated feel, and gain functionality, with these tricks for helping your older kitchen fit modern times
Full Story
REMODELING GUIDES25 Most Bookmarked Remodeling Guides of 2012
Seems like Houzzers couldn't get enough advice on renovating basements, kitchens, showers and even laundry rooms this year
Full Story
WORKING WITH PROSInside Houzz: No More Bumper Cars in This Remodeled Kitchen
More space, more storage, and the dogs can stretch out now too. A designer found on Houzz creates a couple's just-right kitchen
Full Story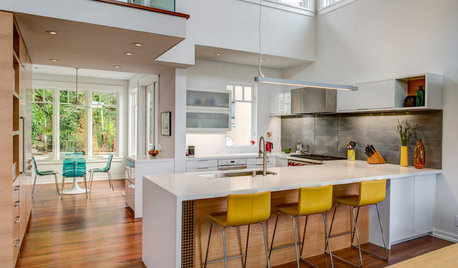
INSIDE HOUZZHouzz Survey: See the Latest Benchmarks on Remodeling Costs and More
The annual Houzz & Home survey reveals what you can expect to pay for a renovation project and how long it may take
Full Story
HOUZZ TOURSMy Houzz: Remodeling Modernizes a Neoclassical Dutch Home
Neoclassical on the outside, a Netherlands home gets a long-wanted renovation inside, including a kitchen addition to suit its family today
Full Story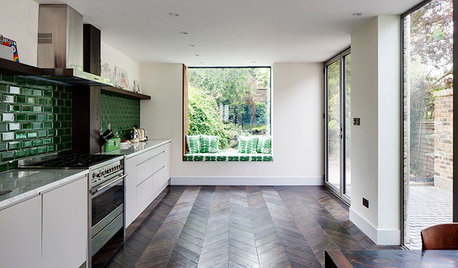
ADDITIONSLight and Personality Fill a Remodeled London Home
Eclectic and heritage elements mix in a clever extension that adds volume without digging into the home’s foundation
Full Story
KITCHEN DESIGNKitchen of the Week: Quirky Texas Remodel
Playful Remodel Amps Up the Personality of 130-Year-Old Kitchen
Full Story
KITCHEN DESIGNKitchen of the Week: Mother-Daughter Budget Remodel
Designer Stephanie Norris redesigned her daughter's kitchen with functionality, affordability and color in mind
Full Story
KITCHEN DESIGNKitchen of the Week: Turquoise Tile and a Dining Nook for 16
Entertaining is a piece of cake in this remodeled beauty with an extra-large stove and seating for a crowd
Full Story
REMODELING GUIDESHow to Remodel Your Relationship While Remodeling Your Home
A new Houzz survey shows how couples cope with stress and make tough choices during building and decorating projects
Full Story
ccoombs1
caminnc
Related Professionals
Commerce City Kitchen & Bathroom Designers · East Peoria Kitchen & Bathroom Designers · Hillsboro Kitchen & Bathroom Designers · Magna Kitchen & Bathroom Designers · New Castle Kitchen & Bathroom Designers · Wentzville Kitchen & Bathroom Designers · Green Bay Kitchen & Bathroom Remodelers · Islip Kitchen & Bathroom Remodelers · Lawndale Kitchen & Bathroom Remodelers · Palestine Kitchen & Bathroom Remodelers · Indian Creek Cabinets & Cabinetry · Radnor Cabinets & Cabinetry · Wells Branch Cabinets & Cabinetry · North Plainfield Cabinets & Cabinetry · South Holland Tile and Stone Contractorscotehele
dawn_t
PoorOwnerOriginal Author
caligal
PoorOwnerOriginal Author
amylovesbud
msrose
PoorOwnerOriginal Author
budgeteer_s
amylovesbud
PoorOwnerOriginal Author
ccoombs1
datura-07
Circus Peanut
claybabe
evilbunnie
slateberry
tetrazzini
PoorOwnerOriginal Author
vicnsb
serendipity01
PoorOwnerOriginal Author
serendipity01
lawyerlee
sweet100s
PoorOwnerOriginal Author
laxsupermom
rosie
PoorOwnerOriginal Author
rnest44
mahatmacat1
PoorOwnerOriginal Author
petra_granite
caryscott
minac
PoorOwnerOriginal Author
PoorOwnerOriginal Author
caryscott
PoorOwnerOriginal Author
nalcar
PoorOwnerOriginal Author
writersblock (9b/10a)
rnest44
PoorOwnerOriginal Author
boxerpups
karena_2009
swickbb
PoorOwnerOriginal Author