


For those who have finished a wood island with Waterlox...
I have applied two coats of Waterlox and the 3rd coat which is the 50% Waterlox/50% Satin Finish. The board is dry but the finish is rough.....why is the finish rough? After the final coat, I cannot sand the board, correct?
Another ?, the directions don't say to rub the 50/50 mixture in with a cloth following the brushing in order to smooth it out during the application of the 3rd coat like you do after the 1st and 2nd coats... I am using a natural bristle 4" brush...When I applied the mixture, it was applied evenly with the brush but you see tiny bubbles and these bubbles seem to be what is creating the "roughness" when the wood dries. The island top is beautiful, and I couldn't be more pleased...but the rough finish is not what I was expecting??? Any suggestions?
Comments (34)

Capegirl05
Original Author12 years agoThanks you Rhone...I was wondering if I could just use the Waterlox original finish for the FINAL coat...on top of the Satin/Original mix (50/50)and rub it on? We didn't have the roughness issue until we added the Satin Finish...
Related Professionals
Agoura Hills Kitchen & Bathroom Designers · King of Prussia Kitchen & Bathroom Designers · Piedmont Kitchen & Bathroom Designers · South Farmingdale Kitchen & Bathroom Designers · Cleveland Kitchen & Bathroom Remodelers · Fort Pierce Kitchen & Bathroom Remodelers · Hunters Creek Kitchen & Bathroom Remodelers · Newberg Kitchen & Bathroom Remodelers · Kaneohe Cabinets & Cabinetry · Roanoke Cabinets & Cabinetry · Saugus Cabinets & Cabinetry · Wyckoff Cabinets & Cabinetry · Turlock Tile and Stone Contractors · Englewood Tile and Stone Contractors · Plum Design-Build FirmsCapegirl05
Original Author12 years agoUpdate: I sanded the roughness away but you can still see the tiny little spots...not sure if I should try a 70/30 mixture next or just use the Waterlox? I don't believe the waterlox will be able to penetrate through the satin finish??? Craft-Art needs a "doctor" on call...
Capegirlrhome410
12 years agoI've never mixed the 2 finishes. I just used 2 coats of the Original, and then followed with coats of the Satin.
What are the spots you still see? Just the sanded evidence of where the roughness used to be? As long as they're completely smooth, I'd try a rag-applied coat of Satin over that and see if they go away.
Another safeguard: Make sure the finish is not bubbly from stirring or shaking. Stir the can well, then pour a small amount into another container (only as much as you think you'll need, not more, as you shouldn't put it back in the can), let it rest a few minutes, and then use.
sayde
12 years agoOn our island top my DH used three coats of regular WL followed by one coat of satin. He wiped it on with a rag. He used the WL on the body of the island as well. After it was dried and cured he used very fine grit steel wool, going over everything very lightly. Did not mix the satin with the regular WL. You might want to try the very fine steel wool. It made a noticeable difference in the smoothness of the finish.
User
12 years agoRhome is right I called the folks at WL after I had a failure in the finish . I had put on 9 !! coats with a rag. The web site states that you CAN use a rag for all coats but that you need to do 2x as many since you won't have enough WL per coat. That is what I did.
The fellow at WL informed me that i should NOT have used a rag..ever. He said use a brush and get the wood really wet with the WL. Also you never stir or mix the Original WL. Only the Satin. That is in the fine print also. He reiterated that to me . I didn't realize there is a BIG difference in the 2 products. DONOT mix them.
So you need to sand down and then start again. At least sand till you get to a good smooth layer. If you call them give them every single detail of what you did so that they can tell you how to correct your problem....hope this helps you.
My countertop is fine now....glad I called them but he was pretty snippy :0 c
rosie
12 years agoI'll take snippy too if it's delivering good information. :)
Capegirl, the satin makes a very pretty soft-glow finish. I think you'll like it after it's on as your top coat. BTW, satin's made satin by suspending lots of fine particles in it. My first coat made the wood very lovely (we were all thrilled with it), and the second was still lovely but I liked the look of one coat better. In one test area where I applied 3 coats to see what would happen, it was noticeably hazy from the increased buildup of particulate matter. If I remember correctly, I think they recommend a max of 2 coats of satin anyway.
rhome410
12 years agoOk...Just checked the Waterlox site and found this:
"If using a hand-rubbing technique, only use our Waterlox Original Sealer/Finish because the Waterlox Original Satin Finish and High Gloss Finish are not formulated or recommended to be hand-rubbed.So ignore my previous advice about hand applying the Satin. I notice these instructions are dated 2009, and are different than what I remember when I finished our doors and island in 2007/08. I know that I remember the advice to use only 2 coats of the Original, and now the instructions say 3 or 4 and only 1 coat of the Satin.
Capegirl05
Original Author12 years agoUpdate...the super standing paid off! The top is a little rough but NOTHING like it was last night...and there isn't any visible evidence of the bubbles. It looks really pretty. Do you HAVE to apply the satin finish? Can you just apply 4 coats of Waterlox and call it "good"?
Sayde...we considered the steel wool idea. After I have applied my final coat of Waterlox, if there are any fine bumps, should I use steel wool to remove them vs 320 super fine grit sand paper? I think it would yield a better result.
Rhoane...No, we didn't rub the 50/50 mixture...we only used the natural bristle brush. The only thing I can figure out is that the instructions from Craft-Art say that you have to apply the mixture in one movement across the board, without lifting the brush. Our island top is 4'X7' which is impossible to cover in one stoke, so I had to pick up my brush, get more product and continue...
Just glad it looks better. We will apply the final coat of Waterlox tomorrow...
Capegirlrhome410
12 years agoNo, you don't have to use the Satin if you like the sheen of the Original.
I advised you above to hand rub the Satin final coat, but then found the instructions on the site not to, so was trying to warn you away from my advice. Still find nothing on Waterlox.com that recommends mixing the 2. Maybe check their site if you still have more questions, rather than Craft-Art.
I'm glad you're getting a better result!
DiaGina
12 years agoThat's strange that you're having the problems. I helped my neighbor do hers a few months ago with the 50/50 mix and it was super smooth.
BTW...We called Waterlox before we did it (after talking with Craft-Art) and they said they knew their customers mixed original and satin and that was fine. Apparently, Waterlox' business is much higher volume in flooring and their instructions are geared more towards that. They said that Craft-Art would be much more knowledgeable about their product on countertops. :)
Capegirl05
Original Author12 years agoRhone, I read your post, so if I decide later to apply the satin, I will definitely use a brush and not mix the product! I applied the final coat of Waterlox tonight and after it dries for a few days, I will go over the rough areas with a very fine steel wool to smooth it, as Sayde suggested. We will install it right before we move in. The top is really beautiful! I will try to post a pic tomorrow! :o)!
capegirlfrancoise47
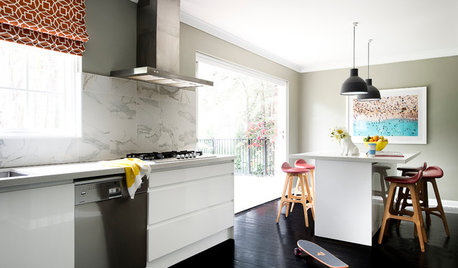
12 years agoI did four coats of the original formula Waterlox on clear walnut. I lightly sanded (320 grit) between coats. I used a sponge brush applicator and did not finish with the satin coat. It has a pretty healthy sheen which I understand will diminish somewhat as it cures during the first year. I love the look.
My kitchen isn't yet ready for the big reveal, but here goes for now...

Capegirl05
Original Author12 years agofrancoise! Your island top is beautiful and has a nice sheen! I can't decide if I should do the satin finish...I like how it looks now, and I am a little afraid to do anything else for fear I might mess it up. Today, the final coat is very smooth. The only thing we did differently is laid the Waterlox on a little thicker, knowing it was the final coat. Maybe we were applying it too thin all along?? I missed a spot on one of the sides, so I will go over that later today. When did you install the island top? I am thinking it might be better to wait until the house is almost finished so none of the trades will mess it up, stand on it, lay things on it. Thanks for your picture. Your kitchen is beautiful!
rosie
12 years agoIf you like it as it is, forget the satin. It offers a low gloss, which I like, but at the expense of dulling the richness of the wood--although you probably wouldn't notice any difference with only one coat.
Francoise, looking forward to your BIG reveal. :)
rosie
12 years agoIf you like it as it is, forget the satin. It offers a low gloss, which I like, but at the expense of dulling the richness of the wood--although you probably wouldn't notice any difference with only one coat.
Francoise, looking forward to your BIG reveal. :)
rhome410
12 years agoFrancoise, the sheen is a nice contrast to your honed counters. Nice job! I also look forward to your grand showing.
User
12 years agocapegirl...that is one of the things that the rep from Waterlox strongly suggested . The WL has to be on very very liberally. He said that is the problem with not using a brush. He said that his countertops in his home are bulletproof because he put on heavy coats and let them dry throughly in between. I thought I was using a lot of the product but I used a rag and did 9 coats...let it dry in between as suggested. I never used anything but the original and I also never needed to sand between coats as they were always very smooth.
I am glad you like what you have. We had the wood turn black in the grain from excess water in one spot where DH drains the dishes. I sanded it all the way back and into the grain using 60 paper. It worked like a charm to get rid of the black tannins in the teak. I then resealed with the WL using a brush and 4 coats. All is perfect now. Good Luck.
And francoise your kitchen is gorgeous. I peeked at all the pics....:) I love the tile up the wall and your gorgeous wood island. c
francoise47
12 years agoDear Capegirl, We probably brought our wood island top up to the kitchen too soon, in part because we wanted to see how it looked in the bigger kitchen context. When installing the pendants over it the electricians put a few dings in it (even though it was covered with a blanket). I also think it is good to let the final coat of Waterlox cure for as long as possible -- at least seven days.
(Thanks for the lovely and enthusiastic comments about ourkitchen reno -- trailrunner, Rhome410, Rosie and Capegirl. They mean a lot to me!)
katieob
12 years agoNot to hijack, but Francoise47~ Wow!!! I took a sneaky peek and it looks fabulous. Can't wait for your unveiling!
Capegirl05
Original Author12 years agoI know, I can't wait to see it in the kitchen, but I agree...it needs to fully cure. My whole family is parking outside and are grateful it is not the dead of winter...lol! We have not installed the pendants over the island...why? because I can't find the ones I want!
Capegirl!MIssyV
12 years agoFrancoise...lookin' good! You must be so happy, so proud of what you have put together! Please, share with me what your black counter top is...thanks :)
Capegirl, I am following your wood island top saga closely as I await a quote for our own top. I told him I would finish it myself to cut down on cost. Hope thats a good idea! I felt confident I could get all the help and input I would need on this forum. Can't wait to see your final pictures!
alexisls
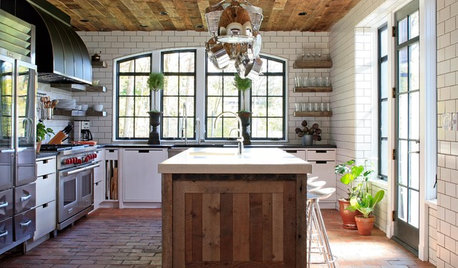
12 years agoIt sounds like I'm in the same Waterlox boat with my black walnut butcherblock! I've done two coats applied with a short-bristled pad applicator (as recommended by CraftArt) and then lightly rubbed with a t-shirt to get an even coat/get rid of bubbles. I really like the sheen so far - good to know I can forgo the Satin finish if I want to.
But now I'm wondering if I'm putting enough Waterlox on with each coat. How do I know what "apply liberally" means? This is a countertop with a sink, so I want to be sure I've sealed it properly.
Here's a picture with the first of my backsplash tiles - had to get them in before the plumber installed the sink, so I'll be taping them off for my remaining Waterlox coats.
Here is a link that might be useful: Counter top
jmcgowan
12 years agoGreat info for those of us who are putting in wood counters and using Waterlox.
And francoise47, beautiful, beautiful kitchen! Looking foward to more photos :-)
Capegirl05
Original Author12 years agoThe directions say that you should apply enough Waterlox "so that you could write your name in it with your finger" but not so much that there would be a puddle left. My MIL (bless her!) brushed (with a natural bristle 4" brush) on the Waterlox and I used a piece of an old tshirt (folded to about the size of a deck of cards)...saturated that with the Waterlox and rung it out and then went behind her and pressed VERY LIGHTLY and wiped (VERY SLOWLY) in the same direction that she went along with the brush. Every so often, we would look for bubbles and I would wring out my cloth. My FIL (bless him too!) held a light above while we worked. :o) It took 5 coats, but we got it! Well worth the effort! It is beautiful! Adding the Satin messed us up...not sure what we did wrong??? If you want a Satin finish, I suggest applying it alone (full strength) as your final coat and apply it liberally...harder to do when your island is 7' long and the directions say that you should not pick up your brush but at the same time "apply evenly"...
I promise to post pictures...
Capegirlfrancoise47
12 years agoI should have mentioned earlier that I thoroughly enjoyed and learned a lot about applying Waterlox from the "Askwoodman" video series on Youtube.
Watching his video gives you a good sense of the amount of Waterlox to apply.
Enjoy!Here is a link that might be useful: Askwoodman does Waterlox
jillandmatt
12 years agoWe moved into our new house about 4 weeks ago and finally have internet hooked up! Woo hoo! I just read the above post. I am having trouble with the satin finish WL too. I still haven't gotten our wood top completed and started the process of applying the first coat of WL probably at the beginning of Sept! We applied the original WL with no problem. I just poured it on and smoothed it out with an old t-shirt. The girl at the store where we bought it had a lot of experience with applying the original and she said that's what she always did, and got beautiful results. Unfortunately, she did not have experience with the satin. After applying several coats of the original, I followed the instructions on the Craft Art website and applied the 75%satin/25%original mix with a bristle brush. It had some bubbles in it and mistakenly I tried to get them out after the mix had been sitting for a few minutes. I should have just left it alone! Maybe the bubbles would have come out on their own..I ended up with noticeable brush marks where I had messed with it... I tried two more times to put on the satin/original mix! Next I tried with a t-shirt (not good). The third time (after talking to WL, and yes they are snippy) I used a natural bristle brush and applied liberally as the WL man said. After I applied it I had to go back over it because I noticed some of the WL was puddling. It was very difficult to get it on thick without this happening!
After it dried I still had brush strokes! Then we moved in and I haven't had the energy to deal with it since. I've been a little distracted with getting unpacked, etc... The wood top really looks gorgeous when the light is NOT shining on it in a certain way, and you can't see the brush strokes! LOL! I'm sure it will be worth it in the end and I'm very happy with the money I saved doing it myself. I'm starting to get my energy back and now I'm trying to figure out what to do next. I sanded the brush strokes out already and it now has sanding marks on it. I hope those go away when I reapply. I am thinking about going back to the original for the final coat but I'm a little frightened of trying the satin AGAIN! Any advice! Hope all this makes sense.
Capegirl- did you end up using the satin for a final coat or a mix?
Thanks! JillLake_Girl
12 years agoWe used 3 coats of original and a final coat of satin WL, all applied with a bristle brush. It turned out great, with a low sheen surface. I think it did bubble a little, but they evaporated out during the drying process. Take extra precaution to not create bubbles by shaking the mixture, gently stir it only. Also, make sure you don't use too rough of a grit when sanding. I think I sanded between each coat with 220 grit, and I'm thinking it took out any brush strokes. I can't believe they were snippy on the phone! I guess at $35 a quart, you get snippy???
I hope it all works out. I just love, love, love your kitchen!!
artemis78
12 years agoJust asked DH how he did ours, and (aside from venting about how he would never use the satin again ;) he used 100% satin for the last coats; first tried with a brush and had the brush stroke problem so he sanded down with very fine grit sandpaper (possibly 320, maybe just 220? remembers "a lot" of sanding) until the brush strokes all came out, and then started again with a coat of satin applied with a t-shirt---that yielded a clean matte finish. He still thinks there are a lot of imperfections (that I don't see, and he says good thing there's not a light directly over it) and would skip the satin next time and just live with the shinier finish of the regular.
jillandmatt
12 years agothanks artemis for the feedback. I'm glad you got a good clean finish!
I did a coat of the original yesterday and now I know for sure I want the less shine of the satin/original mix.
Lakegirl- it's good to hear you got a good result using the bristle brush. That is what I used the first time I tried the mix and I think I would have gotten a good result if I hadn't messed with it a few minutes after it had been sitting. I saw a big clump of bubbles and took the bristle pad one more swipe straight down the middle. After it dried you could see the swipe mark. I didn't try the bristle pad again because of the bubbles. It sounds like all your bubbles went away as it was drying, BUT it sounds like capegirl's bubbles did not evaporate. Maybe you had fewer bubbles because you didn't mix the two products... Could you post a picture of your top. I'd love to see what the straight satin sheen looks like. Thanks for the help!
JillMatt81
9 years agoWaterlox has changed their formula. It is still a great finish but you need to apply it much differently in order to get a perfect, smooth finish. This guide is extremely helpful in getting that perfect finish.
http://www.antiquetrunksandchests.com/how-to-apply-waterlox-original-2014/
Here is a link that might be useful: How to apply Waterlox - 2014
leh5
8 years agoI just finished a cherry countertop with Waterlox. Lots of work and some issues!! I went on several blogs that wouldn't allow me to register and comment on how I came out with my good result. So here it is: did 3 coats Waterlox original sealer finish using a foam brush. Had lots of roughness so I sanded with 320 grit which really smoothed things out. Then did another coat of original (not the low VOC stuff). The result was too glossy so I bought Waterlox satin finish at $50 a quart (yikes) and applied that after 48 hrs (had been doing 24 hrs btwn coats). Mistake!!!! The finish was uneven with lots of brush marks, starts and stops, dull marks. Looked awful!! From all the forums, it didn't look like there was an easy solution!! Sand and start over was the consensus. So.....I rubbed mineral spirits on with a rag which helped to calm down the mistakes. It didn't erase them though. It still looked pretty bad, just not AS bad. Then I mixed half mineral spirits and half original Waterlox sealer/finish (NOT the satin) and applied it with a clean microfiber rag making sure to go all the way down each board with the grain without stopping. The result was really good! Fixed the brush marks!!! The result is halfway between satin and original but NO brush marks. This was NOT a weekend project for an amateur like me!!! Wow!!

Jenn W
6 years agolast modified: 6 years agoleh5- Thank you so much for your reply; and others in this post. I have built my own plank countertops, added some distressing, and now I'm using waterlox to seal/finish them. I've literally been searching the internet and youtube for a way to finish them with WL original that would still seal them appropriately. I've read enough comments on blogs to stay away from the satin- thankfully. But after my 4th coat of the original, I know this is just too glossy. I sanded with 320 between coats 2-3, but it's the gloss I'm concerned with, not the smoothness. So now, for my final, 5th coat, I will use the 50/50 mineral spirits/original mix and use a rub on technique to see if that gives me more of a dull finish. Thanks so much!


rhome410