Shop Products
Houzz Logo Print
kitchen_angst

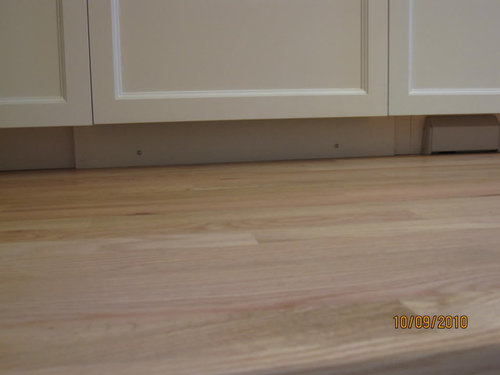
Questions about integrated d/w toekick

kitchen_angst
13 years ago

The last pieces of my kitchen are being put in place, and I was suprised to come home and find this toekick for the integrated Miele d/w.

I was told the screws were installed to allow removal for servicing of the d/w, but velcro is another option. As far as the protrusion though, it appears that the "feet" for the toekick extend beyond the surrounding toekick.

I had expected the d/w toekick to be in the same plane as the surrounding cabinet toekick. Is this normal? Do I have other options?

Thanks in advance!

~kitch

Comments (18)

  • Fori
    13 years ago

    Are you sure those toekick feety holders can't be tightened up to pull it in some?

  • kitchen_angst
    Original Author
    13 years ago

    Fori, I just checked. They can be moved back in a bit, but still protrude slightly beyond the plane of the toekick. It is better though.

  • ci_lantro
    13 years ago

    Another possible solution would be to use some spacer material behind the finished toekick everywhere except on the section underneath the DW. IOW's remove the thin toekick & apply strips of 1/2 or 3/4 inch plywood to the toekick section & then re-install the finished toekick.

  • cali_wendy
    13 years ago

    I just checked mine. Looks like the cabinet guy removed that protrusion piece altogether. Can yours be removed?

    Then, on the sides of each flanking cabinet 2 magnets are screwed in so the magnet is facing forward. The toe kick piece has magnets on the back of it that attach it so it sits flush with the rest of the toe kick.

  • kitchen_angst
    Original Author
    13 years ago

    Cali_wendy, yes, the footie thing can be easily removed. The magnet option sounds brillant. Thanks!

  • cali_wendy
    13 years ago

    Sweet! I hope it works for you.

    I'm happy to discover my cabinet guy did *something* right. ;)

  • calypsochick
    13 years ago

    Our cabinet installer didn't use the toekick that came with our Miele. Instead he just installed the regular toekick we used everywhere else under our cabinetry. It seemed like it was easy enough to do.

  • doonie
    13 years ago

    The toe kick was left off of ours. When I inquired, the GC said it was so the DW could be easily accessed for repair.

    cali wendy, that is a great idea with the magnet attatchment! I am passing it on to my GC. It looks distracting not to have a toe kick on an integrated DW. You all have confirmed that for me.

  • sombreuil_mongrel
    13 years ago

    On my FI Bosch, I had to add 1/2" spacers and velcro strips. It took a while to figure this out in my own kitchen, but it saved me some time on another job where I had to do a similar install.


    Casey

  • brickeyee
    13 years ago

    "Our cabinet installer didn't use the toekick that came with our Miele. Instead he just installed the regular toekick we used everywhere else under our cabinetry. It seemed like it was easy enough to do."

    Unless they made the DW piece separate and attached to the DW the first repair you need is going to be a real PITA.

    This ranks below putting tile in that traps the DW under the counter, but runs a close second.

  • amarantha
    13 years ago

    as posted by sombreuil_mongrel (My Page) on
    Sun, Oct 10, 10 at 14:11

    On my FI Bosch, I had to add 1/2" spacers and velcro strips. It took a while to figure this out in my own kitchen, but it saved me some time on another job where I had to do a similar install.
    ____________________________________________


    Hi Casey, could you post a photo with your DW closed. I am curious as to the fit at the bottom trim. Is your DW panel inset? It looks like you've done what my cabinet maker said couldn't be done - but a photo would help clarify.
    Thanks!

  • woodworkguy
    13 years ago

    Option One..spacers in back of other toekick trim pcs so it flushes with DW toekick pc. Are you only adding a 1/4" panel to the DW front..seems like it it could warp..or is it a miele metal trim pc?
    Option two..DW brackets move farther back enough to have a flush toekick pc.
    Option three...remove the DW brackets so you have more clearance. Looks like you have some space at both sides of the DW at the toekick to still get the DW out. If so you can add narrow nailer blocks to each side and pin nail a trim pc in fron to the DW which should be easy to remove later. You may even be able to cut back each existing toe kick trim pc on each side of the DW so the DW trim pc overlaps and flushes with the side pcs. then just screw in place to the plywood platform you have pictured. Make sense?

  • kitchen_angst
    Original Author
    13 years ago

    Woodworkguy, not sure I understand.

    Option one. The panel on the front of the d/w is 3/4". Not sure what a metal tri pc is?
    Option three. I think I understand, all but the last part.

  • sombreuil_mongrel
    13 years ago

    Mine's overlay, not inset, but inset is doable.

    If you go to the link, you can see the other DW I installed, it is inset, by Crown Point.
    Casey

    Here is a link that might be useful: Inset Bosch DW panel

  • cali_wendy
    13 years ago

    Here are a few pics of how ours was installed (as described above). Please ignore the massive amounts of dirt under my dishwasher. I guess I should have cleaned it while I was down there taking pictures, but I didn't. I decided to have a glass of wine instead. :)

    Just a note about the thickness and warping issue mentioned by woodworkguy. The toe kick is just a thin "skin" and has been installed for over a year and we haven't had any warping issues. Many other issues, but no warping toe kick.

    How the integrated toe kick normally looks:

    Close up of flush toe kick:

    Magnets installed on flanking cabinets:

    Closeup of magnets:

    Metal pieces glued to back of toe kick:

  • kitchen_angst
    Original Author
    13 years ago

    AWESOME! Thank you.

  • toddimt
    13 years ago

    btw,

    From the photo, it appears that there is a decent amount of room from the face of the magnets to the dishwasher. You could also add a piece of wood or metal, the width between the sets of magnets, secured to the back of the thinner toe kick piece to even prevent warping. It also would make it less likely to crack or warp if someone jambed their foot into the area around the center of the toekick. Might not be necessary but looks doable as reinforcement.

  • calypsochick
    13 years ago

    "Our cabinet installer didn't use the toekick that came with our Miele. Instead he just installed the regular toekick we used everywhere else under our cabinetry. It seemed like it was easy enough to do."

    The whole toekick piece is remove-able on that side. You pull it out and can snap it back onto the legs.