Shop Products
Houzz Logo Print
mdodnc

MDOD s kitchen is done!

mdod
13 years ago

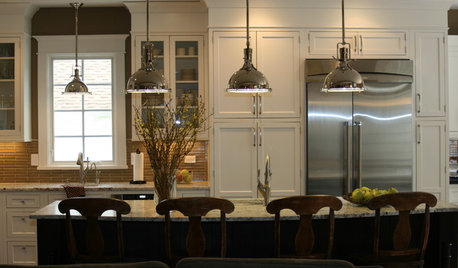
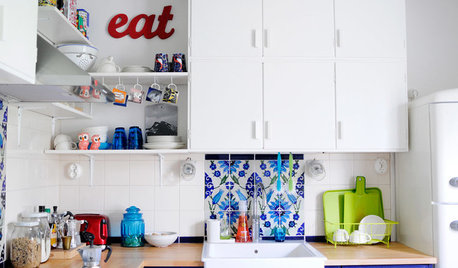
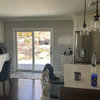
After over a year our kitchen is finally done! Well...not technically but everything but the cabinet lights and'recessed can trim is done and I'm living with what I've got until LED lights get a little better.

I haven't looked it up for a long time but I believe I have to post the kitchen here before it goes to the Finished Kitchen Blog. I'm going on vacation next week and wanted to get this posted before I leave.

I started planning and researching in the spring of '09 and I really appreciate all the help I've gotten here along the way. Other than making the island bigger and using drawers in all the base cabinets except the sink and the corner cabinet, the layout stayed the same. We kept our Bosch dishwasher and Insinkerator garbage disposal and replaced the rest of our appliances. I stripped the wallpaper in July and we took down the fluorescent light box in Sept '09. We got the cabinets in early Oct '09 and changed out the cabinets and appliances in phases so we always had a functioning kitchen. Some of the delays were my fault. It took me several months to decide on hardware. I didn't have the floors refinished until March. It took me over 6 mos to find granite that I liked so we put our old countertops over the new cabinets until we got the granite in April.

The following is a list of everything we put in:

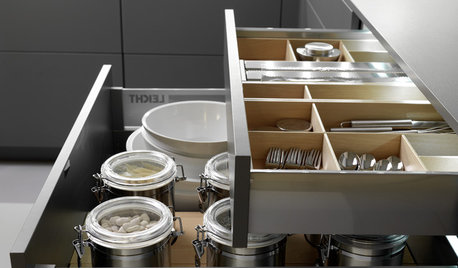
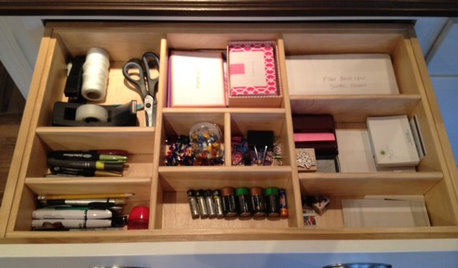
Cabinets: Scherrs RTA frameless custom cabinets. Natural Cherry Select style 200 door, style 500 slab drawer front, "F" edge detail. Industrial board boxes with natural hard rock maple melamine interior. Blum CT Inserta hinges. White melamine drawer boxes with Blum 430 e drawer slides. 32" kidney Super Susan (much better than the old lazy susan that spun around). I had them take 1" off the shelf depth for the corner wall cabinet so I could put a magnetic knife bar in the door.

Granite: Sienna Bordeaux

Backsplash: Interceramic IC Brites 4 1/4 x4 1/4 in canvas

Pulls: Amerock BP53003-G10 96 mm Home Depot

Knobs: Amerock Reflections Satin Nickel BP1387-G10 www.woodworkershdwe.net

Pendant lights: Thomas Lighting Cambridge Colonial Bronze SL8241-23

Panasonic Convection Microwave: NN-C994S Buy.com

Refrigerator: Whirlpool Gold GB2SHDXT

Miele 30" Induction Cooktop bigger than 30" KM5753

Electrolux EW30EW55G 30" Convection wall oven

Electrolux Icon E30DD75ESS 30" Downdraft Ventilation

Kitchen Sink: Vigo SS Sink VG3019 + grid from Surplusdecor.com

Kitchen Faucet: Delta 470-SS-DST faucetdirect.com

Soap dispenser: Delta RP1001SS faucetdirect.com

Red oak hardwood floors refinished

Paint Benjamin Moore Aura Matte in Dessert Green

Comments about Scherr's cabinets and installation

First, I can't say enough about how great Leon and the people at Scherr's were to deal with. No matter how many times I called or emailed he responded like he was happy to hear from me. He had no problems doing some unusual things I wanted to do and went above and beyond the call of duty to help me come up with a trim solution for my cabinets because I didn't have room for crown.

When installing drawer fronts, you have to watch where the handles will go because the predrilled hole in the drawer box may interfere.

I should have made the oven cabinet wider. I was just looking at the minimum cut-out dimensions but with frameless cabinets the box isn't that much bigger and the oven trim goes right to the edge. bigger for trim. It works but it would have been better if I made the cabinets a little wider.

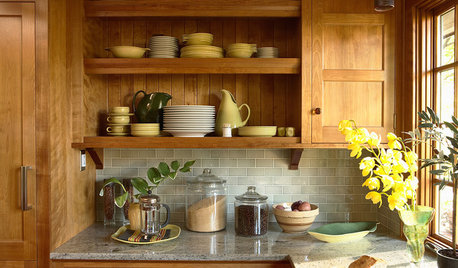
I have several 30" or wider cabinets and the composite shelves do sag in the middle with heavy plates or cans. Our previous face frame cabinets had shelf supports in the middle of the back and the center frame stile that prevented sagging. There's no frame to add them for the front of the shelf but we were going to try to add support clips in the middle of back but haven't tried that yet.

When putting the cabinets together, be sure to pound the dowels in all the way. It doesn't seem right because only a little section sticks out but the ends that it goes into is only 3/4" thick so it will blow out if you leave too much of the dowel sticking out.

To attach the cabinet connectors clamp the sides of cabinets flush at top, bottom and sides.

Drill 5 mm hole 1" from front, in 3 places: top, bottom and middle.

Attaching the filers: drill a 1/8" pilot hole for filler. Use the 1 1/4" filler screw. Fit flush to face.

Install a screw about 2" from the top and bottom, and then 1 per ft.

The Blum door hinges are awesome. You just push them in and flip a lever down to lock them in place. No screws or drills. The 170 degree hinges do take up a lot of space though.

Some special things we did in our kitchen:

Soap Dispenser- no need for Never MT. Just hook plastic tubing to the bottom of the dispenser and run into a bottle of detergent. Just make sure it's fits snug.

They drilled the hole for the soap dispenser before I caught them. It is too far back so the soap just barely clears the sink. It works but it would have been much better if it was further forward.

When we made the island bigger we covered the HVAC floor vent so we had to turn it into a toe kick vent. My husband didn't want to use a 3x12 vent cover and he really liked the flush floor vents we got when we refinished the hardwood floors. So..he took the toe kick and screwed a rectangular wooden frame to attach the vent to. The he got a 4x10 flush vent and cut it down just past the grill and cut out a rectangle in the toe kick to put that in. It took two weeks to find what we needed and get it like he wanted and nobody can even see the thing but he thinks it's cool.

We put an electrical outlet inside the island cabinet for all the chargers.

We already had an outlet inside the pantry for the dustbuster and shredder.

I also wrote a post in the appliance forum with thoughts on my appliances. We've had most of them in for about a year now.

Here's a link to my photo album with before and after photos and comments as we went along.

Thanks again for all your help. I will try to check in if anyone has any question but I won't be available very much for the next month or so. I tried to put everything here.

Comments (18)

  • positano
    13 years ago
    last modified: 9 years ago

    Looks beautiful! Quite a transformation. The granite and cabinets are gorgeous. You must be so happy.Congrats!

  • bmorepanic
    13 years ago
    last modified: 9 years ago

    "try to add support clips in the middle of back but haven't tried that yet"

    The cabinet back isn't structural - trying to do this would just rip the back to pieces.

    So I'm thinking a couple of things - the simplest being get more shelves. You'd have less weight literally piled up on each shelf . Try replacing one or two with their plywood shelves, they hold a lot more weight. Or add a 1 x 2 across the back of the shelf and attach it on edge to the shelf (drill up from the bottom - just like adding a filler). This will provide more stiffness.

  • bmorepanic
    13 years ago
    last modified: 9 years ago

    It's beautiful!

  • rookie_2010
    13 years ago
    last modified: 9 years ago

    What an AMAZING transformation, it's beautiful! Enjoy!

  • vampiressrn
    13 years ago
    last modified: 9 years ago

    Nice colors and I love your counter top. GREAT JOB!!!

  • ejbrymom
    13 years ago
    last modified: 9 years ago

    It looks great! What a beautiful kitchen with so much countertop space and storage!
    Love the granite!!!

  • mdod
    Original Author
    13 years ago
    last modified: 9 years ago

    Thanks for the shelf comments bmorepanic. I never thought about it tearing up the back because that's what my previous cabinets had and the back was only 1/8" hardboard. These backs are 1/4" industrial particle board, the same as the sides but thinner. I will double check with Scherrs before I do anything. Good idea about adding a board to the back of the shelf. I was considering adding one to the front but the back makes more sense. I really don't want to add more shelves because that restricts what I can put on them too much.

  • honeychurch
    13 years ago
    last modified: 9 years ago

    Congratulations! Also, thanks for the informative post in appliances--people agonize over their choices, and then we never hear how they worked out (unless it's bad). Very helpful to read updates like yours.

    Enjoy your lovely kitchen! :-)

  • chris45ny
    13 years ago
    last modified: 9 years ago

    Your kitchen wasn't bad before but looks great now. Thanks for all the detailed info for DIYs out there. Your husband appears to be very handy. The island vent turned out very nice. Love the calmness/serenity of your granite and the simplicity of the backsplash-they look great together. Congratulations!!

  • dianalo
    13 years ago
    last modified: 9 years ago

    Great update! Your counters are lovely and I love the new bigger island. You seem to have much more function with the new size and you did not give up much space to get it.
    Pat your husband on the back because it came out lovely!

  • njmamma
    13 years ago
    last modified: 9 years ago

    It looks great! The Sienna Bordeaux is beautiful- you can't see the seam at all from the picture. I also love your ideas of putting the outlet inside the island and the vent in the toekick. I can't believe you did all that yourself- amazing!

    Enjoy your vacation and your kitchen!

  • Jody
    13 years ago
    last modified: 9 years ago

    Your new kitchen looks amazing. Love your Sienna Bordeaux .... looks *so right* with your cabinets. You guys did an excellent job!!!

  • phoggie
    13 years ago
    last modified: 9 years ago

    I enjoyed visiting your kitchen...and it looks great. I especially liked seeing the pic of the soap dispenser hooked up to the soap bottle... I am such a "visual" person that now I know how it is done.
    And your garnite is wonderful!
    I hope you enjoy it for many, many years.

  • mdod
    Original Author
    13 years ago
    last modified: 9 years ago

    Thanks for the comments. Yes, I've got a lot more functionality out of this kitchen. I love the Sienna Bordeaux itself but it is more gray and darker than I wanted. I saw a single slab of granite called Ivory Fantasy that I loved but I needed 2 slabs and that was all they had. I spent 6 mos looking for more and could never find any. The Sienna Bordeaux kept catching my eye so I figured that must be the one. After much trial and tribulation, I finally found slabs that were tall enough to have just one seam.

    It was amazing that all the granite yards and fabricators just wanted to know how many square feet I wanted. I had 13' run in one direction and when I tried to explain that I needed it to be at least 73" tall to make one seam they all said don't worry, we'll make as few seams as possible. I paid a lot of attention to how everything would lay out before I bought the slabs. I put spots I didn't like in the sink and cooktop cut-outs, I placed the veins where I wanted them and I made sure the seam would be inconspicuous. Believe me, the layout they started with wouldn't have looked nearly as nice. Fortunately my fabricator was very patient and let me do my thing.

    One thing that is good and bad about Sienna Bordeaux is that it NEVER looks dirty. I say bad because I frequently don't realize the counter is dirty until I touch it. I also had a heck of a time finding tile to match. I wanted something simple so it wouldn't detract from the granite but everything was too yellow or too pink. This one is still a little pink in some lighting.

    The paint was another nightmare. My problem is that I've got warm cabinets, floors and granite but I like cool colors! It's probably not the best color but it's a good compromise for me.

    I also wanted more contrast between the floors and the cabinets too but they are what they are. When they did the sample color, they just happened to pick a patch that stained a little differently from the rest so the color looked like it would be different than it ended up overall. I'm just glad to get rid of all the scratches.

    As a follow up to my comment about the cabinet shelves sagging, I wanted to clarify that it was just a little.
    The main problem is the 33" pantry cabinet. It's not terrible but my husband said they would sag and I
    said it was supposed to be OK. After several months we did notice a slight dip in a couple of shelves that hold cans and I got to hear "I told you so". It's been a year and it still isn't bad. I thought about just turning them over once in a while but then I wondered if bending them back and forth would somehow weaken them over time.

    Leon Scherr got back to me and he didn't recommend adding shelf pins on the back like I mentioned. He said I could either flip the shelves occasionally or add solid maple strip of wood (about 3/4" thick 1-1/2" tall)to either the front or back of the affected shelves or both) or get plywood veneered shelves but cans can sometimes be a problem even for plywood shelves. He also suggested putting heavier items toward the ends of the shelves instead of the middle. I generally try to do that but cans are heavy regardless.

  • flwrs_n_co
    13 years ago
    last modified: 9 years ago

    What a lovely and functional kitchen! Thank you so much for sharing lots of information; it will come in handy for lots of folks. Personally, we'll use you toe kick vent idea if we go to 30 inch countertops (which I'm pretty sure we're going to do whether we knock down the wall to the DR or not). Your cabs and granite are a great match! Your granite layout story is a good lesson to the rest of us not to depend on the fabricator to do the best layout for our space. You and DH have done a wonderful job and have certainly earned that vacation--relax & enjoy!

  • toddimt
    13 years ago
    last modified: 9 years ago

    Nice transformation. I have been in contact with Leon over the past several weeks with questions. As you said very responsive. I am looking at the RTA route and hopefully will send my layout soon for pricing.

    I had a question. What is the cabinet width for your trash pullout? What size cans are in there?

  • mdod
    Original Author
    13 years ago
    last modified: 9 years ago

    todds: I just added a photo with the bins out and a full description of what we did but here's what I wrote.

    We made a drawer box out of melamine coated 1/2" cabinet grade particle board that we had and capped it with a piece with cut-outs for the two trash bins. We had a 20" cabinet on each end of the island so we made the drawer box 17 1/2'" wide and 23" deep and used full extension slides. We could have gone down to 16" wide but I wanted as much counter space as possible on that end of the island. We used Rubbermaid 2957 39 liter commercial trash bins that we got from Home Depot. That's bigger than what you get with a typical double bin pull-out for that size cabinet.

    I like the bins inset into a cut-out because garbage can't fall down in between the cans and into the cabinet. It also seems more stable to have the drawer pull closer to the door attachment. The downside is that a different trash can might not work. I really should get some extras for future use.

    I fooled around with a template in cardboard until I got it how I wanted it then we transferred it to the top. You want the trash bins elevated a little so you can get them in and out easily. Also, since the bins taper, the cut-out is smaller farther down allowing a wider crossbar. I ended up with 10" x 14" cut-outs starting 3/4" from the front and with a 1 1/8" gap between them. We brushed polyurethane on the cut-out edge and added a 3" high vertical crossbar in between the two cut-outs for support . The top of the pull-out box is 4 1/4" from the inside of top cabinet frame.

    The back bin has to be jiggled just a little to get it in or out and the two bins butt right up next to each other in the middle. Since we had a wider cabinet than we needed, I wanted to make the drawer sides 4" tall and off-set the cut-outs so I'd have room at the bottom of one side of the cabinet to store trash bags and such. My husband insisted on making the sides taller for support since it's only 1/2"particle board. I think that's total overkill but I just wanted it done so I gave in. If we end up changing the door, we will redo it now that we have a working model. Whenever I dump the recycle and trash bins together, I rotate the recycle bin to the trash position and put a new bag in the recycle bin. That way the recycle bag gets replaced regularly.

  • cj47
    13 years ago
    last modified: 9 years ago

    Those cabinets are beautiful, and so is the granite! I love that big pantry, too--what great space that is! Enjoy it! It's a wonderful transformation.

    Cj