


My UCL install
There is a little bit of a lul in our kitchen install due to a granite snafu, so I thought that I would get the UCL installed. I think that it turned out pretty well and they seem plenty bright to me. Total cost was $161 using Armacost brand LED strips from Home Depot.
Needed parts were:
+ 30W power supply (Home Depot)
+ 12ft LED tape (Home Depot)
+ Snap connectors for the LED tape (Home Depot - online only)
+ 18 gauge CL2 rated speaker wire (Monoprice)
+ Wire connectors (Home Depot)
+ Terminal strip and jumpers (Radio Shack)
+ 3/4" wide aluminum flat bars (Home Depot)
I could have done without the aluminum bars, but it made mounting easier. The 12ft of LEDs was perfect for our needs, as I had just a little left over. If we wanted to, we could have added a dimmer between the power supply and the LED strips, but we like our lights bright and likely would never dim them.
Here's basically, how I installed them:
1) Cut the LED tape so there is a maximum number of LED's to fit under the cabinet, but leaving a bit of space for snap connectors on the ends.
2) Cut the aluminum bar a bit shorter than the LED strip, so the snap connectors can fit over the tape ends.
3) Peel off the LED tape backing and press onto the bar.
4) Attach pieces of heavy duty double sided tape to the back of the bar. For the longer runs, I used 3 pieces of double sided tape and just two for the shorter runs.
5) Using a 3/4" wide wood strip as a spacer, adhere the bar under the cabinet.
6) Attach the snap on connector to the end of the tape.
7) Use mini self adhesive wire clips to tidy up the wires.
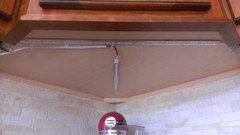
The spacer makes placement easier and puts the LED's about 1-1/4" from the front edge of the cabinet frame. That distance works out well, as there is no shadow of the front edge being cast onto the counter. To make sure that polarity of the strips would not be an issue, all strips where mounted so the writing on the strips were all in the same orientation with respect to the front edge of the cabinet.
Before the cabinets went in, I installed an outlet above one cabinet, controlled by a switch. It is hidden by the crown molding. Plugged into that is the 30W power supply. The output side is connected to a terminal strip which allows connection of the two LED runs. Speaker wire runs behind the wall and to the bottom of the upper cabinets flanking our window.
The two upper cabinets flanking the window were notched around the speaker wires. That is the only modification of the cabinets that was required in this whole install. Bullet connectors attach the speaker wire to the first LED strip in the run.
Snap connectors for the LED tape daisy chain the strips together. Once the light rail is installed, any wire hanging down a bit will be hidden.
Though, after bending over backwards to mount these strips, I may need to get DW to give me a good back massage.
This post was edited by gpraceman on Sat, Jun 22, 13 at 11:38
Comments (42)

SparklingWater
10 years agolast modified: 9 years agoNice job! Lots of creativity there and I believe you on the back rub. Amazing those LV require only 30 Watts. Think how nice your electric bill will be. Thanks for posting the specifics and the pictures. Helps everyone to see genius in action. Enjoy.
Related Professionals
Agoura Hills Kitchen & Bathroom Designers · East Islip Kitchen & Bathroom Designers · Everett Kitchen & Bathroom Designers · West Virginia Kitchen & Bathroom Designers · Adelphi Kitchen & Bathroom Remodelers · Biloxi Kitchen & Bathroom Remodelers · Brentwood Kitchen & Bathroom Remodelers · New Port Richey East Kitchen & Bathroom Remodelers · Port Angeles Kitchen & Bathroom Remodelers · Portage Kitchen & Bathroom Remodelers · Saint Augustine Kitchen & Bathroom Remodelers · Allentown Cabinets & Cabinetry · Buena Park Cabinets & Cabinetry · Saugus Cabinets & Cabinetry · North Bay Shore Cabinets & Cabinetrygpraceman55
Original Author10 years agolast modified: 9 years agoOh, also on the 30W power supply, that can actually support up to 24 ft of LED strips. I could have done over cabinet lighting as well with the same power supply. Maybe at some later date.
SparklingWater
10 years agolast modified: 9 years agoHow many LED bulbs per foot, may I ask, on that 30 Watt power supply?
I had low voltage wire run and 10 in glass cabinet xenon dimmable nickel puck lights installed (20 watts x 10) and needed a 200 watt transformer. Some day those WAC recessed in-cab puck lights will take LED bulbs for real energy savings.
buildinva
10 years agolast modified: 9 years agoLooks great! Thanks so much for the great post with detailed information. We are planning to install these in our kitchen, so I really appreciate the review!
gpraceman55
Original Author10 years agolast modified: 9 years ago@SparklingWater - There are 3 LEDs every 2 inches. That is also where you can cut the tape, at any 2 inch increment.
gpraceman55
Original Author10 years agolast modified: 9 years agoI left the lights on for a couple of hours and the power supply is only warm. Anyways, I put the power supply up on a couple of spacers to make sure that air can circulate around it. With LED systems, if anything is going to fail, it is the power supply, so it helps to keep it as cool as you can.
andreak100
10 years agolast modified: 9 years agogpraceman - thank you for so much detail on those. It's very helpful. I've been going back and forth about what to have installed - I can't really tell how much light is "enough" for task lighting...though truth be told, I have NO UC lighting now, so *any* is better than what I've got.
I'm going to read up more on the Armacost to refresh myself on how bright they are and if any info is available on their dimmable capability since we plan on using them both as task lighting and ambient lighting - from what I've read, some LED set ups dim better than others, but I don't know what determines that.
Hope that you got a nice back rub out of it. I think that installing it actually deserves a good professional massage for you!
PS - your kitchen is looking great!
jalsy6
10 years agolast modified: 9 years agoNice work! These lights are one of my favorite things about my kitchen. Plus it didn't break the bank...which was perhaps the biggest factor!
seosmp
10 years agolast modified: 9 years agoThanks for the detailed instructions and pictures!
I actually purchased a bunch of these and power supply from HD. I figure I can take back what we don't use (or all of it if we go a different route).
You mention you have the outlet connected to a switch in the wall and that if you wanted to, you could use a dimmer between the power supply and LED strips. Do you happen to know -- Is it possible to use a wall dimmer switch with these? I would like to be able to dim ours.
Thanks!
gpraceman55
Original Author10 years agolast modified: 9 years agoandreak100 and seosmp,
There are two basic ways to dim these lights.
1) Use a regular dimmer and purchase a dimmable power supply. The dimmer would go on the high voltage side of the power supply.
2) Use a non-dimmable power supply and get a dimmer that will work on the low voltage side (between the power supply and the lights).
Option 1 is by far the more expensive option, as dimmable power supplies are much more expensive than non-dimmable. I don't think that Armacost has a dimmable power supply, so you would have to use another brand.
For Option 2, Armacost does have a dimmer that works on the low voltage side. You can mount it in a wall box, if you wish. Those are available from Home Depot.
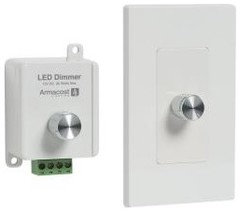
Here is a link that might be useful: Armacost Dimmer
gpraceman55
Original Author10 years agolast modified: 9 years agoAlso, if you do use the Armacost dimmer, I would not put that in a box that contains any AC wires. The low voltage DC wiring should be kept away from the the high voltage AC wiring to prevent interference. The current running through AC wires can induce currents into the low voltage wires. That also means that you should not run the low voltage wires along side any AC wires.
gpraceman55
Original Author10 years agolast modified: 9 years ago@andreak100 - DW did give me a nice back massage last night. I must have really tweaked a muscle in my lower back as it is pretty sore this morning. I guess that I should have added the cost for a professional massage into the cost of the lights, LOL.
gpraceman55
Original Author10 years agolast modified: 9 years agoHere's a closeup of the terminal strip, if it helps anyone. Jumpers were used to connect terminals together. Radio Shack does have terminal strips that have more contacts, if you need to wire in more runs. I only had two runs, so a 4 contact terminal strip was all that I needed. Narrow spade connectors were crimped onto the ends of the wires.

gpraceman55
Original Author10 years agolast modified: 9 years ago@holly-kay - Thanks. They are cherry with a "spice" stain. We love the character of the grain that the cherry wood has.
icefox
10 years agolast modified: 9 years agoThank you so much for your detailed description and pictures!
I was just researching LED striping for my kitchen and your topic came up. Would you mind to post a picture with the finished product?
I am thinking of adding LED strips to the bottom of my contemporary Ikea cabinets against the backsplash to create a striking effect for the backsplash.
oldbat2be
10 years agolast modified: 9 years agogpraceman - Love the combo of your countertops and cabinets. I will look forward to your reveal. Best, oldbat2be
Mgoblue85
10 years agolast modified: 9 years agoI agree with Oldbat2be - the cabs and counters are lovely! Can't wait to see the rest.
gpraceman55
Original Author10 years agolast modified: 9 years agoHello All,
Here's the final reveal, http://ths.gardenweb.com/forums/load/kitchbath/msg0821435913619.html
gpraceman55
Original Author10 years agolast modified: 9 years agoI will be making one minor modification to our UCL setup. The corner is a bit dark for my taste, with only the strip towards the front edge. So, I will be splicing in a strip to go down the middle of that cabinet, from front to back. I have the materials. I just need to make the time to get it done.
gpraceman55
Original Author10 years agolast modified: 9 years agoI finally got around to fixing the dark spot in the corner. I added a strip of lights down the middle of the cabinet. I teed off one of the connections between light strips, with some speaker wire, to get it wired in. Now, the corner is nice and bright.

vgkg Z-7 Va
10 years agolast modified: 9 years agoThanks for the ideas and feedback. We presently have halogen under cab lighting which also get too hot for our tastes and as well eats up energy to produce that unwanted heat. Have planned on LEDs for over a year now but waiting for costs to come down and design improvements. Our present cab lighting has a wall switch which can easily be switched to a dimmer and we'd use it on low as a kitchen night light as well. We need about 8' of cab lighting but will go with pre-made snap-on modular units once we find a design we like at either HD or Lowes. I'm not sure who would by halogen, xenons, even florescent anymore? We really like LEDs, hopefully the prices will drop soon.
gpraceman55
Original Author9 years agolast modified: 9 years agogabytx12 - Glad this can be of use to you.
It's been about a year and a half since we installed these and we are still loving them.
We installed these same lights in my in-laws kitchen. I used the leftover tape strips for my basement work area.
emajination
9 years agolast modified: 9 years agogpraceman,
Great instructions.. I'm planning on using your steps to install my UCL or to have the electrician install them since they will be hardwired.
I have a few questions.. how are the flat bar attached to the cabinets? I know the LED are attached the flat bar because they have glue strips on the back of them, but not sure how the flat bar is attached to the cabinets.
Thank you sooo much for the detailed directions.
gpraceman55
Original Author9 years agolast modified: 9 years agoI simply used heavy duty double sided tape. You can find that at Wal-Mart or a home improvement store. Squares of the tape were placed at each end of the bar. For the longer bars, I also added a square of the tape to the middle.
{{gwi:2140127}}
marg143
9 years agoGpraceman, thank you so much for this! Really appreciate all the detail and the photos. I've been looking at Armacost for awhile and am hoping to install UCL soon. If you're still reading this thread I'd be interested in your (or anyone's) thoughts, if you know the answers here:
It doesn't look like you used a diffuser - any issues with hot spots on the reflective granite? If I use a diffuser, I'm also concerned lumens will decrease too much. I was looking at the most concentrated tape - 120/m - is that the one you used and does your granite show the LED individual hot spots?
Here are some more generic electrical questions on this topic:
I had the electrician install an outlet in the cab above the micro, controlled by switch on opposite wall. I need a run going each way from that outlet, so the wire needs to get down to the underside somehow on either side of the micro. The electrician I was using (he's gone now; I will need another) did not want to install any wire in the walls, but here you have done that (he thought there were code issues?). My options are to see if it can be done after the fact, or, what we were planning, to tack the wires on the interior of the cabinets to get down there. Similarly - going above the sink where the cabinet base is higher, the wire was going to be tacked inside the cabinets. Am I missing a better opportunity than tacking wires in cabs?
I think at the sink I could branch off two runs to double the light there, and continue with just one on the remaining cabinet?
For the dimmer, I think I could switch on the light at the wall switch, and install the dimmer you have photographed on one side of the power supply - but if I need to go two ways from the power supply, the other side simply wouldn't be dimmed - is that correct?
Thanks!
gpraceman
9 years agolast modified: 9 years agoI didn't use any type of diffuser. The individual LED's can be seen if you get close to the counter, but that hasn't bothered us at all.
If you have regular framed cabinets there is a small gap between cabinets, so you can run the wire down that space. You may even be able to run a wire between the cabinet and the microwave. All you need to run is low voltage wire, so you shouldn't have any code issues.
You can do as many runs as you like, as long as you don't exceed the capacity of the power supply. Armacost does have a 60W power supply on the Home Depot website, if the 30W one will not suffice.
We didn't install a dimmer, so I cannot speak to that. We like our lighting bright, so we'd never feel the need to dim them.
marg143
9 years agoThank you, gpraceman! Did you use the 120/meter version - highest brightness - or the 60/m which is sold in HD stores?
My cabinetmaker did not frame each individual cabinet - there is no space between cabinets. So it's wire in the cabinets or.. in the wall. I don't know why the electrician didn't think he could run it in the wall - sigh.
gpraceman
9 years agoI ordered everything off of the HD website. The extra connectors were available only online, so I did everything there.
I think your electrician was just lazy.mdod
9 years agolast modified: 9 years agoGlad you are still around. I've been following the lighting forum for a few years and I posted
there but haven't gotten a response yet so I decided to search the
kitchen forum.We redid our kitchen several years ago and we held off replacing the fluorescent under and over cabinet lighting because LED wasn't there yet. OMG I just looked it up and it was in 2010!!! Anyway, I've wavered between LED UCL/fluorescent over and LED for both. I finally decided to go with low voltage LED strip lighting for both. I see that you just have the strips without a diffuser. I was worried about the exposed strip LEDs getting dirty or banged up. We used it like you did (on an aluminum strip without a diffuser) on a project at my office but it is protected in that installation. Now that your lights have been installed for while now, are you still happy with them being exposed?
gpraceman
9 years agoWe have no issues with them not being in some type of diffuser or whatever. I not sure that I understand the concern about them being exposed. We don't normally have anything hitting the undersides of our upper cabinets that could damage them. They don't get dirty and dust doesn't settle onto them. If anything ever got splashed onto them, I would have no problem with just wiping them off. If they did somehow get damaged, it is pretty inexpensive to just replace that segment.
mdod
9 years agoOK. Thanks. It's cheaper and easier to not have to mess with that. It just seemed kind of weird to have all the guts hanging out there.
gpraceman
9 years agoThe guts aren't really hanging out, in my opinion. Besides, how often do you or other people look at the undersides of your upper cabinets?
mdod
9 years agolast modified: 9 years agoI wasn't worried about people seeing them, just potential damage. Are yours waterproof? Also, it looks like the HD product is 60 LEDs/M. Any desire to have them brighter? I have some leftover from my other project that are twice that brightness.
writersblock (9b/10a)
9 years agoGosh, somehow I missed this thread the first time around. Thank you so much, gpgraceman. This is the best tutorial on UCL that I've seen yet. So glad it got a bump.
gpraceman
9 years ago@mdod,
They really don't need to be waterproof. Are you often splashing the undersides of your upper cabinets? Anyways, It's only 12V DC we are dealing with, not 120V AC.
If ours were any brighter, then I might want a dimmer. As they are, I think they are just right.brettj930
7 years agogpraceman - This walk-through is one of the most helpful I can find on installing LED under-cabinet lighting. Can you explain in more detail and/or post additional photos on the process for connecting speaker wire to the various components (terminal strip + jumpers, bullet connectors, etc). Is there soldering involved? Is it ok to leave these connections exposed in the open due to being low-voltage (as opposed to normal wire splices which need to go in a junction box)?
Thanks!gpraceman
7 years agoThere is a photo above that shows the connection of the speaker wire to the first LED strip. Those are wire butt splices crimped onto the ends of the wires. You can find those at your local home improvement store. There was no soldering involved. Many wire strippers have a location on the tool to do the crimping of those connectors. I believe that I got the butt splices, spade connectors, terminal strips, and terminal jumpers at my local Home Depot. Low voltage connections do not need to be in a terminal box.


gpraceman55Original Author