Shop Products
Houzz Logo Print
brickton

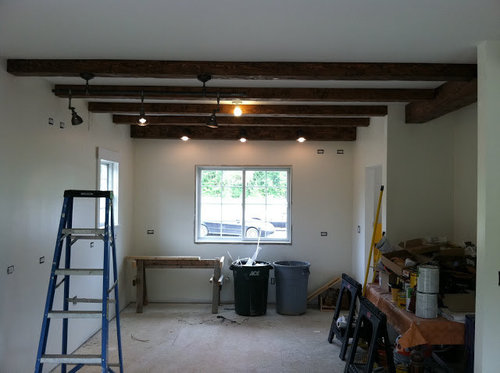
Kitchen Update - Lighting in (mostly) and Beams review

brickton
12 years ago

A while back I posted about my lighting plan for the kitchen which included a mishegoss of way too many types of lights. Thankfully you all helped me edit it down and we have it mostly in. That thread is too old to revive apparently, but I wanted to post an update. We don't have the center pendant in as we're waiting for floors, cabinets and countertops before I put a (what I'm assuming to be) ridiculously easy to break glass ball on a chain in the middle of the room.

** Ubiquitous apology for iphone photo quality here **

So here's our kitchen to be as it stands now:

Sink wall with 3 lights. Again thanks to caoh for the inspiration and exact light recommendation.

Better shot of the track lights. Ignore the scrap on the wall, it's just a flesh wound. Installing beams is hard y'all.

Looking out towards the living room dining room where the "beam" goes "through" the wall.

Our beams are pieced together hollow beams that came unfinished from Virtual Timbers. They are in the hand hewn finish and we love them. We stained them with one coat of Provincial by Minwax left on for 15 minutes and wiped off. We ended up paying less for these than some of the foam beams we priced out and seriously could not be happier with them. Both before and after staining you could not see the seam at the corner where to sides meet. They do a wonderful job and I would heartily recommend them to anyone or use them again for another project.

We did have some issues installing them but that was mostly due to us not realizing that the sheetrock tape in the corner of the wall caused the distance at the top of the beam to be tighter than the distance at the bottom of the beam by up to 1/2" inch. My contractor (who did not install them, we did) later told me he has a special tool to scribe the ends just so when he does it ... of course he does. Oh well, we can patch the walls and the gaps at the bottom of some beams (maybe 3 beams out of 7 have gaps on the bottom on one end or both) will get patched and painted if it continues to bug us, or maybe some moulding if we get desperate. The actual putting up of bracing, and nailing / screwing the beams to it was very straight forward and only required 3 guys for the one 16' beam. The cutting and measuring would have been probably fine too if I knew ahead of time to scribe or if I had checked the corner for square.

Comments (30)

  • abbeys
    12 years ago

    Your beams look beautiful. Can't wait to see the rest!

  • steph2000
    12 years ago

    The beams are great - and so is the track lighting. I wish the old thread could be resurrected, as I am going to have similar questions at some point here. I like the idea of a track across the run - is that a smaller track with a single light over to the left? What did you use?

    I'm still in the initial stages and trying to pick out a layout, but I have a feeling I am going to have lighting questions galore at some point here. Might as well start a file now... lol

  • brickton
    Original Author
    12 years ago

    The track lights on the beam is one 60" track light from Pottery Barn with 3 Gallery spotlights in 'bronze'. It's actually a kind of grey-ish brown color IRL. We bought it off ebay because we didn't know if we were going to love it or not. My wife and I are both psyched with it so far, hopefully even more so once there is a peninsula underneath.

    {{!gwi}}

    It's attached to two remodeling boxes that I drilled into the beam and wired to support pendants (ie wires even in the dummy suport for the track) in case we want to switch the track for pendants later. I only mention it because the track supports didn't cover the remodel boxes so there was an obnoxious blue ring around the support which annoyed me to no end. But it turns out those little Glidden sampler things in Walnut Bark make a pretty good little cover up solution.

    The 3 lights on the beam over the sink are the Essen Dark Sky 6" Short light in Rust. It's very close to black, more like charcoal. I don't know why that's called Rust. It messes with my color blind head when color names don't mean what I assume they mean.

    The light in the center is a super-chic porcelain fixture, trendy hipster faux vintage industrial $1.50 temporary thing. It will be replace by the PB Calhoun pendant eventually.

    {{!gwi}}

    If that doesn't work (not enough light, too low, too blinding, etc.) then our plan B is to cry about it. And who knows maybe our gorgeous sleek minimalist industrial piece will make a come back.

  • palimpsest
    12 years ago

    I like the beams :)

  • doonie
    12 years ago

    I love those beams! Thanks for sharing:)

  • nutherokie_gw
    12 years ago

    Those beams are amazing looking! And your color choice is beautiful, too. You've inspired me to run out and get some Provincial stain and give it a try. I wish I'd heard of Virtual Timbers before our ceiling details started going in.

    I look forward to seeing all your lighting choices in place.

  • marcolo
    12 years ago

    OK--honest question? Do they look as realistic in person as they do in pictures? Because in your photos they just look great.

  • slush1422
    12 years ago

    Those beams are gorgeous. I am so jealous! I can't wait to see your finished kitchen. Thanks for sharing.

  • kmmh
    12 years ago

    Looks great so far!

  • brickton
    Original Author
    12 years ago

    Nutherookie- We're doing planning to do Provincial for our floors (two coats on oak) and we liked it so much we did the beams to.

    Marcolo- Honestly I can't tell they're not solid. My GC kept getting his face as close to a corner as possible to try and see the joint and the way they miter them and sand it, it makes it nearly impossible to see or feel.

    I was nervous when we stained them because one beam has a very different grain pattern, like it might be another type of wood. But once they're up I have hard time even remembering which one that was.

    The only place you can tell they are fake is at the gaps at the wall. If we had installed before sheetrock it would have been perfect, or if I had done a better job of coping it, maybe. As it is we have some ideas to camouflage the one or two gaps that are noticeable. We might try to fill with shims and then spackle it and paint it to match the wall. If that doesn't work, we could do molding, iron brackets or someone even suggested wrapping it with thick rope.

  • rhome410
    12 years ago

    Looking so great. Can't wait to see more.

  • oldhousegal
    12 years ago

    Brickton I love your Beams!!

    Not to hijack your thread, but any way you could explain how you installed those? I am installing beams that I built, in my dining room, and was curious how you attached them to the ceiling joists. Or, if you could point me to where I might find that info, I'd be very grateful!
    Thanks

  • mythreesonsnc
    12 years ago

    Brickton, I love your beams, they are amazing, and I especially love the beam through the wall, very cool. Wish I'd known about virtual timbers! The Provincial stain looks perfect on them as well. The lights look great too, can't wait to see more!

  • brickton
    Original Author
    12 years ago

    Not a hijack at all oldhousegal. We ripped 2x8s and 2x6s to fit into the channel of the beams. The larger beams are 8" x 8" exterior with an inner channel of 6.5", the smaller beams are 4"h x 6"w with an inner channel of 4.5". We screwed these to the ceiling joists through the finished sheetrock using 3" deck screws (I double heart Scorpion brand screws). We then cut the beams to length, making sure to cut both ends as they come with uneven ends (ie one side longer than the other two). We then slid the beams up over the 2xs and screwed in from the side to the 2xs. We used maybe 2 screws just to hold the beam and then 2" finish nails shot through the side into the 2x. Some people recommended PL/Liquid Nails but we had a hard enough time getting the beams in place, I shudder to think where the glue might have ended up.

  • doggonegardener
    12 years ago

    I remember that thread. I think you made great choices in narrowing things down. Didn't you have another thread about the placement of that window? It's looking good! Love the beams.

    Ne

  • oldhousegal
    12 years ago

    Brickton - thank you so much for the description of installation. That is so much easier than what I found online that said to install with lag bolts, and I just couldn't figure that one out!

    I hope mine turn out half as nice as yours are!

  • brickton
    Original Author
    12 years ago

    I figure I would toss up a couple more update photos as things slowly chug along with the house. All of the hardwood is in in the house (woot!) and has been stained (or in some cases stained, found to have a huge mysterious circular scratch, resanded and stained again) and is getting finished this week.

    The floors for the kitchen (DR & LR) is rustic white oak 6", 7" and 8" stained again with Minwax Provincial.


    And shelf support mockup for my wife. We're going to go with a mix of these two corbel options (only 1x behind, not ontop and behind like on the left). And it will all be painted white.

  • bigjim24
    12 years ago

    Wow! That is absolutely beautiful! What an amazing job you've done so far. I love your PB Calhoun pendant. Please keep posting your progress!

  • formerlyflorantha
    12 years ago

    I'm reminiscing about one of my abandoned plans. We had a big old tree go down and I so much wanted to use it somehow--under an arm of the peninsula if nothing else. Seeing your ceiling makes me nostalgic for what could have been.

    Nice work.

    Am also impressed by your avoidance of recessed lights. Much more interesting. More personality. You and your spouse have a good eye (each of you) and a good vision (both of you).

  • boxerpups
    12 years ago

    Bricton,
    It is looking amazing. You must be so excited.
    Clever use of lighting with those beams is just perfect.
    ~boxer

  • NewSouthernBelle
    12 years ago

    The beams are fabulous. Are they all totally aesthetic or are any of them structural and you wanted to duplicate the look to keep one from being lonely? (This might be part of your original post or design creation threads but I am new around here.) I ask b/c we have to do a structural beam and I am wondering if I could/should add some more to keep them company. I can't wait to see your kitchen totally finished.

  • pricklypearcactus
    12 years ago

    The beams look fantastic! Thanks for sharing this company! I currently have beams in my home that are very obviously 3 pieces of wood wrapped around something and then painted brown. While we love the architectural detail of beams, we really wish they looked more like real beams (real stained wood, beautiful mitered corners, etc). I had been wondering if I could hire a true carpenter to build something, but this looks like it could be an even better option! I don't see a selection of wood species (just "texture"). Can you select the wood species? If not, do you happen to know what wood they are made out of? Thank you for sharing your fabulous beams.

  • brickton
    Original Author
    12 years ago

    Thanks for the kind words everyone. Florantha, my wife and I thoroughly enjoy getting to design each and every part.

    NewSouthernBelle- They are entirely aesthetic. They were applied over the finished sheetrock after it was taped, primed and painted. I'm all for making structural elements less lonely though.

    pricklypearcactus- I don't know what type of wood they are. I would guess Douglas Fir, but it's just a guess. I'm sure if you contact Luke at VT he'll let you know. They were really great about communicating back and forth with me during the whole process. One thing to note is that the grain on some of the beams is very prominent and with a lighter stain, it might have stood out more than some would like.

  • Capegirl05
    12 years ago

    Hey Brickton and wife :o)...it looks amazing! I am new to GW kitchens and I don't know what the "before" looked like, but you all have done a great job. I love how you have both done so much of it on your own! I am going to let my husband see the pics and your explanation of install...we are building a home and we have put in three 20' hewn barn beams across the vaulted ceiling in our great room (the real ones)...darn it! I wish I knew about your connection about a month ago..:o) I will wax them once the sheetrock is hung, etc. They will look very similar to yours. Did you all follow the directions to leave it on for 15 minutes before wiping off? Just curious. Keep posting pictures so we can see your progress...btw, I like the make-shift light..

  • Adrienne Gray
    12 years ago

    I just love the weight and character that beams bring to the picture. Yours space is no exception - heck it's empty and I already wanna be there! Can't wait to see it all come together.

  • brickton
    Original Author
    12 years ago

    Capegirl- There is no before actually.. unless you count a semi-empty field. This is new construction. We had considered doing full beams but getting the right length, dealing with supporting the weight, etc was more than we wanted to do. We applied the stain with foam brushes and then wiped it off after 15 minutes. Make sure you don't leave pools or drips as the stain will stay tacky and collect dust and other bits. It can be buffed off but it's a pain to deal with.

    alabamamommy- Considering your fabulous kitchen, it's a high compliment that you would ever consider being somewhere else. Thanks.

  • huango
    12 years ago

    I love those beams and lights.

    Can you please tell me the height of your ceiling?

    We have the ?standard? 8ft (almost 8ft) high ceiling and am wondering if beam would make the room feel shorter.
    I've always seen beams in rooms w/ high ceiling, so you'd look up in awe :)

    thank you,
    Amanda

  • brickton
    Original Author
    12 years ago

    The ceilings are 9'. The smaller beams (6"w x 4"h) would be fine on an 8' ceiling, the larger ones (8" x 8") would be a lot.

    For those interested in the installation details here's a progress pic or two should all the bones laid out on the ceiling.

  • flwrs_n_co
    12 years ago

    Brickton, your lighting, floors, and beams look great! I also really like the corbels for your shelves. I love that they're not overly fancy/embellished, but a bit on the understated side. May I ask where you bought them? I'm thinking about putting some open shelving in my prep area but haven't found any shelf brackets I like. Thanks!

  • brickton
    Original Author
    12 years ago

    A very exclusive giant orange box store carries the corbel/brackets in stock actually. You can check local stock via the website ... except now I can't find the exact one on the website. We were psyched to find something that we could look at before buying without going to a custom shop. They are 9-3/4" by 2".