


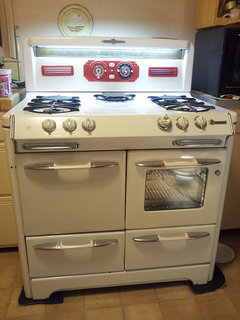
O'Keefe & Merritt Stove
califsouthpaw
13 years ago
Featured Answer
Comments (83)

auclark
9 years agolast modified: 9 years agodesiree4gw
9 years agolast modified: 9 years agoRelated Professionals
Beavercreek Kitchen & Bathroom Designers · El Dorado Hills Kitchen & Bathroom Designers · Frankfort Kitchen & Bathroom Designers · King of Prussia Kitchen & Bathroom Designers · Salmon Creek Kitchen & Bathroom Designers · St. Louis Kitchen & Bathroom Designers · Weymouth Kitchen & Bathroom Remodelers · Fairmont Kitchen & Bathroom Remodelers · Wilmington Island Kitchen & Bathroom Remodelers · Town 'n' Country Cabinets & Cabinetry · White Oak Cabinets & Cabinetry · Green Valley Tile and Stone Contractors · Roxbury Crossing Tile and Stone Contractors · Bloomingdale Design-Build Firms · Mililani Town Design-Build Firmsauclark
9 years agolast modified: 9 years agookeefeandmerritt
9 years agodesiree4gw
8 years agomanuel zarate
8 years ago
Anthony Zimmerman
8 years agodesiree4gw
8 years agodesiree4gw
8 years agoAnthony Zimmerman
8 years agoAnthony Zimmerman
8 years agodesiree4gw
8 years agodesiree4gw
8 years agoAnthony Zimmerman
8 years agodazerm
8 years agodesiree4gw
8 years agodazerm
8 years agodesiree4gw
8 years agodazerm
8 years agodesiree4gw
8 years ago
Tanya Ross
8 years agodesiree4gw
8 years agoTanya Ross
8 years agomariooj
8 years agodesiree4gw
8 years agodesiree4gw
8 years agoTanya Ross
8 years agoTanya Ross
8 years agodesiree4gw
8 years agoTanya Ross
8 years agodesiree4gw
8 years agowritersblock (9b/10a)
8 years agodesiree4gw
8 years agowritersblock (9b/10a)
8 years agohigginsa
8 years agodesiree4gw
8 years ago
Mary Ellen Herdener
7 years agodesiree4gw
7 years agoMary Ellen Herdener
7 years agomainegrammy
7 years agodesiree4gw
7 years agoKay Kitchens-Poindexter
6 years agofklepach
6 years ago
Katie Benoit
6 years agodesiree4gw
5 years ago
Alyse Kehler
3 years agomainegrammy
3 years agolast modified: 3 years ago
beckysharp Reinstate SW Unconditionally
3 years ago
Mary Ellen Herdener
3 years agoCarolyn Dee
3 years ago


Related Stories
VINTAGE STYLERevel in Retro With Vintage and New Kitchen Appliances
Give your kitchen old-fashioned charm with refrigerators and stoves that recall yesteryear — even if they were made just yesterday
Full Story
COTTAGE STYLECute, Cook-Friendly Cottage Kitchens
Before you lament the limitations of a cottage kitchen, have a look at the possibilities
Full Story
BEFORE AND AFTERSKitchen of the Week: Classic White Farmhouse Style Restored
A couple remodel their kitchen to better match their 19th-century Oregon home’s style
Full Story
MOST POPULARContractor Tips: Top 10 Home Remodeling Don'ts
Help your home renovation go smoothly and stay on budget with this wise advice from a pro
Full Story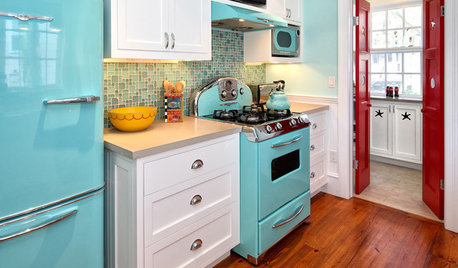
12 Eye-Candy Appliances That Enchant With Color
Move over, stainless. These rainbow-colored confections are bringing a delicious, unexpected note to kitchens and laundry rooms
Full Story
KITCHEN DESIGN10 Big Space-Saving Ideas for Small Kitchens
Feeling burned over a small cooking space? These features and strategies can help prevent kitchen meltdowns
Full Story
HOUZZ TOURSMy Houzz: Honoring the Past in an 1891 Queen Anne
Antiques and respectful renovations give a home in Oregon old-world charm and modern-day comforts
Full Story
BEFORE AND AFTERSA ‘Brady Bunch’ Kitchen Overhaul for Less Than $25,000
Homeowners say goodbye to avocado-colored appliances and orange-brown cabinets and hello to a bright new way of cooking
Full Story
KITCHEN DESIGNJulia Child's Childhood Kitchen Gets a Makeover
Drop in on the California kitchen that may have influenced a legend, now remodeled for a next-generation cooking and entertaining enthusiast
Full Story
HOUZZ TOURSMy Houzz: The Orchard and the Life-Changing Decision
Toxins give way to pure, wholesome produce and passionately green living in this home and orchard in Eastern Oregon
Full StoryMore Discussions


Circus Peanut