


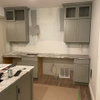
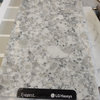
$500 Kitchen makeover
Tmnca
11 years ago
Sort by:Oldest
Comments (44)
Related Stories

KITCHEN DESIGNKitchen of the Week: Making Over a Rental for About $1,500
Fresh paint, new hardware, added storage, rugs and unexpected touches breathe new life into a Los Angeles apartment’s kitchen
Full Story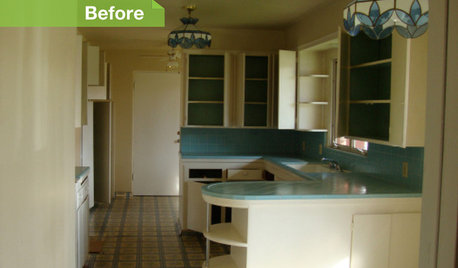
KITCHEN DESIGN24 Dramatic Kitchen Makeovers
From drab, dreary or just plain outdated to modernized marvels, these kitchens were transformed at the hands of resourceful Houzzers
Full Story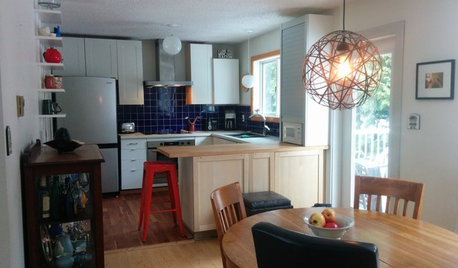
SMALL KITCHENSThe 100-Square-Foot Kitchen: One Woman’s $4,500 DIY Crusade
Teaching herself how to remodel, Allison Macdonald adds function, smarter storage and snazzier materials
Full Story
BEFORE AND AFTERSBefore and After: 19 Dramatic Bathroom Makeovers
See what's possible with these examples of bathroom remodels that wow
Full Story
DECORATING GUIDESA Mobile Home Gets a Bohemian-Chic Makeover
Designer infuses world traveler’s guesthouse with tribal textiles, Moroccan tiles and kilim rugs
Full Story
BEFORE AND AFTERS7 Dramatic Bathroom Makeovers Across All Styles
You'll be amazed at these bathroom transformations, spanning different design tastes, budgets and remodeling approaches
Full Story
KITCHEN DESIGNKitchen of the Week: A Budget Makeover in Massachusetts
For less than $3,000 (not including appliances), a designing couple gets a new kitchen that honors the past
Full Story
KITCHEN DESIGNJulia Child's Childhood Kitchen Gets a Makeover
Drop in on the California kitchen that may have influenced a legend, now remodeled for a next-generation cooking and entertaining enthusiast
Full Story
KITCHEN DESIGNKitchen of the Week: A Burst Pipe Spurs a Makeover
Once dark and clunky, this compact kitchen in a 1962 ranch is now light, bright and cheerful
Full Story
DECORATING GUIDESJazz Up Your Dining Room for Less Than $500
New lighting, colorful dishware, fun fabrics and other small updates add up to a big-time facelift on a little bitty budget
Full Story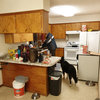


motherof3sons
badgergal
Related Professionals
Ballenger Creek Kitchen & Bathroom Designers · Clute Kitchen & Bathroom Designers · Forest Hill Kitchen & Bathroom Remodelers · Minnetonka Mills Kitchen & Bathroom Remodelers · Alpine Kitchen & Bathroom Remodelers · Londonderry Kitchen & Bathroom Remodelers · Martha Lake Kitchen & Bathroom Remodelers · Pasadena Kitchen & Bathroom Remodelers · Port Angeles Kitchen & Bathroom Remodelers · South Jordan Kitchen & Bathroom Remodelers · Fairmont Kitchen & Bathroom Remodelers · Foster City Cabinets & Cabinetry · Indian Creek Cabinets & Cabinetry · Sunrise Manor Cabinets & Cabinetry · Spartanburg Tile and Stone Contractorsdebrak_2008
ginny20
williamsem
stolenidentity
liriodendron
sara_the_brit_z6_ct
KBSpider
fouramblues
a2gemini
crl_
TmncaOriginal Author
Sarah Cronin
TmncaOriginal Author
taggie
Molly Phillips
Mizinformation
TmncaOriginal Author
rkb21
Olychick
patricianat
deedles
laughablemoments
awm03
bellsmom
TmncaOriginal Author
mama goose_gw zn6OH
crampon
graywings123
ginny20
writersblock (9b/10a)
User
EATREALFOOD
TmncaOriginal Author
chiefy
laughablemoments
sundownr
susanlynn2012
desertsteph
eam44
Holly- Kay
amykath
lilmissunshine