


Painting a refrigerator
kitysaver
10 years ago


Sort by:Oldest
Comments (24)
Related Stories
FUN HOUZZHouzz Call: What’s on Your Refrigerator?
Magnets, menus, children’s art, coupons, perfect-attendance certificates, song lyrics — what is fridge-worthy in your house?
Full Story
BATHROOM DESIGNSpotted: Refrigerators in the Bathroom
You read that right. Before you protest, here are seven good reasons why people are chilling in the bath
Full Story
KITCHEN DESIGNSee-Through Refrigerators Dare to Go Bare
Glass-front fridge doors put your food and drinks on display, for better or worse. See the benefits and disadvantages
Full Story
PRODUCT PICKSGuest Picks: 20 Magnets With Staying Power
Pick a chic or silly magnet set to style your refrigerator or file cabinet with, hanging family art and notes with ease
Full Story
DECORATING GUIDESHow to Create a Room With a Magnetic Personality
Are you feeling the pull of a magnetic-paint project? Here’s how to get started and what to expect along the way
Full Story
VINTAGE STYLERevel in Retro With Vintage and New Kitchen Appliances
Give your kitchen old-fashioned charm with refrigerators and stoves that recall yesteryear — even if they were made just yesterday
Full Story
REMODELING GUIDESGet the Look of a Built-in Fridge for Less
So you want a flush refrigerator but aren’t flush with funds. We’ve got just the workaround for you
Full Story
MOST POPULARHow Bluetooth 4.0 Will Change Remote Control
Manage lights, TV, refrigerators and more through your phone or tablet when the latest wireless technology rolls into all your home devices
Full Story
MONTHLY HOME CHECKLISTSTo-Dos: Your March Home Checklist
Get ready for sunnier days, whether you have an hour or a weekend to spare
Full Story
KITCHEN DESIGNThe 100-Square-Foot Kitchen: Farm Style With More Storage and Counters
See how a smart layout, smaller refrigerator and recessed storage maximize this tight space
Full Story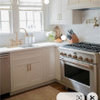
User
bicyclegirl1
Related Professionals
Buffalo Kitchen & Bathroom Designers · Owasso Kitchen & Bathroom Designers · Biloxi Kitchen & Bathroom Remodelers · Eagle Kitchen & Bathroom Remodelers · Folsom Kitchen & Bathroom Remodelers · Manassas Kitchen & Bathroom Remodelers · San Juan Capistrano Kitchen & Bathroom Remodelers · Walnut Creek Kitchen & Bathroom Remodelers · Eufaula Kitchen & Bathroom Remodelers · Kaneohe Cabinets & Cabinetry · Red Bank Cabinets & Cabinetry · Sunset Cabinets & Cabinetry · Tenafly Cabinets & Cabinetry · Wells Branch Cabinets & Cabinetry · Short Hills Cabinets & Cabinetryapinksweater
sherri1058
feisty68
cat_mom
deedles
CEFreeman
mudhouse_gw
kitysaverOriginal Author
kitysaverOriginal Author
nosoccermom
shelayne
kitysaverOriginal Author
kitysaverOriginal Author
kitysaverOriginal Author
shelayne
kitysaverOriginal Author
adrianjuaneli
nosoccermom
kitysaverOriginal Author
kitysaverOriginal Author
kitysaverOriginal Author
hotzcatz