


Anyone have Conestoga Cabinets in Crystal White or Chesapeake?
Hi
I am looking into getting Conestoga Cabinets and was wondering if anyone was familiar with their white finishes.
I want something to match Plain and Fancy's buttercream (which is just an off-white).
I've read that crystal white and chesapeake are their creamy colors (chesapeake being the most creamy).
I am ready to purchase some samples and thought I would do some research before wasting money on samples I know off the bat won't work.
Any pics to share?
Thanks
Comments (74)

goodguy2k2k
9 years agolast modified: 9 years agoI can add a bit on the inset doors and hinges.
Due to the nature of inset hinge, it is much much easier to measure, align, mark, drill, attach the inset hinge mechanism BEFORE the cabinet is assembled. Luckily Brian Long from Cabinet Joint had a video which mentioned this and it saved me all sorts of time and hassle (had I tried to install hinge post cabinet build). Thanks BL from CJ!If you notice on the pic, there is less room to maneuver with Blum inset hinges due to the nature if how it attaches. The thing I would REALLY recommend is to buy a digital caliper (harbor freight see link) to do your measurements and marking for hinge locations, etc.
How I did hinges was this: Your conestoga doors come with pre drilled hole/cups for the one half of the hinge. The other half of the hinge gets connected to the cabinet inside frame with 2 screws. A few tips: ... You must use some sort of guide or drill bit stop so you don't drill all the way through your face frame and create a hole on the front of your beautiful cabinet. It helps to angle the screw a bit to match the angle of the Blum hinge plate (look at the hinge and you will understand). Lastly, when you mark your holes for drilling, don't mark all the way into the u shaped hinge hole pocket, back your mark off a bit to give space for the screw shaft to fit in the and not push your hinge plate out of position when tightening.
I think BL gives the actual measurent for hinge placement but I measured it to be something like 3.08 inches from frame edge to center of hinge (measure to the center of the door hole and add 1/32 for GAP between door and frame. If I am not mistaken it comes out to 3.08 (but confirm on your own cabinet.
The digital caliper really helps for getting these exact.Conestoga inset door and frames are stamped with a number because they make the door and frames together so they are an exact match.

Here is a link that might be useful: Digital caliper
goodguy2k2k
9 years agolast modified: 9 years agoRegarding the color and finish of the cabinet (frosty white, etc). To me, the Frosty White looks plain white (even when I put it up against my "brilliant white" house trim. The Designer white seems to be a more brilliant white type with maybe a more blue undertone (if I am describing that right) whereby the Frosty White (while still white) has a warmer undertone. As I am looking at all the Frosty White cabinets, without designer white to compare them to- they look regular white to me... But I know we chose the Frosty because it had a slightly creamier tone to it. We ordered a box of paint wood samples from Northern Granite and Cabinetry (just out a deposit down which you get back when you return them)... And that worked well. We then ordered a "sample" door which we thought we might use in our plan anyway (I think garbage can pullout). Unfortunately, we changed from overlay to inset after we got the sample, so we have this really nice frosty white 18" full overlay door if anyone needs one for cheap ...lol
Regarding the cabinet bottoms and the finish- mine are unfinished furniture grade wood so they still look nice. You could probably brush them with a clear polyurethane if you wanted. Nobody will ever see them though.
One upgrade I would recommend though is to order the solid wood shelves. We only had a couple since most of our cabinets we sourced with double rollout trays. But the solid wood shelf just seems like a cheap but good upgrade. Not necessary though.
One more thing with the inset setup is you will need to run to home dept and buy some 3/4 wood stock for the mounting blocks for your drawer slides. These are not provided. Easy to do though. I bought 1 x 2 select pine from HD and cut to something like 6" long to attach the front edge if blum drawer glides to. You will need to glue and nail (or screw this block inside the cab). I think CJ shows this also In a drawer slides video.
A final thing I did to strengthen my cabinet bottoms (last thing you want is your sink can floor bending down under weight or wear after a coupe years) is to run a bead of clear hot glue under the cabinet floor where it meets the face frame. It won't be seen by anyone as it's hidden inset the front edge if the face frame and it gives support across the whole front bottom edge if you are stacking heavy pans (or a microwave in a micro cabinet)
Hope some of this helps. You might be able to see the glue (and the unfinished cab bottom) in the picture.

Related Professionals
Martinsburg Kitchen & Bathroom Designers · St. Louis Kitchen & Bathroom Designers · University City Kitchen & Bathroom Remodelers · Grain Valley Kitchen & Bathroom Remodelers · Citrus Park Kitchen & Bathroom Remodelers · Auburn Kitchen & Bathroom Remodelers · Pico Rivera Kitchen & Bathroom Remodelers · Port Arthur Kitchen & Bathroom Remodelers · Cave Spring Kitchen & Bathroom Remodelers · Burr Ridge Cabinets & Cabinetry · Citrus Heights Cabinets & Cabinetry · Jefferson Valley-Yorktown Cabinets & Cabinetry · National City Cabinets & Cabinetry · South Gate Cabinets & Cabinetry · Englewood Tile and Stone Contractorsaries61
9 years agolast modified: 9 years agogoodguy2k2k, Thanks for the information on the two whites and the bottom of the upper cabinet. I might be interested in your 18" full overlay door. You can pm if you want. I'm in the Chicago are. This way I can get a better idea what frosty white looks like in a larger sample.
aries61
9 years agolast modified: 9 years agolexmomof3, You mentioned that you did your master bath cabinets. Did you do the same as the kitchen or something different? Sorry for the many questions,

oldbat2be
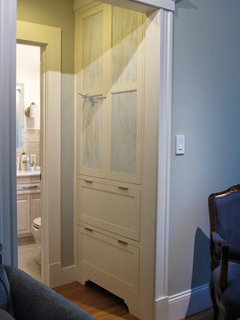
9 years agolast modified: 9 years agoHere's our linen closet in crystal white with the madison door style. A nice detail to add is the 'elegant arch bottom rail'. I'm still figuring out placement of upper handles, hence the temporary ribbon handle.
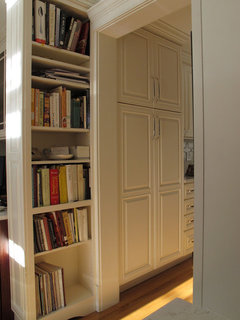
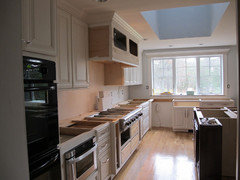
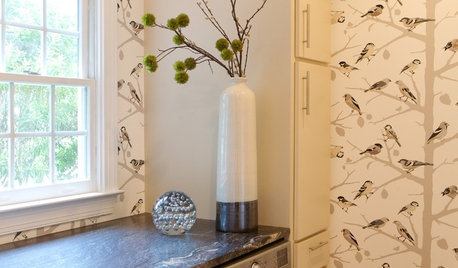
We also used the same color but different door style in the kitchen and pantry. I really like the color in the pantry but not so much in the kitchen. In hindsight, I would have gone with a different color. (Look up Breezygirl's kitchen; I would have gone with that kind of white). We have Torquay countertops and island, a skylight and white ceilings. It was all very blah but eventually a bold backsplash drew the eye away :)
Pantry:
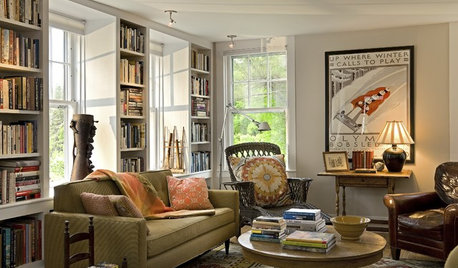
At the blah stage:
With bold backsplash:

Good luck!
lexmomof3
9 years agolast modified: 9 years agoMaster bath is the same. Micro is in a butler pantry. I'll take pics this afternoon when I get home from work.
I agree with good guy on upgrading shelves. Love the solid wood shelves.
Regarding frosty white vs designer white - definitely cool bluish undertone. Frosty is a warmer white but definitely white.lexmomof3
9 years agolast modified: 9 years agoMaster bath is the same. Micro is in a butler pantry. I'll take pics this afternoon when I get home from work.
I agree with good guy on upgrading shelves. Love the solid wood shelves.
Regarding frosty white vs designer white - definitely cool bluish undertone. Frosty is a warmer white but definitely white.aries61
9 years agolast modified: 9 years agooldbat2be, Is your range hood an actual range hood cabinet or a cabinet made to look like a range hood? Thanks
I've posted a picture of the frosty and designer samples with the colonial stained cherry in the middle. Not sure if I'm going with an all white or white in on perimeter and a stained on the peninsula.Please note that the tile that's lying on is for the master bath, not the kitchen.


susanlynn2012
9 years agolast modified: 9 years agoAries61, is the Frosty on both sides or is the left side slightly more creamy and the right sides is whiter? I love the combination of the two whites with the darker door. The white shade is so nice. I wish I had room for an island. I wish I had a handy husband and the two of us would want to work together to give me a gorgeous kitchen.
susanlynn2012
9 years agolast modified: 9 years agoI need to see both whites in person as they both look so nice and neither is too creamy.
oldbat2be
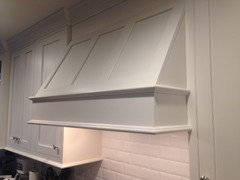
9 years agolast modified: 9 years agoaries61 - No, not a cabinet. DH made a custom box which he secured to the ceiling joists and to which the hood was mounted. Then, we framed on the outside with custom panels and on the inside upper with custom stainless steel surround.

aries61
9 years agolast modified: 9 years agooldbat2be, thanks for the information. DH did a nice job.
lexmomof3
9 years agolast modified: 9 years agoI'm sorry for all of the posts but I have never figured out how to post multiple pics in one post.

lexmomof3
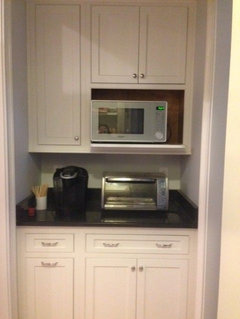
9 years agolast modified: 9 years agobutler pantry - there is a trash can in the left bottom cabinet. My only mistake in placing this order was not specifying that the interior of the microwave cabinet be finished. In my defense, I thought when I specified that the microwave cabinet be "finished", I assumed that it would be clear that any exposed part of the cabinet should be finished but apparently not. I will eventually get around to painting it myself.

lexmomof3
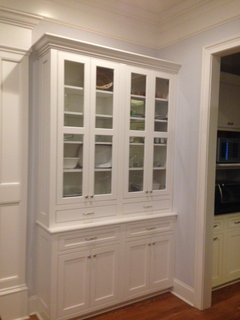
9 years agolast modified: 9 years agochina cabinet - sorry it's sideways. The pic isn't on my computer until I post it here.
susanlynn2012
9 years agolast modified: 9 years agoLexmomof3, just beautiful! I love the cabinets and the white finish chosen as well as the design.
aries61
9 years agolast modified: 9 years agolynn2006, in my picture, frosty white is on the left and designer white is on the right. I don't know if you saw, but capecg is starting to install her Conestoga inset cabinets tomorrow. I posted the link to the thread.
Lexmomof3, very nice and thanks for the added pictures. It appreciated. Looks like you did the microwave shelf. What's the width of the cabinet? I'm still trying to decide if I should go with the microwave shelf cabinet or the built-in microwave cabinet. I wish I could get a hood like yours for $600.00
Here is a link that might be useful: capecg install starts tomorrow.
aries61
9 years agolast modified: 9 years agoLexmomof3, returning the favor for posting the added pictures by rotating the two that posted sideways.
aries61
9 years agolast modified: 9 years agoLexmomof3, returning the favor for posting the added pictures by rotating the two that posted sideways.

susanlynn2012
9 years agolast modified: 9 years agoAries61, thank you for letting me know which white is which! Thank you for the link to capecg installs tomorrow!
lexmomof3
9 years agolast modified: 9 years agoThanks for rotating and thanks Aries and Lynn for the compliments. I did the design myself and had a lot of custom pieces, not just sizes but omitted a drawer in the corner cabinet, split a single drawer into two top drawers in the 36" drawer bases, custom depth on china hutch, etc. It gave me just the look and functionality I wanted but made the order complicated. Regarding the hood, I too was surprised with what he charged for building the hood. It is all plywood.
The micro shelf is 30" wide.
goodguy2k2k
9 years agolast modified: 9 years agoUPDATE: After writing my extensive message below, I found out something I wish I would have known ahead of time and was not pleased with my Conestoga re seller for not making known earlier. You can order a custom made face frame for microcabinet to your exact cut out size. Agh..This makes sense now because most things are customizable but I know I was told before ordering that I could not change the micro cab and I would just have to use fillers and/or cut the opening to size. Now should I buy a new face frame that will be exact or try to pay someone to cut the one I have perfectly, I doubt it will look right if I have it cut? Frustrating to say the least.
aries61 - From what I understand the shelf (on the microwave shelf cab) can be removed if you don't need it. I went with the microwave cabinet (not the shelf version). Coming from on over-the-range microwave, we decided we did not need such a large microwave after all and went with the Panasonic Genius Prestige 1.2 CF model. One of my only disappointments with Conestoga options was the microwave cabinet choices I'll explain what i mean:
We ordered a 24" microwave cabinet because that fit with our design and space. Unfortunately, that limits you microwave choice to a 1.2 cu ft micro or less due to the width and fit of standard micro sizes and the construction of Conestoga cabinets.
With a 24" inch wide cabinet, you have to leave at least 1.5 inches on each side for face frame. So the maximum size of your microwave has to be 3" less than the width of your cabinet. In our case, the max microwave width we could go with is 21". Due to the aspect ratio of microwave design, it is almost impossible to find any microwave larger than 1.2 cu ft which is less than 21" wide. This is not a problem as we are actually very pleased with the Panasonic look and function and size (family of 5).
My largest concern was that microwave look built-in and fit the opening without gaps around it. I still have not put together the micro cab as I need to cut or remove the side filler so I can achieve this made-to-fit look. I hope it works and I will provide pics. But I wanted to also maybe help someone looking at this microcab option.
We ordered our micro cab 18" deep by 24" wide (the one without the shelf). You will probably need at least 18 deep as most microwaves need close to that in depth. Taking into account the plug, I installed a recessed receptacle in the micro cab to be hidden behind the microwave on the right side where the microwave is less deep.
The thing about Conestoga microwave cabinets which I was a bit frustrated with (and I didn't understand until I got it) was the opening size for the microwave is (with included filler) 18" wide x 15.5" high. The only microwave on the market (at least in the US) that is 15" high and less than 21" wide is the LG Pizza Oven Microwave combo. Due to this being and oven also, it generates alot of heat that needs to be vented, which would not work in this cabinet due to 24" width prevents using a trim kit (which are only sold in 27" widths) - therefore convection micros are out unless you go with a 27" wide microcabinet (which I would recommend if you can fit it, as 27" allows so many more choices for microwaves and trim kits, etc).
So Conestoga ships the microcabinet with a 18" wide opening (essentially the 1.5 inch face frame with an extra 1.5 inch filler on each side which they say you can trim to size). The BIG problem with how Conestoga does this the cabinet frame is finished very nicely (absolutely smooth face frame finish with no visible seam for filler). IF you trim this, you better do a perfect job because you will probably not find a 24" trim kit to cover your cut if it is not perfect (unless you have one custom made). Actually I did find only 1 microwave that had a 24" trim kit option (See link) but to make it fit a 24" trim kit, the micro is .9 cuft and lacked some key features and was $200 more than comparable ones.
So to make a long story longer, even if I can trim the sides of the opening perfectly and make them look "ok", There are no microwaves 15.5" high (and only 21" wide). Most are 12.25" high or so. So I am forced to use a filler piece above the microwave. Hopefully it all works out and does not look bad.
Conestoga should really reconsider their microwave cab opening size to conform to what is actually available on the market. Mine may end up looking fine but it is so much more hassle to have to customize the cabinet yourself rather than having Conestoga re-engineer their opening. Maybe I am asking too much for a RTA cabinet? There is no 21" wide microwave that is 15.5" inches high. And there are almost no trim kits 24" wide. So a 24" inch micro cabinet with a 15.5" opening height is almost worthless. Note: I think cabinets taller than 30" have a 15.5" micro opening size. 30" cabs have a smaller opening?
Lesson with Conestoga is: If you want a tight fit (built in look for your micro cab) make sure your micro cabinet is at least 27" wide (or be prepared for getting a carpenter to trim it and touch up paint, filler on the top edge, etc). Also, buy your microwave before you order and know the trim kit sizes and options. If you don't mind a gap, then this is all a moot point.
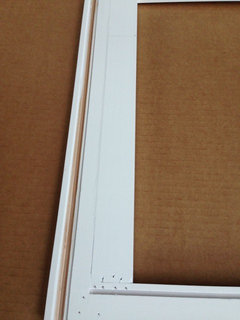
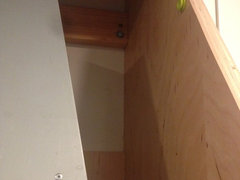
I am going to attempt to remove the added in side filler strips and see how it looks. If I am lucky, they will come out cleanly and look like a finished edge. I am not hopeful because Conestoga painted and finished the fronts so well. Picture shows back of frame and how they tacked in filler piece (front is so well finished/painted you cant tell it is even there). You can see edge of it in my pic. I hope it comes out cleanly but front paint may look cracked, etc. fingers crossed (pic is sideways, filler comes on the side of opening).
Maybe my fears are unfounded and I will update how it turns out. Hopefully this helps someone with their planning.
Check closely the opening size based upon your cabinet height, etc. Good luck.
Here is a link that might be useful: Summit Microwave
This post was edited by goodguy2k2k on Wed, May 7, 14 at 15:00
aries61
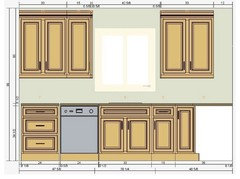
9 years agolast modified: 9 years agogoodguy2k2k, thanks for all your helpful information. Sorry for all the questions, but don't want to make a wrong decision which I probably will still make. I will probably be going with a 30" wide microwave cabinet. I was thinking about a 27" one, but then that throws off the symmetry of the wall cabinets on either side of the window which I'm trying not to do. In the picture, I'll be replacing the upper cabinet on the far left with the microwave cabinet.
I'm still trying to figure out with what I'm doing with the wood range hood. Thinking about maybe order a deeper wall cabinet with a valance attached to be used as a range hood. I love the look of Lexmomof3 range hood, but my kitchen is not that large. I still can't believe what she paid for it.
goodguy2k2k
9 years agolast modified: 9 years agoThere are many pre-made wood hood options. Good wood hoods and I'm sure you will find many.
We were looking for a 3 panel wood flat angled hood. All of the pre-made ones had a "behind the times" style to them that didn't really fit. So we are forced to get the parts and piece one together ourselves (if we wanted the exact paint match/sheen of our cabinets). Which involved ordering painted parts, to be partially cut and assembled locally to get the look and finish we wanted.
Note on the inset cabinets: We opted for 14" deep wall cabinets since the inset would lose a portion of interior storage area (and just because we could). With Conestoga, almost anything is customizable all the way down to the face frame lengths and widths of each rail and stile.
Because of the ability to customize, we decided to go with an old arts and crafts detail of extending some of the face frame stiles (side frame) to the floor to sort of get a foot/furniture look without tacking on an inappropriate style foot after the fact (see example pics of what I am talking about, not our kitchen but an example of the look - there are some tricks to installing this style though on imperfect floors, you cant just shim the cabs unless you want to use a molding at bottom and lose the clean cut look, you have to scribe the actual cabinet level, not as simple). There are many ways of getting a furniture foot look (i.e. adding and elegant arch valance piece to fit into the toekick area like oldbat2be showed in her Linen Closet posting -or- adding feet after the fact).

Jennifer Franson_Hopper
9 years agolast modified: 9 years agoI'm loving all the photos and Conestoga experience all on one thread!
Sorry if I'm taking away from the OP, but I notice several pics showing finished panel ends. I heard planning/ordering with this detailing on inset cabinets can be tricky to measure/install and are pricey. Our "quirky" sized kitchen will have 7 exposures cabinet sides and I love any information on inset looking finished end panels. Did they cost a lot, how did you measure and was assembly/install a bear?
aries61
9 years agolast modified: 9 years agogoodguy2k2k, sorry to hear that you could have changed the micro opening and was told you couldn't. That's why I ask so many questions. Trying to make the best decisions with all the information that I can gather.
I'm not thrilled with the wood hood offerings that Conestoga has. I'm surprise that they don't do their own hoods, but are outsourced by Omega National Products and Stanisci.
jhophop, The paneled ends are actually a frame and a door that you order separately. The only other thing is that you need to do is a custom frame for the cabinet so the end is extended so you can tuck the side frame into the back of the front frame. If you're doing full overlay, the ends are one piece.
They're really not that expensive, I priced out some cabinets a couple of months ago before I decided to make changes and these are the prices that I got for a base end panel and peninsula back: The side panel was $70.24 for a 24"x34.5" frame and $83.94 for the door which totals $154.88, the peninsula panel was $119.57 for a 54"x34.5" 3 door frame and the doors were $70.65 ea which totals $331.52. This was for painted with a TW-10 door which is one of their least expensive door. Hope this helps.
goodguy2k2k
9 years agolast modified: 9 years agoWas not happy with the Microcabinet option Conestoga came up with. Hence, but your micro ahead of time and get a custom frame to match it (with a bit of clearance to fit micro through the opening - note: hard to describe, but if you make the opening too perfectly tight to the micro specs, you may find it hard to get micro in. You must consider the lip on the front edge of cabinet as it drops to the cabinet floor. There is a slight drop once you get past the face frame into the cabinet.you must get your opening sized to the microwave including the micro feet.
Couple points that may be helpful:
Conestoga can take parts you source from a third party and finish them at their factory. I purchased some island posts from Osborne Wood Products and sent them to Conestoga. They painted them and shipped them back to me. It is not cheap to do it that way but it worked for us because I wanted the posts to match exactly. you could do the same thing with a hood if you found one elsewhere. For my hood, I designed on and am having Conestoga supply the painted pieces which I will assemble (fingers crossed). IMO, Conestoga has poor hood choices (many look cheap and out of date). So the hood and island posts were the only thing I sourced outside of Conestoga.For paneled ends: I don't have mine assembled yet so i cant show exactly the application but I have attached a picture of the exact island I am constructing. You will notice the side panels are NOT inset doors with frames. I was told by multiple dealers "you MUST use inset doors and frames as side panels or it wont look right" - I didn't listen to that advice because I wanted the clean look of a one piece side panel.
There were alot of calculations necessary to get the side panels right.
Couple key points here: You can hide the side panel edge by getting a custom face frame and extending the stile (on the side where you are placing the side panel) enough to cover the side panel (so you don't see the seam of the panel from the front but from the side). I know some will say extend the stile by 3/4" to cover the exact thickness of the side panel. Rick from Cabinet Authority recommended going a bit more (not sure of the exact amount but maybe a 32nd more than 3/4" on the stile extension). What that does is it gives you a bit of wiggle room if the edges aren't perfect upon alignment. You can basically shim the side panel out a touch and attach so you have a perfectly aligned edge.Our island took quite a bit of thought to figure out how to make it happen with Conestoga parts (custom panels,fillers, etc) so I am hoping everything lines up right when we start to connect it all. The panels were not cheap but I think will be worth it in the end.
We did go with the Stockbridge door style for all the decorative panels as it was a bit cheaper and since it is the exact same appearance from the front, we felt it an Ok compromise since once assembled, you could never know the difference.
I would question whether the "Inset side panel is necessary" contention (I may be singing a different tune after I put the island together).
Couple final points. You can order the height of the decorative panel bottom rails to be higher (so the line of the rail matches with the line of the doors on your cabinets). You may need to lean on Rick at Cab Authority (or BL from Cab Joint) for help with this as it takes some thought (add 1/32 for door spacing, etc).
I will update with pictures as my island goes together. Wish me luck.

aries61
9 years agolast modified: 9 years agogoodguy2k2k, That's for all the helpful information especially buying from another source and sending to Conestoga to finish.
I do wish you luck with your island, but I don't think you'll need it. I've attached a picture of the island that romy718(which is inset) posted which shows the same as you're doing with the ends.
I do agree with you about Conestoga hood choices, but really haven't found any from any other sources that I really care for except for one that Medallion Cabinets has one. This is the response that I received from CA about wood hoods "People have created all sorts of wood hoods from our cabinets, valances and other products".
I did find out something interesting. You can get the exposed bottoms of the uppers clear coated, but that is an option that I was told would run about $10 for a 30" wide upper which I don't think is that bad.
I do think that I'll be going with designer white. Just need to figure out the rest and then go for it. I'll be doing a raised panel door instead of a flat/shaker panel. Just need to decide on the framing bead/panel raise.
goodguy2k2k
9 years agolast modified: 9 years agoAries, I think you are making a good choice with designer white.
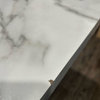
I have attached a pic of the difference between a "brilliant white" (Home Depot Behr paint color) on the shown door jamb -and- my refrig cab in frosty white (refrig can just installed today so not finished).But I will say, in the picture, the frosty white may look a little more creamy than it would in a normal situation as the light may have played a part. But it may help to show the creamyist possible scenario with frosty white.
I will say, the way I did this creates a lot of detail work (joining cabs, scribing can bottoms to make up for level, attaching toe board backers, toe boards, measuring everything twice, making sure things are joined together well, etc).
So what I am saying is: If assembling conestoga cabinets is a medium task, joining cabs, leveling, installing, etc. is definitely advanced work for a pro installer -or- a very handy person with tools and patience. In other words, it is a decent amount if work to get it right. But I am doing it a hard way from custom face frame stiles (which prevents me from shimming) and requires me to scribe cabinet bottom edges to get level.
Lots of measuring, testing, removing, testing again, etc.Also of note, inset conestoga requires some 3/4 inch blocking to be installed to attach drawer slides (and door stops in some cabs).
Moving and setting cabs can take some assistance (especially if you join them prior to moving into place).
Also: if you don't have a very high ceiling next to your kitchen, a refrig (or other tall cabinet) can will need to have some pieces cut off back corners to be able to stand it up under the celing. Nobody wil see the pie cuts though.
I was lucky to have a 2 story family room where I am doing my assembly. I stand the refrig cab up in the Family Room and then slide it into the kitchen area. It is a big cab and I moved it myself but it was a but if a chore to stand under it and basically carry it.

susanlynn2012
9 years agolast modified: 9 years agoGoodguy2K2K, Thank you for showing us how creamy the Frosty White is. So if someone wants creamy, go with Frosty White. If someone wants more white, go with Designer White.
goodguy2k2k
9 years agolast modified: 9 years agoSure. I would say tht the picture above is about as creamy as it is ever going to look. It was taken under LED lights. After I stepped back and compared what I actually saw with the picture, I thought the Frosty White didn't look as "Creamy" as the picture. But, it definitely is different than a "Designer" type white.
Wouldn't want anyone to buy Frosty White thinking they are getting a stark white and be dissapointed under lighting conditions that really showed the "creamy" aspects of it.
We chose Frosty White because we wanted white but a white that had a bit of warmth to it. In most conditions, without a "Designer" type white right next to it, Frosty White will look like regular white to most people.aries61
9 years agolast modified: 9 years agogoodguy2k2k, you're a wealth of knowledge. Thanks for the advice on the tall cabinets. I won't have any tall cabinets in my plan. For my fridge, I'm doing 3/4 painted plywood ends with a deep cabinet above the fridge.
What hood insert are you going with?
I recommend for anyone choosing Conestoga and wanting white, order some samples so you can see what they actually look like. Well worth the small investment to be happy with your cabinets. If I get a chance I'll try to take a picture of the various whites next to each other so you can see the differences. If I can I'll do that within the next couple of days.
goodguy2k2k
9 years agolast modified: 9 years agoThanks aries61. Hopefully I can learn some things from those who have gone through this already (oldbat2be is great) and help those starting the process.
There is a lot to know and maybe one hint can save someone a bit of hassle.
Regarding your fridge: We also did a deep cabinet above frig (but as a part of a complete refrig cabinet from Conestoga). I also considered doing a separate cabinet with side panel. If I recall, the reason I went with the full cabinet is to get the seamless extended stile on the right hand side (which I scribed to the wall) and to avoid a gap between wall and Frig side. You could put together a Cabinet and sides (maybe a filler only on one side) but you will get the seams, which are probably not that bad. The disadvantage with going with Conestogas refrig cabinet is you have to stick with their frig opening size of ..I think 72" - 74" high...which means you will have a gap above the frig of 2" - 4". Which you could fill with a fill strip I guess. Perhaps one of those new slightly taller refrigerators would fit nicely? Samsung?
We were trying to get as close to a built in look using a standard 36' wide refrigerator (need to buy a new frig sometime soon). The conestoga frig cabinet is 30" deep and comes out to the edge of the refrigerator box (not the doors, just the box) And It works well and allows the doors to clear upon opening. The above refrig cabinet is huge and should be fun to watch my wife get a stepladder to gain access to the rear portion. We will probably just store less frequently used items back there.
I have 3 of the 15 cabinets installed as of now. Took my time the last couple days installing the Refrig cabinet. Since it is the first corner cabinet, it had to be set right and leveled, etc. It too some doing but since everything would depend upon that one, I had to get it right.
Maybe I will do a separate post on my challenges doing so, but since I wanted to go with the extended stile (to the floor) look with not floor moldings - i could not just shim the cabinets up. It necessitated having to scribe (trim off the back bottom edges of the cabinets) A real pain to measure, test, measure again, test on and on. But I got the frig cabinet perfect and last night installed the 2 cabinets just to the left of it.
I would definitely recommend laying adjacent cabinets on their back on a level floor and (using various thicknesses of plywood) joining them all together (the adjacent cabinet run) as one big cabinet and then setting in place and installing. It also worked well for me because of the design I ended up with they were supposed to look like one joined cabinet anyway.
To join these together, I used plywood, GRK panhead screws (which I would definitely recommend) for inside the boxes and GRK Trim screws (along with cabinet clamps) to join through the face frames (see pictures). I layered up plywood between the cabinets in four side corners before screwing through them. This way, you aren't dependent upon just the face frames for holing together. The cabs together become one solid unit that prevent face frame movement/separation when the whole thing is moved.
We actually had an installer lined up to do the job but his schedule changed. I was forced to start the install myself. I am actually glad I did. Installers would have come in and tried to rush through the job to get it done quickly and ended up shimming, and slapping shoe molding on, etc. That would have been done quickly (good) but maybe not the way I really wanted. It is more detail work than I expected and I am probably being anal about it - but hopefully it all turns out ok.
There are probably 100 ways to do this but just wanted to share what seems to be working for me.

This post was edited by goodguy2k2k on Mon, May 12, 14 at 10:11
goodguy2k2k
9 years agolast modified: 9 years agoAnother pic of cabinets joined through cabinet box (with layered various widths of plywood) for structural rigidity and through face frame with GRK trim screws (to keep frames tight together). I may fill the face frame holes after the fact if they appear too noticeable but I am thinking the hinges will hide them.
Important to predrill the face frame holes a bit smaller than the screw shank diameter (I also used wax on the screw) to prevent cracking face frame.
Note on any plywood spacers: If you leave a gap with spacer that is not wide enough, you will suck the cabinets together when screwed and it will pull your face frame seam apart. Too fat a spacer, and you will be forcing your face frame seam apart. Lesson is to have the exact width of spacer pieces before you screw them together. This may necessitate using a 1/4" piece of plywood and a wood shim (you drill through). I didn't like shims because they are so thin and not very structurally sound.
I bought various thicknesses of plywood (1/4" & 1/2", underlayment (5mm) and even some thinner pressboard, and cut about 20 squares to use when joining cabinets and also attaching to wall. You need to use these fillers (or a ledgerboard ..basically a filler) behind wall cabinets on Conestoga due to the small gap between wall and cab back - or else you will suck your cabinet back to the wall and pull it out of your cab box (not good).

This post was edited by goodguy2k2k on Mon, May 12, 14 at 10:08
Jennifer Franson_Hopper
9 years agolast modified: 9 years agoSuch great information and suggestions! Still waiting on my various white samples to arrive, so I'm still at the very beginning but am swooning at all the beautiful kitchens and reading all the great suggestions!
I was just planning on ordering a basic wood hood with shelf (style Q) from Conestoga in the chosen finished color. Any suggestions on where I could find less costly options or more choices for wood hoods would be great! I'm surprised to hear that Conestoga will paint a hood purchased elsewhere to match....great tip.
iandl
9 years agolast modified: 9 years agoWe have the Frosty White, which looked pretty white until we painted the baseboard and molding BM white semi and now it looks a little yellow.
We ordered through The Cabinet Joint. I cannot say enough good things about Brian and his patience, definitely recommend him. The cabinets are also beautiful, and the granite company we used, who also sells cabinets, commented on the cabinets. All visitors also comment. Assembly was pretty easy once one cabinet is done, and the online videos provided by Brian are very helpful.
I estimate we saved at least a 1/3 of the cost of other cabinets. Extremely happy with this decision.
aries61
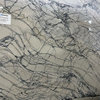
9 years agolast modified: 9 years agoI'm posting some of the whites next to each other. Sorry the picture isn't better but, it's cloudy and rainy this morning when I took the picture.
From the far left, Chesapeake(popular, but really not in the white family), upper left - Antique White, upper right - Crystal White, lower left - Frosty White and lower right - Designer White
Had incorrect picture. Posted corrected picture.

This post was edited by aries61 on Fri, May 16, 14 at 8:39
susanlynn2012
9 years agolast modified: 9 years agoFrom these pictures, I like both the Frosty White and the Designer White. It would depend on the granite chosen to which white is best for the kitchen as well as the lighting.
Thank you Aeries61!
aries61
9 years agolast modified: 9 years agogoodguy2k2k, curious how the kitchen progressing? Any other pictures to share. Haven't seen anything from you.
The hood is my last piece that I'm trying to figure out before I place my order for Conestoga Cabinets.
SoJersyLife
9 years agolast modified: 9 years agoBeware Medallion does not honor their warranty! We purchased $18,000 of cabinets from them. Not one single cabinet out of the box is good. Open miters on every door & drawer front, cracks all over the place gaps inside the cabinets, and the stacked cabinets don't match up at all. The range hood is cracked and scratched so badly we didn't even take it out of the box all the way. They are only offering us $5,000 credit towards a new set of cabinets. #medallionfailsoncraftmanship

monika2024
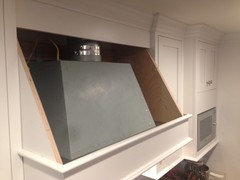
8 years agooldbat2be- you wouldn't happen to have info on how your hubs secure the hood? I'm building mine out of solid wood panels and they're so heavy - add a 50 lbs insert and I'm worried about it not holding up. Thanks!
oldbat2be
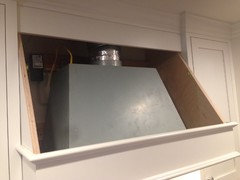
8 years agomonika2024 - Here's what we did for our wood hood with Conestoga panels. DH built a plywood box and secured it to the joists (I forget how!!). Then, the hood was secured to the box. The cutouts are simply to reduce weight.
This shows the custom stainless steel surround. Getting the hood in place was a b@$#h!!!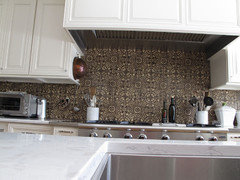
Good luck!

Huzkit
8 years agolast modified: 8 years agoIt has been a long while (don't think I ever posted final pics - I will in the near future .. kitchen is a mess right now... :-) )
Anyway, here are some pics of the hood I constructed from panels.
The main 3 panel front is basically a cabinet door that I specified as a 3 panel door.
I would have had to have someone construct the sides/box and have that painted to match by conestoga (which would have been really cost prohibitive for what I wanted). I think I achieved the 3 panel look I was going for though using panels ordered from Conestoga and cutting and constructing a box.
Like I said, the front angled 36" panel (with 3 panels) was basically a door made to my specs. The sides were 3/4" plywood painted/finished to match from Conestoga (I cut these to get the angle. The front flat panel and top (under crown molding panel) were pieces of hard maple from Conestoga painted to match.
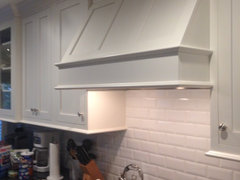
The molding pieces were used to match/hide some of the edges and give it a finished look. They are light rail moldings from Conestoga I also ordered in the matching frosty white.
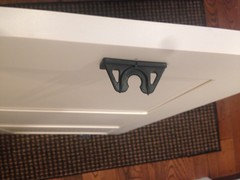
I attached the 3 panel to the front so you can remove it (see pics) with some panel clips I ordered (see pics). The bottom of the panel rests on an angled cut of the molding and the top pops into the clips to hold it in place.
Sides of panel were screwed into the adjacent cabinet and across the back by two stringer pieces of wood (bottom one was painted maple ..because it shows underneath) which is used to connect the whole box to together for stability. The other upper stringer, is a 2x4 which is used to carry the weight of the fan housing. This 2x4 stringer is lag bolted into the wall studs. The side panels of the cabinet were also screwed into this 2x4 stringer (again for stability prior to installation).
Like I said, it is not ideal but passes the eye test if you don't look too closely - but I am picky (whenever you build something yourself...you are pretty critical because you notice everything). If I had the extra to spend, I probably would have had someone build it from scratch but this was my attempt to get the look while using all Conestoga sourced panels (to exactly match the Frosty White paint color and sheen).
Being a medium talent DIY carpenter with limited tools, I would consider this to be an advanced difficulty job since it required pocket screws to get the panels connected in front and it was generally a PITA to measure, remeasure, connect the panels, trim etc all to get exactly 36" wide and get tight panel match lines (which I did with some tweaking). A real Carpenter would have a better time doing this and would probably turn out a bit better.
Hope this helps someone.
Dorothy Junio
2 years agoThank you for this thread! this post is a few years old. How are your cabinets holding up, especially if you ordered the Conestoga MDF? We want the white shaker cabinet, but we definitely want something that will last more than 3 years. Our plan is to renovate our kitchen and bath this year.
Huzkit
2 years agoHolding up well. We have the hard maple & plywood bodies (not MDF). We are pretty hard on our cabinets and they have held up well… couple very small chips where we have banged something into a door edge or other. Some very slight discoloration where we alway touch the garbage cabinet door. Otherwise great. Couple things I would have done differently - inset doors are really hard to line up perfectly … and couple cabinets we took a standard available sizing not knowing almost everything can be customized completely (even though we customized a lot)… would have a couple more tweaks to get it exactly right. The factory finish is good. But after all is said and done, it’s hard to get everything looking as perfectly installed as you might see at the local kitchen and bath showroom (they are pros)… you save a lot and the cabinets are good quality. It’s a good amount of work and you always notice anything off if you do the work yourself. But you can’t beat it for the money spent.
Dorothy Junio
2 years agoThank you Huzkit! We are ordering our cabinets within the next two weeks. Also, thank you for letting me know that you got the hard maple & plywood bodies. I honestly can’t wrap my head around ordering MDF although it is what they recommend for painted cabinets.


goodguy2k2k