


Ikea Super Hack - Part 2
Hello All.
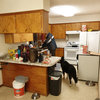
Site finishing has begun and I wanted to start a new thread since the old one was getting long. I hope you all donâÂÂt mind. IâÂÂm so thrilled to be getting close to completion!
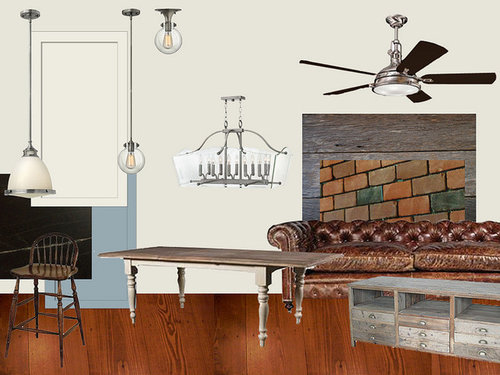
As many of you may know, my yellow kitchen was scrapped because DH decided yellow was just not for him. So, weâÂÂre going blue and white. I felt it was a little cool so I decided to warm it up with wallpaper and this is my new vision.

This is my mood board. I own all of these elements except for the barstools which are too expensive. So gorgeous and over $500 a piece! No way, Hosé! The search continues.
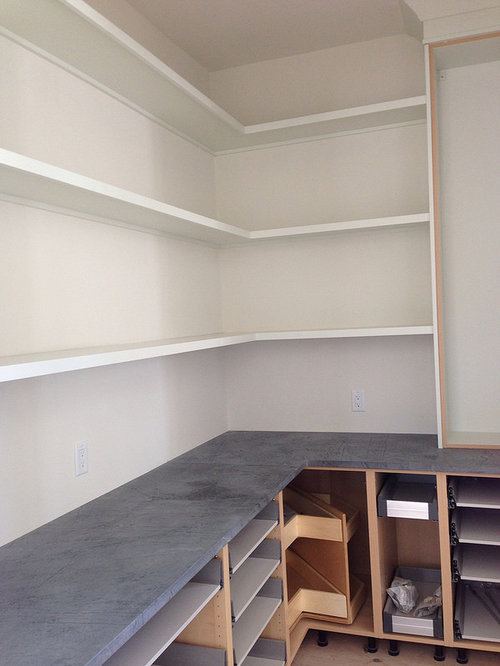
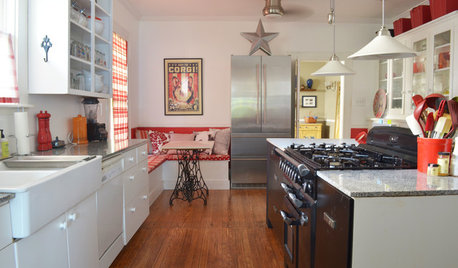
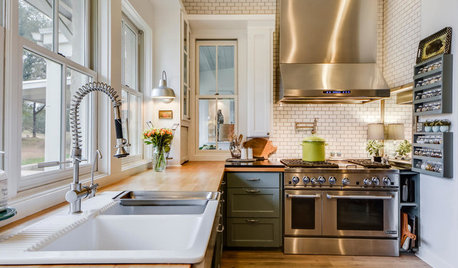
ButlerâÂÂs Pantry shelves have gone in and been finished:

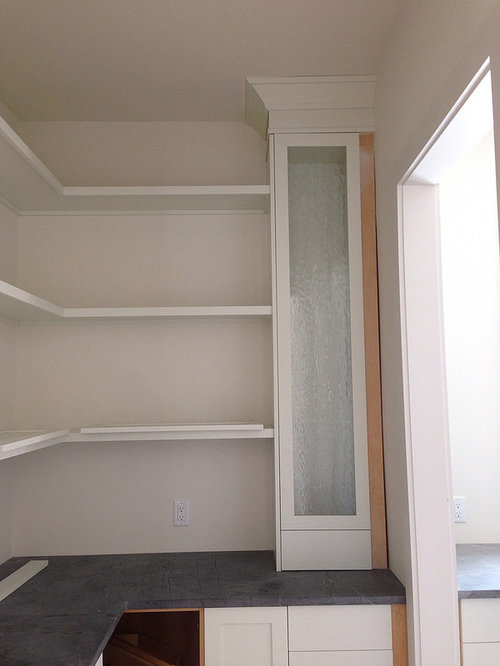
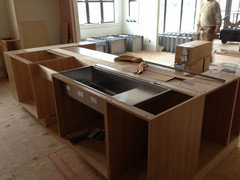
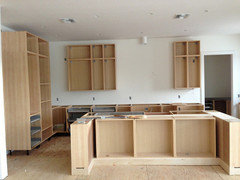
Custom pieces and trim were painted first, on-site before doors were delivered:

Doors, glass, and shaker covers are being installed⦠they still need to be adjusted.


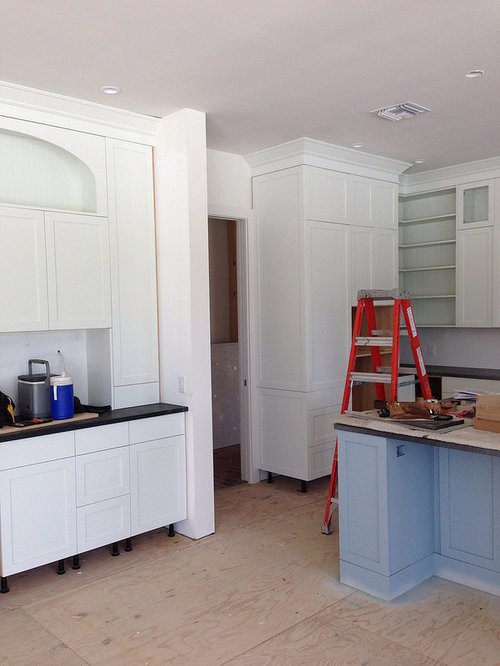
The floor in the laundry is finally done so the cabinet guys can start building the surround for the washer and dryer. We did not go to the ceiling in the laundry because DH wanted somewhere to put chotchkies (IâÂÂm anti-chotchkie), so I gave him the laundry. ;)

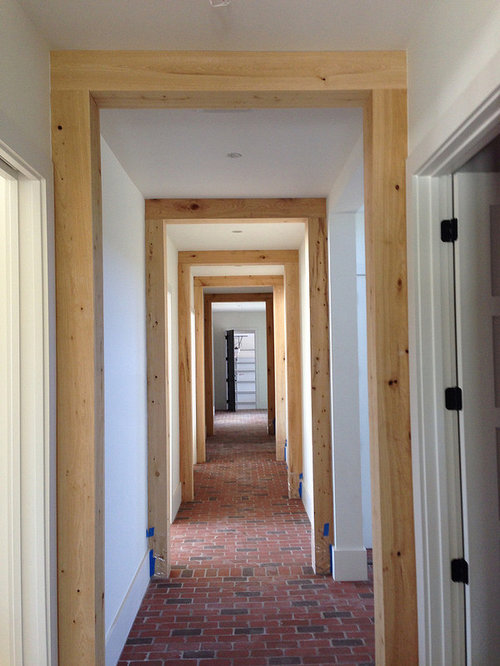
And, because IâÂÂm so excited with how the brick floor turned out, here are a couple of extra, non-kitchen pics! :D

Thanks for looking... Ikea has been a life-saver! Now, to customize the PAX wardrobes for my closet! Uggh! Do I need ANOTHER project? LOL.
Comments (58)

dutty
Original Author10 years agobicyclegirl Yay. I'm so glad I was helpful! When I was originally considering Ikea cabinets, I could not find anyone who had done a hack like mine. I was terrified to make the leap but I'm so glad I did. I was hoping that my experience might be like the lead penguin... once one jumps, they all jump. The possibilities are endless if you take the time to plan it out.
Good luck. And if you make the jump, please come back and let me see! :D

jellytoast
10 years agoFantastic thread(s)! It all looks incredible!! Please do share your future customization of the Pax wardrobes.
Related Professionals
Four Corners Kitchen & Bathroom Designers · Piedmont Kitchen & Bathroom Designers · South Farmingdale Kitchen & Bathroom Designers · Boca Raton Kitchen & Bathroom Remodelers · Elk Grove Kitchen & Bathroom Remodelers · Jacksonville Kitchen & Bathroom Remodelers · Kuna Kitchen & Bathroom Remodelers · Phoenix Kitchen & Bathroom Remodelers · Superior Kitchen & Bathroom Remodelers · Gibsonton Kitchen & Bathroom Remodelers · Plant City Kitchen & Bathroom Remodelers · Dover Cabinets & Cabinetry · Prospect Heights Cabinets & Cabinetry · South Gate Cabinets & Cabinetry · Saint James Cabinets & Cabinetrydutty
Original Author10 years agoktj459 - Oh wow⦠we lucked out with our guys! The first cabinet guy we picked, who is strictly an IKEA installer, abandoned us when he saw the scope of the job. I applaud him for admitting he was over his head but he put us behind the 8-ball with timing. The guys I found were finishers/furniture makers who also happened to do cabinets and they swooped in and saved the day. I think one key is to have a rock-solid plan in place. Even though my guys had not worked with IKEA, they saw that I had everything perfectly laid out and planned⦠fillers, hinges, sizes, hacks, etc. It made them more comfortable. And, they also realized they had a market out there if they could add Ikea installation to their services list (as proven by the enthusiasm people have shown over the hack). You also need to be sure you approach a group that can really customize or build whatâÂÂs needed. Not a semi-custom company that just installs pre-bought boxes and puts in fillers.
Good luck. There are many door companies that do IKEA doors so you can have your dream off-white kitchen! âº
dutty
Original Author10 years agofirsthouse_mp - I totally hear you on the expense of custom closets. Blech. I have a truck full of Elfa closets right now and they were at least cheaper than custom. But, Elfa didn't feel right for my master closet so I'm DEFINITELY doing Pax.
Did you know they updated the Komplement inserts? And the planner, too. It's sooo easy right now to build a closet with them. For some reason, the doors haven't made it to the planner but everything else is in there. You can place them in 3-D space, move them around, add and subtract inserts and it'll keep a running total of cost at the top. You can do it!
All this said, I will post when I get my closet going. I'm doing that one without cabinet guy help... scary. I'm planning on painting the doors myself and adding some sort of trim to the top. I'm exhausted but at least when I do my closet I'll be living in the home.
Amy Sumner
10 years agoEverything is beautiful and I'm with you... Those bricks! Love it. Thanks for sharing!
dutty
Original Author10 years agolazygardens They are not full depth brick but they are real brick. They are tumbled between just a hair under an inch to 1.25 inches. At that depth, they are able to be laid like tile. I actually wanted to set full bricks in sand but I was vetoed. I was worried they wouldn't come out right so now I'm just tickled pink how it all came together.
Thanks, everyone, for your kind words; They are very much appreciated.
jellytoast
10 years agoI must be way out of the loop. I was not familiar with the term "Ikea hack," much less SUPER hack, but now that I am, I'm a fan. Pretty amazing stuff!!
six172
10 years ago@Dutty Kitchen looks fantastic. I love the countertops they look great. I was wondering what resources you used for sketchup? I have seen a lot of videos but the instruction is all over the place. Do you have any that you recommend over others? I have been trying to build a basement, kitchen, and bathroom with it but it's been pretty terrible.
emilymch
10 years agoWOW! Dutty, your hacking power knows no bounds! It must be so fun to see your vision turning into a reality! I'm a huge fan of Ikea cabinets, and I love seeing how effectively you've deployed them!
dholland99
10 years agoBut seriously, my level of obsession with what you've done in this kitchen is approaching stalker status. Incredible!!!! Would you mind detailing what combination of pieces you used to create your island?
firstmmo
10 years agoI agree with dholland...I am obsessed with what you've done! I look at it over and over and try and convince myself I might be able to do this (or something even a fraction of this) to my master closet and the kids' closets. I tried the online 3-D planner and indeed it's super easy. But can I actually do this is the question? As they say, "All the best laid plans". I don't need doors on my closets since they are all walk in, so should be easy, but I am still worried!
annkathryn
10 years agoCount me in among the ooglers, you've done an amazing job on your kitchen, dutty!
I used PAX wardrobes in my master bedroom, in two fairly small closets. One thing I forgot to take into consideration was the height of the door into the closet. DH and I had to tilt the wardrobes back to clear the door, then slide in slowly to stand them upright. Those wardrobes are *heavy*.

autumn.4
10 years agodutty-I will be looking for your ikea pax hack closet thread...........I was just on there last night trying to figure that out for ours. Sigh. It was too late for any critical or creative thinking so I just went to bed!
Your kitchen looks amazing. What an awesome work of cabinet engineering there, kudos!
jellytoast
10 years agoI am not getting the "easy" part of the Ikea closet planner. I couldn't figure it out at all, starting with how to put in the dimensions of my closet. I finally just gave up.
dutty
Original Author10 years agosix172 - Yes, Sketchup can be a bear at times. To be honest, there was no particular resource that was better than others. I work in Adobe Illustrator all the time so I wasn't a complete novice with graphics programs BUT the 3-D space was so different. I basically would go until something bugged me enough to look it up. Then, I'd google it and watch a couple of youtube vids to get better clarification. It was a slow progression over the course of 6 months.
I wish I could be of more help but unfortunately, it's just something you'll have to plod through. I'd be happy to offer some tips on specific issues if you'd like, just let me know.
firsthouse - YES YOU CAN!!!
Ann - I have heard how heavy they are! And, on the Pax, I'm going solo so my cabinet guys won't be there to save me! ;) I think I will have to assemble them IN my closet.
Jelly - Are you looking at the new planner or the old one. I've found the new planner to be really simple. I never used the planner because it was a PAIN but the new one is just drag and drop... super simple. I'll put a link... is this the planner you're using?
Here is a link that might be useful: New Pax Planner
jellytoast
10 years agoYes, dutty, that's the one I'm using (or trying unsuccessfully to use). It makes absolutely no sense to me! I can't see where to add any dimensions for the space I'm trying to fill, can't see any dimensions for the units I'm trying to add. Maybe I want it to do something it can't do ... I have a large wall and I wanted to add multiple units in different sizes and then see about outfitting them.
dutty
Original Author10 years agodHolland - I would be happy to share my island combination... I have to think...
OK, if I'm standing in the isle in front of the stove facing into the family room, that side (L to R) has a cover panel that covers the side of a 12" wall cabinet / a 30" base cabinet with 3 drawer stack / dishwasher / 36" sink base / 18" trash pullout.
Go around the corner to the short side facing the ovens is a cover panel for the side of the 18" trash (depth of roughly 24") / a 24" wall cabinet with 4 shallow drawers / a 12" wall cabinet
Go around the cabinet and you have a cover panel for the side of the wall cabinet / the underside of the overhang is 3 - 30" wall cabinets / another cover panel for the side of a 12" wall
Finally, the side facing the refrigerator is a 12" wall cabinet / a custom bookshelf / another 12" wall cabinet.
I had a computer crash (thank God I was done by this point) but I do have some of the completed files. I'll see if I can't pull the doors off the picture so you can see.
dutty
Original Author10 years agojelly - They try to push you into a pre-designed unit but if you look on the bottom right, it'll say "start from scratch". Then a window will pop up that says, "start in an empty room" and this is where you can set your length and width. Did you see that prompt?
dutty
Original Author10 years agodHolland - Sorry, the editable sketchup files are MIA but here are some pics... hope they help.
Side facing cooktop wrapping around to the side facing oven with the cover panel, 24" wall, and 12" wall:
Side with overhang made of 30" wall cabs and filler:
Side facing refigerator with two 12" wall cabs. The center piece is a support piece and the space between the cabs eventually gets a custom bookcase.

jellytoast
10 years agoThanks, Dutty ... I'll go try it!
Update: I finally got it working ... thanks much!! Still looking forward to seeing what you do with your closets.
This post was edited by jellytoast on Fri, Mar 7, 14 at 15:18

bbtrix
10 years agoDutty, did your carpenter add structural support for your Stages 45? How about for your overhang? We're building our island now and want to be sure it will support granite. We're using a 36 and 24 sink cab and plan to notch and reinforce. What installation method was used for the sink? I'd appreciate any advise you can offer!
dutty
Original Author10 years agobbtrix - hmmm... no, I don't think they added support for the sink. They added support for the soapstone at the front of the cabinet since it was going to be a long and thin run of stone and soapstone is soft but the sink itself is held in with the special mounting clips. I didn't see how they work but I think it's all that's needed. When they notched out the space between the two cabinets, that also acted as additional support I suppose. I'm left wondering now if we needed something more. I don't think so... it's a really light sink. Next time I'm at the site I'll poke my head under there and take a picture.
As for the overhang, yes, that needed support. There are two metal support rails that run from the center structure out under the overhang. They are black so they blend in with the soapstone and you really need to stick your head under there to see them. I'll try to snap a pic of those, too.
Sorry I couldn't be more help. I think my brain has melted... two weeks until final inspection for C/O and we still won't be done with everything. Blech.
bbtrix
10 years agoDutty, thanks so much for the response. We also will reinforce the front of the cabinet but I wondered what your guys did since they have done such a great job. I've read so much about sink harnesses or additional blocking and am concerned about the frameless strength being compromised by the notching, but you're right that sitting on the notched area would add support. I am overthinking everything. I have not decided my countertop material but will in the next few days. If we choose granite then we'll add rolled steel plate as we need more support than your configuration. I am also brain-dead over thinking every decision!
Wow, 2 weeks till your final inspection! You are moving fast and the end is in site! I appreciate your offer for pictures and have you in mind as we work through this reno. Can't wait to see your reveal! I have to share how much satisfaction I have internalized with this project. It's been a very satisfying process - like a completed puzzle. It's quite a feeling to confidently put these cabs together quickly and proficiently once you have the system figured out. Thanks for all your help and inspiration, and hang in there. I can't imagine the satisfaction you feel!
infinitylounge
10 years agoTotally inspirational.
I myself have been struggling all weekend with the IKEA planner. It's like Tetris, only with no possibility of ever getting a red spike to take all this stuff out of here.
Thanks for updating the progress on your massive success story, I love everything and the counters. Omg the counters.
firstmmo
10 years agoYou are so close Dutty! and all of us can easily commend you for a amazing job. I still look at your pictures and try and decipher whether the base cabinets plus the fillers, etc., are within my ability to create myself. For now, I am thankful for my cab company! Can't wait to see finished kitchen. Yours is truly super-hack, supercalifragilisticly, awesome and inspirational....people will be looking at your kitchen and this thread for years :)
Rikki72
9 years agoLOVE your kitchen!!!! The layout is so similar to mine, yet my builders did a poor job of utilizing the space (hence my desire to remodel) I live in Tampa & notice you mention that you are in south west florida. Would you mind referring your various contracted companies to me? If we are in the range of their service, I'd love to work with them as you did. Thanks for the amazing inspiration!!!
lynn_r_ct
9 years agoTo say "Wow" would be an understatement!
You are being so patient in answering everyone's questions. I have read both your posts thinking I must be a "dummy" not to figure this out on my own. It seems to be something so obvious, yet I am clueless.
Assuming you have a cab that doesn't need to be hacked. You buy the cab box from IKEA. Then... you get the drawers/doors from another source i.e. Scherrs. Now re: the drawers, do you order each individual drawer boxes also from IKEA? What is confusing to me is that everyone mentions that IKEA drawers come with BLUM slides, so I am thinking that you do get the individual drawer boxes from IKEA (why else are people stressing the BLUM slides) and getting the drawer FRONTS elsewhere, or am I way off base.
Re: the cabinet door boxes - where do you get the shelves - IKEA or somewhere else? I live about 10 minutes away from IKEA so it is easy to drive there (not to order the cabs just yet), but I want to know ahead of time what I should be looking at - aside from the Swedish Meatballs.
Can't thank you enough. Lynn fr CT
bbtrix
9 years agoThe thing is that when you just order a particular cabinet there are many parts for that particular cabinet: the cab base (sides, back, and nails), and depending on what you order, drawer boxes, drawer fronts, doors, hinges and appropriate hardware...
Until you've either studied the details or gone through it, it is hard to decipher. But it is truly incredibly simple once you understand. You do not have to order the stock parts for a cabinet, but just order the bases, drawers, and hardware you need separately. It is difficult to find the item numbers unless you've already purchased one. The drawers are ready to be either pull outs or drawers depending on how they are mounted to the fronts. I live 350 miles from Ikea and had to figure this out on my own, though looking at what Dutty has done helped me understand the system.
I hope Dutty comes back soon. I'm kinda worried that something has happened since we haven't heard from her. Let me know if I can answer any questions you have. I'd be glad to help as I'm just finishing my Ikea kitchen.

eam44
9 years agoLynne, you order the whole cabinet, drawers and all, and all of the components end up in your cart listed by part number. You then just remove the door/drawer front part number from your order.
feisty68
9 years agoLynn,
IKEA cabinets can be ordered as one piece - including everything - or as the individual parts. For example, if you go to IKEA.com and search for article number 198.151.06 you'll get an entire cabinet. If you click on the Product Information tab for that article, then scroll down and click on the link "Show dimensions, weight and article numbers" - you'll see the individual components of that cabinet - each of which can be ordered individually.
I have IKEA cabinet boxes, shelves, and IKEA blum drawers and hardware - but no cabinet doors or drawer fronts. Those I am ordering custom from a local cabinet maker using the IIKEA dimensions and customizing a bit as I go. It sounds confusing but if you go to a showroom and talk to a kitchen expert they can break it down for you.
lynn_r_ct
9 years agoThanks bbtrix, I think! With your help I finally got to frames, legs & plinths and it made more sense to me. I definitely will have to be a hacker. The wall cabs only come in 30 or 39"s (rounded) and I need 33" if I am going to have any trimwork (short ceilings). They're also a number of smaller base cabs @ 9" and pullouts @ 12" that I need. You have really made it easier for me to understand and begin to plan .Did you buy your drawer fronts and door fronts from IKEA or did you go elsewhere, if you don't mind my asking.
If I were Dutty, I would be knee deep in a cocktail of her choosing by now even though it is not even noon on our side of the country.
I say thanks I think, because a plumber is supposed to be here in less than an hour and I should be cleaning the kitchen and scooping the litter in the basement. I will get the kitchen done, but he may have to hold his nose for a bit! Wish I could get my cats potty trained.
bbtrix
9 years agoLynn, I used Ikea fronts and drawers but feisty68 is doing custom. As she and EAM44 said the easiest way to find the numbers is through the search feature and the item listing the planner cart makes. I've made many additional orders as I've seen the need. You'll be lucky to just drive to the store. I realized I made a mistake only ordering a 24" sink base, so I ordered a 36" base and added an 18" regular drawer, 18" short drawer, and drawer partition so I can do the under sink trash pull-out hack, and turned the 24" sink base into a drawer cab by adding three 24" drawers and four 153 degree hinges. I ended up with quite a few extra regular hinges since a have many pull-outs. Be sure you have the correct dampers for the type of drawer/door. I threw in three extra 15" drawers to add to what came with the tall pantry and customized placement to fit my storage needs. That was the fun part. They should be able to help you in the store to make sure you don't order extra parts and make sure you have all the required fittings. I'm going to make a trip to my store this summer to get a few things that are too expensive to ship and lots of fun stuff.
I'm sure Dutty has been tremendously busy with closing the project out and moving. Can't wait to see her reveal!
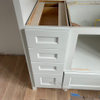
Here's a pic of my former 24" sink cab. The island is still a WIP, so I haven't done the edge banding yet.


Michelle
9 years agoI'm super in love with dutty's kitchen and impressed with this concept. Can you all tell me why you're not using Ikea's cabinet and drawer fronts? Is it to get a different/higher quality look than what they sell? Also is the motivation for savings? How much is a person able to save using this hack method?
Thanks!
feisty68
9 years agoMichelle,
IKEA offers a variety of cabinet fronts in different styles and price points. I think they are great, in general. My husband and I got fixated on a very specific look though - grey stained slab fronts, which IKEA doesn't offer, so that's why we're doing custom. It took me a while to calculate *exactly* how much the actual IKEA door fronts and panels would cost, for various styles, for *my* kitchen layout. Once I had that cost in mind, I started shopping custom options and found that custom isn't too crazy expensive. Of course, there is a huge convenience factor in going with IKEA fronts. I've been living without drawer fronts for 2 months now (and they don't have false fronts so they really aren't usable. Also, I will have to do the finishing myself to make it affordable.
If you go custom you can pick a company that specializes in IKEA fronts, or you can just order from a front fabricator and specify all measurements.
Ikeafans.com is an extremely invaluable resource for planning your IKEA kitchen layout. The help there is fantastic in figuring out the best layout for your kitchen using exact dimensions and the IKEA web site's kitchen planner.
Michelle
9 years agoThanks feisty. One question....we really want furniture type legs on our cabinets. Is that possible with ikea?
lynn_r_ct
9 years agoOT, I said I had to clean the kitchen and the basement litter because the plumber is coming. He is now 3 hours late. There is no way I am cleaning that litter out of spite!
Still learning from you guys, and everything you say is helping me out on this journey.
feisty68
9 years agoMichelle, of course furniture type legs are possible. There are a few ways to do that - either "faux" legs in front of a discreet toekick, or custom legs, or custom "leg covers" that surround the IKEA Akurum or Capita legs, or ready-made legs for IKEA made by third parties like this:
http://www.superfront.com/global/legs-70.html/?redirect=truefeisty68
9 years agoDutty nails it with this quote:
"Is Ikea for everyone? No. Are there better cabinets out there? Yes. But for the money, it's a VALUE and you can do amazing things with a little ingenuity. Plus, with the savings you can put drawers everywhere, inserts, soft close, etc. All of those would be UPGRADES with a cabinet company. The thing you need to be most careful with is who you hire to put it all together and PLAN. PLAN. PLAN⦠make sure you KNOW the product inside and out. "
Dh was just drilling through a Home Depot particleboard panel that had an IKEA cabinet behind it. He remarked that it was incredible how much denser the IKEA cabinet side was compared to the no-name particleboard - not the same stuff at all. Also, he had a major allergy attack while working with the Home Depot particleboard - something he hadn't experienced during hacking the IKEA cabinets at all. I wondered if that's because IKEA particleboard is made to EU standards which limits some VOC levels, etc. It's a mistake to assume that all particleboard is created equal. IKEA wouldn't be able to warranty their kitchens for 25 years if their stuff was the same crappy material that my home's original 2001 builder grade cabinets were made from for example.

tempe110
9 years agoAny new pictures Dutty? I have been anxiously waiting to see the finished kitchen!
bicyclegirl1
9 years agoDid I miss a reveal or at least some more pictures? I hope all is going well, Dutty. I know we'd all love to see more of your amazing kitchen, & well, the whole house when you have time! Thanks!
thehype
9 years agoJust checking in oaths thread...was there an update or reveal? So excited to see this beauty all finished.
User
9 years ago@dutty: Totally amazing, impressive and inspirational! As it has been awhile since you posted; do hope you are keeping well and all your projects meet your expectations as you certainly have earned it girl. âº
With sincere appreciation in sharing your journey. -mrsben-This post was edited by mrsben on Thu, Jan 1, 15 at 12:14
User
9 years agoRe my earlier comment. For those who may be contemplating an Ikea kitchen; it is my understanding that come February 2015, they will be introducing a new line of kitchen cabs in North America called Sektion (which will replace the Akurum system) that is suppose to offer more versatility in components.
With that said, I am in no way affiliated with Ikea and for all one knows; perhaps 'dutty' influenced them to some degree with her creativity and vision like she has with myself and the many people who have left comments. -mrsben-
This post was edited by mrsben on Thu, Jan 1, 15 at 12:18


dholland99