Shop Products
Houzz Logo Print
juliekcmo

Ugly Duckling to Swan-Kitchen Eye Candy

juliekcmo
10 years ago

I have been meaning to post this for a while, just as a thank you for all of the wonderful advice I have received on GW over the years.

Backstory. We were happy and content in our large home in a traditional older neighborhood. House built in 1931. Kitchen remodeled in 2002. It was my dream kitchen to be sure. But time marches on, the kids start to graduate, and we crave less yard work and house work. Long story short, about this time last year we decided we had "had it" with dealing with the snow and the yard work and decided to think about moving to a "no mow, no snow" subdivision where the HOA takes care of these problems. The one particular neighborhood we liked was built 25-30 years ago. So the home we ended up buying had not ever had much redone, and that meant we got a good price, but needed to update everything pronto right when we moved.

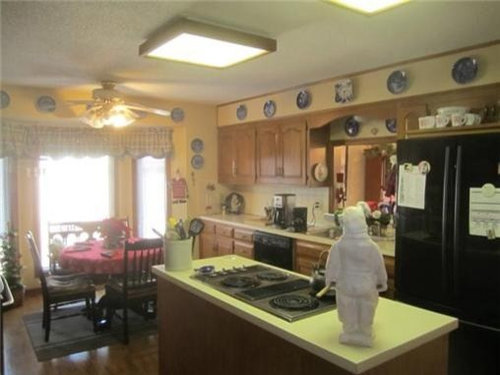
The kitchen had a lot of good features. Solid oak cabinets, plenty of storage, nice window, laundry in the kitchen, an island, wood floors, and room for a large kitchen table.

However, it had original formica counters held together with scotch tape, an island downdraft coil cooktop with a non-working fan (so basically no ventilation at all), and a 27 inch wall oven micro that killed the feeling of continuous counterspace.

Our contractor from our old house look at the new place and assured us that he could find a way to make a 30 inch range and hood work where the 27 inch wall oven was. That sealed the deal.

Here is what we bought: Pictures are from PO from the listing.

(yes, I know. See the thread on Is staging worth it? on the home decorating thread)

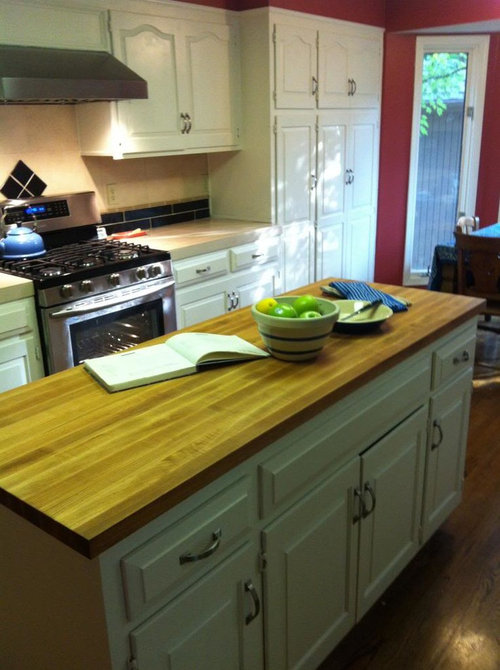
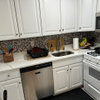
So here is the result with the basics fixed. Contractor did some woodworking magic to add range and range hood where he removed the oven/micro combo. Plumber installed gas line for new range. Samsung all gas range. Has amazing 18,000 btu and 15,000 but front burners. Also added 600 cfm hood and ducted outside through wall behind oven.

Removed coil top and formica on island and put in John Boos maple butcher block. On side of island cut recess and put microwave there below the counter. Had electrician put outlet at correct height on island near countertop for using appliances, and outlet inside cabinet to plug in the microwave. Had new Blanco wave sink (Amazon) and Hansgrohe faucet (Costco) installed by plumber (reused existing disposal). POs took their refrigerator with them, so we were able to get a counter depth side by side which was better for the layout then what they had before.

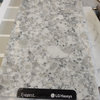
Tile guy removed formica countertops and 4x4 basic backsplash. Now have 12x12 porcelain tile counters (almost exactly like we had in our old house). We were even able to use some of the accent tiles left over from our old house. We got the tile all from the "back room" at the tile store where there are over runs and special order returns, so got exactly what we wanted and got a great deal as well.

In a nod to the arches on the cabinets, and pulls on the oven and refrigerator, we selected new pulls that are satin nickel Mission style from Lowe's. Very clean and enough of an arch that a man's hand fits in them.

Handyman put in new ceiling fan with better light fixture and satin nickel finish.

We decided to leave the square ceiling fluorescents at this time, even though I have 2 just darling LED pendents that I got for $19 each on clearance in the garage. Not sure about diving into the popcorn ceiling issue of it all.

At this point we had also been tackling the bathrooms with stripping wallpaper, and painting cabinets, and I was just about out of energy.

My angel of a DD told me that even though she knew I liked the kitchen "fine" as it was, that she knew that I really wanted to paint the cabinets. But that I had just run out of gas. And would I trust her to do it? So she and one of her friends (both going into senior of college) took on the monumental task of painting the cabinets for a solid week in August. As a thank you, we bought their gas for the road trip they took to see a friend in California, so everyone was happy with the outcome. The did an amazing job. Then DH and I did the walls and got a new table and chairs for my birthday. I wouldn't change a thing except to maybe get those pendants up. All in all very budget friendly.


Comments (18)

  • Holly- Kay
    10 years ago
    last modified: 9 years ago

    Oh Julie, how lovely. I liked your kitchen before but the after is amazing! We had a large fluorescent fixture on the ceiling in a home we built and I loved the light that it gave in the kitchen.

    Please post a pic of the eat in side of the kitchen so we can see your new table and chairs. I just love the outcome. Many happy days in your new kitchen!

  • MarinaGal
    10 years ago
    last modified: 9 years ago

    Not only is your updated kitchen beautiful, the story about your DD and her friends painting your cabinets for you made my eyes tear up. That is the sweetest story ever. I know you will enjoy your kitchen even more now!

    PS - did the pig move out with the POs?

  • mudhouse_gw
    10 years ago
    last modified: 9 years ago

    What a huge improvement to remove the island cooktop, and install a range where the old wall oven was. Looks like that resolved a lot of problem issues in one fell swoop! Everything did change, truly, from an ugly duckling to a swan. Good for you for being able to see what was possible.

    It's really helpful how you detailed each change as it evolved. I can see why you wouldn't change a thing. Terrific too that you can think of your DD and friends every time you see the cabinets.

    (I'm glad the pig left, he was kinda scary.)

  • schoolhouse_gw
    10 years ago
    last modified: 9 years ago

    Nice!

  • homebuyer23
    10 years ago
    last modified: 9 years ago

    Omg, I was actually almost embarrassed to admit, but I just saw Marina girl did, that I got a lump in my throat reading about your dd and friend painting your cabinets! She and her friend just sound like a couple of wonderful young adults! What a nice thing to do, and then I imagine them feeling great taking a road trip with the burden of gas money taken off their shoulders....just such a nice story!!

    And, the kitchen looks great seriously! What a nice space. Would love to see your table too. Congrats on a great kitchen, and even better, raising such a generous kind hearted daughter!

  • juliekcmo
    Original Author
    10 years ago
    last modified: 9 years ago

    Aw, you guys are making ME tear up now! She is fantastic.

    Here is the table and the bay window. It is a northern exposure, with the side bays east and west. So sitting on one side you can see the street, and the other the nice wooded back yard. There are a total of 4 chairs. Got that at a local "antique" mart for a steal. I think the table might be hand made, as there is not maker's mark on it.

    And yes, lil' piggie did leave with the previous owners. Imagine how ironic it was to walk through a kitchen with a pig in it. It was like an aura of GW was already there.

  • juliekcmo
    Original Author
    10 years ago
    last modified: 9 years ago

    Oh, and added bonus.

    The ovens and oven cabinet that were removed were taken by my BIL for his cabin.

    Tile guy took the old sink and faucet.

    Habit Restore got the old ceiling fan, 42 cabinet pulls. Door knobs, (and lots more from LR, DR, and bathrooms).

    So only the non-working coil cooktop, and the formica and backsplash were not re-used.

  • mudhouse_gw
    10 years ago
    last modified: 9 years ago

    Bravo! Drives me crazy when people are smashing things with sledge hammers, during the demo phase on HGTV. Good for you for finding new homes for all those things.

    I love the table and chairs, and those great tall windows.

  • Chris
    10 years ago
    last modified: 9 years ago

    Great job! Although it looked good before the cabinets were painted they really do finish it off perfectly. Well done to your DD!! :)
    Love the butcher block. It looks right at home.
    Congrats!!

  • tinker1121
    10 years ago
    last modified: 9 years ago

    Very nice!!!

    Can you tell me about the tiled counters? Was the tile put over the existing formica or did a new countertop need to be made to apply the tiles to? Did you keep the original backsplash or how did he change it?

  • CEFreeman
    10 years ago
    last modified: 9 years ago

    Wow!!!
    It looks like you were lucky to start with a pretty spacious area. You've really optimized it.

    I am really happy to hear you recycled your stuff. As one who is building from reused stuff :) I also hate to see the HGTV destruction.

    Ironically, they talk about doing things that are good environment, reusing, going green, blah.
    Then they have these "cathartic" demo sessions, where the people make the same stupid comments as they waste perfectly good stuff -- to someone else. Don't get me started on another rant. I've already done one this week.

    ANYWAY! The paint job is lovely and changes the entire feel of the place. The really beautiful table lends warmth.
    I hope you enjoy it!

  • juliekcmo
    Original Author
    10 years ago
    last modified: 9 years ago

    Thanks for all of the compliments and good wishes! I owe a lot to GW, so I wanted to show what can be done by "seeing" the layout function first.

    Also I used the new SW alkyd cabinet and trim paint. It is soap and water clean up when wet, but scrubbable after it cures. It levels very nicely. We used it on kitchen cabinets, bathroom cabinets, and whole house doors and trim. (painters sprayed it on the areas they did. I laid on with a brush and laid off with a foam roller on the projects I did.)

    Tinker, the original back splash was very basic 4 x 4 "bathroom" style tiles in the same antique white as the formica. So they are kind of hard to see in the before pictures.

    The installer had to remove the old counters and lay down a new plywood base for the install on the counters. He removed the wall tile and I believe he only had to patch drywall in a few spots. There were also some drywall patches behind the stove area, as the 220 outlet had been removed by the electrician, and in the wall area where the original cabinet had been. It took the tile guy and plumber a week. He was a true pro and knew that the drywall patches needed to dry, that the tile needed to be set up before grouting etc. He was very proud of his cutouts by the electrical outlets, and we showed him the tiles we had to work with and asked for his input on the details. He came up with the diamond behind the stove. We like that because that tile, and the half round liner bar were leftover tile from our previous kitchen, so that made it feel like home. So the backsplash is the same porcelain as the counters in the main field, with the sesame colored liner bars, and the black running bond horizontal tiles.

  • Mags438
    10 years ago
    last modified: 9 years ago

    Wow, nice!!

  • Ilene Perl
    10 years ago
    last modified: 9 years ago

    What a wonderful warm kitchen,,,enjoy!!!

  • Mgoblue85
    10 years ago
    last modified: 9 years ago

    I really liked the transformation before you painted, but now it looks even "more" better - ha! Great story - regarding the painting and donations. It's always great when good stuff can be used by others versus trashed.

    The table is fabulous. It looks great and the perfect fit too.

  • williamsem
    10 years ago
    last modified: 9 years ago

    Wow, nice update! I wish I could see the potential in stuff like that, it's a whole new room with just a few changes! Looks great.

  • romy718
    10 years ago
    last modified: 9 years ago

    What a darling DD. Your new kitchen looks wonderful. Love the butcherblock & the thick tile countertops. Great kitchen table.

  • chiefy
    10 years ago
    last modified: 9 years ago

    That is so impressive that you were able to "see" past what was being shown into what the kitchen could be. That's wonderful that your daughter helped you out with the painting. That's so sweet.