


Keep or change bones of 60's southwest ranch kitchen?
Hello folks,
We have been pondering the layout of our kitchen walls for years. I think it's finally time to either commit to making changes, learn to love it, or give up and move (let somebody else figure out how to love it, or fix it!) I have never liked how the kitchen is isolated from the rest of the house, but the people who built this house clearly did.
Sometimes I question making changes. I wonder if we should try to accept the bones of the 1965 house, low ceiling and isolation and all. When we work on houses, we try not to ignore or remove character, but this is a struggle. Our indecision has become an excuse to delay needed updates in the two adjacent rooms as well, so I feel like the heart of our house is stuck. I need fresh eyeballs (and honesty!) to help me get my mojo back.
There is no room in the budget for all new cabinets and partially opening walls (which might be load bearing?) so we need opinions about prioritizing a number of issues. In other words, where is the money best spent?
I've included lots of info so you can see all the factors we're juggling. (No mercy.)
Us: Retired craftspeople. We like to make things, and garden. DH does most of the cooking (I'm hopeless), but neither of us are passionate cooks. We microwave a lot. No kids, but we want to consider changes to help this big house work for future families. We're DIY for paint, tile, basic woodworking, basic plumbing. We love creative scrounging, and we're not worried about tackling labor intensive things...once we have a plan.
The house: 2900 sq feet, 5/3, southwestern style 1965 ranch rambler in southern New Mexico. We're the second generation of my family to live here. It's a great old house, but it's sneaky. Every time we look away, it tries to turn into a lovely big money pit.
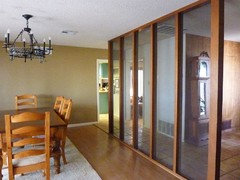
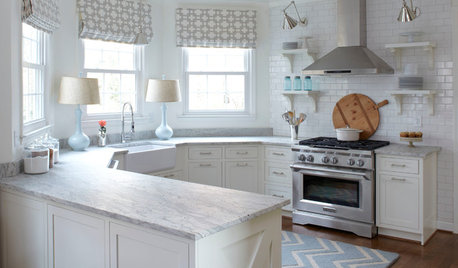
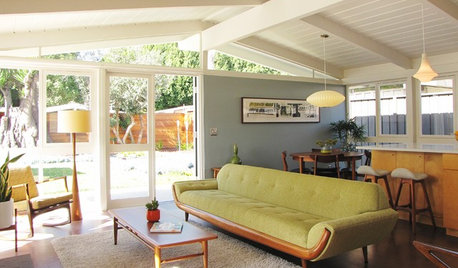
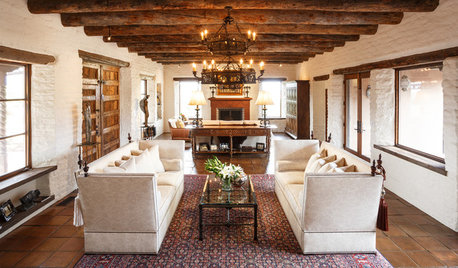
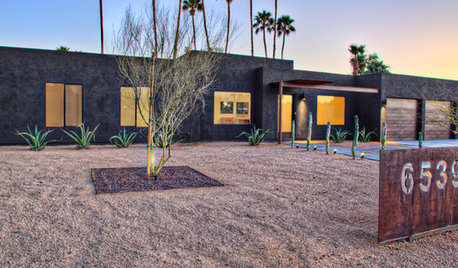
Style: The one-story custom home was designed as a blend of midcentury and southwestern features. Framed construction, low pitch roof, stucco and adobe brick exterior. Deep eaves with heavy carved rafter tails, wooden beams on porch and den ceilings. Saltillo tile, oceans of popcorn ceilings (shoot me now), wood paneling, funky tile baths. Big banks of (old) glass sliders open to big covered patios. Over an acre, with privacy and views.
Kitchen update budget: Here's the rub. Around $20,000, because we're trying not to badly overinvest. Current values in our older neighborhood are wobbly, and our house/lot is larger than most. No plans to sell soon, but because it's so big, this may not be our forever home. We've done a lot (restored adobe exterior, replaced windows, new HVAC, new electrical service, landscaping, one bath) but there's lots more to do.
Goals: Within this budget, fix the most likely potential deal breakers for future buyers. Help the kitchen relate better to the rest of the house; do something with the low ceiling and poor lighting; replace range and add ventilation; improve visuals.
Appliance layout: As a non-cook, I don't think the current work triangle is too bad, and I hoped to save money by keeping the same appliance locations. The main problem I see is we use the same small area between the sink and the fridge for both prep and clean up, since that's the side the dishwasher is on. But it doesn't bother us much.
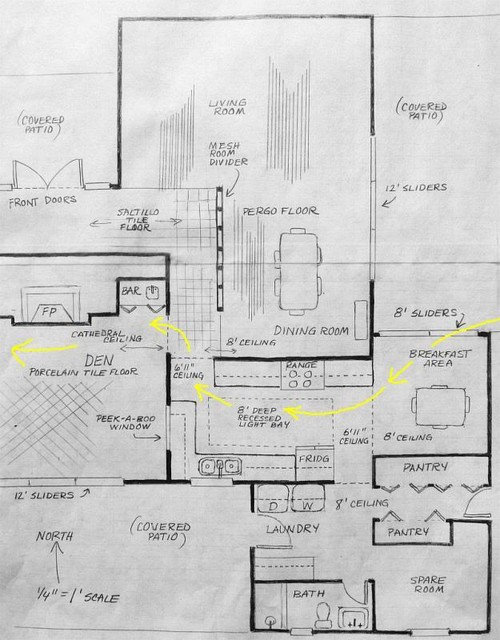
The kitchen has a very low 6' 11" ceiling, and is closed off from the adjacent living/dining on one side, and the den on the other. The passage to these rooms is tight. For added headaches, each room has different floor and ceiling treatments.
In my first plan I tried to show differing ceiling heights and floorings, and the general layout. Note the bottleneck formed by opposing countertop corners, as you leave the kitchen. This is the start of the area that bothers me the most. (I hope you can read my hand-drawn plans.)
The yellow arrows show how we normally enter the house, and pass through the kitchen, to get to the most-used part of the house.
I drew another plan of the kitchen, larger, with dimensions.
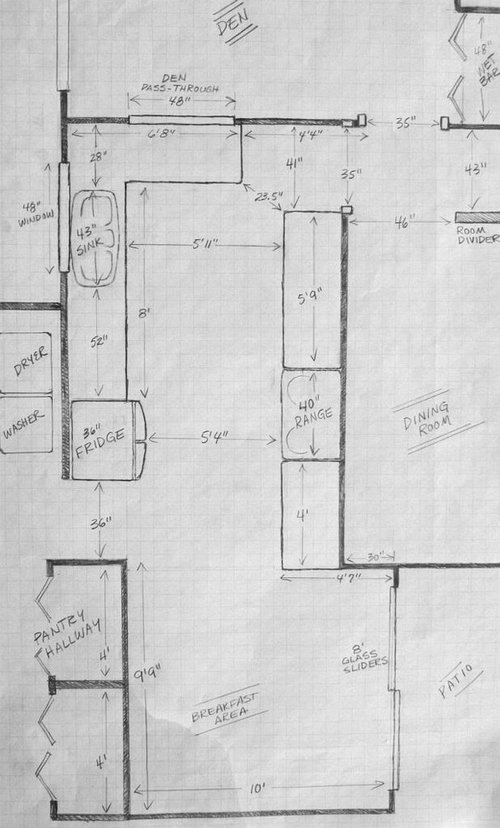
Gripes: Major traffic goes right through the heart of the work triangle, but I think that's unchangeable. There is no easy place for guests to hang out in the kitchen; we dodge them inside the work zone. They can sit in the breakfast area, but it feels a little far for talking. A family with kids could not watch them from the kitchen.
The middle of the house feels a bit like a maze. In the first floor plan, you can see part of the brick fireplace in the den, central to the house. This big central "island" is 16' long by 5' deep, and contains the fireplace, mechanicals, a closet, and wet bar. I think this island makes it harder for visitors to get their bearings in the rambling house, as it blocks any long range views. The solid kitchen walls make this problem worse. It makes me uncomfortable when infrequent visitors have a hard time finding their way out.
Photos next. Grab some coffee. And bring paint.
Comments (96)

nosoccermom
10 years agolast modified: 9 years agoI personally wouldn't change the rounded "bump" on the cabinets, nor would I change the room divider.
I think these are features that some people may like and others not.
The ceiling is probably more of an issue as is the old cooktop/oven combo, and opening up to the den might be a great idea.
Soapstone would be great.
I personally wouldn't be bothered by the range opposite the sink (unless there's a major reason that I don't realize).
Your kitchen is charming, and some tweaking can accentuate this even more.Evan
10 years agolast modified: 9 years agoI think the bumps are kind of cool. I don't think they really look dated, because I've never seen anything like them. Just unique. A softer paint color will probably make them not stand out so much.
I can't get over how cool that range is. I can picture Betty Draper cooking on it while wondering if Don will make it home in time for dinner.
Related Professionals
Agoura Hills Kitchen & Bathroom Designers · Mount Prospect Kitchen & Bathroom Designers · Broadlands Kitchen & Bathroom Remodelers · League City Kitchen & Bathroom Remodelers · Sioux Falls Kitchen & Bathroom Remodelers · Terrell Kitchen & Bathroom Remodelers · Upper Saint Clair Kitchen & Bathroom Remodelers · Wilson Kitchen & Bathroom Remodelers · Joppatowne Kitchen & Bathroom Remodelers · Key Biscayne Cabinets & Cabinetry · Lakeside Cabinets & Cabinetry · Newcastle Cabinets & Cabinetry · Reading Cabinets & Cabinetry · Wells Branch Cabinets & Cabinetry · Shady Hills Design-Build FirmsUser
10 years agolast modified: 9 years agoI'm in love with the stripped off paint natural wood doors. Man, that would be a LOT of work though, and I'm afraid I couldn't even suggest that to my best friend unless she were OK with it becoming a lifestyle rather than a project.
Moving the range bit IS about safety, but it's also about kitchen efficiency. Most of the prep work in a kitchen takes place between a sink and the hot zone. When you have them on the same run of cabinets, it reduces your trips back and forth across the aisle. You mainly "shop" in the fridge, gathering the ingredients, then transport them to beside the sink, rinse them, wash your hands, and do what you do, dropping the chopped onion into the skillet on the stove to saute. Most of your traffic becomes concentrated, and less likely to be interrupted by passersby. That's a two fold benefit of both decreasing the work, and increasing the safety. Especially if you aren't able to divert the traffic. I'd consider it essential to do if your plans to direct people to the other door fail.
On that front, it's difficult to tell where the opening in the wall lines up with the door that you'd like to have used. Moving that opening further to the right, with a deliberate path to the entry door might be all that's needed at the moment if you change the arrangement of the furniture. I remember the landmark study about pathways taking place on a college campus where groundskeepers were getting snarly about the bare spots on the lawns where students cut across between paths. It was because it was the shortcut between two points. When new paths were installed that followed the shortcut, no more bare spots in the lawn. Use that strategy. Put the opening in the wall directly in front of the door that you want to use, and put an obvious paver path straight to the door. That should cost far less than trying to replace the doors at this point. If that works, then replacing the doors can go way down on the "nice to have, but not essential" list.
I just wanted to comment on your original post also. It's one of the best I've seen for illustrating the problem well, and also giving the parameters within which the problem has to be solved. If more people approached home design like that, they'd get far far more out of the process and end up being happy about the whole experience. I can't tell you how refreshing it is to encounter someone who gets that.

robo (z6a)
10 years agolast modified: 9 years agoIf you do find a little pot of extra cash for cabinets I have to say IKEA abstrakt white or cream cabinets OR applad white or stat white would look absolutely lovely in your space.
See Petra's famous Southern Spain kitchen for sort of rustic-Spanish-modern inspiration in stat white.
Here is a link that might be useful: Petra's White kitchen in Southern Spain
This post was edited by robotropolis on Wed, Feb 5, 14 at 12:43
aviphysics
10 years agolast modified: 9 years agoI love that someone made that range, but it is a super terrible design. I hope you never had to make a stew at the same time as baking.
juliekcmo
10 years agolast modified: 9 years agoIf you want a resource about the layout specifics for cooking, buy the book on Amazon or his website: "Kitchen Design with Cooking In Mind" Best job of explaining the logic process I have ever seen.
To answer your layout question. Using the stove is the most dangerous part of the kitchen. Prep is next most dangerous. So making that safer is worthwhile. Our last house, before we remodeled, had the stove and sink across the traffic isle. And it was a kitchen that served as an entrance as yours does.
When we bought the house our kids were 3 and 5. It was so dangerous in my mind that I would be crossing the aisle to dump out a hot pan of pasta right when someone would need to run through the kitchen (person or dog) that I was a complete banshee and barred everyone from the kitchen while cooking just to keep everyone safe. Didn't want to trip and dump hot water on a kid, and didn't want to dump it on me.
So from that standpoint, having the sink and stove on the same side of the traffic aisle to me as a young parent looking at your home would be a plus, if I were savvy enough to consider such things.
pricklypearcactus
10 years agolast modified: 9 years agoI have a kitchen that has a slightly different layout, but has the range across from the sink. (My refrigerator is on the same run as the range, but there is counter space between.) Personally, I like to have lots of room to spread out and prep. Additionally (full disclosure here), I often have dirty dishes stacked in and/or next to my sink (above the dishwasher). So the idea of losing that luxurious amount of space around the range that you have now to share the space with the cleanup zone seems crazy to me. Ideally you could add a prep sink to the run with the range and have the water needed for prepping, but I'm guessing that's not an easy change.
Also, your stripped cabinets are really cool! I think they go well with the earthy warm feeling of the southwest ranch home.
mudhouse_gw
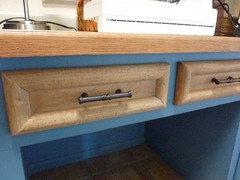
Original Author10 years agolast modified: 9 years agoedb2n, and nosoccermom, thanks for your votes on the Big Bump Question. Also, edb2n, you're right on target; the Madmen series did use a Frigidaire Flair in their season 5 premier. This photo courtesy of Uncle Atom:

(And look closely...the color of the cabinet frames above looks similar to our current blue. Also, the doors and drawers are stained, not painted. Hmmm. A sign that the Decorating Gods want me to strip all of ours?)
I don't think I like the color combo, but I did toss the stripped drawers back in the cabinet, later that day. Kind of spooky how much they match the above, lol!
And of course, Samantha Stevens cooked for Darron on a Frigidaire Flair (I would have just twitched my nose):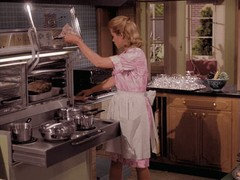
According to a post in the above blog, General Motors (the corporate parent of Frigidaire) was a sponsor of Bewitched, so they placed current Flair models in the show set each year. Great product placement.
aviphysics, it can sometimes be a little awkward to reach over the stove to access the ovens, as you said, although DH doesn't seem to mind. We do love how the oven doors open; it's wonderful to place and remove things without having the door in your way. And the doors glide up smooth as silk.
We have enjoyed the differing reactions to the dining room divider, because they're so varied. (My Mom says the main reason she liked it was because it was a nice place to hang my grandmother's white crocheted snowflake ornaments, at Christmas time.) I think nosoccermom is right; it's just one of those features that some will like, and some won't. I take that to mean, the world won't end regardless of what we do with it, and that is a comfort!
live_wire_oak, juliekcmo, and pricklypear, your responses to my questions were exactly what I needed to have a much better understanding. Since DH and I aren't big cooks, and also never had kids, we are doubly handicapped in appreciating some of these issues. Now that you've helped us, we will do a much better job of weighing out the pros and cons, matched against the pricing for the various options.
robotropolis, I have stared at Petra's kitchen many times, but I had forgotten the details of her cabinets. I remember her for the way she used the Susan Jablon sample tiles, as a lovely stripe in the backsplash! I should probably spend some time on the IKEA site for pricing; there's a chance the bids for structural work won't be as scary as I'm thinking. I could make a last minute veer towards modern cabinets (and lower drawers, sigh!) Then I could donate our cabinet doors to the Smithsonian, since they are (apparently) the only ones in existence with Big Bump Trim.
live_wire_oak, and others who have said kind things about my original post...your words made my day! I did work hard because I thought it was the courteous thing to do (asking for free help, after all.) But also, I was so darned hungry for some real honest input, and creative no-holds-barred brainstorming. I wanted to increase my odds of getting what we needed. You folks really came through.
The side benefit to the whole exercise of trying to explain things is...it became more clear to me. My time on the post was worth it. The first time I really measured and drew out the floor plan of our walls...I thought...holy cow, no wonder I feel constricted, and frustrated! Same thing with the photos. I saw things I had never seen before. It's hard to bare your "before" house to the world. But I learned a lot about our house by doing so...even before I clicked "submit," and before you all jumped on board to help!

tinker1121
10 years agolast modified: 9 years agoI just wanted to say I enjoy reading all of the "brainstorming". Such talent and insight which will surely guarantee great results with such a wonderful home to work with. Good luck with your project!
mudhouse_gw
Original Author10 years agolast modified: 9 years agoTinker! You need to get right over here, and help me strip this country wallpaper! (You proved in your thread that you're very good at it, so now you're in trouble...)
Bring your steamer...don't worry, I won't start without you.
tinker1121
10 years agolast modified: 9 years agoAfter 5 inches of snow topped off with sleet and some freezing rain here in Pennsylvania today, you could almost convince me to head west.
If you think I am good with a steamer, you should see me with a snow blower!
nosoccermom
10 years agolast modified: 9 years agoI really like IKEA kitchens, especially their Abstrakt fronts, which is most likely what I would pick if/when our kitchen will get redone. However, your cabinets are unique --- and I mean "unique" in a positive sense, so I would not replace them with IKEA unless they were beyond repair.
mudhouse_gw
Original Author10 years agolast modified: 9 years agoThey're definitely not beyond repair. There is a slight crack in the plywood veneer on one of the big sink base doors, but I'm sure we could so something creative there, if repairing it isn't feasible, since sink bases can be an area for a little fun.
After I stripped the two little drawers, I played around with some ideas in Olioboard, trying to see what it would look like to have the doors/drawers stained gray, and the frames painted gray. (Of course I could not find any "big bump" doors on the web to swipe into Olioboard!) I was feeling kind of "Pancho Villa" that day instead of "George Jetson," so played with all kinds of Mexican and rustic tiles and rustic hardware. Might not be right...but that's what idea boards are for, I guess.
In this case I painted the upper frames white (to blend in with the ceiling better, because I thought it would help the room seem taller.) And painted the lower frames light gray.
I love the look of 8" cement tiles (these shown are vintage tiles, I think, so out of my reach.) I'm crazy for oldbat2be's famous tile backsplash, too.
I have wondered if I could actually recreate the look of antique terra cotta tiles myself, by using 1/2" thick saltillo tiles, cut to 8" square, and paint using stencils. Then sand/abuse for some aging, and seal super well. I dunno. It's fun to think about, though.
Our backsplash area actually varies a bit in height (around 16", and less) so I'll be cutting/fiddling with tile heights anyway. Two rows of 8" tiles would be about right for our squishy backsplash area.
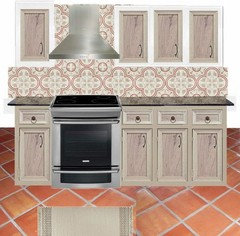
So this is kind of what I had in my head when I started the thread, and why I had to work a bit to reopen my brain to the idea of keeping any kind of blue.
I had this stainless hood in my image file, so used it. But probably some kind of painted white wooden box, maybe with an arched lower edge, would be complementary to the traditional Spanish arch form (the den adobe brick fireplace has one of those 60's Spanish arches.)
Just posting it here for fun. I should play with some ideas for a much more retro look too (find a backsplash that George Jetson would like) to see how that feels. It's so hard for me to know which of those two guys should have the upper hand in this house.
mudhouse_gw
Original Author10 years agolast modified: 9 years agoI was just talking with DH about the wooden box for the vent hood. I pointed out we'd definitely have to trim it out with several rows of Big Bump Trim.
He thought a minute, narrowing his eyes and visualizing. "You know," he said slowly, "this thing could catch on fire."
LOL. So when Big Bump sweeps the country, just remember it all started right here.

bpath
10 years agolast modified: 9 years agoI LOVE the stripped drawers with the blue frames! Half the work of stripping the whole thing?
mudhouse_gw
Original Author10 years agolast modified: 9 years agoI'm still not really sold on the blue, but so many folks like it, I'll have to keep an open mind. I thought posting my gray Olioboard above would sway folks, but maybe not! More to think about.
It's true that stripping the doors/drawers is half the work of stripping the whole thing. But since stripping the whole thing is completely wacko rubber room insane, from what I've read, I worry that even doing half of it is still pretty crazy (I think?) Too bad it's still an appealing idea to me.
Maybe I could ship everyone a door to give me a hand...
This post was edited by mudhouse on Wed, Feb 5, 14 at 23:45
texasgal47
10 years agolast modified: 9 years agoI'm in the process of stripping a 6 unit shelf system with drawers and drawers. Don't even think about tackling a kitchen. How about a temporary job to pay for the new Ikea?
Also,look at Susanka's books. She has used open shelves with collections on them as room dividers. I'm not at all a fan of the wire, though. Finally, please accept my complements on your initial layout of the issues. It's the best I've seen on GW.deedles
10 years agolast modified: 9 years agoOkay, just read through the whole, long thing here... love your house. Many possibilities there!
I too have fallen in serious like with the stripped drawers... esp. with the paint remnants showing. Could totally envision them rubbed with wax for a beautiful, soft glowing finish. Some kind of lovely, colorful tile counters and backsplash, too. 'Course, I don't have to do the work... :)
Can't say that I am a fan of that blue in the kitchen at all.
The suggestion to visually re-route the path to the living room sliders is a good one. Also, like the peninsula instead of that pass-through wall, too.
If I had to pick the first thing that I'd do, it would be to get rid of that big, flat light panel and get the solatube up there. Then see how it feels, height-wise. That thing needs to go, man!
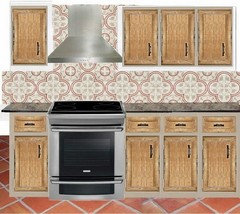
Here, I stuck your drawers into your image... turned them into doors, too, just for fun.
nosoccermom
10 years agolast modified: 9 years agoWoah, love that look with the wood and the tiles.
How much work would it be to strip the drawers and doors. Also, the doors wouldn't look like the drawers, right?
Either way, though I love all things blue, I'd go with a paint that's less contrast, more like the gray or greige in the pics you and deedles posted
Looking at my tall family members, I'd say that raising the ceiling would be a non-negotiable, and those solatubes are really neat!mudhouse_gw
Original Author10 years agolast modified: 9 years agoTexasgal47, I know yours is the voice of reason. In our last house I stripped (country blue paint) off a built-in corner china cabinet. The 8 doors were not as bad as the built in areas, because at least I could put the doors on sawhorses to work on them. I would never try to strip the frames/stiles of anything again...after that ordeal. Good luck with your project!
I have been using Jasco stripper. If you have any words of wisdom for a better stripper, I'm all ears. Also, I am off to the library today for some Susanka books.
WOW, Deedles, thanks so much for that work! It's such a help to have the real doors in there. I'm very impressed at your skills to make that work out of my puny drawer pics above...not sure how you accomplished that since I didn't have a full on photo! You're good. Now I can steal the doors you built for me, and do further playing. Cool!
Honestly, I had not considered keeping the wood natural, before this thread. The brainstorming is so helpful here.
nosoccermom, the drawers and the doors are made exactly the same way, but the little inside flat panel on the drawers (where the handle goes) is teeny compared to the doors. They used the same size big bump trim on both the drawers and door, so the bump sort of overpowers the shallow drawer fronts. Deedle's board shows it right; the doors just have a bigger flat area in the center, so they would actually show off the wood grain a lot better.
I realized this morning, there's really no reason for me to strip the inside of the doors; they could be painted the color of the stiles. One way to reduce the stripping time would be to only strip and stain the flat interior panel of the doors/drawers, and let Mr. Bump around the edge of the doors/drawers remain painted. It would reduce the area of visible wood grain, but I'm trying not take on something that will become (as live_wire_oak said) a "lifestyle decision" to strip wood for months to come.
Stripping the rounded bump area slowed me down; stripping only the interior flat part would be a little faster with a flat scraper. I'd still have to carefully paint the bump around the stained area (kinda slow and fiddly work) but I think I could do it carefully. If you look at the photo I posted above, the wood grain is only in the interior portion. Here it is again:
I also thought about buying veneer and gluing it over the central area. I haven't ever worked with veneer; no idea of price. DH says we'd have to add some kind of tiny trim over the veneer edge too, so probably just gutting out the stripping would be better, if I am that desperate for wood grain.
I'm going back to my graph paper to work on some elevations of the den wall, and how to open it. I think we are committed to that now, and removing the uppers over the peekaboo window would give me some doors to experiment with.
I think we are fully on board now, with raising the ceiling, and solatube, and a den opening. I kinda knew it, but it really helps to have everyone here confirm it.
robo (z6a)
10 years agolast modified: 9 years agoYou could also probably cut out the center panels of some doors and add mesh or glass. This is not something I would or could ever do but it looks nice when other people do it. Plus less stripping.
Here is a link that might be useful: Converting doors to accept glass
deedles
10 years agolast modified: 9 years agoCan't you call a few shops and see what the cost would be for them to strip the doors? I've taken all kinds of things to shops that have dip tanks and whatever all and they've done a great job. I would GLADLY pay someone several hundred dollars to do this and I'm speaking as one who did it 4 years ago.. my whole summer was stripping 4 layers of paint off and repainting only 5 cabinets and doors/drawers. If I'd have had a brain I'd have taken the doors and drawers.... no if I'd have had a brain I'd have NOT skimmed over the kitchen search results that kept taking me to GW back then... oh, water under the bridge. But your doors are groovy and totally suit the house.
At least check around and see what it would cost to have someone else do the stripping for you.
nosoccermom
10 years agolast modified: 9 years agoOK, got it. Do you know whether the veneer in the door panels looks the same on the outside as on the inside?
I've used that orange stripping gel (Citi-Strip?), which worked quite well. It also comes as a spray, which goes in little crevices. But I have to agree that stripping all these cabinets would keep you occupied for months, so maybe just paint them gray/greige.mudhouse_gw
Original Author10 years agolast modified: 9 years agorobotropolis, right there with you. I saved four panes of privacy glass that we removed from a run of windows a few years ago, wondering if I could reuse them in cabinets. (Might look goofy, the glass has a kind of a frosted cloth-like texture, but I save everything for a while.)
Our cabinet doors aren't well suited to inserting glass, because (unfortunately) they're not panel doors; they're slab doors (solid flat surface on the back.) The article you linked to is one I had saved also, and it says people with slab doors should just go buy glass doors instead of trying to convert them. DH told me the same thing years ago, when I started waving this idea around. But I'm not quite ready to give up, because I know darned well that anything is possible; it just takes more work and money. ;-)
deedles, good idea. I can't find any shops locally that do stripping so far (need to be in a bigger city I think.) But I have a few leads on home-based businesses that refinish furniture, so I'll run that down.
With the way your totally unique kitchen is shaping up, I can't imagine that you would have any regrets about the road that brought you here. (I feel guilty about you doing the photoshopping for me, because I know you have a lovely new vent hood to sand and paint...!)
nosoccermom, I don't know if the veneer in the door panels looks the same on the door front as on the back. It should be as good quality or better, since the cabs were originally stained dark, and not painted, and hopefully they put the good face forward. DH says they used 3/4" plywood for the doors, hardwood veneered on both sides.
I really want to strip a door front to see, but I should probably get a few more ducks in a row before I start ravaging things.
Just brought a big stack of Sarah Susanka books from the library, and they are wonderful.
We had an estimate on sliding door replacements this morning, and also visited a local builder supply for more door quotes. It feels like we are getting unstuck.
texasgal47
10 years agolast modified: 9 years agoMudhouse, several years ago I sold a home DH and I custom built in 1975. There were several places where I needed to replace baseboard. A privately owned lumberyard near us happened to sell molding from that era so I was able to have an exact match. You might try several lumberyards or carpenters to see if yours is still available. One of your neighbors may even have some in their garage. Our cabinets had the same exact method of construction as yours. We saved some of the cabinet molding from when the house was originally constructed. Also, you could pose the question over on the GW Carpentry Forum. By the way, love your house and your can do spirit!
deedles
10 years agolast modified: 9 years agoOh, I like to fool around with images... and I've run out of my own stuff to work on, ha! Glad when I can be helpful since I've gotten so much help here for my kitchen.
nosoccermom
10 years agolast modified: 9 years agoI love this thread because I love to reuse and recycle things rather than ripping out and replacing with (inferior) new stuff, even though I could afford it.
Without singling out specific threads, suffice is to say that some before kitchens look perfectly fine to me.mudhouse_gw
Original Author10 years agolast modified: 9 years agoWe're the same way, we always enjoy trying to figure out how to reuse materials and components in interesting ways. It becomes part of the game to us, and the enjoyment we get from it makes the extra work worthwhile.
Thanks to those above who suggested the Sarah Susanka books again...so many helpful things. I also came back with an armload of books about mid century/retro ranch homes, too. Although I've checked them all out before, I'm finally getting it through my head that some notes of bold color would be true to the period, and fun as well.
Who knows, I may end up using some kind of blue after all, (in spite of all my fussing and whining about not liking it.) Opening up my brain to a whole range of thoughts here was exactly the exposure I needed.
You've definitely headed us in the right direction. I will be sure to post back, when we carve out another block of decisions. Thanks so much for helping me get my mojo back...(I was starting to think it was lost forever!)
lyfia
10 years agolast modified: 9 years agoTo redirect traffic have you considered removing the cabinets to the right of the stove and across from the laundry opening and make an opening to the dining on that side? Whether you are coming from breakfast area or garage you have a different path into/out of the kitchen. Would require some reconstruction of the cabinets to fill in on that side after you replace the stove, but saving doors it should be doable and it looks like you have the space.
mudhouse_gw
Original Author10 years agolast modified: 9 years agolyfia, thank you. I did consider that, early on, because it would make the range cabinet wall more of an "island" that you could walk all the way around. Then I decided I was going crazy and taking down walls in too many directions, and forgot about it.
That was before I posted this thread, though, and before everyone helped me understand the importance of creating alternate traffic routes away from the range and work triangle.
I'll revisit that idea again. Looking at it now, I think you're right, maybe we could lose 24" of the cabinets to the right of the range, as well as the little perpendicular 30" wall that forms the corner of the dining room.
Thank you for pointing that out!
aliris19
10 years agolast modified: 9 years agoOK, it's not my house and I'm hopelessly late to this party (having been away for years) ... but you aren't seriously really honestly going to lose that marvelous masterpiece of a stove are you? Really?? I think it wouldn't be out of line to build a whole house right around it!
Sorry, gratuitous comment, I realize. You gotta do what you gotta do. But that thing is so totally cool. You could install some of the new groovy swing-up hardware on some of your upper cabinets to match the stove. And with blue-and-natural "striped" cabinets you'd have just about the niftiest conceivable kitchen. "Nifty" may not be your goal though. But imagine swapping out the whatever-it's-called, middle wood panel of the cabinet door fronts with glass, adding swing-up hardware and striping the blue from the door - just cool to contemplate.
I admire your energy!!!
detroit_burb
10 years agolast modified: 9 years agothough my vote is for a new kitchen, just because I like new better because of functionality and pullouts (and I've also restored a 1960's kitchen in my second home), I do love the stripped drawer fronts and would not worry to much about what you perceive to be different wood colors. If it is all stripped it would look cool. The TV picture you posted with the painted stiles and wood doors is really nice.
and someone above mentioned just raising the middle of the kitchen ceiling to make a tray, and that sounds nice, too.
you are getting lots of good responses because everyone loves MCM.
merrygardener
10 years agolast modified: 9 years agoI love all the ideas and flow here! juliekcmo's plan resonates with me. I am envisioning a big GW party, with a chainsaw taking out the upper wall dividing the kitchen and den and some cabinet stripping in the southwest sunshine. If you ditched the mesh, how will you keep the deer out of the den and kitchen? .
mudhouse_gw
Original Author10 years agolast modified: 9 years agolyfia, back again to your comment. I worked on some drawings last night, and realized we'll need to lose about 36" (?) of the cabinets to the right of the range, to make a doorway thru to the dining. I'm sure that what you meant when you mentioned rebuilding the cabinets, and I see it now.
At some point rebuilding the stick-built cabinets becomes more trouble than it's worth, but we both think the doorway to the dining room has a lot of merit, for a number of reasons. So we'll work more on that idea. The area you mentioned has always sort of bugged both of us as being a little tight. Thanks again for bringing it up.
Aliris19, no way you can be late to this party! And no need to apologize... I understand. Visually, the range is killer cool. It's unique and unusual, and goes against who I am to even consider replacing it, but one thing GW has taught me is to try to balance function with looks.
Functionally, the range has to do two things for us. 1) heat our food. 2) not hurt our house value.
It's OK on the first point, but only because DH has taught himself how to deal with the burner quirks. And, because we're just not interested in really serious cooking.
The second point is hard for this forum, because you can't see where we live. We watch our neighborhood for home ownership changes, and prices, and we know who is moving in, and moving out. The truth is, the folks most likely to buy our home will not "get" this range. They'll see it as old and scary, and they won't want to surf eBay to buy a used oven element if one dies someday.
If I lived in Portland, or California, or someplace where all you cool people live, I would build a kitchen around it, most likely! It some markets it would probably help our resale value.
But here, you could say, if I buff up the old girl until she gleams, and then adopt her out to somebody who really, really loves her, I'll probably be saving her stainless Frigidaire soul. Otherwise, she'll likely be scrapped by a future frustrated owner (after we lose a bunch of prospective sales because she looks so...nifty but old.)
But I understand your pain. The clocks never work on these old Flairs, but since I've done this thread, it's ticking (randomly) at night. Tick - don't kill me - tock - don't kill me. I'm serious. It's brutal.
I'm surprised you guys even speak to me, because I know this goes against the core of what GW folks appreciate. (Hangs head in shame.)
mudhouse_gw
Original Author10 years agolast modified: 9 years agodetroit_burb, I've never had a modern kitchen with all the cool cabinet features I see here, which is probably good. Otherwise I'd be having an even harder time justifying working with these cabinets. I waved a tape measure all over last night, and I still can't figure out how to modify them to get the microwave up off the countertops. Grrrr. But I do think they would stain up fine, as you said.
Merrygardener, we both laughed out loud at your question, because in our last home in TX, Bambi was the bane of my existence (as a gardener.) DH says to tell you the deer are no problem here, because the coyotes eat them. Clearly the mesh is designed to keep the coyotes out of the kitchen.
I'm all for the GW party. It's sunny and 64 degrees. We have a chainsaw. Bring paint stripper.
lyfia
10 years agolast modified: 9 years agoWhat I was thinking with the opening and rebuilding is this. You will need to take the stove out and replace with a 30" stove which would leave a 10" gap, so I would demolish all the cabinet to the right of where the stove goes. Put the stove right against the edge of the old cabinets. To not have to replace cabinets.
Keep the door and drawer fronts from the right side and only demolish the boxes. Then you could just build two new boxes, a base and a top cabinet, or use a stock cabinet that work with your door sizes and replace the doors and drawer fronts with your saved. I'm not sure how wide your doors are as to what size you should go with. Minimum of 12" is needed for safety. If you have just the boxes built without doors you could use stiles and not have to door overlay fully to get some more width to the boxes to get the doors to work if not wide enough.
On the other side I think with a new counter that just has a normal overhang on the side will make the pinch point a bit larger. If you open that wall up then you don't have to worry about it.
I would spend the money on opening up that wall and create another opening to the dining. Raise ceiling. Save the cabinets and new counters, stove, and backsplash.
mudhouse_gw
Original Author10 years agolast modified: 9 years agoGreat, lyfia, got it!
That plan is making a lot of sense to us. It would serve to complete the idea started above, of diverting house entry traffic into the dining/lr area, by changing the sliding glass door run on the patio. Even if we carried groceries through a "new" front entry into the house (mocked up earlier in the thread) we'd still have a quick path to the kitchen, by going left, through the opening you're suggesting.
People entering the kitchen through the current 8' sliders (the way we do now) could still come in that way, and turn right, into the dining/lr area, to avoid a busy kitchen.
So, no need to pay for the plumbing/electrical changes to swap the stove and range, as they could stay put. The house would also gain some new sight lines.
I have some ideas for the possible problem of our original cabinet doors being a bit too narrow for the size of the new cabinet boxes to the right of the range. Back to the graph paper to redraw things, thanks so much.
nosoccermom
10 years agolast modified: 9 years agoIt's 23 degrees here, more snow and ice on the way, and I have my orange stripper packed....
rantontoo
10 years agolast modified: 9 years agoIf the goal is to ultimately maximize resale potential and price, are you sure you want to go to the effort and expense of stripping drawers/doors/frames and reconfiguring cabinets when what is behind the doors/drawers/frames would be a reason for many potential buyers to lower their offers? While I agree that the stripped doors/drawers are interesting, the problem for me and I suspect many potential buyers would be "the problem with the cabinets is they are not boxes...they're built in place with no backs." Because of that issue, I would lower my offering price since the kitchen cabinets would be replaced.
Before I decided what to do with the kitchen, I would spec out the price of just cabinet boxes and then cabinet boxes with face frames (in case current face frames cannot be removed without damage) from American made online RTA sources and local cabinet makers...if you want to reuse the door/drawer/face fronts. Even a general contractor or skilled handyman could make plywood boxes. I quickly searched two online sources for a 24 inch bottom plywood cabinet box with adjustable shelving and front hardwood facing (no drawer or door); both sites were well under $200. Custom sizes are often possible; this would be extremely helpful if you want to reuse your stripped doors/drawers.
mudhouse_gw
Original Author10 years agolast modified: 9 years agonosoccermom, since you're packed first, you get dibs on the guestroom (and your very own pink bathroom, lucky you.)
Ranton, thanks for the chance to kick this interesting idea around.
The rub is, the goal is to make the most critical improvements we can, within the goal we've set to spend, and we were aiming at $20,000. That may already be long gone, since I keep changing banks of doors! We try to consider resale as we choose the improvements, since we can't do them all.
If we stray too far from our goal, we're tossing money down a rabbit hole. Having too much fun here, and then doing a few needed bathroom updates, can send us over the price range our neighborhood will currently bear. We're walking a tight rope because our house is already one of the largest, on the biggest lot, in the older neighborhood.
In our city, potential buyers are unlikely to balk at older cabinets, if they're looking at an older home with sufficient desirable character...in our price range, at least. (Very expensive custom homes are a different kettle of fish.)
Here, the older adobe homes (or adobe veneer, like ours) do sell with old cabinets, and sometimes old Mexican tile counters. It's usually cited as part of the character. Of course, I suppose some are replaced by the new owners, but I'm going by the kitchens I see in real estate listings.
Doing a quick calculation based on your numbers (thanks so much for that!) I came up with roughly $4000-5000 for new cabinet boxes just for the kitchen (not laundry.) That isn't much to vastly improve the function of the cabinetry, and your idea is a good one, because it couples new features with the chance to keep the original doors and drawer fronts.
I think the problems with the walls/ceiling are a bigger problem than our admittedly unsophisticated storage, and I seem to be going in the direction of doing even more with walls than I'd originally planned. But some of this can be more carefully weighed out, once we have real bids for the work we can't do by ourselves.
I do appreciate your idea.
tinker1121
10 years agolast modified: 9 years agoHi Mudhouse. Just stopping by to see how things are going for you. Decisions, decisions.
Good luck and hoping your bids are kind to you!mudhouse_gw
Original Author10 years agolast modified: 9 years agoHiya Tinker.
No bids yet, we are still working on drawings and decisions, but making mental progress, at least. We're committed to raising the ceiling, and opening the wall to the den, as well as including a doorway to the dining room (as suggested by lyfia) at the end of the range run.Still reading (mid century, atomic ranch, and Sarah Susanka.) Funny thing has happened, I'm turning into an MCM fan, after all my protests about how unsaleable that style is here. (It is, but I'm starting not to care so much.) The brainstorming here has truly opened my brain to some new directions I was closed to before.
Another funny thing; the dreaded room divider in the dining room has gone from a Big Problem to an opportunity to set the tone for the whole house. Our plan right now (which may change by 6AM tomorrow, lol) is to cut out the wire mesh, strip and restain the woodwork a light color, and add glass. Still evolving, but lately thinking about tackling some smallish glass-on-glass mosaic panels to add a color/retro feel to the piece. The colors and shapes are key since they would then be repeated elsewhere in the house...so still thinking.
I have never done glass mosaic but I've done tile mosaic, so it's tempting to try.
I'm so grateful to everyone here who helped get my brain rolling again. Truly, I thank you all daily!
lyfia
10 years agolast modified: 9 years agoAlthough I love the idea of glass mosaics if I were a buyer with kids I would really balk at having any glass there unless it was safety glass (read expensive). Too much of an issue with kids throwing/running/jumping just generally being kids and I would lower the price based on how much I thought it would cost to replace which as a buyer is always over estimated vs. not.
Any other options you could go with?
mudhouse_gw
Original Author10 years agolast modified: 9 years agolyfia, thanks, and we agree. The glass company said building codes only require us to use safety (tempered) glass for the two end panels; the center three could be annealed, if the glass started 18" off the floor. How crazy is that? We'd never want to take that risk, either. Yikes.
Fortunately the bid for tempered glass was only about 15% higher than annealed glass (which really surprised me.) So we'd only consider tempered 1/4" if we use glass. Laminated glass (with the plastic skin in the middle) would be the safest, but it's super pricey. I think safety glass would be OK.
Another option is 1/4" plexiglass, which I think would work as a substrate for the glass mosaic, as long as I didn't go too big with the panels. (I think big plexi panels might flex, which isn't good for a grouted mosaic...?) At some point I need to go ask the folks in the stained glass/mosaic forum here.
So far the pricing for thick plexiglass seems comparable to tempered glass. There would still be small grouted glass pieces on one side of the divider (we could put it on the low traffic side) but I don't think the surface would be risky for kids, since all the sharp edges would be embedded in grout. And it would be pretty hard to break.
We considered colored plexiglass panes too, but it just seems so "mod" for the informal, earthy textures in the house. Colored tempered glass and frosted tempered glass are way too expensive (pushing $1000 just for the frosted glass idea, for five 5' panels.)
I considered frosted films and frosted spray paint, but I think those ideas have a limited life span (especially if the house has active kids) since the spray frostings can scratch off. And DH keeps wishing for color, and he's got me agreeing.
It has to be somewhat transparent or it blocks too much light. So, now considering a fairly open wooden framework, with smallish glass mosaic panels scattered. Still playing with ideas...!
nosoccermom
10 years agolast modified: 9 years agoWell, I was snown in, so couldn't make it to the airport --- but the pink bathroom sounds so tempting!
The glass doors sound cool. What kind of mosaic do you have in mind?
mudhouse_gw
Original Author10 years agolast modified: 9 years agonosoccermom, the pink bathroom sounds nicer than it is. :P
You're actually pretty close, but I'm thinking about a terra cotta and turquoise color range. More like the colors in this synagogue window in CT (made in 1960 by Jean-Jacques Duval.) I'm trying to pick up the warm tones in our saltillo floor and pine table.

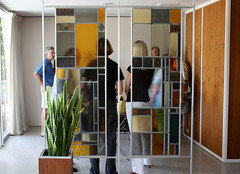
So here's the pic (again) of the divider now:
And here's the latest idea. Trying to keep the squares of mosaic glass sorta smallish so I have some small chance of really finishing it before I'm 92. The wood frame is stripped of the current dark brown and stained a light gray. Also the paint color (and dark paneling in the adjacent entryway) will change; the whole house needs to go whiter and brighter.
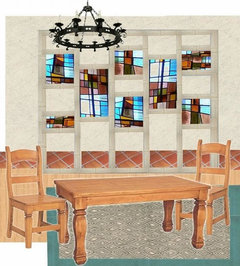
Kinda rough because the glass mosaic panels would not read as "real stained glass with black leading" as the clips I stole above, but you can get the idea of the colors and fairly simple shapes. (Squinting helps!)
Still playing.
texasgal47
10 years agolast modified: 9 years agoHi mudhouse, just wondering if the fronts to your drawers could be removed with the intent of having new doors and drawer fronts made. Most likely not, but you could ask over on the GW woodworking forum if interested. I recall someone on GW having new doors made and hiring a pro to paint. The result was fantastic.
mudhouse_gw
Original Author10 years agolast modified: 9 years agoThanks Texasgal47. Normally that would be a good consideration, but my gut feeling is these cabinets aren't worth the expense of new doors/drawer fronts, because of their functional limitations (fixed shelves, shallow drawers, etc.) I think they're worth a new finish and hardware, but not much more.
If we decided the original doors and drawer fronts weren't workable (let's say we fell out of love with the clunky Big Bump style) I think we'd be better off with all new cabinets, to get modern improved function at the same time.
The cabinet decisions should be easier once we have the major construction costs pinned down (and we can see how badly dinged up the budget is.) My guess is the Big Bump cabinets will be around for a while longer. :-)
texasgal47
10 years agolast modified: 9 years agoMudhouse, you show sound reasoning in all of your comments. Your fortitude in holding back "project creep" is impressive and prudent. Hope DH appreciates your strength in using logic rather than emotion.

mudhouse_gwOriginal Author