


Small kitchen - Big success
We have just completed our kitchen renovation and since we gained so much from this forum during our research, we wanted to contribute these notes of our experience to possibly help or inspire someone else. It is long, but hopefully not tedious.
There were several motivating concepts that drove our design:
-The space we had was 'land locked' by a stair and back door that we did not want to move. We also did not want to make any changes to the exterior walls or windows to contain the cost.
-Use appliances, materials and details that are the easiest to clean and maintain.
-Establish the budget necessary to obtain good quality appliances, materials and construction with limited regard for high-end design or decoration.
-We felt that it was within our capabilities to lay out the kitchen as well as design custom elements to achieve an optimum design. We are confident that one can trade research for experience in matters like this but knowing one's limitations is the key to success.
-We were able to accomplish much of the carpentry and all of the plumbing and electrical as a means to reduce cost while gaining the highest quality in materials, installation and function.
-We have lived in our house for 25 years and have made the decision to stay here as long as we can, thus making investments to meet our personal objectives, both short- and long-term, with only modest concern for resale.
-We have a master plan that has evolved for fifteen years encompassing interior and exterior renovations. The kitchen area has been under consideration for this entire time with many concepts, ideas and experiments contributing to the final design.
Since we simply had too much kitchen to put into the space available, it was necessary to move some of it into another area. As it happened, several years ago we built a screened porch onto the back of our house and added a door for access from a back bedroom. At that time (as part of the master plan) we decided to turn this room into a utility space so in our present concept we included a desk area to act as command central and a 'buffet' as storage and display space for our pottery, dinnerware and large service pieces. In the kitchen proper we have only a few basic service pieces with four place settings of daily dishes, retrieving what we need for events and rotating settings on a monthly basis.

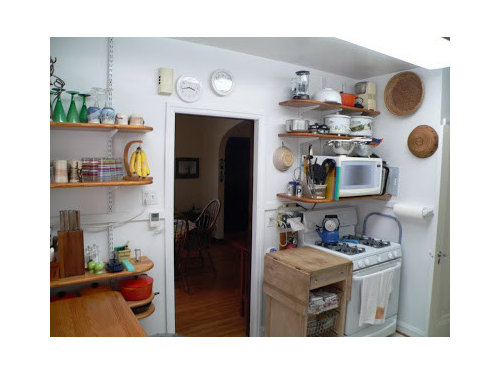
When our house was built in 1928 there were no refrigerators so our fridge was crammed into a small closet at the back door a few steps away from the kitchen. Thing one was to move the refrigerator into the kitchen. In so doing we would make it possible to have a passageway between the kitchen and the new utility area with a straight path to our beloved porch. We had to move a radiator, however, before any work could begin.
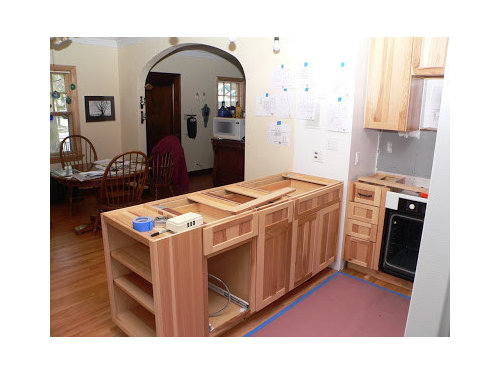
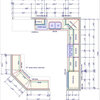
The next major change was to remove the bearing wall between the kitchen and dining room to make way for a peninsula that would give us more work space and open up the whole area. This required installing a beam as well as moving another radiator that had piping running in that wall. Both challenging conditions that required some careful thought. We developed techniques to remove the original studs and install the new beam while leaving the top 12" of the dining room lath and plaster in place to avoid having to rebuild a cove and picture rail or match the existing textured plaster surface. We were able to fit new columns into the existing wall cavities for a flush finish. There was a good chunk of engineering and additional construction that went into this to deal with eccentric loads so it is not for the faint of heart.
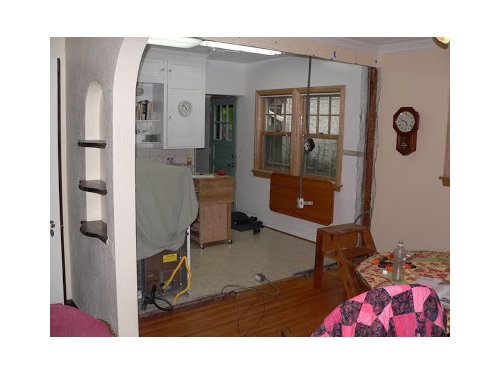
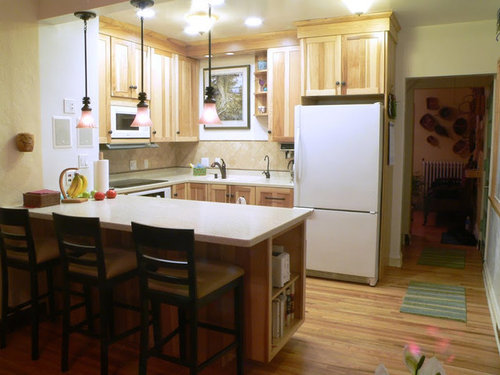
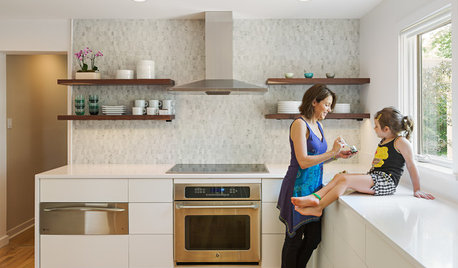
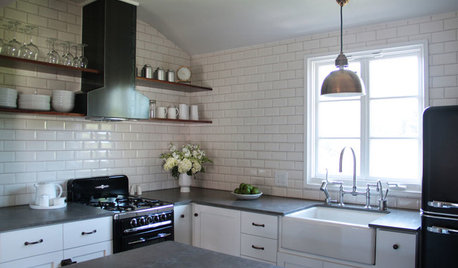
Removing the dining room wall and adding the passageway to the utility space made it feasible to block up the door from the old kitchen to the central hallway making this space available for the cooking area. The space for the doorway also made it simple to install a duct for the hood with an inline fan mounted in the joist space below. This avoided lost cabinet space above the cooktop or construction for overhead ducting. We were then able to use the space over the cooktop for the microwave. We built a recess into the wall so that, in addition to 15" deep cabinets at the cooking area, it was possible to install the countertop-sized microwave that we wanted.
The cleanup area remained approximately where it was to avoid moving major plumbing. Our master plan fell down here just a bit since we actually moved the sink over a couple of feet and piping that we had installed several years ago in a laundry room renovation just below the kitchen had to be moved. Oh well. The plumbing lines for the sink and dishwasher were very carefully laid out and some of it was even mocked up to be able to reduce the space dedicated to plumbing to an absolute minimum.

We removed a broom closet from the kitchen and moved that function to an existing closet in the utility space. We had the old fir floor removed and replaced with narrow red oak to match the rest of the flooring on the first level (something we could not handle). We removed old wall lath and plaster up to 54" to simplify electrical, plumbing and cabinetry installation, but did not remove the rest of the wall or the ceiling since it was sound. It is a tossup as to whether one removes and reinstalls walls and ceiling. New drywall is nice to work with but because we were doing the work, it was possible to match surfaces and retain old materials rather than filling a dumpster. One of the first construction tasks, however, was to get new light fixtures into the old lath and plaster ceiling. Careful layout and a RotoZip saw with circle attachment made it happen.

And the desk and buffet...

Some of the interesting things that we did:
-Induction cooktop for simplicity of use and ease of cleaning. This is a wonderful device. We chose the GE 30" since it was available with a frameless glass surface, fit into standard cabinetry, met our space limitations and had an optimum configuration of burners. There are others with more features and maybe even better layout, but they were eliminated for one reason or another, not the least of which was cost. (We also have a full set of Le Creuset cookware. After a month of use we are *very* pleased. We had dual fuel before and find that the heating is more uniform in the pan and much more responsive.)
-Restaurant-grade undercabinet coffee maker to clear the counter (BrewMatic BICA). This unit is hooked up to filtered water and only hums a bit when it runs. It draws 14 amps, however! Very industrial strength.
-Central filtered water system in the laundry area below with runs to the coffee maker, refrigerator ice maker and faucet at the sink. We used 1/4" polyethylene tubing rated for high pressure use with inserts at the connections. We have used this detail for 12 years now without a problem.
-We could not find a hood that met our particular requirements so we engineered our own. It took a bit of research and discussion to find a fabricator, but the folks we found cut it out of 16ga stainless steel with a laser and folded it up like origami. The front edge is tempered glass to let in light and provide visibility. The fan is rated 400 cfm from Fantech. We had some acoustic and noise control issues that needed to be worked out, but it just hums now.
-Bosch 500 series wall oven installed below the cooktop. We chose the 500 series because it has knobs for most functions that are easier to use than touchpads at this height. The oven is 27" wide to provide ventilation space around the unit so as not to overheat itself or the cooktop. We used filler panels instead of a cabinet for the installation since the unit is 24" deep. Bosch was rated very high by Consumer Reports.
-18" dishwasher to gain cabinet space. We chose the smaller unit based on the experience of friends and since it is just the two of us most times. We run it daily since it uses less water to do a load of dishes than we would use doing them by hand. We chose a Bosch since it was the only 18" unit with a stainless tub. It was a fully integrated unit, however, that required some thought to fit with a door. This brand was also rated high by Consumer Reports.
-Full-size microwave over the cooktop. We wanted a full-sized microwave, but did not have counter or wall space and since we have had a full-size microwave over the range on a shelf for 20 years (but without a hood) we wanted to replicate that again. We designed a simple shelf into the cabinetry and with the recess noted above it works great. We chose an Amana unit because it was the largest unit that would meet our depth limitations and was also rated high in Consumer Reports.
-The refrigerator/freezer is an existing Amana that we chose because it had a bottom-mounted freezer. The surrounding cabinetry is 24" deep but it seems to integrate well enough.
-We installed a foot-operated valve (Fischer #3070) with mixing valve (Legend Anti-scald) at the sink to make it possible to rinse hands without touching the faucet. This installation bypasses the faucet valve but uses the spray head thanks to some specialized fittings we had to make. We are finding it to be very useful. We can use two hands to hold a pot that is filling and since it operates more quickly, we will often use that for a short blast of water rather than operating the faucet. The mixing valve is set for 110 degrees to avoid scalds when the water in the lines is hot. We need to add water hammer chambers, however.
-Multi-level, zoned lighting to avoid the need for undercabinet fixtures. There are two surface-mounted lights at the ceiling for general illumination even into the highest cabinets. Five downlights are recessed into the ceiling for high-level illumination on the work surfaces. Pendant lights at the peninsula provide supplementary work light but are dimmed for ambient use. Miniature downlights over the sink provide additional work light there but are also dimmed to provide ambience and grazing illumination on the wall. The hood has supplementary lights as well.
-We chose Moen for the faucet (Camerist, comes in ORB and has pull-out sprayer functions), soap dispenser and filtered water faucet so these items would have the same finish. As part of the master plan, we standardized on Moen faucets 25 years ago so that we now have only one type of cartridge in six faucets and valves to simplify maintenance.
-Corian counters were used to gain a seamless undermount sink (#874, a 1-3/4 unit that works great for us with a small dish drainer on the counter) as well as ease of cleaning, maintenance and repair. In fact, the installer (Corian can only be installed by certified installers) located the cutout for the cooktop 1" off so the opening had to be 'moved'. It is only possible to see the correction by careful examination of where it was done.
-We wanted oil rubbed bronze baskets for both the disposer and deep side of the sink so they would match as well as provide some protection from things going into the disposer inadvertently. Our disposer was a WasteKing (highly rated) which required an adapter since there are not many baskets (Cucina) available for disposers.
-The stone tile backsplash was chosen to remind us of Italy where we spent a couple of wonderful weeks last spring.
-Finally, we are building a mechanism to open the garbage bin by pressing a switch with one's toe.
We feel that we did a great deal with a small space and limited budget, challenges that are faced by many. Here are some of the ways that we met this challenge:
-Used stock cabinets (Thomasville) from Home Depot. There are many details that would be done better by custom fabrication, but at commensurate increase in cost. We chose the best construction materials and operational components, however, to maximize durability.
-We had Home Depot install the cabinets as well to avoid sales tax and our own learning curve with some detail carpentry. It also made it simpler to resolve several issues caused by field conditions, saving us money in the end.
-We chose a simple style of door and molding. In our case a plain overlay style was the only one available in the wood we wanted (hickory; it is very hard and dense which we chose for durability as well as look) but it also simplified the installation details of many other components.
-We purchased nearly everything except the cabinets and counters online. We have had very good experience with this in the past and we clearly knew what we wanted. In addition, it gave us access to a broader range of components and manufacturers so that we could get exactly what we needed.
-Limit the scope of the work when possible. While one does not want to build-in long-term problems to avoid construction issues, there just might be simpler or less invasive ways to accomplish some things.
-Do as much work on your own as possible. We are thankful to be in the special situation to have the skills, tools and time for this, but many elements of the work seemed daunting prior to starting but with care and thought we got it done.
-More than anything else, it was careful planning that made it all work out in the end. Detailed drawings of all of the appliances showing clearances and installation requirements, full-scale drawings and mockups of some areas to be sure it would work (we joke that beneath our sink is like the engine compartment of a Ferrari) and a lot of research (much of it right here) to gain as much knowledge as possible from the experience of others.
Comments (39)


worldmom
busybme
Related Professionals
Albany Kitchen & Bathroom Designers · College Park Kitchen & Bathroom Designers · Hershey Kitchen & Bathroom Designers · Woodlawn Kitchen & Bathroom Designers · Shamong Kitchen & Bathroom Remodelers · Athens Kitchen & Bathroom Remodelers · Jefferson Hills Kitchen & Bathroom Remodelers · Patterson Kitchen & Bathroom Remodelers · Payson Kitchen & Bathroom Remodelers · Rancho Cordova Kitchen & Bathroom Remodelers · Santa Fe Kitchen & Bathroom Remodelers · Rowland Heights Cabinets & Cabinetry · Foster City Tile and Stone Contractors · Scottdale Tile and Stone Contractors · Boise Design-Build Firmschinchette
mamadadapaige
caligal
danielle00
pluckymama
raenjapan
gardenburgher
kitchen1921
arbordomusOriginal Author
donna214
trixieinthegarden
3katz4me
mama2c
bbstx
sunfeather
karena_2009
vicnsb
arbordomusOriginal Author
caryscott
davidro1
plllog
arbordomusOriginal Author
twinkletoesmomma
arbordomusOriginal Author
quietlife3
mustbnuts zone 9 sunset 9
arbordomusOriginal Author
arbordomusOriginal Author
starpooh
Maria410
buddyrose
User
candibarr
arbordomusOriginal Author
ponotte
jdougjo
arbordomusOriginal Author