Cant believe we are finally here. We took the kitchen from an oak that was turning an orange we werenÂt crazy about to a painted, distressed and glazed off white. Some of the pics look more yellow (darn lighting). The off-white color shows the more accurate color of cabinets and walls. The upper cabinets were all 30" cabinets that we added crown molding and an undercabinet trim to so they would look taller. We added some wood to the one over the microwave to break up the heights. We added beadboard to the backs of the glass cabinets and on the ends.
We took down a wall and incorporated the hall into the kitchen gaining us about 44 inches of space. All perimeter cabinets were ones we re-used (green not cheap!). All but two were changed in some fashion by my DH. IÂd ask, "can it be done" and there is was. HeÂs amazing!
We didnÂt think about taking pics before we began (hadnÂt found Garden Web yet) so the before pics are during the takedown. We did all the work except for the soapstone/granite install. The total cost was less than $12,000 but we decided to add new Pella windows (installed, of course, by DH) since the walls were down so that added $2000. Since all the drywall came down, we also took the opportunity to insulate all the walls since the house was built in the 1950s. WeÂve lived here 25 years and have been continually working on the house.
Thanks to all of the wonderful GWs for all your great inspirations and advice. I used so many of your ideas and recommendations just by reading and looking at all the beautiful things you have done. Our kitchen is small compared to some of the gorgeous ones IÂve seen but working within the space we had, we were really happy to meet our goal of opening up the space to a more open area. IÂm giving lots of info just to help someone else who might be needing the experience of other novices (as I did) to get started.
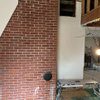
BEFORE From Family Room. Hallway wall w/bookcase came down.
AFTER From Family Room.
BEFORE FROM KITCHEN EATING AREA
AFTER FROM KITCHEN EATING AREA
BEFORE FROM DINING ROOM
AFTER FROM DINING ROOM
Cherry Island. This is the one set of cabinets we ordered. It consisted of a bank of drawers, an upper wall cabinet on the end that was turned into a trash pullout, and some panels. DH built a base and made it all fit together. The granite is Crema Bordeaux. DH ran 2 pieces of flat ½ X 4 inch plate steel across the top of the cabinets and extended out to support the granite overhang where the 2 stools are.
We took a couple of cabinets, cut them shorter, added the plate shelf, and converted the doors to glass.
We used limestone subway tiles and a couple of 12x12s that DH cut into the size of squares we needed to make the design fit. The black squares are leftover soapstone that he cut. We then ran some of the soapstone down past the corbels where the backsplash does not go clear up to the bottom of the cabinets.
This was constructed from a cabinet that we changed to glass; the upper part of our old oven cabinet turned into a "garage"; and one he just made because I wanted a pullout to put soaps etc in.
We bumped out the sink base, first because we were forced to so the sink/faucet would fit; and second because we liked the look. He built the legs from a pic I found. We painted the base behind black so the legs stood out more (read that somewhere on GW).
This shows how we converted them to pullouts for recycling.
On the peninsula, we actually have two cabinets we didnÂt mess with and then we took some fronts of pasta bins that we had on an old end cabinet and made 2 deep drawers. We had a narrow door that we turned at an angle and made a cabinet for cookie sheets etc.
This cabinet to the left of the oven was made into a pullout that he custom made to fit the lids; and the pots do all manage to fit in even tho the cabinet is a 15" one.
HereÂs a closeup of the soapstone. We went with the intention of getting a very plain piece of stone and saw this one with the large vein and both decided it was what we wanted. We found out it was okay to change our minds because it is one of our favorite parts of the kitchen.
The cabinet to the left of the frig is a combination of 2 base cabinets (one with 3 drawers and one with 1 drawer and 1 doorÂturned upside down to make the opening with the 2 vertical doors (which were actually previous drawer fronts). Then we left a cabinet open that we cut apart and put shelves in to make the cookbook shelves. We planned to have a countertop to set the coffee maker on but not enough soapstone in our slab so we got creative and made it be a full cabinet. He built the shelf above the frig to tie the cabinets on either side together. Maybe a flat screen TV someday :)
HereÂs what we turned the opening of the cabinet into..a poor manÂs coffee bar. Works great to keep it off the countertop but easily accessible. The coffee pot is actually filled by pulling out the handle (not from the top) so that makes life easier.
We had this display cabinet with the glass doors before so we retro fitted it into this angled wall and added the beadboard inside to match the other cabinets.
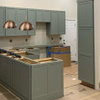
DURING--for those of you who like to see the down and dirty of the reno. Demolition of the hallway wall
The wall is down. Where the full length of wood is marks where the narrow entry to the kitchen used to be. Some cabinets, frig and stove set on the part that is concrete & wood. To the left of the post (temporary one until a steel one was installed) is what was the hall. Later pic shows the beam placed in the attic.
We laid the oak floor in a previous updating and we could still get the materials to match. What wasn't so easy was making the wood still look random...lots of cutting and grinding ends. It all ended up matching really well. He did not want to lay another entire floor since it was glued down...yuk!
You always need a helper! Our grandson learned alot as he started this project at 1 yr 9 mo and ended at 2 yr 9 mo.
Our house in on a concrete slab which created some tough issues with running plumbing and electrical under the concrete. Labor intensiveÂmy DH didnÂt tell me about the day his arm was stuck in the trench he had created until he had dug his way back out with his hand inch by inch.


julie92
User
Related Professionals
Four Corners Kitchen & Bathroom Designers · Frankfort Kitchen & Bathroom Designers · Fresno Kitchen & Bathroom Designers · Ossining Kitchen & Bathroom Designers · Springfield Kitchen & Bathroom Designers · Camarillo Kitchen & Bathroom Remodelers · Dearborn Kitchen & Bathroom Remodelers · Galena Park Kitchen & Bathroom Remodelers · Paducah Kitchen & Bathroom Remodelers · Southampton Kitchen & Bathroom Remodelers · Brea Cabinets & Cabinetry · East Moline Cabinets & Cabinetry · Rowland Heights Cabinets & Cabinetry · Town 'n' Country Cabinets & Cabinetry · Ardmore Tile and Stone Contractorspluckymama
cotehele
sherylmole
marthavila
pam2007
becktheeng
laxsupermom
gam51Original Author
loves2cook4six
claybabe
merimom
sandsonik
malhgold
User
nightowlrn
biochem101
Fori
malhgold
3katz4me
bbstx
budgeteer_s
amylovesbud
wisrose
momov3
busybme
gam51Original Author
iris16
gam51Original Author
tetrazzini
raehelen
jenanla
trixieinthegarden
sprengle1
evilbunnie
gam51Original Author
soooomanyboys
Maria410
jesemy
holligator
marybeth1
Meghane
jillkins
alicia58801
bdaykitchen
datura-07
gsciencechick
scootermom
2ajsmama