Shop Products
Houzz Logo Print
gam51

diy no-mo-oak....pics one year later

gam51
15 years ago

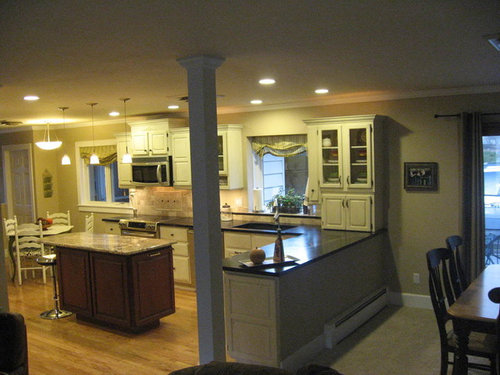
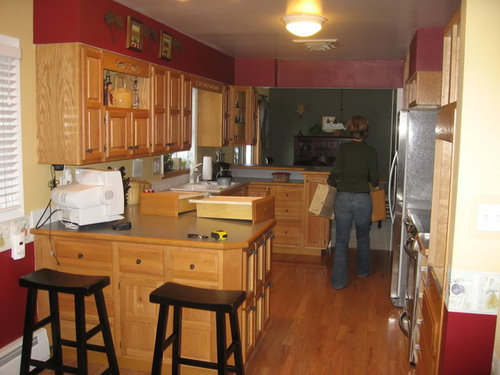
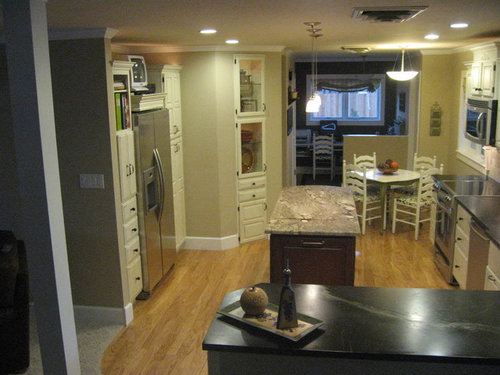
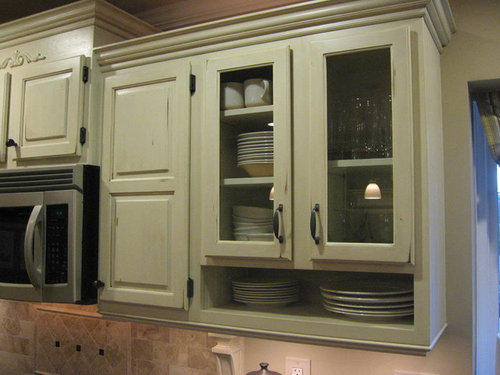
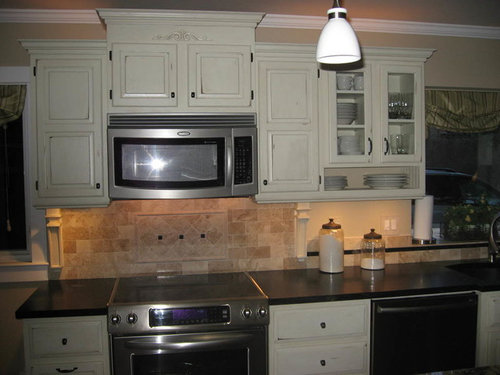
Cant believe we are finally here. We took the kitchen from an oak that was turning an orange we werenÂt crazy about to a painted, distressed and glazed off white. Some of the pics look more yellow (darn lighting). The off-white color shows the more accurate color of cabinets and walls. The upper cabinets were all 30" cabinets that we added crown molding and an undercabinet trim to so they would look taller. We added some wood to the one over the microwave to break up the heights. We added beadboard to the backs of the glass cabinets and on the ends.

We took down a wall and incorporated the hall into the kitchen gaining us about 44 inches of space. All perimeter cabinets were ones we re-used (green not cheap!). All but two were changed in some fashion by my DH. IÂd ask, "can it be done" and there is was. HeÂs amazing!

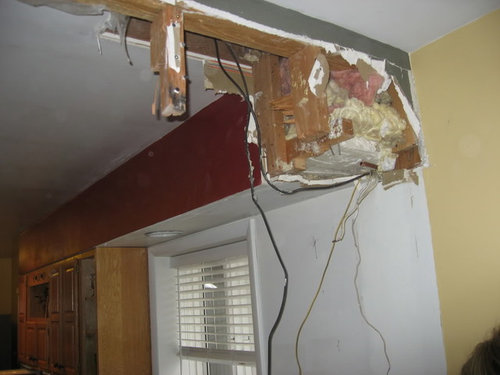
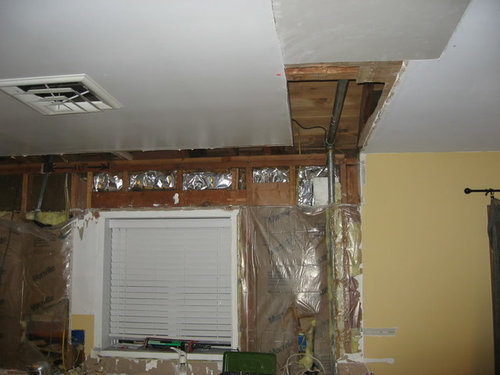
We didnÂt think about taking pics before we began (hadnÂt found Garden Web yet) so the before pics are during the takedown. We did all the work except for the soapstone/granite install. The total cost was less than $12,000 but we decided to add new Pella windows (installed, of course, by DH) since the walls were down so that added $2000. Since all the drywall came down, we also took the opportunity to insulate all the walls since the house was built in the 1950s. WeÂve lived here 25 years and have been continually working on the house.

Thanks to all of the wonderful GWs for all your great inspirations and advice. I used so many of your ideas and recommendations just by reading and looking at all the beautiful things you have done. Our kitchen is small compared to some of the gorgeous ones IÂve seen but working within the space we had, we were really happy to meet our goal of opening up the space to a more open area. IÂm giving lots of info just to help someone else who might be needing the experience of other novices (as I did) to get started.

BEFORE From Family Room. Hallway wall w/bookcase came down.

AFTER From Family Room.

BEFORE FROM KITCHEN EATING AREA

AFTER FROM KITCHEN EATING AREA

BEFORE FROM DINING ROOM

AFTER FROM DINING ROOM

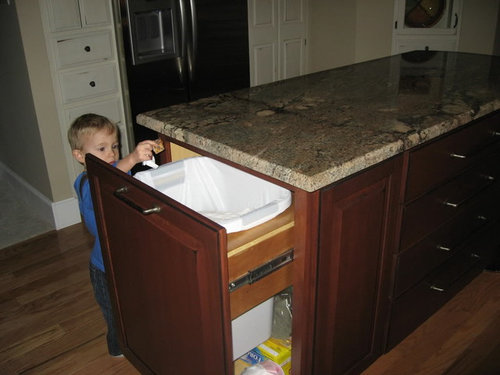
Cherry Island. This is the one set of cabinets we ordered. It consisted of a bank of drawers, an upper wall cabinet on the end that was turned into a trash pullout, and some panels. DH built a base and made it all fit together. The granite is Crema Bordeaux. DH ran 2 pieces of flat ½ X 4 inch plate steel across the top of the cabinets and extended out to support the granite overhang where the 2 stools are.

We took a couple of cabinets, cut them shorter, added the plate shelf, and converted the doors to glass.

We used limestone subway tiles and a couple of 12x12s that DH cut into the size of squares we needed to make the design fit. The black squares are leftover soapstone that he cut. We then ran some of the soapstone down past the corbels where the backsplash does not go clear up to the bottom of the cabinets.

This was constructed from a cabinet that we changed to glass; the upper part of our old oven cabinet turned into a "garage"; and one he just made because I wanted a pullout to put soaps etc in.


We bumped out the sink base, first because we were forced to so the sink/faucet would fit; and second because we liked the look. He built the legs from a pic I found. We painted the base behind black so the legs stood out more (read that somewhere on GW).

This shows how we converted them to pullouts for recycling.

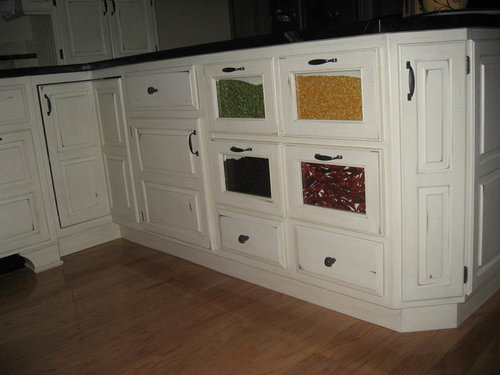
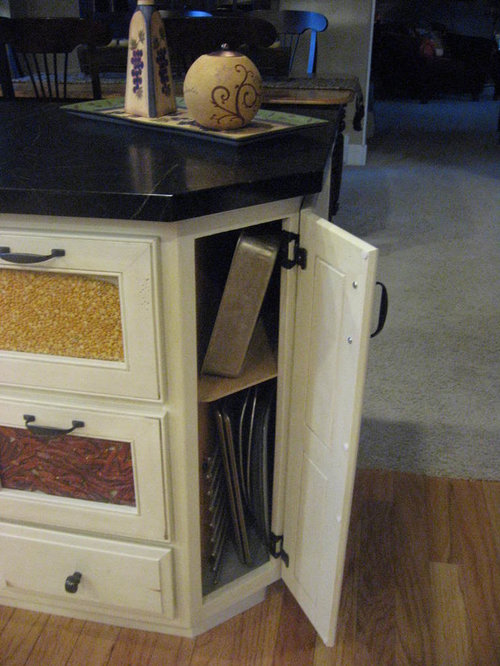
On the peninsula, we actually have two cabinets we didnÂt mess with and then we took some fronts of pasta bins that we had on an old end cabinet and made 2 deep drawers. We had a narrow door that we turned at an angle and made a cabinet for cookie sheets etc.


This cabinet to the left of the oven was made into a pullout that he custom made to fit the lids; and the pots do all manage to fit in even tho the cabinet is a 15" one.

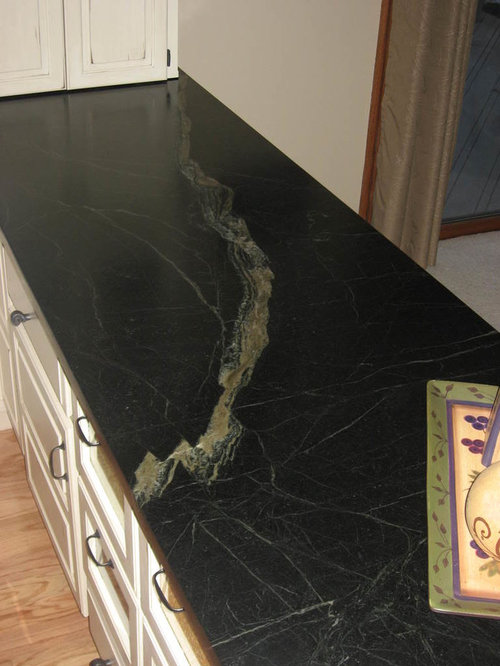
HereÂs a closeup of the soapstone. We went with the intention of getting a very plain piece of stone and saw this one with the large vein and both decided it was what we wanted. We found out it was okay to change our minds because it is one of our favorite parts of the kitchen.

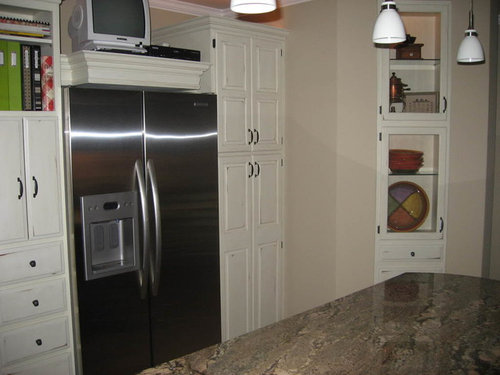
The cabinet to the left of the frig is a combination of 2 base cabinets (one with 3 drawers and one with 1 drawer and 1 doorÂturned upside down to make the opening with the 2 vertical doors (which were actually previous drawer fronts). Then we left a cabinet open that we cut apart and put shelves in to make the cookbook shelves. We planned to have a countertop to set the coffee maker on but not enough soapstone in our slab so we got creative and made it be a full cabinet. He built the shelf above the frig to tie the cabinets on either side together. Maybe a flat screen TV someday :)

HereÂs what we turned the opening of the cabinet into..a poor manÂs coffee bar. Works great to keep it off the countertop but easily accessible. The coffee pot is actually filled by pulling out the handle (not from the top) so that makes life easier.

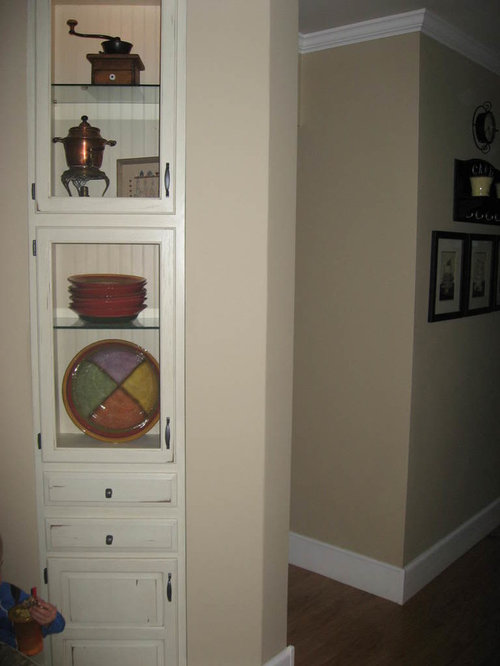
We had this display cabinet with the glass doors before so we retro fitted it into this angled wall and added the beadboard inside to match the other cabinets.

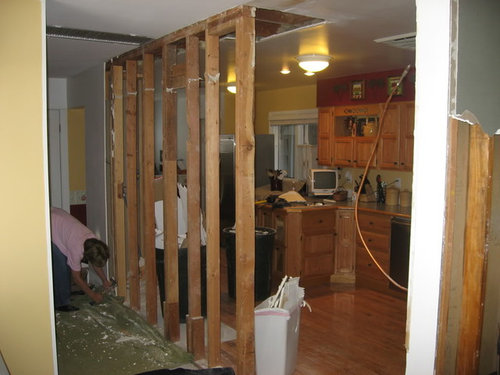
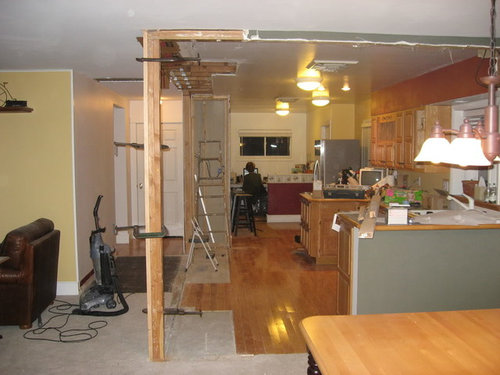
DURING--for those of you who like to see the down and dirty of the reno. Demolition of the hallway wall


The wall is down. Where the full length of wood is marks where the narrow entry to the kitchen used to be. Some cabinets, frig and stove set on the part that is concrete & wood. To the left of the post (temporary one until a steel one was installed) is what was the hall. Later pic shows the beam placed in the attic.

We laid the oak floor in a previous updating and we could still get the materials to match. What wasn't so easy was making the wood still look random...lots of cutting and grinding ends. It all ended up matching really well. He did not want to lay another entire floor since it was glued down...yuk!

You always need a helper! Our grandson learned alot as he started this project at 1 yr 9 mo and ended at 2 yr 9 mo.


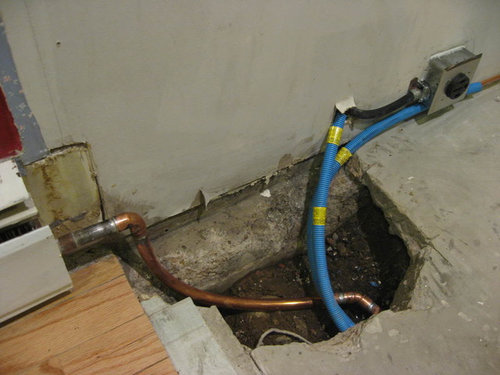
Our house in on a concrete slab which created some tough issues with running plumbing and electrical under the concrete. Labor intensiveÂmy DH didnÂt tell me about the day his arm was stuck in the trench he had created until he had dug his way back out with his hand inch by inch.

Comments (67)

  • julie92
    15 years ago
    last modified: 9 years ago

    Please give more details on your hardware and paint color, too!

  • User
    15 years ago
    last modified: 9 years ago

    Wonderfil innovative use of all your materials. Your DH could definitely get a job as a consultant to anyone trying to plan a DIY and you for the amazing vision and design ideas. Hats off to you both ! c

  • pluckymama
    15 years ago
    last modified: 9 years ago

    Kudos to you and your DH for having not only an incredible vision, but the talent and dedication to see it through and in only one year! As everyone has said, this is a truly amazing transformation. You need to post on rate my space on HDTV. I just keep going back and forth from pic to pic with admiration for what you've done.

  • cotehele
    15 years ago
    last modified: 9 years ago

    I am overwhelmed. Your insight, imagination, creativity and DIY skills are amazing. Truly beautiful. Trailrunner has your future pegged: DIY consultants extraordinaire.

  • sherylmole
    15 years ago
    last modified: 9 years ago

    I think you and your husband did an absolutely unequivocally amazing job.
    You really thought it through so well. I am in awe of folks like you and your husband. Will he travel?

  • marthavila
    15 years ago
    last modified: 9 years ago

    This is the kind of kitchen transformation that renders me rather speechless. What words can match the level of beauty, skills, smarts, creativity that is clearly exhibited in these photos? As most have said, the work is amazing ! Not just because it's pretty to look at, and is pretty darn functional and is a work of your own hands. What gets me most is that this is a DIY that is so very green in its essence. The way you have recycled your cabs, cutting down on waste and saving the environment, and saving money in the process is, yes . . . amazing! I'm just loving all of it. Not the least to mention is your soapstone. Believe it or not -- I have the exact same type of soapstone in my kitchen. Isn't it. . . amazing? LOL! ( For Worldmom who asked earlier, that's Green Mountain PA.)

    Congratulations and enjoy!

  • pam2007
    15 years ago
    last modified: 9 years ago

    Very lovely. You must feel such a sense of accomplishment every time you walk in the room. Great job! Love the soapstone & granite they compliment each other well.

  • becktheeng
    15 years ago
    last modified: 9 years ago

    Love it...I'm impressed with all your hard work!

  • laxsupermom
    15 years ago
    last modified: 9 years ago

    I normally don't like to repeat so many previous posters, but there's nothing more to say beyond this really is the best DIY kitchen I've ever seen. The creativity and innovation while using the materials at hand is exceptional. And the skill to create everything in the vision is awe-inspiring. Hats off to you and your hubby.

  • gam51
    Original Author
    15 years ago
    last modified: 9 years ago

    Thank you for all your kind words! When it takes a year to do a project you slowly see the changes so it's gratifying to hear all the comments about how much it has changed. Believe me, our daughters and husbands are glad it's finished so they don't have to listen to us talk kitchens any longer!

    worldmom - yes it is Green Mountain PA soapstone. We live in Colorado so we got it at BelTerra in Denver. They were awesome to work with; kept moving slabs until we found the one we wanted.
    morton5 - no background in design. I'm just a freak at looking at magazines, going to home shows and design centers. Basically, I'm good at copying others' ideas. So it helps to have a very talented former shop teacher who enjoys it also. We are very slow but doing it yourself just takes time--and alot of DH patience with me; he'd just shake his head at some of my ideas but I always knew he'd figure something out:).
    julie92 - I like the KA counterdepth, just took a little getting used to not being able to put milk jugs on the door and no really deep containers. We got the best deal in Denver at The Great Indoors mainly because they were having a special through KA & Whirlpool that gave you extra $ off the more appliance you purchased. The paint color - I'm guessing you mean on the cabinets - is antique white milk paint by American Finishes with a watered-down solution of their VanDykeBrown glaze effects. We then put a spray finish of Minwax waterbased polycrylic clear satin finish over it. We were very impressed with both; they seem very durable. Not sure which hardware you liked but I have quite a mix. On the cream cabinets, I used some previous knobs I had and added the pulls I found at Target (also available on their website). They are an iron finish. The ones on the island are on the opposite end of the price spectrum and are Montana Aged Iron Appliance Pulls (ordered online from Bellacor).
    Thanks again. We are loving it but always nice to get feedback that it really did turn out okay. And, no, I'm not giving him up!

  • loves2cook4six
    15 years ago
    last modified: 9 years ago

    Can both of you GC my next project - PLEEEEAASE!! and maybe you want a trip to Alaska and you can work for ichic?

    You guys have done an incredibly professional job. As MarthaVilla pointed out - it is a truely amazing project even more so for how you reused and recycled as much as you could. Adding beadboard to the back of the cabinet was truely inspirational and I love every detail.

    I love every detail - this a well thought out kitchen with a place for everything.

    While this may be DIY, you guys are more professional then some and should take much pleasure in a job well done.

  • claybabe
    15 years ago
    last modified: 9 years ago

    Really astonishing: Beautiful result, creative ideas, wonderful craftsmanship, all around gorgeous. Wow. Thanks for sharing.

  • merimom
    15 years ago
    last modified: 9 years ago

    Talk about Reduce, Reuse, and Recycle!! Great job taking something you already had and giving it a new life.

  • sandsonik
    15 years ago
    last modified: 9 years ago

    I'm just so impressed - and insanely jealous because my husband is just NOT handy and I'm not really either, though I'm more willing to try!

    You've thought of EVERYTHING and I bet this kitchen will really fit all your needs. I love the soap/cleaner pullout; I keep my stuff under the sink so the pull out recycle bins would have been problematic but you solved that perfectly.

    I love the way you adapted all the old cabinetry, very ingenious transformations! And the new island cabinet is simply gorgeous, as is the crema bordeaux and the soapstone.

    Really - top notch job all the way. Congrats!

  • malhgold
    15 years ago
    last modified: 9 years ago

    Absolutely unbelievable!!!! I never would have guessed that you used the same cabinets. Love the way you took some of the old cabinets and transformed them into new "nooks and crannies". Just a fantastic job! I'm really in awe and will be going back to read all your comments again.

    CONGRATULATIONS!!! One of the best kitchen transformations I've seen.....

  • User
    15 years ago
    last modified: 9 years ago

    This is truly fabulous and the fact that you re-used the cabinetry is the icing on the cake. I love what you did with cutting down the door and making the coffee station and charging station. I love everything, but those 2 were the types of small but genius idea that is dazzling. I mean it.
    Please give details of what you did use- paint color? Faucet, the trash pullout thing. the backsplash tile which I love. so simple but stunning. you did an amazing job.

  • nightowlrn
    15 years ago
    last modified: 9 years ago

    Wow !!!!

  • biochem101
    15 years ago
    last modified: 9 years ago

    Extraordinary! This is as amazing as everyone is saying. Cutting up old cabinets, turning them upside down, sticking them in other walls?! No way would mine come out like this if I tried it.

    Although I DO wish you'd posted a couple months ago so I could have stolen an idea or two. :)

    Now about that husband...you did say you're keeping him?

  • Fori
    15 years ago
    last modified: 9 years ago

    Just one year? This almost has to be a hoax!

    Verrrrry nice! Thanks for sharing, even though you made me feel inadequate! :D

  • malhgold
    15 years ago
    last modified: 9 years ago

    bumping this up....too good to drop down and get lost.

  • 3katz4me
    15 years ago
    last modified: 9 years ago

    WOW - that is fantastic and amazing!! I LOVE that you did not throw away your old cabinets that look perfectly good just not esthetically pleasing to you. You guys are really talented!!

  • bbstx
    15 years ago
    last modified: 9 years ago

    How many ways are there to say "fantastic," and "fabulous." Plus I am sooooo jealous that your hubby is so talented. Mine is sweet but clueless when it comes to DIY projects! Good work!

  • budgeteer_s
    15 years ago
    last modified: 9 years ago

    This beats watching "Spice Up Your Kitchen" on HGTV by a hundred times. It was not just remove everything replace new cabinets, new counter tops and floors. You and DH are so talented in designing and executing your plans. So much careful thoughts went into the many features of your drean kitchen, specially rewarding that you were able to recycle cabinets and make them look ah-so custom. I specially LOVE your grain/pasta bins! Fool them , didn't you - alas it's full of plastic storage containers. Kudos to you and your DH. My hats off to your hubby for all the work and patience to DIY and babysitting grandson at the same time, a rare combination!

  • amylovesbud
    15 years ago
    last modified: 9 years ago

    Wow! I love the finish on your cabinets and your soapstone. What beautiful job.

    Do you mind sharing where you got your canisters? And does the large one hold a ten pound bag of flour? I'm on the hunt.

    Congratulatiosn on your beautiful kitchen!

  • wisrose
    15 years ago
    last modified: 9 years ago

    Custom cabinet extraordinaire...seriously, ya know a lot of people like to express the fact they have custom cabinets/kitchens but they ain't got nothin on you guys! Hats off to the both of you!
    The earth thanks you for recycling!

  • momov3
    15 years ago
    last modified: 9 years ago

    Beautiful kitchen... congrats on a job well done!!

    Is your range a kitchen aid?

  • busybme
    15 years ago
    last modified: 9 years ago

    Wow, WoW, WOW!!! gam, you guys are amazing!! Absolutely the BEST DIY I've seen here on GW.

    Thank you for sharing so many details and the incredible pictures. What a gift to the rest of us...pure inspiration!

    Sandy

  • gam51
    Original Author
    15 years ago
    last modified: 9 years ago

    amylovesbud - I got the cannisters at Hobby Lobby. I think it holds closer to a 5 lb bag.

    momov3 - yes the range is a KA

    Thanks to all for the kind words!

  • iris16
    15 years ago
    last modified: 9 years ago

    We are in the middle of our DIY kitchen project. Thanks for posting and giving encouragement that it can be done!
    Did you have all your cabinet plans done before you started? I'm amazed at how you reused all those door fronts. Wonderful!

  • gam51
    Original Author
    15 years ago
    last modified: 9 years ago

    iris16 I had gone through all the cabinets we had and figured out where I wanted them to go (or where they would fit) but my DH will tell you I changed my mind A LOT on how I wanted them to function, He also came up with some ideas that he sold me on as we went along. It was definitely a work in progress throughout. Good luck--it is such a good feeling when you are finally done.

  • tetrazzini
    15 years ago
    last modified: 9 years ago

    I love what you guys have done, reusing, repurposing, cutting and adding... it's not only very creative and ingenious, but it came out beautifully. I hope more people catch this spirit now that the economy is suffering. You don't have to throw things out and buy new to create something wonderful. Congratulations!

  • raehelen
    15 years ago
    last modified: 9 years ago

    I have to reiterate what all the above posters have said.

    Wow, as another DIYer I totally get how much work that took! I do have a technical question though. You said "We then put a spray finish of Minwax waterbased polycrylic clear satin finish over it." I'm in the process of painting new doors for our house, and always seem to get little bits settling into the finish before it dries. Did you have any problem with that? If so, what can a DIYer do? Perhaps spraying gives a much thinner coat that dries faster...?

  • jenanla
    15 years ago
    last modified: 9 years ago

    WOW!! AMAZING!! What else is there to say!

  • trixieinthegarden
    15 years ago
    last modified: 9 years ago

    Jampacked with clever, efficient and beautifully engineered and executed custom touches! Your DH must have an engineer's mind...it shows in every detail. Enjoy it to the fullest with your family!

  • sprengle1
    15 years ago
    last modified: 9 years ago

    Gorgeous, gorgeous, gorgeous! I love all the different custom changes you made to the cabinets. Wow!

    Now for an off-the-wall question. What brand/model coffeemaker is that? LOL My husband wants the same thing. Is it DeLonghi? We bought a DeLonghi and then I came home and read a bunch (more than 50% of the reviews posted) about leakage problems. So we haven't taken it out of the box.

  • evilbunnie
    15 years ago
    last modified: 9 years ago

    I am overwhelmed. I hope someone puts you in a magazine, because that is exactly the kind of creativity, and deft hand with decorating, that I look for when I want to be inspired. I think the small neat touches that you put in put this kitchen over the top. What a task, what a husband, what a long transformation for you! But what a great result! I am so happy for you, you should be very proud.

  • gam51
    Original Author
    15 years ago
    last modified: 9 years ago

    sprengle1 Yes it is a DeLonghi. Guess we have been lucky because we have had no problems. My DH is fairly picky about his coffeemaker and he is thrilled with this one...so far!

  • soooomanyboys
    15 years ago
    last modified: 9 years ago

    I am wiping the drool off my face right now! You have done an amazing job! Do you mind sharing how you distressed your cabinets? I am so inspired!

  • Maria410
    15 years ago
    last modified: 9 years ago

    Great transformation. My contractor is in trouble -- LOL. I see a few alterations that I want. Love the pot and lid drawer!! Thanks for posting so many details. This is a good primer on how to make your kitchen really functional.

  • jesemy
    15 years ago
    last modified: 9 years ago

    Fabulous!

    How did you attach the moulding at the bottom of each cabinet? I've been wanting to do that for years but can't figure it out!

  • holligator
    15 years ago
    last modified: 9 years ago

    WOW!!! How did I miss this?!? This is a simply amazing transformation. It would be amazing if you had hired someone to do it all, but the fact that you did it yourselves makes it much more impressive. It must be really satisfying to enjoy such beautiful fruits of your labor. You have really demonstrated perfectly what's possible with true creativity and perseverance. Congratulations!

  • marybeth1
    15 years ago
    last modified: 9 years ago

    OMG! I can't come up with enough adj. to comment in how impresive of a transformation this is w/o sounding redundant to other posters. Great Job!

  • Meghane
    15 years ago
    last modified: 9 years ago

    Wow, that is an amazing transformation. Congratulations on a job beautifully done. You must be so happy with the new kitchen- enjoy it!

  • jillkins
    15 years ago
    last modified: 9 years ago

    What an absolutely beautiful and inspiring transformation!

    I noticed you already have white baseboard and interior doors. Is that painted oak also or are these something other than oak?

    Thanks for sharing all your pictures!

  • alicia58801
    15 years ago
    last modified: 9 years ago

    Simply amazing. My vocabulary isn't large enough to come up with any adjectives that haven't already been stated--but your kitchen is truly incredible! An inspiration to us all. Congratulations and enjoy!

  • bdaykitchen
    15 years ago
    last modified: 9 years ago

    Holy Moly!! What a fabulous and efficient family kitchen. I too see all sorts of things I'd love to change based on the pics you shared, but alas too late for that.

    Of all the mundane things--can you tell me about the trash can in the island? We're looking for a big, tall one like that.

    Enjoy the fantastic spaces. P.S. I can't believe how clean you kept it during the process- very impressive!

  • datura-07
    15 years ago
    last modified: 9 years ago

    WOW!!! Beautiful - thanks for sharing your pics with us.

  • gsciencechick
    15 years ago
    last modified: 9 years ago

    Wow, this is amazing and on a budget. Your skills and patience are incredible.

  • scootermom
    15 years ago
    last modified: 9 years ago

    That is one amazing DIY. You guys are so clever and creative! That soapstone is killing me -- I'm trying to touch that incredible vein through my monitor.

    Now I have to ask -- what is on the other side of the kitchen, beyond your angled wall and little table-n-chairs set? It looks like more chairs. What's that room, if I may ask?

    I love your trash can in your island. I love all of the clever ways you added space...the soap pullout, the angled tray cabinet, etc. Brilliant!

    Congrats -- enjoy it!

  • 2ajsmama
    15 years ago
    last modified: 9 years ago

    I love how you reused everything! Can you tell me how wide your pullout by the sink is?

Sponsored
We believe that great design should be accessible to everyone