


TrafficMaster Allure vinyl floor install
For those of you that have installed this flooring, I have a question...
I plan on installing this in a hallway leading into the living room. I was going to put it in the hallway to see how it looked, then if I liked carry it into the living room. The problem is that if I do that, half of the living room will be installed backwards...the adhesive lip will have to be put under the existing plank.
My question is, do you think I should start in the living room and hope that the hallway is square to that space?
LOL - I just answered my own question...I think that I should start in the living room, on the wall closest to the hallway, that way if it isn't square I would have less to lift up and adjust.
Any suggestions?
Comments (66)

mjsee
16 years ago1) We used the double stick tape all the way around the room....seemed to keep things from slipping as we laid the strips. Don't know if it's necessary--but it was certainly helpful.
2) We did not trim the excess overhang. I don't think we realized we were supposed to! So far so good.
3) I used a rolling pin to roll the floor...seems to be handling the traffic well. Now, granted, it's the laundry closet...but we did shift the washer several inches and all seems to be well.
melanie
clg7067
16 years agoI'm just posting an update on this product. I was looking at the Home Depot web site and there are about 16 (if I counted correctly) different colors/wood types to choose from. There's even a cork pattern. Because of all the new options I found a color that I like for my master bedroom. Woo Hoo! Just thought there might be some other interested parties.
Related Professionals
Beacon Flooring Contractors · Deerfield Beach Flooring Contractors · Desert Hot Springs Flooring Contractors · Indian Trail Flooring Contractors · Louisville Flooring Contractors · Stoneham Flooring Contractors · Alhambra General Contractors · Country Walk General Contractors · Havelock General Contractors · Hillsboro General Contractors · Jacinto City General Contractors · Kilgore General Contractors · Natchitoches General Contractors · Rossmoor General Contractors · Saginaw General Contractorslarrylwill
16 years agoI plan on doing my LR with that stuff, probley the kitchen also maybe even the Bath room depending on how it goes. I was also concerning putting heating wire under part of it because 1/2 of my LR is on an above ground slab. Anybody had any experience with electric heat wire under it?
clg7067
16 years agoA rep stated:
"1.Yes you can install this product over in-floor radiant heat as long as the heat strips(electric) or pipes( hydronic ) don't come in direct contact with the product."
There's a very long thread here and a company rep made a bunch of posts answering questions.
Here is a link that might be useful: House and Home
cynthia1_2008
16 years agocan someone please explain how to install this flooring i was not told about a roller and i have the flooring cutter thats it i hear you can use a rolling pin?...i need step by step directions its a approx 8x10 room plus doorway to living room but stopping at doorway....this is my kitchen so i need to go around stove fridge water line for fridge which are on the south wall..i figured to start at south work may way toward back door and living room and basement door which are on the north where i intend to end.
larrylwill
16 years agoIm concerning installing this in my new kitchen and LR and was looking at the Konecto site and saw that they warranty was only 7 years for the country collection and 25 years for the other lines. I believe that Home Depot has the cheaper 7 year stuff. Can anyone verify this? How is it wearing with those of you that have it installed over time?
thanksmlraff53
15 years agoI'm about to buy the Allure from Home Depot and it has a 25 yr warranty. I'm doing the hallway and bathroom and hopefull bedrooms in the future.
Does anybody have a picture of the hickory installed?cindyk_1964
15 years agoInstalled the Allure Trafficmaster in (2) bedrooms about 6 months ago on a clean cement floor. YUCK - The seams are lifting and the floor is buckling. It looks terrible. Love the look and the feel of the floor but cannot get it to stay down.
madeyna
15 years agoWell this thread answered my guestion about why we had a near perfect lay in the bathroom and pantry and it keeps lifting in the kitchen . The kitchen was done a day later and the product was taken out of the hot van and put right on the floor without any time to get to room temp. I love the look and feel of it but what a huge waste of monney. It will have to be replaced soon. Its to bad because its a beatiful floor.
mjsee
15 years agoMine has been down for over a year...and hasn't lifted. It's also in an interior basement room...small space, with heavy appliances on it.
We used a rolling pin to roll the seams. We also had the stuff in the house for a month before we laid it.
charlenef
15 years agoi am going to be putting this in my bathroom soon im really glad people took the time to help us install allure i will wait a few days after it arrives use double sided tape make sure there is no dirt around and roll the seams lets hope we live and learn from this product that looks so beautiful i will update as things go along thanks again charlene
slk133
15 years agoJust wondering if anyone has had this in their home for over a year now, and what they think of it? We are going to install it in our laundry room, on a concrete basement floor. We live in Manitoba, Canada,so we have very cold seasons (-37 degrees Celcius today) and very hot seasons. The house is always heated/cooled to about 20 degrees C/ 70 degrees F. Just wondering if everyone is still happy with the flooring, after a year or more.
acolsen
15 years agoI installed the hickory trafficmaster in my kitchen and hallway. I had to meet up the cut ends between the hallway and kitchen to make the best fit. Now I have a gap that needs a transitions strip and I haven't found any obvious choices yet. Pergo has some strips and some company makes metal strips with wood motifs but nothing matches with the Allure hickory color. Any suggestions?
morganpuff
15 years agoAnyone install this in a laundry room where you have a front load washer. Concerned about the high spin of this type of machine and any vibration this could cause and shift the floor. The HD rep told me to first put a deglazing product on my existing vinyl sheet flooring, then roll on a vinyl adhesive and secure the Allure to the floor where the washer is located. Anyone has any input or ideas or dealt with this issue?
7win7_live_ca
15 years agoHay all just got this from HD and I am about to install it in are Kitchen any help or heads up on how to do it would be nice. I like the idea of the blue tape befor hand to lay it out. The instructions on the box read like Greek, and even though I am Greek I still do not get it lol.
I dont get the part about the cutting of trimm 1/8" and the 1/8" from the wall, will this stuff slide or move at all? let me thank you now for any help and I will post bfor and after pic for all to see.chickysue50_yahoo_com
14 years agoJust finished putting this in my bathroom and adjacent vanity area. Because of where my clawfoot tub and drain were going, I started this basically at the threshold to the bathroom (without any cutting.) Then, when ready to bring the flooring outside the immediate bathroom area, I would have been going the wrong way. (And slipping it underneath is no where's near as easy as laying it on top! Very sticky stuff! Though it is possible.) So I cut a piece lengthwise that would give me the sticky inch to go underneath plus the sticky edge width with about a 1/16 less than the usual exposed sticky side. Then I just used my hair dryer to slowly and carefully peel the peice apart. That give me one sticky piece (approximately 1/16 less wide than two sticky edges would be put together) to go underneath the strip I had and that left a remaining sticky edge exposed like normal. Then away I went out the door into the hall area installing like normal on top of one another. (I cut the peice the 16th less, just in case I wasn't exactly square, though I did use a square for all cutting.) This worked really well, too bad they don't include a couple of pieces with the sticky pertruding all the way around for this purpose! Anyway, so far (it's been down about a month) love this stuff and the way it came out, and am going to do more hallways with it. Hope this helps if you need to make the same sort of transition, and I hope I made sense here!
reccie
14 years agoDo you remove the shoe molding or just leave the 1/8 gap without removing the shoe molding.
mjsee
13 years agoWe removed the shoe molding. It has been three years (almost) and my Allure still looks great. No seams lifting...and it's gotten serious water on it on three separate occasions. Dried out beautifully.
melanie
jpeeps
13 years agoPROBLEM... Not sure what to do..
I planned on installing the allure Sierra style ceramic tile sheets in two areas. I will try to describe.. entrance hall and Kitchen. you walk into our home is the entrance hall and to the right is the kitchen. I have a couple questions and a problem.1. The problem I have is the instructions say to start in a corner which I did and to cut off the grip strip that is underneath facing the wall, which I DID NOT do, I just butted it up against the wall in the corner and staggard them 1st row 3 squares, 2nd, 2 squares, 1st ¡V one square. There will be molding against the wall that will cover it up, I was wondering if this is a major problem and I need to take up what I have put down which is about 4 boxes worth and start over.
2. I started in the kitchen which is to the RIGHT up in the left corner, the entrance hall is a room on the left to the Left, my problem is I now have to go to the left from the kitchen, and the tiles are basically formed to go Left to RIGHT.. ¡K. SHOULD I start in the entrance all Left corner and then hope the tiles meet in the correct
Similar to this floor plan
http://www.buy-to-let.me.uk/floorplan1.jpgThe Bath and Bedroom would be MY ENTRANCE HALL
NO Study, The Living/dining would be the area where I started.. top left corner.I hope this helps¡K. Please HELP.. I need suggestions.
I am thinking of trashing my 3 hrs of work and trying to salvage what I can and start over¡K ¼
Here is a link that might be useful:

jpeeps
13 years agowell thanks for the non response.... I went ahead and used a hair dryer and pulled up the tiles and started over. I am glad I did. Would have bothered me for a long time. I did this after consulting with Allure and visiting my local Home depot. Using a hair Dryer is the trick. Allure said when they go in to repair tiles they always use a hair dryer to heat the glue and putll up the tiles.
nursetammi
13 years agojpeeps,
Thanks for letting us know your experience. I am thinking of using Allure in my basement apartment so everyone's experience is a BIG help in case I run into any similar problems. Sorry nobody was able to help you here :(FRANKFAZZY_YAHOO_COM
13 years agoTHE WIFE AND I PUT THE LIGHT OAK PLANK IN HER OFFICE AT THE HOUSE IN ABOUT 2 HOURS. (12'X12' ROOM)
WE LOVE IT! THE PRODUCT IS VERY TEMPERATURE SENSITIVE, AND YOU HAVE TO LET IT ACCLIMATE FOR ABOUT 48 HOURS IN THE SPACE WHERE YOU WILL LAY IT. WE PUT SHOE-MOLD DOWN AND IT LOOKS GREAT. I HAVE JUST 2 OR 3 END SEAMS THAT ARE GAPPED A BIT, AND ONE THAT WILL NOT LAY DOWN! I HAVE YET TO TRY THE HAIR DRYER TRICK, BUT I WILL TONIGHT. WE ARE PUTTING THE AFRICAN WOOD IN OUR MASTER BEDROOM NOW, CAN'T WAIT FOR THE RESULTS. WE THINK IT GOES GREAT WITH HER TEAK ANTIQUE PIECES. TIP OF THE DAY IS TO USE AVIATION SNIPS
(STRAIGHT CUT) TO CUT COMPUOND CORNERS. AND USE A STRAIGHT EDGE AND A STANLEY KNIFE TO CUT THE LONG EDGE. THREE SCORES ACROSS THE LINE AND BEND BACK AND FORTH ONCE - VIOLA!
GOOD LUCK, I WILL KEEP YOU UPDATED AS WE ARE INSTALLING 1100 SF IN ONE PIECE COMING IN JANUARY.
PS OUR HOME DEPOT HAS 16 DIFFERENT WOOD PATTERNS AND 12 TILE PATTERNS TO CHOOSE FROM. ALL BUT 6 ARE SPECIAL ORDER, AND IF YOU DO SPECIAL ORDER, MAKE SURE YOU GET BOXES FROM THE SAME PRODUCTION RUN (DATE) OR DYE LOT. AS THIS PRODUCT "CURES" IT CHANGES COLOR AND WE HAVE HEARD FROM SEVERAL PEOPLE THAT THE LOTS CAN VARY A BUNCH!newjerseybt
13 years agoI was going to install top of the line Konnecto in Beech but did quite a bit of research before ordering. The first problem was the possibility of dog pee. IMO pee will destroy the glue at the seams so I decided to go with a Armstrong's best sheet vinyl. Definitely not as nice but I had to make a tradeoff.
Secondly, I Googled and found floor forums in which professionals were having problems with the glue tabs not holding due to defective product or wrong temperature or improper installation techniques. The solution per Konnecto was crazy glue.
If it were not for possible pet damage I would have still gone with the Konnecto Beech and tolerated future repairs using crazy glue as there is nothing nicer than Konnecto's best flooring besides real wood.
mjsee
13 years agojpeeps...
Some of us do not come to the forum daily...or even weekly. Sorry you didn't get the timely response you were hoping for. We just laid another 140 square feet of Allure... in a basement bedroom. It went down like a dream. It's been down since before Thanksgiving and so far so good. Original (laundry room) floor has been down 3+ years...and looks like it did the day we put it down.
I paid for a more expensive color this time--the Honey Maple. I am pleased with the results:
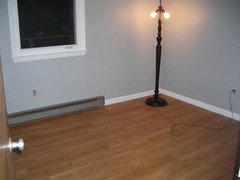
At $1.99/sq I'm not expecting it to be a floor for the ages...but it should do until I can afford what I wanted. I just wish we'd replaced the baseboard heater BEFORE we did the flooring. DH didn't want to mess with it. Argh. Luckily, with the furniture back in the room it's not quite as egregiously ugly:

(I still think we need to put in a new heater. A white one.)
sixtiesvet_yahoo_com
13 years agoA former floor installer working at Home Depot told me that there is a special way to lay the vinyle plank laterally to one another that prevents the seams from rising and becoming visible. He indicated that you need to always force the planking laterally together with pressure before pressing the planking to the floor. In other words tilt the plank and then force it laterally into an ajoining one.If a mistake is made he said a hair dryer could be used to pull a plank to repositionin it. I'd advise anyone who is doing this job for the first time to get some professional pointers first because it sounds like the first time DIY folks may not be happy with their seam results upon completion of the floor.
mjsee
13 years agoRoy--
The instructions specifically tell you to do it as the HD guy did. Perhaps that is why I had such good results! It's been down since the Sunday before Thanksgiving and nothing has shifted/lifted. I think it would have by now.
frankfazzy
13 years agoPUT DOWN THE MASTER BEDROOM FLOOR. FINALLY! IT HAS BEEN SO COLD HERE IN FLORIDA, WE DID NOT DARE PUT IT DOWN. WILL POST A PICTURE, JUST THOUGHT I WOULD TELL YOU ALL THAT HOME DEPOT SELLS A HAND ROLLER FOR ABOUT $20 THAT WORKS GREAT!
etw926
13 years agoI am also planning on putting the African Darkwood in my bedroom. I would love to see pics of your finished floor Frank. Thanks.
shellsmom2
13 years agoWe are considering using Allure in our kitchen. After searching for reviews on the product, I came across a few customers that told of problems with "off-gassing" after installation, and the side affects they had experienced. One poster even mentioned health issues her dogs were having since she installed the flooring. Have any of you experienced this, or are these isolated cases?
mjsee
13 years agoshellsmom--
We noticed no significant off-gassing. Of course...I'm not certain I'd have noticed over the smell of the latex paint...
nclearyfarrell_nycap_rr_com
13 years agoI installed 22 cases of special order Brazilan Cherry Allure 2yrs ago.
We left the flooring in the basement for 2 weeks prior to DIY installation.
we left 1/8 spacing on all four walls and have yet to put the molding back on due to continued problems with seams lifting!!! Love the color of the floor and the ease of cleanup but had to contact HD about the problems. We tried re-activating the glue with a hairdryer as suggested with no lasting results.
We rented a roller twice- once during install and then again as suggested with no lasting results.The area it is installed is in my dry basement on concrete floor that is finished and heated and/or air conditioned in summer.
HELP!!! Very disappointed with long term results of seams lifting ete.
I am in the process of dealing with Hofsta int'l to get some satisfaction because of defective product.The warranty says 25years and I am praying they honor this product after spending over $1000.00. Sent them "lovely" color photos and all. Will keep everyone posted.mjsee
13 years agoI wonder why we have had NO trouble with lifting seams...when others have had such problems? Things are still looking great in my two rooms...it's all very strange.
swearingen_jo_gmail_com
13 years agoMy daughter and I installed Allure in her kitchen a few years back. It took about a day for a 12x12 area. It still looks like new, wears like iron, and is easy to keep clean.
We're using the bamboo style in her main bathroom next.
To transition to carpeting, go to the flooring department at HD and ASK for the trim strip. We'll use heavy duty double stick tape along the bathtub, and put a bead of silicone caulk on the edge. Unless the instructions contraindicate it, of course. READ AND FOLLOW INSTRUCTIONS.
MAKE SURE YOU LET THE PRODUCT ACCLIMATE to your room's temperature and humidity level before you install it. That's true for ANY flooring materials. Rush it, and you'll be sorry!
CSChickKT_yahoo_com
13 years agoHello all, fond this link when looking for answers. Installed this flooring in playroom about six months ago. Was very careful since we know once its stuck its stuck. We did a goos job. Now we are moving on the the adjoining room. Moved all furniture into finished room AND the damn foot of the couch created a huge 4 ft long gouge in the flooring! We are freking out. The company says there is a repair putty but not sure if it will work. Has anyone used this?
scri8e
13 years agoYou can cut the 4ft gouged planks out of the Allure flooring and replace with new planks. Instructions on how to do this are in a PDF file. You can find online in a google search.
I have a copy on this hard drive. My first post here so I'm not sure what is acceptable here yet.
slovaceks_earthlink_net
13 years agoWe put the vinyl floating floor down 2 years ago. Was really satisfied with it the first year but now it has started seperating @ the seams in several places. Contacted Traffic Master & was told we could fill in the spaces with something called minwax latex grout. We have looked everywhere for this stuff, even the internet & there just doesn't seem to be such a thing. Has anyone else used this & if so where did you find it? Also, has anyone else had this problem & what did you do to fix it? Thanks, Shirley

4boys2
13 years agoAre the seams lifting or actually spreading apart ??
Lifting seems to be a product issue.
Spreading seems to be an installation issue.If the item was installed correctly they should honer the warranty .
If your willing to do a patch job
let them send you the material needed to fix it.mdickey4810_comcast_net
13 years agoI put in my dinning room, it looks great and was easy to install. I have one question that I haven't seen posted; I have Oak hardwood in the living room. What can be done to the edge of the allure plank where it goes across the enty from the living room to the dinning room? I don;t want to put a high tranistion strip across because it's only about 1/8 inch higher,
MvR55_aol_com
12 years agoWe put this product down in our basement last February over the cement floor. We had previous floods and had a French drain installed so decided to use this floor over the newly drier basement floor. The floor looks great but it is lifting at the part that sticks to itself, and its all over. The glue doesn't seem to be very good. It is obvious and we spent $1600 for the product. I have notified Home Depot, as their sales staff recommended this floor. No answer yet, but a friend used this floor and the same thing happened and he got his money back!!
barbcollins
12 years agoI too am confused why some people have so much trouble with lifting and others (including me) don't.
I installed it in our bathroom 3-4 years ago. I did not use a roller, just pressed it down well.
I have no lifting and the only gaps were due to my error.
We have installed it in several bathrooms, and never had any problems. I am going to install in a kitchen next month.
I did find the 6"x36" were easier to install then the bigger ones.
IRuehl
12 years agoWe put down 3 bedroom in the cherry color allure. Had a few seams pop a day after laying it, pushed um down, and haven't had an issue since. We have 3 kids, and 2 big bulldogs, and its holding up great! In the master it sits over the concrete foundation. The kids room it covers an old vinyl tile. We removed carpet from all the spaces it is in, had had to fill in all the holes with leveler, make sure you have a smooth clean area when laying down.
Master
{{gwi:1554913}}{{gwi:1554914}}
Daughters room
{{gwi:1554916}}{{gwi:1554918}}
Babys room
{{gwi:1554920}}DYIMom
12 years agoI would like to know how the Allure flooring planks are supposed to be laid down. Is each row supposed to be staggered?
If so, how far in? Should I start the new row half way down the first plank on the first row and continue doing the same on the following planks?
Although I'm a DYI type, I've never done this sort of thing before, and no one explains this part of the project.
Any details would be very much appreciated!
barbcollins
12 years agoCut 1/3rd off the first plank of the second row, and 2/3rd's off the next row. Then go back to a full piece.
shelly0624
11 years agoI have the TrafficMaster vinyl planks in our living room, hallway and kitchen. We love it and plan to put some in our family room. We've had it for three years and it has been amazing. Still looks good. The problem is that we are removing a bookcase. We had the flooring stop at the point where the bookcase was located, installing the flooring around it. How do I patch in the vinyl planks so they blend with the rest of the floor? I've read a little about people using a hairdryer to unstick the planks. Would anyone know about a procedure that would enable patching?
Any help would be much appreciated.shelly0624
11 years agoI found the answer to my question. The actual instructions are from the manufacturer. Here is a link:
http://www.homedepot.com/catalog/pdfImages/d0/d0c0bf10-7dd2-47ca-9459-577a22eeeb65.pdf
flamingofern
11 years agoI installed Allure tiles in my living room about 3 years ago. I thought it was super easy. I put it over a new subfloor I'd had to put down (we flooded). Well, 4 years later we flooded again - Isaac. I had to pull up the laminate, and the adhesive tiles in the kitchen. I have not pulled up the Allure; I'm not sure I'm going to. After the flood, I cleaned it and it looks just fine, right next to the new Allure I put in the kitchen to match it. the only problem is now some of the seams are coming up, and they have gotten dirt in them. The subfloor dried just great under the floating vinyl floor. Just adding my experience in.
flatrat62
10 years agoDon't know what other people are experiencing with the Trafficmaster floor tiles but I'm very satisifed with the product. You can install it/float it right over top the existing vinyl floor as I did.The original vinyl flooring in the kitchen was shot but i did not want to tear it all up and looked for alternatives and found this product. I watched a few youtube videos on installing the flooring and followed the advice about laying it carefully. I used a 4" Caster wheel available at Home Depot to apply strong pressure and roll the joints with and it worked great and after the job was finished, I returned the caster wheel for my money back. It seems wise to install the flooring at the median temperature that the floor will be most of its life to reduce any gaps from expansion, contraction, etc. and leave a tiny gap around the edges of the walls and counter bases so it can breath a bit. I left about a 1/8" gap. You can cover that gap with something like shoe molding.
I installed the 12" x 36" Cyprus tiles for a total of about 250 dollars. i have lived with it for over a year now and I love it. Clean it with a wet rag or damp mop. If you get right down on the floor and inspect it all VERY closely you may find a few gaps between some tiles but they aren't even large enough to stick a credit card into.I have not had any lifting in ANY location. I have shown the floor to many folks and they like it a lot and others plan to try it in their homes.I do not know how it will perform on a cold concrete floor but it has performed beautifully in my kitchen.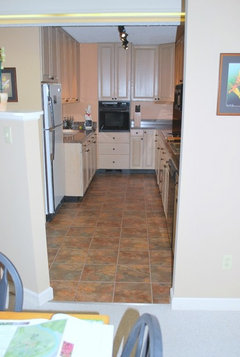
SpeedyRaindrop
10 years agoMy experience with Allure was very good. I installed in a basement, and although several people have recommended against a basement install, mine has worked well in spite of what is generally a somewhat damp environment. Installers must follow the instructions and install at room temperature and apply pressure to the seams as you install. I installed some planks under raised cabinets and had some seam adhesion failures there because there was no way to adequately use pressure on the seams. I will repair those seams by resealing with contact cement and using bricks for pressure while the cement cures.


mjsee