


Low odor stains and finishes
Hello all! I've been reading lots of forum posts here, and really appreciate everyone's insight and experience.
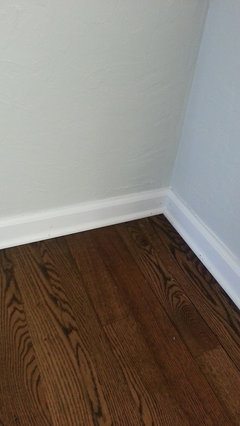
We've been researching adding hardwood floors to our 1975 house for the last 18 months. We will start with about 1400sf upstairs and on the staircase, and then someday, we'd like to do the downstairs. Upstairs is currently carpet over concrete (likely acoustical, it's about an inch and a half thick - I know because we had a gas leak that necessitated a nearly whole-house re-pipe and we had to cut part of the floor away in one room). We've got a few challenges we are dealing with, including:
Low ceiling height of 7' 6".
Concrete subfloor
Linoleum/vinyl tiles in a 600sf bonus room
After lots and lots of research, we plan to purchase an unfinished engineered hardwood and install them ourselves using Elastilon underlayment. We like that the engineered is thinner product and won't necessitate building up the subfloor, the Elastilon won't damage the concrete in case we ever want to change it out or take it up, we can lay it ourselves (we are on a major budget, especially after our gas re-pipe hit last year), and we can site finish it, which is the only "look" I have found that I really want. We came from a 1960 ranch with 50 year old site-finished, hand-scraped, stained and waxed floors and I loved them. I would like to get as close to replicating them as I can, but in the interest of finishing this DIY sometime this decade, I plan to skip the hand-scraping.
I am now searching for low odor stain and finish option. When we had our old house's floors refinished, I was terribly sensitive to the chemicals used and ended up falling very ill and having to sleep on my Dad's couch for something like 10 days. This began with the staining process and I didn't go back into the house until it was all over and we could move furniture back in. I don't know if the waxing was very smelly, but the staining was. I planned to use a poly finish this time, simply because we were not very diligent about buffing the wax floors so what was the point, but if it is possible for a DIYer to wax, I'm open to that, too, if it will be a durable and low-odor choice.
Does anyone have a recommendation for low/no-odor options for us to stain and finish our floors? Since it's likely to be a slower process than having a contractor do the work, moving out for the entire time is not feasible. I do have a jar of the dark colored custom stain we had on our old floors that I would like to have color-matched once we decide on the products.
Thanks in advance for any help you can provide!
Comments (35)

gregmills_gw
10 years agolast modified: 9 years agoIs this engineered have a micro bevel or do you need to sand it? And are you going to float the floor of glue it down?
I dont work with water based stains so i cant atest to how it handles but being water based my guess is it would be low odor. Also for the urethane go with a water borne finish for low VOCs.
Related Professionals
Bethpage Flooring Contractors · Danvers Flooring Contractors · Lansdale Flooring Contractors · Monroeville Flooring Contractors · North Aurora Flooring Contractors · South Pasadena Flooring Contractors · Valencia Flooring Contractors · Three Lakes General Contractors · Claremont General Contractors · Elmont General Contractors · Franklin General Contractors · Harvey General Contractors · Milton General Contractors · Toledo General Contractors · Warrenville General Contractorsgregmills_gw
10 years agolast modified: 9 years agoOk be advised that floor is going to move like a floated floor. Be sure to smooth out and humps. And it doesnt matter how well the install is done. You still need to sand it well. Especially if staining.
eclecticcottage
10 years agolast modified: 9 years agoHave you looked into Waterlox? I've never used it (I think that is what it's called) but I've heard good things about it.
I used Boiled Linseed Oil on ours. Not a typical finish now, and it does need to be reapplied. It also has a smell, but it didn't bother me (I am a chronic migraine sufferer and chemicals can be big triggers). I actually like the smell, but my grandpa was a woodworker and I grew up with it.
My DH hand waxed our hallway floor with beeswax. It smelled good, but didn't last very long. He used Daddy Vans orange/lavender wax. I use it on some of our furniture.

lazy_gardens
10 years agolast modified: 9 years agoWaterlox REEKS! It's mostly the tung oil, so it's an all-natural reek, but you can expect a few days of stink.
If you are OK with the way water-based stuff smells, there are several brands that have good reputation.
If you are afraid you might suffer from fumes, get pre-finished engineered wood.
MiaOKC
Original Author10 years agolast modified: 9 years agoThanks, eclecticcottage and lazygardens. I will try to obtain small samples of both of your recommendations to test in our house. lazygardens, I haven't found a single engineered wood that looks anything like a match for a traditional hardwood 3/4 strip floor. The style in our area is for ridiculously wide widths, "hand"scraping, and deep bevels. All of which I very much dislike. I finally did find a 2 1/4 strip pre-finished, non-scraped engineered wood with a micro-bevel (and it was like finding a needle in a haystack) but the depth of the finish on pre-finished products is what I would describe as "flat." There is just no life to it, and looks as bad as many other man-made imitations of natural things (granite-look laminate counters come to mind - they look fine for what they are, but they sure aren't granite).
With the expense and effort we will be making on redoing an eventual 3200sf of flooring, I decided we didn't want to compromise for a potential 25% savings (having a pre-finished engineered installed for us) if I have to look at it for the next 30 years and think "I hate this floor - it's what I had to get instead of what I wanted to get." Thus we will be doing it ourselves so we can have the material we want for a price we can afford.
MiaOKC
Original Author10 years agolast modified: 9 years agoAs an update to this thread, we have placed our orders for materials! The Elastilon underlayment has already arrived, and it will be a few weeks to get the unfinished engineered 5mm wear layer, square edge, red oak 3" x 5/8" flooring and the stair treads/trim pieces. Over the next few weeks as we wait for the wood to arrive and acclimate, we will pull out the remaining carpet and tack strips (we've done about half the upstairs now, to coincide with our city's "big trash pickup"). We also will need to patch up the hole the plumbers had to make in the floor of one room when they did our gas re-pipe, which will entail sistering some pieces in and pouring a small amount of concrete to fix the floor. I think we will end up removing all the baseboards, too, they are pretty short to start with. I'm not sure if we'll try to re-affix them or to put down new, taller baseboards, perhaps in lieu of baseboards + shoe molding.
We are still looking for the particular stain and finish we will use. I'm somewhat resigned to a stinky stain process, but thinking about waxing the floors instead of applying poly. Will update as we go along and I'm sure I'll be back with more questions as we go along.
gregmills_gw
10 years agolast modified: 9 years agoYou dont acclimate engineered. When it arrives open one box. It should be wrapped in plastic. Do not open it until your ready to start laying it down.
MiaOKC
Original Author10 years agolast modified: 9 years agoThanks for the comment, Greg. This is unfinished engineered which will be stained and sanded on-site (9 ply birch core with red oak 5mm wear layer), is it possible it has different requirement than a pre-finished product? The manufacturer's website says it needs 5-7 days to acclimate, but I'm sure there will be instructions when the boxes get here that I can check.
We've got 65 boxes that we've got to lug upstairs. We'll be getting a workout!
Here is a link that might be useful: unfinished engineered
gregmills_gw
10 years agolast modified: 9 years agoThe instructions are to store the unopened boxes for 5-7 days. Which isnt quite what i was thinking needed. They are just stressing the inside environment needs to be at a constant.
User
10 years agolast modified: 9 years agoTo eliminate finish odor the best thing to do would be to go with natural color and use water borne finishes. Most people would not describe these products as having an objectionable odor.
Another option would be to use one of the newer solvent free oil finishes like Rubio Monocoat. Buy a sample size can of the color you like to determine whether it has any objectionable odor.MiaOKC
Original Author10 years agolast modified: 9 years agoJFC, I am ordering the Rubio color samples after researching Rubio/Pallman's Magic Oil/Woca. Thanks for the tip, it looks like exactly the type of product we have been searching for.
Our stair treads have arrived from one mill and the flooring is on a FedEx truck and should be delivered this week. Woohoo!
MiaOKC
Original Author10 years agolast modified: 9 years agoAn update on our progress: the boxes of engineered unfinished wood flooring are here and as of yesterday, all 65 of them have been moved into the house to acclimate. Our FedEx guy was like Superman, and delivered all the boxes to the garage for me. I've also ordered samples of Rubio and Pallman's Magic Oil in colors (black and chocolate, and red-brown respectively) to test out. Will add photos once we get started this weekend!
tulips33
10 years agolast modified: 9 years agoWhat finish did you go with and how do you like it?
thxMiaOKC
Original Author10 years agolast modified: 9 years agoTulips, we are in the midst of our install now so haven't done the final finish yet. I've applied samples of Pallmans Magic Oil in red-brown and 3 colors of Rubio (black, chocolate, charcoal). Leaning towards Rubio but haven't decided yet.
tulips33
10 years agolast modified: 9 years ago@MiaOKC
I was looking at those two as well plus Synteko Natural Oil (b/c it says its good for high traffic, but I'm still researching).
Do you have any samples of those two that you've tested?
I read a comment on a blog that a lady said sweaty, dirty socks left on a Rubio Monocoat floor over night caused it to stain, so then I was kind of worried about going with that. I think maybe I just need to get some samples and test them out. Keep me updated, we have a while before we have to do them so I'd like to hear what you decide and how it works out for you.
Thanks!This post was edited by tulips33 on Mon, Oct 28, 13 at 9:13
tulips33
10 years agolast modified: 9 years agoOh yeah, I was going to test Woca Oil too b/c it doesn't have wax and I didn't know if maybe a finish without wax would be less maintenance??? Does anybody know if that is true?
MiaOKC
Original Author10 years agolast modified: 9 years agoHave you looked at the blog where they test OSMO/Rubio/Pallman's Magic Oil? That helped me visualize. I have my small samples applied to red oak, I can post a pic in the next day or two. I do not think that a hardwax oil has the same maintenance as a traditional wax floor.
Here is a link that might be useful: Hardwax Oil Experiment
tulips33
10 years agolast modified: 9 years ago@MiaOKC
Have you tried putting on stuff that might stain onto your sample to see if comes off?
I did read those posts and but one person's comments at the bottom here about Rubio their kitchens made me kind of worried:
http://napervillehardwood.com/blog/the-hardwax-oil-experiment-part-2-monocoat/
and this post about their kitchen:
http://floormasters.com/flooring-pros/viewtopic.php?p=57487
Has anyone had this happen and is it fixable or preventable with proper maintenance?
I really want to use one of these products but I'm worried about staining in the kitchen.MiaOKC
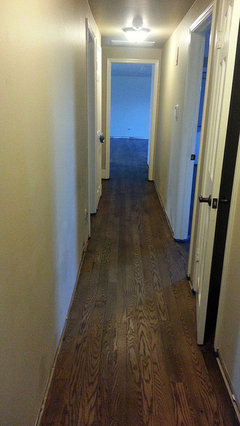
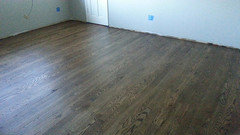
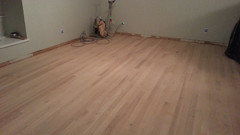
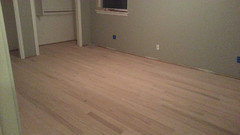
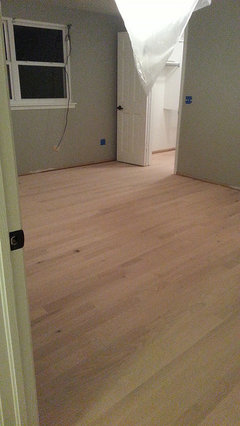
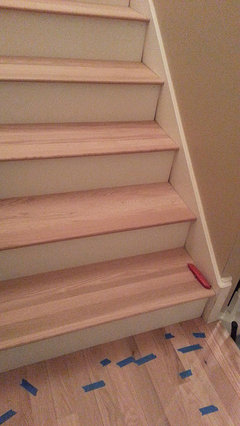
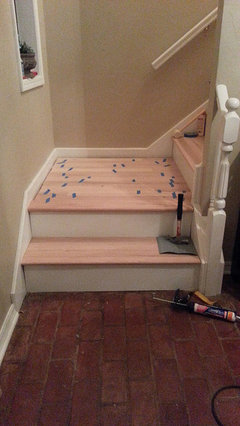
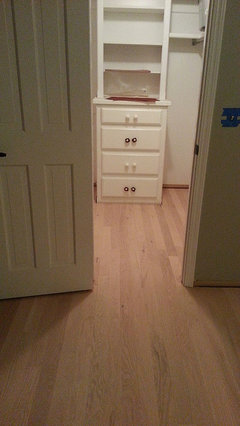
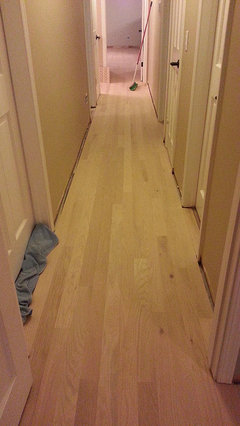
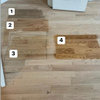
Original Author10 years agolast modified: 9 years agoWe are getting ready to begin Day 6 of our install. It is slow going for sure, but I love how it is shaping up. We are installing unfinished engineered over concrete using Elastilon underlayment. Several of our days have been eaten up with non-flooring-laying tasks, like running to the hardware store, undercutting jambs, pulling baseboards and carpet, fixing a big hole in the floor of one room. The prep is the killer, actually laying the floor isn't so bad! We are stymied for a bit today in need of some self leveling concrete for a spot in the closet that is beyond the tolerance of the flooring's slope, so will be heading out soon to get some SLC. Here are pics of our progress thus far.
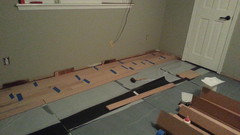
MiaOKC
Original Author10 years agolast modified: 9 years agoMore pics from our install.
Here is a link that might be useful: Our install
MiaOKC
Original Author10 years agolast modified: 9 years agoAs of tonight, we have sanded 66% of the flooring we installed. We are waiting for our order of Pallmann's Magic Oil (hardwax oil) to come in, hopefully tomorrow. We are on our 6th weekend of floor/stair install and think we've done just about 1000sf. Whew! Hope our oil gets here tomorrow so we can put it down. Due to our layout, we plan to finish the 66% that is done now in Phase 1, move a bunch of heavy furniture into those cured rooms, and finish out the last two bedrooms for Phase 2 asap. Our final color choice is something like a 5:1 ratio of dark-brown to black, to give a rich dark color to our red oak. Wish us luck!
tulips33
10 years agolast modified: 9 years agoSomeone was just telling me the other day that their flooring guy strongly discourage them from mixing colors b/c if you have to spot repair it's hard to get the exact match again....something to thing about, we were thinking about mixing colors too.
MiaOKC
Original Author10 years agolast modified: 9 years agoThanks, Tulips33, that's a great point. When we had the floors in our old house professionally refinished several years ago, it was a custom color (the guys mixed colors and put them down to show us, and we said, make it more red, or less black, or whatever until we liked it and they did the whole floor with that). What they did was leave us with some of the mixed color poured in a glass spaghetti sauce jar that we sealed tightly and stored. When the inevitable happened - several big scratches in the floor from a felt pad falling off the bottom of an ottoman and a nail head scratching back and forth when the ottoman shifted around - we were able to just get the jar, grab a paper towel and dab it in the stain and rub it in the scratches. When we had a bathroom retiled, we needed a new transition piece and we used the custom stain again.
For the Pallmann's Magic Oil we want to use this time, it is a two part formula (you add an accelerant to the colored part to get it to cure) so we will plan to keep the colored part mixed to our custom color in a glass jar, and keep the accelerant separate and mix up as needed. I think it is a 10:1 ratio but I will have to check to be sure. If we needed to do a spot repair, depending on the size, I'll probably just use a medicine syringe to measure out the right quantity of each and mix in a plastic cup.
User
10 years agolast modified: 9 years agoI may be incorrect but I think the accelerant is exactly that, an accelerant that speeds up the curing of the oil finish. Rubio, which I am more familiar with has an accelerant which cuts the cure time from 21 days to 5 or 7 days. If you need to do a touchup in the future I don't know if it's absolutely necessary to use the additive. Of course you can always try a sample board now to see.
I'm more curious about the Elastilon. How did it work?MiaOKC
Original Author10 years agolast modified: 9 years agoDue to a shipping snafu, the Pallmann's Magic Oil didn't arrive until today. Big bummer that we spent Thanksgiving sanding the floors and now we will need to rescreen to prepare them again for the colored oil, but we are moving on. The new plan is to go ahead and finish the last 30% of the installation and do the rescreening and finishing of the entire second floor all in one fell swoop. This will necessitate taking apart several pieces of large furniture and moving them downstairs, which we were seeking to avoid by doing two phases in our project, but in order to regain some normalcy before Christmas that is going to get us to the finish line the fastest so that's what we're going to try to do.
Thanks, JFC. I have a few sample boards with only the Part A color that I was using to mix my colors until I found one I like, so I will see if it seems if they ever harden up. When I ordered the sample sizes, I think the distributor mentioned that it wouldn't ever set up completely without the Part B but I may not have heard him correctly. I believe the Rubio has an optional accelerant but with Pallmann's I think it is required. We shall see and I'll report back!
Regarding the Elastilon... it worked pretty well. I do not have a big frame of reference, as our floor laying experience has been limited to setting tile, repairing a few pieces of termite-eaten 2.25" strip flooring, and refinishing existing strip hardwoods and parquet flooring in three houses. We have never floated or glued down a floor before. That said, the Elastilon works just about how it says it does on their literature. It is easier than laying tile, that's for sure! We chose the Elastilon because we have concrete subfloor and didn't want to build up the floor with plywood to create a nailable base. We were hesitant to try gluing the floor, due to the skill level needed and the fact that any future tear out would likely destroy our concrete, which I believe to be mainly acoustical as it is on our 2nd story.
We chose to use a 5/8" engineered floor with the Elastilon instead of a solid 3/4" - although using solid is supposed to be possible - because we thought engineered would be more precisely milled and need less manhandling (since we cannot strap the floor to pull bowed boards or use nails to make a bowed board conform when using the Elastilon). I do not know how true that reasoning ended up being, because we did run into some bowed boards, mostly on the really long 8 foot pieces.
The Elastilon is supposed to be a lot faster than glue. Not sure if that's true since we have never glued. I will say it is very fast to get it rolled out and prepared. The long amount of time we've spent has been largely devoted to board selection and racking the floor to try to get the best, most professional installation we can manage by minimizing too-close joints, stairsteps, H joints, getting similarly placed joints to be at least five rows apart, a good variety of long and short boards throughout the entire floor, and so on. That takes a lot of time for the uninitiated!
Using the Elastilon with two people has been pretty easy, but a few times when my DH was at work I worked on the project by myself and managed just fine. It is easier with two, and at those times our division of labor was this:
- I chose the boards, and did the layout of each row, measured and then cut the final piece to finish out each row with my miter saw.
- DH used carpenter's glue to glue the small ends of the boards (as recommended by Elastilon), and pressed them down, and taped the rows together with blue painter's tape, and pulled the Elastilon plastic back to get the boards into place. When I was heading out to cut my row-ending board, I would shuffle slowly over the last row of Elastilon to help press it firmly down - it needs weight to get it really adhered.
- Whenever we needed to rip a piece, we did it together to support the whole length of the board. We have a wonky old table saw that needs extra supervision. For some odd cuts, DH used his jig saw to make those.Occasionally the Elastilon would get caught up between two tightly fit rows or butt joints and pulling it out would cause it to tear into two strips. We would use a screwdriver to tease it out or pull slowly to get it pulled out far enough to where the pieces would rejoin. Kind of like clear packing tape and how it can pull apart when you pick at the edge to get it started and it doesn't pull the whole width of the tape. Really annoying, but not devastating. Another thing we ran into was forgetting to "start" the new row of Elastilon. This happened in rooms where we were piecing the Elastilon together like a jigsaw puzzle - there is supposed to be no waste, it is 100% usable, but to do that sometimes you get to the middle of the room and have to peel back to start a new piece. If you are hoofing along making progress and not being very diligent about peeling as you go (DH would like to wait until we had about three rows down before peeling) you can find out in the middle of the room that you peel and the plastic pulls free right in your hand like you are finished! We figured that out by backing out the second piece and pre-pulling the film, adding in an old piece of film upside down so we can pull the new film back to where it is back in the open air again, then very carefully sliding it back under the finished floor by pulling the wood floor up slightly. That sounds more confusing that it was, I think!
I'll put some new pics up soon that show the few places we had small gaps in detail (due to bowed boards we couldn't get perfectly straight) and we can see how acceptable they are. Since we are in heater season, we're not too worried about the very small gaps as we anticipate some swelling during more humid parts of the year. The floor feels very solid, but I attribute that to the thick 5/8" flooring to a large extent. There are a few places that have a very slight soft bounce, and that is because our subfloor prep was not the best. I will put some pics up of those specific places, too.
Overall, I am happy with the product. It's been very convenient to be able to walk away from the install at any time, with no clean up, and has suited us with our weekend-warrior schedule.
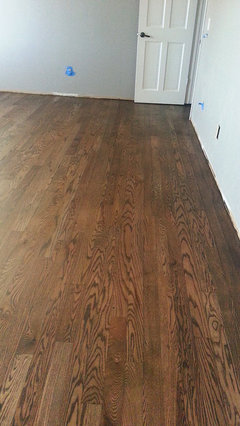
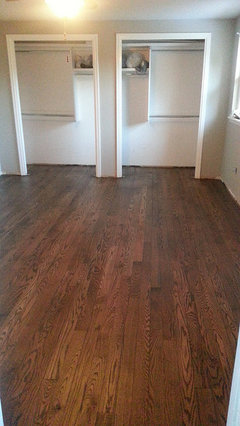
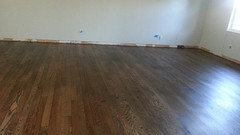
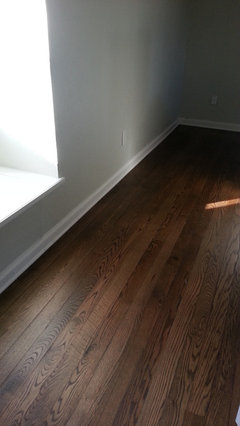
MiaOKC
Original Author10 years agolast modified: 9 years agoWe have color! I am in LOVE with the Pallmann's Magic Oil finish we put down. Because I was trying to avoid a strong odor during the refinishing since we would be staying in the house during the process (sleeping downstairs), I decided to go with a colored Pallmann's Magic Oil rather than staining using Minwax or DuraSeal first then using the clear Pallmann's. To find a color I liked, I ordered several samples of Pallmann's from the distributor that is closest to me, in Dallas, and the samples are called "pucks." I got black, dark brown, and red brown. Straight out of the can, the colors weren't what I was looking for, but when I started mixing them, I found a great combo. I just took a plastic solo cup and a plastic teaspoon and mixed in various ratios until I got what I wanted. First was 3 spoonfuls of dark-brown and 1 of black, but that was too dark, so I added 2 more spoonfuls of dark brown (for a 5:1 ratio) and that was perfect. I was also mindful of how much total finish I needed to buy (6 liters for my project) so tried to mix in ratios that would minimize waste, and 5:1 was perfect for that. We mixed all six of the Part A containers (colored oil) in a 5 gallon bucket and stirred thoroughly, then used a small measuring container (from the paint section of HD) to measure out a small amount of the colored oil to mix with the Part B (accelerant) which is what makes it harden to a very durable finish. I think the colored Pallmann's has a different ratio of Part A to Part B than the clear, but just follow the directions on the box. Ours was 4:1, I think, so I would fill the container up 16 ounces with color, then top off to 20 ounces with the accelerant, stir with a stir stick, then trowel apply per the directions and video UFloor (the distributor/mfr.) has on YouTube.
To prep, we screened the entire floor upstairs at 100 screen (we'd sanded it previously with a sanding sequence of 60, 80, 120 but had a week's worth of foot traffic and moving the last bits of furniture out so wanted to make sure the wood fibers were all the same to accept the stain evenly. Perhaps overcautious, I don't know). Screening is MUCH harder than using the vibrating square buff sander - it took lots of muscle to figure out how to control the buffer. There were a few times initially where I didn't think we were going to be able to do it - mostly when the buffer was going airborne like an ice skater doing a triple Lutz. Eventually got it under control, but managed to leave lots of marks on our freshly painted walls from the buffer handle pushing us around. Got some touch up to do. It looks so easy on YouTube but it was HARD!
Then, we swept up tons of sawdust. Then, we shopvacced all the dust we could, carefully carrying around our shop vac canister so it wouldn't leave wheel marks on the floor's fibers. (Again, overcautious much?) We tacked the floor with old towels misted with paint thinner. This was stinky but my husband did it while I was at Home Depot exchanging our buffer for a new one - the first one's wheel was messed up and it was really annoying to work with. All the prep work takes forever, but I figured it was better to do it now than spend two months installing the floors and messing them up in the final stretch. Before sanding and screening, we also had taped over all the light switches, electrical outlets, covered vents and air returns - and turned off the heat - taped plastic over the ceiling fans and lights, removed all the blinds, etc, and then removed all that stuff so that when we were doing the clean up, all the sawdust would be on the floor so we could get it up before we applied the finish.
OK, still with me? We are back to applying the finish. We started with the side rooms so that if we had to stop, we could end along a doorway with a full plank of wood. The first room we trowel applied - I used the trowel (which was a 10" stainless steel drywall trowel that I just took a piece of sandpaper and rounded the edges on) for the majority of the floor and my husband took a piece of the buffer pad and did the edges - like cutting in when you are painting a room. We got about 1/3 through the room and needed to stop and buff (there is a time limit on how long the product is workable, we set our phone's alarm and stopped to buff whenever it was time). The first bit was frantic as I was really worried about hurrying and the time and everything, but I calmed down soon enough and figured out this is a marathon, not a sprint. We followed the buffing sequence the instructions specified and didn't have much problem, The first buff is really "grippy" and you need to use some muscle to control the buffer or it will throw you around. The final buffs with the white pads were pretty easy, and I did those to give my husband a break. Per the tip from the Pallmann rep, we applied two coats back-to-back before moving on to the next room.
Trowel application:
The second room, we thought we'd try the other application method, the buffer method instead of hand-troweling. Big mistake! Maybe if we were more experienced with the buffer we could have done better, but as it was, that buffer through us both around like a rodeo bull. Grabbing the liquid oil made it really careen around, no matter how carefully or lightly we dipped into the oil pool. I had the honor of putting the first hole in the drywall - at which point DH thought he'd better take over. He was doing better than me at first, but then the buffer got the best of him and he put two more holes in the drywall in the same room! We decided to finish that room using the buffer method but to go back to troweling after that. There is no real difference in how the finished product looks, and it really wasn't faster to do the buffer with the way it was flinging us around. The only thing was my wrist was practically crippled by the end of the project, as we did almost 1500 sf in a 10 or 12 hour marathon. I was switching from left to right hand, and DH even had to take a turn troweling, but I've had to wear my wrist brace all week to give my poor arm a chance to rest.
This is reaching the length of a novel, so I will just post some more pictures of the final product. We still need to do the stairs (at 2:30am we called it quits because we needed to get up for work in four hours) and baseboards and shoe molding, so these aren't the final final product, but we are getting close. It's been an adventure! We did have a few problem areas that we need to address, I will come back and post about that soon.
Buffer application:
Back to troweling:
MiaOKC
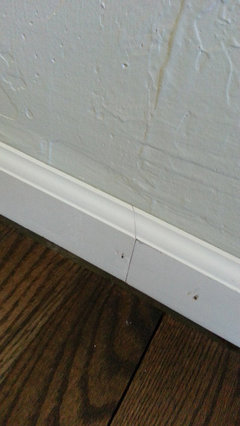
Original Author10 years agolast modified: 9 years agoWe are in the home stretch. It is amazing what a difference adding the baseboards makes. It's taking us from a construction zone back to a house!
We have about 500 linear feet of baseboards and 500 feet of shoe molding to install. We did probably 175-200 feet in one day, but that included moving furniture to the middle of the room, setting up the saw, getting out the nail gun, etc, etc. The prep is always the killer - actually doing the work goes faster! Oh, I'm also hand-coping all the trim rather than doing exclusively miter cuts. It's a learning experience, and my shoulder and wrist have learned they do not like it. :)
When we get the baseboards and shoe up, we will caulk and paint. We also still need to stain the stairs and do the trim on the landing, but are waiting for a time when we can spend 12 hours post-staining either upstairs or down - we'll be stuck on one side or the other! Hopefully soon.
tulips33
9 years agolast modified: 9 years agoHey it's time for us to choose a floor finish....do you still love Pallmans?
 PRO
PROCancork Floor Inc.
7 years agoPolywhey by Vermont Natural Coatings, Loba 2K Supra AT, Bona (so long as it is the 2 part water based version), Samaan, Glitza, etc. They all make beautiful, state of the art, high-end (ahem EXPENSIVE) long lasting, water based finishes with very low VOC content (careful with BONA...some of them come in higher VOC versions for a lower price).
The SOLVENTS are what cause VOC content. It if says "polyurethane" or "urethane" without other words infront of it - it means it is a SOLVENT based finish. If it says things like water based (low VOC) or waterborne (moderate VOC) you are fine.
If it says "oil modified" to offer "depth" of colour to your floor = solvent content = higher VOC content.
These are simple things to remember....but the advertising is what is throwing people off. And don't expect Home Depot or Lowes to know that. Some of their staff were sweeping parking lots as their last permanent job.


MiaOKCOriginal Author