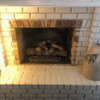
I just finished a DIY insert installation for a Pacific Energy Summit wood burner.
Here are some notes that may help a future DIY installer.
1). The installation took 6 hours. I had the help of 3 110 pound or less women and children. I am a pretty big/strong guy and I am pretty darn handy, excuse the immodesty. I did the demolition previously, which took about 2 hours (used acetylene torch to cut out some of the damper - I've heard a grinder cuts cast iron well too).
2). The flue liner of the masonry fireplace was about 6.5" by about 9". The stainless liner I used just fit in the flue liner. I just read that oval liners are available, and I recommend them to anybody doing this job. Why? Because it was torture getting the 6" stainless down the 20 feet of flue liner. I had to pretty much get up next to the chimney and pile drive the SOB down. Worse yet, the fireplace is "offset" from the flue liners, so after the stainless cleared the flueliners, I had to work hard to get it to redirect about 35 degrees. I ended up inside the fireplace with lockjaws yanking down on the liner, then going up top and pushing. About 6 iterations before the stainless was low enough for a helper to grab the wrench and pull. By the way, the stainless didn't need any clearance to the flue liners because the chimney construction was within the specs.
4. I got the stainless liner to about 2 inches lower than what I calculated would be it's final, inserted height.
3. Getting the stainless liner end into the "coupler" was a real bear. The liner didn't want to go in, and I had to work for about 1/2 hour to get it in 90% of the way. I also opened up a huge gash on my finger from the sharp edge. Wear gloves when you handle the stainless ends.
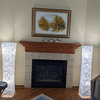
4. Moving the insert was an exertion, but not difficult. The unit weighs about 350-400 pounds. Note that you should take out everything you can. My unit had a removable baffle that weighs about 40 pounds. I didn't take it out, but I should have. I used a dolly (handcart) and two helpers to get it into position. I left it screwed to the pallet. I used a floor jack under the pallet to get the stove up on the raised hearth.
5. Installation after that was pretty easy - I finagled the insert into position (DON"T SQUISH THE STEEL LINER!). Per the dealer's instructions, I jammed insulation up around the damper to seal off the insert (no craft paper!). Then I popped in the coupler. Leave the unit out about a half inch. On went the sheet metal that covers the gaps around the insert - then slide it back the last half inch.
6. The bricks went in easy.
7. Up to the roof. When I had put the steel liner in, I had the end plate already screwed on the end (I originally thought it might get pulled in! Hah). I unscrewed the plate and lowered to the top of the flue liner. I then used a lock jaw to pull up on the stainless liner to tension it up, and then torqued down the clamp screw on the top plate.
Oh yeah, I used high temp silicon between the top plate and flue liner and between the coupler (at the bottom end) and the stainless liner.
Finally, I cut the stainless so that it protruded at the top the right amount, mounted the rain deflector/spark arrestor, and that's it.
If you have a bigger flue relative to your liner and if you have a straight shot from the top of the chimney to the insert, then this job would be a lot easier.
Last thought - the guys at the dealer recommended "squishing" the stainless for the last 4 feet to get it through the damper without having to cut up the damper to make the hole bigger. I'd guess it would have worked fine, but I think it would be harder to clean and could produce long term stress issues on the stainless.
That's it. Feel free to comment, and you won't hurt my feelings.


vshap
Switching2WoodOriginal Author
Related Professionals
Germantown Fireplaces · Hercules Interior Designers & Decorators · Mount Laurel Interior Designers & Decorators · Cibolo General Contractors · Arlington General Contractors · Fitchburg General Contractors · Forest Grove General Contractors · Fredonia General Contractors · Fort Pierce General Contractors · Great Falls General Contractors · Hanford General Contractors · Los Lunas General Contractors · Palestine General Contractors · San Bruno General Contractors · Westerly General Contractorsbamckenna
CDouglas46
zeta
steveallen7_mac_com
woodcutter_2008
wildboar