I posted about a month ago about my first upholstery project - a super bright yellow wingback chair for my son's room. it took me a month, but here's my second project! (in all fairness, there were a couple holidays with 2 kids mixed in, a full time job, and we're building a home, so all in all i think 1 month isn't too bad) haha
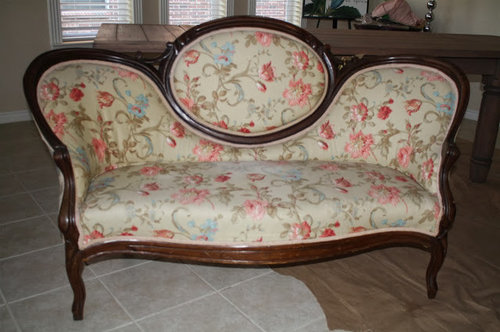
an antique settee that i'm putting in our peacock themed office.
BEFORE:
AFTER:
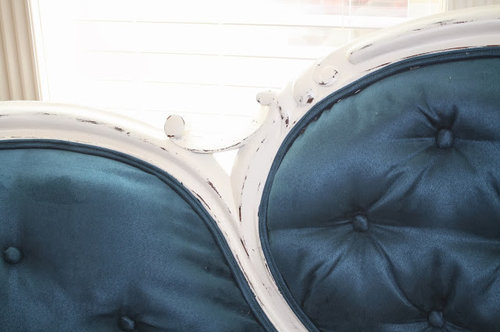
up close:
with this project, i had to build on my EXTREMELY basic upholstery skills. i had some frame reinforcement to do, some springs needed retying, and i button tufted what was not previously tufted on the sofa back. Thank goodness for YouTube!! i'm so pleased with it, but ready to put the staple gun away for a while and switch back to my paint projects. :)
Merry Christmas everyone!


JennaVaNowSC
loribee
Related Professionals
Mount Laurel Interior Designers & Decorators · New Providence Interior Designers & Decorators · Ridgefield Park Interior Designers & Decorators · Suisun City Interior Designers & Decorators · Van Wert Interior Designers & Decorators · Englewood Furniture & Accessories · Greer Furniture & Accessories · Discovery Bay Furniture & Accessories · Encinitas Furniture & Accessories · Golden Glades Furniture & Accessories · West University Place Lighting · Iowa City Lighting · Richardson Window Treatments · Riverside Window Treatments · Stanton Window Treatmentsoldbat2be
bbstx
Annie Deighnaugh
Laurie
romy718
countryatheart
cat_mom
TxMarti
maggiepie11Original Author
mlweaving_Marji
maggiepie11Original Author
theclose
Boopadaboo
Tmnca
mlweaving_Marji
ttodd
kellienoelle