


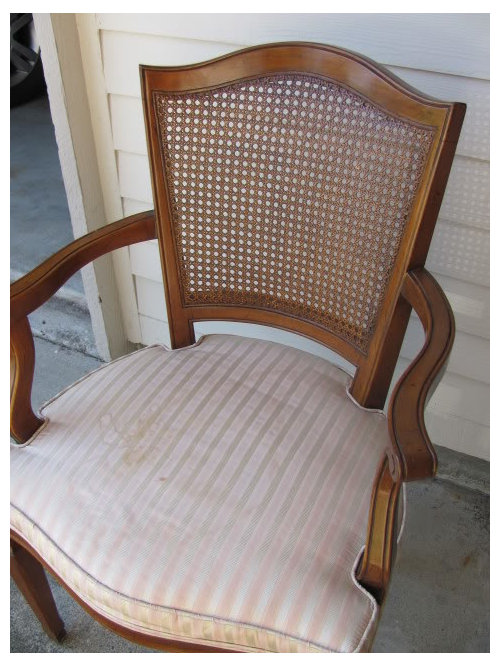
My first Craigslist transformation, I'm pretty proud of myself!
alex9179
13 years ago

Related Stories

HOME OFFICESRoom of the Day: Proudly Pink in San Antonio
See how a ho-hum beige box became a luscious and energizing workspace worth showing off
Full Story
ARCHITECTURE4 Japanese Homes Proudly Speak to Their Surroundings
We’re celebrating the launch of Houzz Japan by exploring 4 key homes that speak to the Japanese lifestyle and landscape
Full StoryBEFORE AND AFTERSSee a DIY Powder Room Transformation for $1,100
Determination, DIY skill and a stunning tile feature wall helped make this formerly dark and gloomy powder room feel spacious
Full StoryHOUZZ TOURSMy Houzz: Midcentury Modern Style Transforms a Vineyard Bungalow
Spectacular surroundings and iconic design inspiration meet in a major overhaul of a 1960s Ontario home
Full Story
HOUZZ TOURSMy Houzz: Major DIY Love Transforms a Neglected Pittsburgh Home
Labor-intensive handiwork by a devoted couple takes a 3-story house from water damaged to wonderful
Full Story
STUDIOS AND WORKSHOPSRoom of the Day: Garage Is Transformed Into a Dreamy Studio
An eclectic mix of old and new creates an inspiring, distraction-free space for writing
Full StoryHOUZZ TOURSMy Houzz: Creative Solutions Transform a Tricky Basement Studio
Structural issues and puzzling features give way to beautiful design at the hands of a can-do Montreal homeowner
Full Story
HOUZZ TOURSMy Houzz: Ingenuity and Joy Transform an Oregon Farmhouse
A hardworking couple turn an 1800s farmhouse into a welcoming family homestead with original art and DIY touches
Full StoryMY HOUZZMy Houzz: Global-Inspired Color Transforms a Lavish Beach Home
See how a Southern California designer breathes enchantment, color and texture into her family’s coastal home
Full Story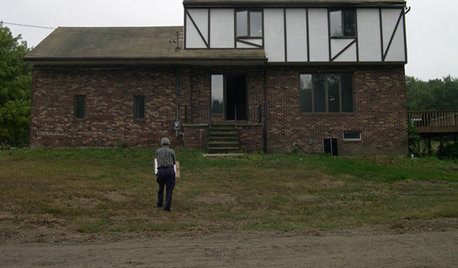
BEFORE AND AFTERSRadical Makeover Scoop — See a New York Home's Fantastic Transformation
How much can you change a home's personality without moving or tearing the whole thing down? Completely, it turns out
Full Story


dixiedo
katrina_ellen
Related Professionals
Bloomingdale Interior Designers & Decorators · Bend Furniture & Accessories · Jacksonville Furniture & Accessories · Manhattan Furniture & Accessories · Norwalk Furniture & Accessories · Spartanburg Furniture & Accessories · Asheville Furniture & Accessories · Pinehurst Furniture & Accessories · Central Falls Custom Artists · Ocean Springs Custom Artists · South Bend Lighting · Aurora Window Treatments · El Sobrante Window Treatments · Rochester Hills Window Treatments · Westfield Window Treatmentshaley_comet
alex9179Original Author
folkvictorian
demeron
gobruno
msrose
sable_ca
cattknap
cyn427 (z. 7, N. VA)
alex9179Original Author
mahatmacat1
creekylis
susanka
neetsiepie
alex9179Original Author
creekylis
susan209
loribee
User
Kathleen McGuire
newdawn1895
igloochic
wi-sailorgirl
User
gobruno
Valerie Noronha
linnea56 (zone 5b Chicago)
Diane Smith at Walter E. Smithe Furniture
melle_sacto is hot and dry in CA Zone 9/
Lyban zone 4
alex9179Original Author
alex9179Original Author
linnea56 (zone 5b Chicago)
juddgirl2