Shop Products
Houzz Logo Print
my3dogsii

Easy to sew valance directions

My3dogs ME zone 5A
15 years ago

Hi everyone!

Here are the directions for the valances that you saw in the post linked below. They ARE EASY - but the directions are long, because I am trying to give you enough detail, even if you are a beginner. Read them all the way through so you understand them, and ask any questions you may have. If you are a real novice, you may want to make a sample using just muslin, or other inexpensive fabric, til you get the hang of it.

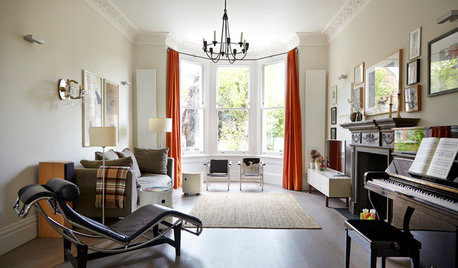
This is a no-pattern valance that I started making last summer. It requires just straight stitching. My windows are generally about 50" (more or less)in height. If your windows are very short or very tall, you may want to vary the length of the fabric you use. I would say to err on the 'buy more' side though, so they don't look skimpy. The fullness adds richness.

I generally use 1 1/4 yards of 54" wide home dec fabric to make the valance. You will need an equal amount of lining fabric. If you choose to put trim on the bottom (it adds a lot to the treatment, IMO) buy 1 1/2 yards of trim to make sure you have enough to go across the length of your 54" wide fabric. If your fabric is wider than 54", buy enough trim to cover its width.

Cut your valance fabric and lining to equal lengths. I always measure the side edges of my fabric and mark the length before cutting. It may have not been cut straight at the store, and you want to be sure that your left side is the same length as your right side.

Pin the two rectangles of fabric together on all sides, with the RIGHT (front) sides of the fabrics inside, facing each other. Before putting the fabrics together, I mark lightly on the back which is the TOP of the print (if using a print) and which is the bottom, so your print will end up right side up!

Depending on the type of rod you plan to use for the valance, you need to leave openings on each side that will become your rod pocket. Continental rods (the flat wide plain ones) need a 4" rod pocket. If you use a decorative rod, with finals on the end that screw off, I would recommend making your rod pocket 2" wide. For a small tension rod, I'd make the rod pocket 1.5" wide. You don't want to force your fabric onto the rod - allow room to make it easy for you.

Measure down from the TOP of your pinned together fabric, and make a light mark with pencil on each side, the size of your chosen rod pocket, plus 1/2". That 1/2" is going to be the width of your top seam. You'll be making a mark on the left and right sides 4 1/2" down from the top if you use a Continental rod, for example. Stitch from these marks down each side to the bottom, using a 1/2" seam.

You'll need to leave an opening in the top or bottom to turn your valance inside out when you're done stitching.

I'd suggest a 4" - 6" opening for turning. If your rod pocket openings are 4", you don't need to leave another opening, you can use them to turn it inside out.

Mark the opening you need to leave, then stitch across the top and bottom edges, using a 1/2" seam, leaving your opening...well...OPEN!

Clip your fabric corners off OUTSIDE of your stitching. This is just a small triangle of fabric from each corner. This will allow you to get nice sharp edges on your corners when your turn the valance right side out, as it reduces the bulk of fabric there.

Turn your valance right side out, pulling it through the opening you left. I use a wooden chop stick to push the fabric gently at the corners to make them nice and square, once I have turned mine right side out. Don't push too hard, or you may poke a hole through your valance! At this point, you should have a lined rectangle of fabric, with rod pocket openings near the top of each side.

Close the opening you left for turning, either by folding and pressing the edges in and hand stitching it closed, or use 'stitch witchery' type of fusing tape to do it. You can also sew it closed with your sewing machine, but you want to do it right at the edge. You want to make this closure as 'invisible' as possible, so I always use fusible tape.

Carefully iron your valance. Use your fingers to work the edges, so that you have your seam right in the middle of each edge, so you don't see the front fabric on the backside, and you don't see the lining from the front.

Now, to stitch the rod pocket. You will be making one row of stitching across the front of your fabric from side to side.

Measure down from the top edge, so you have the same length opening on each side. The size of the opening you left on each side was determined above by the type of rod you're using.

You can lightly pencil on the line that you need to stitch across, or do what I do - Place the fabric on the sewing machine, and put the needle down on the place where you'll start stitching. Take a 4" (approx) length of masking tape, and lay it against the upper edge of the fabric, to the right of the needle, and stick it to the sewing machine base. You can use this tape edge as a guide to hold the top edge of your fabric against as you stitch across. It helps you make a straight, even rod pocket. My sewing machine has tape on it for all different widths of rod pockets!

If you chose to put trim on the bottom of your valance, do it now. I use 'Aleen's OK To Wash-It' fabric glue that you can get at WalMart or a fabric store. If you use glue, just follow the directions on the bottle to glue your trim evenly to the front bottom of your valance. I lay my valance on my kitchen island, and let it set overnight, while the glue dries. You can also stitch your trim on, either by hand or by machine. I prefer the glue, because you see no stitching on the back side. (I'm anal.)

Now to make the ties. You can simply buy ribbon (such as grosgrain) or use purchased cord (see my dining room silk ones in the link) or make them out of fabric. Use either the same fabric or a coordinating one.

Here, you first need to decide if you are going to tie your valance up with bows, or do knots. Bows take longer ties.

Allow yourself a MINIMUM of 36" long ties. You can always cut them shorter if necessary, but you can't make them longer. I suggest hanging your valance up and using string to tie them up temporarily to see how long you need to make your ties. (It's longer than you think!)

Cut your strips of fabric approx 4" wide and the length you have decided on above for your ties. Fold and pin the strips in half the the short way, so you have a long strip of fabric that is 2" wide. Make sure the right sides are together, (inside) because you are going to turn them inside out after stitching.

Stitch along the pinned edge of each strip, about 1/4" from the edge. Now the fun part - turn those narrow strips inside out. My chop stick comes in handy for this, but use whatever method you choose to accomplish this.

Press the ties just as you did the valance rectangle, making sure your seam is even on the edge. I fold in the raw ends and use my fusible tape to close them, but you can machine stitch them closed or do it by hand - Your choice. Your valance is done!

Put it on your rod, using the rod pocket. Hang it in your window. Now, take the ties, and simply drape them over the rod on each side, having half of the tie fabric strip hanging in front, and the other half of the tie hanging behind the valance.

Now, gather up one side of the valance in your hands, and reach behind it it grab the dangling tie in back. Tie up the valance, by tying the front and back pieces of the tie together, either in a knot or a bow. Do the same with the other side, making sure your ties on each side are tied up at the same length.

Now stand back and make sure your valance looks even at the bottom on each side. Use your hand to 'finger fold' and drape your fabric until the look is what you want.

You'll be surprised at what a difference it can make in the look by spacing your ties closer together, or moving them further apart on the rod. Also by tying the ties higher or lower...

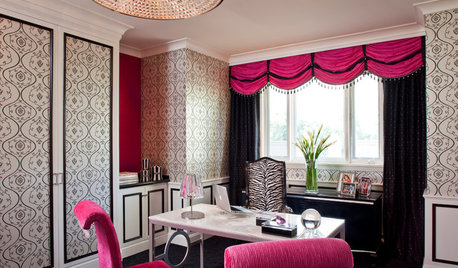
This is where you need to play around until you get the look you want. On the HGTV message board, a woman made these and kept posting pics asking for advice - Higher? Lower? Move the ties apart or closer...It's really all up to you. Hers looked GREAT when she was done, and she was so pleased to have made her own custom valance. I hope you all feel the same way, if you try them!

Here is a link that might be useful: several shown here - all the same instructions

Comments (18)

  • cooperbailey
    15 years ago
    last modified: 9 years ago

    I know what I will be doing on rainy days in the fall! Thanks for the great directions.

  • brutuses
    15 years ago
    last modified: 9 years ago

    Thanks for all the time it took to post this, I really do appreciate it.

  • tinam61
    15 years ago
    last modified: 9 years ago

    I am SO glad to know someone else does the masking tape *trick*! LOL

    How long do you normally make your valances?

    Thank you so much for sharing with us.

    tina

  • Lyban zone 4
    15 years ago
    last modified: 9 years ago

    my3dogs,
    thank you so much for the instructions. I too am printing them out.
    I have never sewed anything before , but I am going to start with a small bathroom window that is 22 inch. wide. Would I use the whole width,about 54 inches for that size window and then just decide on how long I want it to determine how much I need.

  • tinam61
    15 years ago
    last modified: 9 years ago

    I should have read more closely the first time. You are using the 1 1/4 yard (45 inches) minus seam allowances and ties for your length, if I am following correctly - right?

    tired tina

  • laurensmom21
    15 years ago
    last modified: 9 years ago

    Wow, thanks so much for taking the time to write all this up! It's very kind of you to educate all of us and share your wonderful tips. Now I'm off to find some fabric! Thanks again :)

  • My3dogs ME zone 5A
    Original Author
    15 years ago
    last modified: 9 years ago

    Hi, lyban...hmmmm, I would not use the whole 54" width of the fabric for a window that narrow. You do want to have some 'gathering' at the top across the width, but that is too much (IMO) for that size window.

    I just measured my half bath window width. From outside to outside trim, it is 36" wide. I used the full width of the 54" fabric on that. So, doing the math, my fabric was 18" wider than the overall width of my window. Is the 22" the entire width of your window including trim? If yes, my suggestion would be to have the width of your fabric approx. 38" - 40" to have it the same ratio as mine was to start.

    Hi, tinam61, I actually buy a tad more fabric to start due to the fact that it may be cut unevenly in the store. So, I might buy 1 3/8 yards. If I am making my ties from the same fabric, I'll buy 1 1/2 yards to start. I am very careful to have my starting piece of fabric be the exact same length on the left and right sides.

    BUT, for the ties, you need to see if your ties can be cut across the WIDTH of your fabric, or do you need to buy a longer piece for the ties, so the pattern on them will be correct? If it's solid, plaid or dots, it doesn't matter. But if it is a print with a definite up and down, you need to see how the pattern runs on the fabric.

    In these with the striped fabric ties, the stripe ran the length of the fabric, not the width, so I bought about 1/2 yd of the striped fabric and cut 2 pieces lengthwise for EACH tie, and carefully stitched them together end to end, matching the stripe, so it ended up looking like one long piece of fabric.

    I hope this all makes sense. It does as I write it, but I have made several valances and used many different fabrics.

    Someone last night on the HGTV boards was asking how to make this valance that she saw online. Isn't it beautiful? It just shows what you can do with the right fabrics and trim. I gave her my directions, because even though I didn't make this one, it's exactly the same 'pattern' as mine!

    Once you become comfortable with the directions, you will really enjoy finding great fabric combinations to make YOUR custom valances! The possibilities are endless!

  • Lyban zone 4
    15 years ago
    last modified: 9 years ago

    Thanks so much my3dogs for that explanation. I understand now.
    I am going to go back to ebay and keep looking.
    Then maybe I will try my fabric shops around here after.

  • kaelkriver
    15 years ago
    last modified: 9 years ago

    Thanks so much for the instructions, it's very generous of you to do so. I look forward to trying this myself.

  • User
    15 years ago
    last modified: 9 years ago

    bought some fabric off ebay. this will be my first project.

    my3dogs - you rock! thanks for taking the time to post this.

  • tracey_b
    15 years ago
    last modified: 9 years ago

    I can barely sew on a button, so do you think fusible web would work for this window treatment? I guess it couldn't hurt to try! My windows have been left "nekked" in the 2 homes we've owned because I'm "drapery illiterate"! I have wood blinds up but that's it. Time for some dressin' up thanks to these wonderful toppers of my3dogs.

  • jaybird
    15 years ago
    last modified: 9 years ago

    Thank you My3....I appreciate your time to put all of this in print!! I'm off to the fabric shop!

  • My3dogs ME zone 5A
    Original Author
    15 years ago
    last modified: 9 years ago

    tracey b, Personally I wouldn't do it, but you can try!

    But what are you going to do about the rod pocket? You'd need to turn the treatment right side out, then press it, and you'd need 'something' running across the width of it to hold it on the rod. Would you be able to do that by hand, or do you have a neighbor or friend who could sew it for you?

  • User
    15 years ago
    last modified: 9 years ago

    my3dogs - Recently bought some material and after reading your "easy valance" post i'm pretty determined to make a new valance for my kitchen myself. Never done this before. Only ever sewed the occasional button. (I may need DH's grandma to help me out with the sewing. :)) anyhow, after rereading multiple times I have some questions i'm hopping you can help me out with. Oh and I will be practicing first with a piece of cheapy stuff.

    What material should I buy for lining?

    you said about pinning the two fabric pieces together. just the corners or randomly the whole way around?

    You lost me on the leave opening for turning inside out. I understand why you need the opening but where do you leave it?

    Then I read "mark opening you'll need to leave, then stitch across the top & bottom edges, using 1/2" seam... leaving opening... OPEN" edges as in the whole way around?

    Close the opening you left for turning by either stitching or fusing tape. I'm all about the fusing tape but won't that look odd if you've already half sewn it?

    Here's a pic of my fabric.... I'm assuming the little white ends with writing are the left and right sides and these get cut off? The fabric is 54" but what is a good length of the valance? 20"?

    {{gwi:1766062}}

    I'm sure some of these questions sound stupid but after I pulled out the fabric last night I felt really lost!

  • My3dogs ME zone 5A
    Original Author
    15 years ago
    last modified: 9 years ago

    Hi sheesharee,

    Let me take these in order -

    Lining fabric is sold at any store that carries home dec fabric. It's usually white or off-white and comes 54" wide. I buy mine on eBay about 20 yards at at time, since I use quite a bit of it. It comes in all cotton, all poly and cotton/poly blends. Joann Fabric has many different linings.

    Pin your fabric ALL the way around. I use a pin about every 3".

    You can leave the opening for turning on the top, side or on the bottom. As noted above, if the openings you leave on the sides near the top are large enough, based on the type of curtain rod you are using, these openings may be large enough to use for turning the fabric.

    The opening that you leave for turning your fabric right side out must be left OPEN. You will choose where to leave your opening - I suggest the bottom or on a side.

    Wherever you leave it - stitch across the top of your valance using a half inch seam. Stitch across the bottom of it next. Now stitch each side, from top to bottom, using the seam allowance. Doing it in this order reduces the chance of puckering. BUT, you must also leave the openings near the top of each side that will become the openings for your rod pockets. If they are large enough, you do not need to leave another opening to turn the fabric. You can stick your hand in the rod pocket openings to turn it.

    No, if you do it correctly, the opening that you have left open, when you turn and press your valance, will be folded under by ironing. It will fold in itself as you iron. You simply need to cut the fusible tape to the length of that opening, place the tape inside on top of the folded fabric edge, and press it closed. It will look just the same as the stitched fabric above and below it.

    I suggest cutting off the selvages, which are the white parts with the writing, before you pin the fabric and lining together. This assures that you will not see that writing through the lining when you finish your valance.

    You will see in the 3rd paragraph above where I say that I use about 1 1/4 yards of fabric for the length of my valances. This extra fabric is needed for the folds that are created when you tie up the fabric.

    However, if you are making this for a short window, you can buy less. The center 'drop' on my finished valances after tying them up is generally 20" - 24", but there are folds in that, as you see above in the pic, or in the one below that shows it clearly. I'd always err on the side of it being too long, rather than too short. When it's short it looks skimpy and cheap, IMO. You can tie it up as high or as low as you want, but the folds add richness to the valance.

    Here is a link that might be useful: see lining fabric here on ebay

  • User
    15 years ago
    last modified: 9 years ago

    thanks my3dogs! i'm sure i'm making this more difficult than it needs to be. I'm going to print these off and reread them (again)later.

  • ewigginton
    15 years ago
    last modified: 9 years ago

    Great tute, my3dogs! Come play with us on our home dec sewing forum nouveaustitch.lefora.com!

  • cvkesk
    12 years ago
    last modified: 9 years ago

    I love the look of these. Question: I have double windows...total measurements are 76 inches long by 70 inches wide (two 35 inch wide windows together like the bedroom pics you posted). Can I make one long valance or would two smaller ones look better? Also, what would you suggest for the measurement of fabric? If I used the 54 inch wide and made two on the window, that would be 38 inches of "extra". So, 54 inches on each 35 inch section of window. Is this too much? I will not have drapes in between like in the bedroom pics you posted.

    Would love suggestions!