Shop Products
Houzz Logo Print
wendyb_gw4

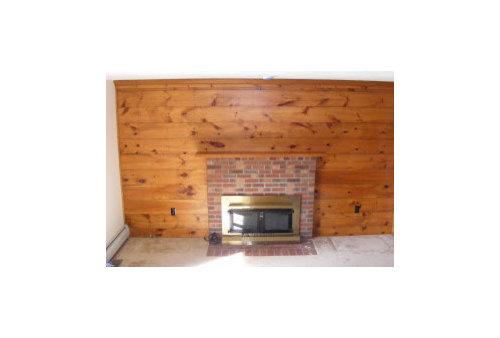
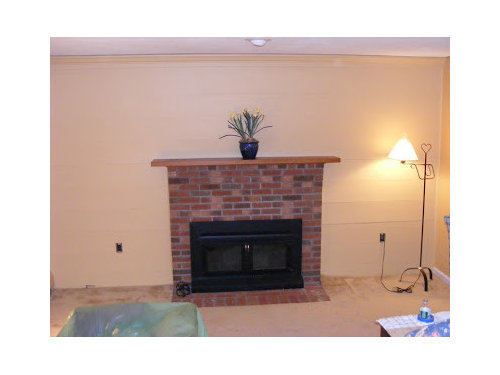
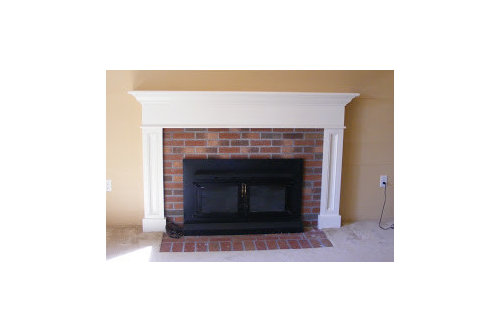
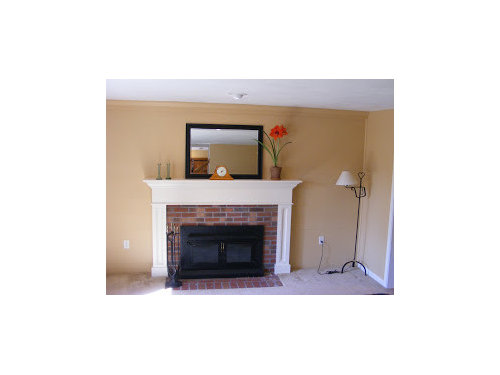
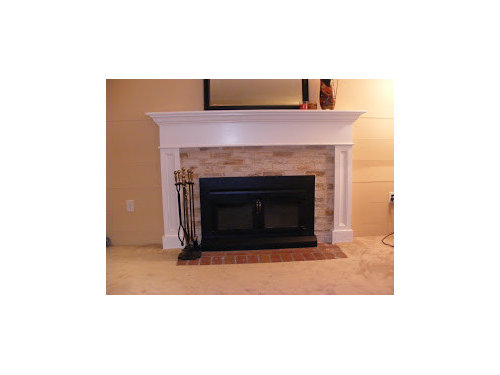
fireplace update picture story... almost done

WendyB 5A/MA
13 years ago

I started out this knotty pine wall and fireplace renovation project thinking I was going to just paint the wall and paint the fireplace to try to take away the dated 80's look and be done with it simple and fast. Boy, was I wrong!

Here is what it looked like in use with all the clutter...(notice cute kitty taking a nap in the dog's bed)

Here is the same thing all naked! Notice the dated brass insert.

So I started off painting the knotty pine (tons of work filling all the knots and gaps... got it as smooth as I could). And painting the brass black was a no-brainer. (the insert is semi-permanent so it stays)

So now the pure ugliness of the F/P really popped! My plan to paint it white disintegrated. That would just go from brick ugly to white ugly. I could now clearly see that the real problem was the lack of a proper mantel. No paint was going to fix that!

THe picture doesn't show it, but the top courses of the fireplace were protruded in a staggered fashion... some sort of brick faux mantel illusion. That always complicated the idea of getting a ready-made wood surround. So I bit the bullet and hired a carpenter and got this:

I was afraid it was too wide and overscale for the room, but it is growing on me and I really love it.

At this point I wanted a tile surround to cover a vertical settling crack in the brick face and a matching hearth to bring the hearth to be the same width as the mantel "legs". Took forever to find a tile that I liked, but the quotes I got to install it were ridiculous, so I decided to leave it like that.

But then recently I remembered my earlier idea of painting the brick. That would at least allow me the opportunity to fill the vertical crack. I was pondering that for awhile trying to picture it. Then I recently got my Ballard catalog in the mail and on Page 16, I saw a beautiful picture of an antique brick wall. I fell in love with it and could picture it on my F/P. So I did some faux magic:

I love it, but I hope it doesn't look too formal. I am trying to make the room more fresh and updated - a la Pottery Barn (is there a style name for that look?)

But there's still one part left. I still have to paint the hearth to match, but I am stuck. It doesn't seem quite right to have the faux antique bricks on the hearth. Does it? Can I just leave it like it is? paint it black? One of the colors from the faux? light? dark?

What do you think? Have I ruined my living room? I suppose some people might like the original BEFORE picture. It does have a warmth to it that I miss a little bit sometimes.

Comments (38)

  • mjsee
    13 years ago
    last modified: 9 years ago

    Are you happy? It is a dramatically different look...but if YOU like it then all is well! I wouldn't paint the hearth. You might impair the function and I think it's fine the way it is. Many people have a brick hearth with a different surround.

  • teacats
    13 years ago
    last modified: 9 years ago

    Incredible, wonderful transformation!!! Well done indeed!

    Yes -- paint the hearth brick to match the other bricks! :)

    Again -- GREAT job!!!

    Jan at Rosemary Cottage

  • polly929
    13 years ago
    last modified: 9 years ago

    Wow, it really looks awesome. You did not ruin your living room. I painted knotty pine in my house too, it was a real pain, but so worth it. I always thought painting wood was a sin, but would do it again in a heartbeat.
    How did you paint those bricks? I have a FP in my master bedroom that was covered by paneling for 50 years and the brick is all dingy and gross. I would love to do something similar to give it a clean fresh look.

    I wouldn't paint the hearth bricks. In the picture it doesn't stick out to me at all, and looks fine.

    Great transformation!

  • Happyladi
    13 years ago
    last modified: 9 years ago

    I think it looks great and I enjoyed how your pictures showed each step. I think the hearth would look better painted to match but it's okay like it is.

  • WendyB 5A/MA
    Original Author
    13 years ago
    last modified: 9 years ago

    thanks for the compliments. Re hearth...hmmm... 2 no's, 1 yes, 1 maybe. So far the no's have it!

    Polly, it wasn't very hard. I first cleaned them up a bit...stiff brush and heavy duty lint roller (sticky tape kind). THen I primed them completely with Benjamin Moore All-Purpose primer. Then I painted with a base coat of some leftover white ceiling paint (because it is flat). I added some cream to it just to see what that looked like overall and to act as a base color for the faux. Then I painted in some grout lines. Got this:

    Then I didn't like that as a base color, so I tried something more gold-ish, but it ended up too orangey:

    But it didn't matter. The best thing about doing faux treatments is that there is no way to make a mistake. Because you just add layers and layers, anything goes. And for a small area, it was no biggie to keep having do-overs. The more layers, the better.

    At this point I was mixing translucent glaze and ceiling paint and colored acrylic craft colors and a little water to just invent my own 5 "antique" colors based on the inspiration photo from the catalog. Brick by brick I just dabbed and re-dabbed and wiped off and wiped on over and over. I used rags and sea sponges and brushes. Doesn't matter too much. I just added lots of layers to each brick until it looked decent, trying to create a consistent randomness!

    I kept trying to clean off the grout lines as I went, but they did get a bit blurred as I proceeded. I may go back and touch them up a little to define them a little more.

    When I was all done, I brushed on a non-yellowing matte poly over it all, not so much for a sheen, but just to add a little more protection and allow cleaning in the future.

  • texanjana
    13 years ago
    last modified: 9 years ago

    I think it looks great!

  • vampiressrn
    13 years ago
    last modified: 9 years ago

    I think it looks 100% better and yes paint the hearth to match. The surround looks great and you picked wonderful colors for your project. GREAT JOB!!!

  • busybee3
    13 years ago
    last modified: 9 years ago

    definitely paint your hearth to match, tho you might want to consider more of a matte finish on the hearth??

  • hilltop_gw
    13 years ago
    last modified: 9 years ago

    Beautiful! Yes paint the hearth; it looks dated compared to the rest of it and competes with the rest of it.

  • ttodd
    13 years ago
    last modified: 9 years ago

    It looks wonderful! You did an awesome job!

  • ctlane
    13 years ago
    last modified: 9 years ago

    Just wanted to say WOW. Another vote for leaving the hearth as is. Great transformation.

  • nicole__
    13 years ago
    last modified: 9 years ago

    Yes to painting the hearth! It looks FANTASTIC! Good job!

  • WendyB 5A/MA
    Original Author
    13 years ago
    last modified: 9 years ago

    One consideration for NOT painting the hearth is possible nicks and dings from putting stuff on it over time. Touching up anything faux is typically very tricky. Maybe it wouldn't be so terrible in this case with each brick unique or semi-unique, but touchups are a consideration.

    Interestingly, no one has voted for painting it a solid neutral color. That would minimize the touch-up issue.

    So it seems to be an all or nothing choice. and about a 50/50 "public" split on paint or not-paint. Yikes....

    I guess I'll live with it for a bit and see if it blends in over time or annoys me to heck.

  • adh673
    13 years ago
    last modified: 9 years ago

    Its a great transformation. I would match the hearth though or at least paint a solid coordinating color. Right now the hearth is the boldest color so it is drawing my eye.

  • Boopadaboo
    13 years ago
    last modified: 9 years ago

    Fabulous and I love the step by step pictures.

    I would paint the hearth. Any plans to change the flooring in the room?

    If you don't like the idea of the paint could you remove the brick and put down a tile that is close in color to the carpet, or maybe tile over the brick, that might not be as expensive if you need to hire someone to do it? I think black would nice for the paint or the tiles if you didn't want to match the carpet and might be making changes to the flooring in the future.

    A piece of soapstone or a granite remnant cut to fit over the brick might look nice too, although I have no idea how expensive that would be. :)

    Thanks for sharing!

  • kwb1999
    13 years ago
    last modified: 9 years ago

    Hi!

    Just wanted to add my vote for painting the hearth and tell you that I think the fireplace looks beautiful! Well done! I am about to re-do my fireplace as well, and I was thinking of a white mantel with a creamy tile facing, similar in color to yours, as well as painting my brass insert black. Your pictures have made me positive that that's what I want to do! Thank you!

    Oh, and any tips for painting the insert? What kind of paint did you use?

    Thanks again for the ideas!

    kate

  • spiceislands
    13 years ago
    last modified: 9 years ago

    Wow, wow, wow! What a beautiful transformation. No question, IMHO, that the hearth needs to be fauxed or painted a slightly deeper color.

    Really great job...congratulations and thanks for sharing!

  • pamghatten
    13 years ago
    last modified: 9 years ago

    Great job, looks totally updated!

    I would also paint the hearth ... possibly just the base color so the tones are similar at least.

  • mitchdesj
    13 years ago
    last modified: 9 years ago

    what a great job, so much fun to see this before and after; I would wait till everything is in place to paint the hearth, right now I would say don't ;
    show us when the room is finished, is there going to be a something on each side ?

  • WendyB 5A/MA
    Original Author
    13 years ago
    last modified: 9 years ago

    you all are so encouraging! Thanks so much. I appreciate it. I think I have decided to go ahead and paint the hearth to match. I can always paint it more solid if it looks too busy. I should do it now while I still have all the leftover 5 custom created colors in covered plastic cups.

    The floor will eventually be hardwood, but for now the carpet stays, unfortunately.

    The rest of the furniture in the room is too embarrassing to show now. Its "in transition". It still is in the 80's. Try to visualize 2 caramel colored leather chairs. That's my future vision!

    tiling just the hearth would still be complicated. It needs backerboard. The people who came out to quote on the job said the brick is good for an underlayment , but the two end pieces to get the width right would get a little tricker to keep it all perfectly level and strong. do-able, but not by me. Although, if I only cover the brick that is there and leave the width exactly the same and if the width is an even multiple of inches so I don't need to cut tile, perhaps I could do it myself....Or get a slab cut to a template I provide... hmmmm... something to think about. I would have to find out about how the edge works with the carpet edge.

    I didn't use any special paint for the brass insert. I primed it with my favorite primer mentioned above. Then I had some BM Aura (I'm a big Aura fan) Black eggshell leftover from another project. I don't use the FP for burning wood myself, so I don't know if heat resistant paint would have been better. Probably. They have such paint for outdoor grilles.

    Kate, I posted a bunch of pictures of some tiles I was considering and that I even photo-shopped onto the fireplace photo to help visualize. If you want to take a peek, they are here starting at Picture #11: My Fireplace Update album

  • gmp3
    13 years ago
    last modified: 9 years ago

    Wow beautiful!!!!!!

  • boxerpups
    13 years ago
    last modified: 9 years ago

    I love it. You are amazing. I wish I had that talent
    and creativity.

    Now I need your help. How did you paint the old brass
    to black? What kind of paint? How did you update that
    so nicely. I need to do this too.

    Thanks,
    Boxerpups

  • jane__ny
    13 years ago
    last modified: 9 years ago

    When we were putting our house on the market we painted our fireplace (painted the entire house). The fireplace had dark wood paneling above it. We did not paint the brick, but tried to cleaned it. The mantel was the same ugly wood and we painted that. Changed the whole look of the room!

    Living room before painting


    After painting:


    Jane

  • loribee
    13 years ago
    last modified: 9 years ago

    Fabulous transformation...
    I vote yes, paint the hearth bricks~~

  • WendyB 5A/MA
    Original Author
    13 years ago
    last modified: 9 years ago

    Boxerpups: see the post before yours re brass painting

    Jane: Great job! Isn't it amazing how the wood accent was such a feature back in the day and such a distraction now?!?! Your picture is not close-up enough to see if your painted panelling shows lines of the grooves. Mine does, but it doesn't bother me at all because the improvement was so huge. My wood wall wasn't actually panelling which is typically more stable. Mine was wood planks that were not even and had a slight warping in them.

    I started painting the hearth bricks last night. Got the priming and a base coat done. Hope to get to the decorative fun part today.

  • boxerpups
    13 years ago
    last modified: 9 years ago

    Silly me .

    thanks so much.
    ~boxerpups

  • nhb22
    13 years ago
    last modified: 9 years ago

    Oh my goodness. All these transformations are wonderful!

  • teresatree
    13 years ago
    last modified: 9 years ago

    Great job! May I ask the paint color of your wall?
    Thanks!

  • WendyB 5A/MA
    Original Author
    13 years ago
    last modified: 9 years ago

    Benjamin Moore Honeymoon. (Aura - eggshell finish)

  • WendyB 5A/MA
    Original Author
    13 years ago
    last modified: 9 years ago

    Okay, all done! I have no idea why I hesitated on doing the hearth. I think it looks fine. It's off a speck in tone. It was a little challenging getting it to match the top part. Should have done it all once in the same session. The bricks were different texture so it went on differently and looks a bit different, but it blends fine in the room. I'm very pleased with the whole thing. Now onto the bathroom...

    I uploaded some rather sad whole-room pics on the website too. They are at the end of the album.

    Here is a link that might be useful: Fireplace Update Album

  • sonaliagrawal
    13 years ago
    last modified: 9 years ago

    Love the transformation! I am clipping your post. I have a brick small covered area before the entrance to my house. My house is 50 yrs old, so the bricks look really aged. I am so curious to experiment with it the way you have done... clean it, prime?, paint an exterior base coat, paint grout lines, and then faux with various exterior colors in similar tones like what you used.

  • homersmom
    13 years ago
    last modified: 9 years ago

    Looks fabulous!

  • paintergirl94
    13 years ago
    last modified: 9 years ago

    I've been doing decorative/faux painting for more than 20 years and just had to chime in here to say you did a great job!!
    I was also going to vote "yes" to paint the hearth...looks beautiful, too.

  • mjsee
    13 years ago
    last modified: 9 years ago

    I didn't realize that you don't burn wood in your fp. In that case...painting the hearth wouldn't impair function. I'm glad you are pleased with it! You did a wonderful job.

  • Happyladi
    13 years ago
    last modified: 9 years ago

    Is it a wood burning fireplace but you just don't use it? I think it looks great and I can't tell the hearth is different then the other brick.

  • teacats
    13 years ago
    last modified: 9 years ago

    Lovely!!! A great job all around!

    Well done (again! LOL!!)

    Jan at Rosemary Cottage

  • sonaliagrawal
    13 years ago
    last modified: 9 years ago

    Saw this blog post on something similar (faux painting brick), and thought I would add it to this thread. Hope it is useful!

    Here is a link that might be useful: Pretty Handy Girl's blog post about faux painting brick

  • WendyB 5A/MA
    Original Author
    13 years ago
    last modified: 9 years ago

    THanks for posting that. I would be curious to see those bricks in person to see if they really look real. Its so ironic that I wanted to get away from the "real" thing.

    However, since I have done mine, I decided I want to darken them up a bit. I think the light look is too formal. I also put a "matte" sealer on mine for protection, but it left a sheen that I do not like. So I will be tweaking mine again. Will post a final final update.