Shop Products
Houzz Logo Print
equest17_gw

Before and After - Avocado Bathroom Update

equest17
14 years ago

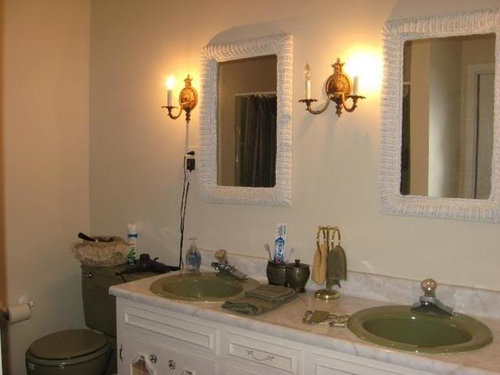
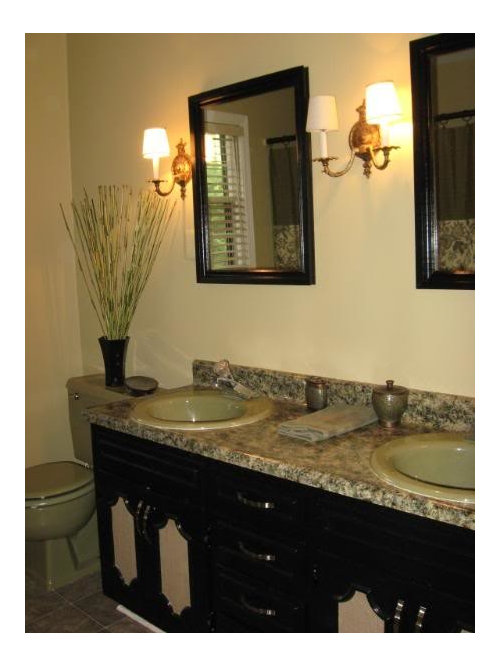
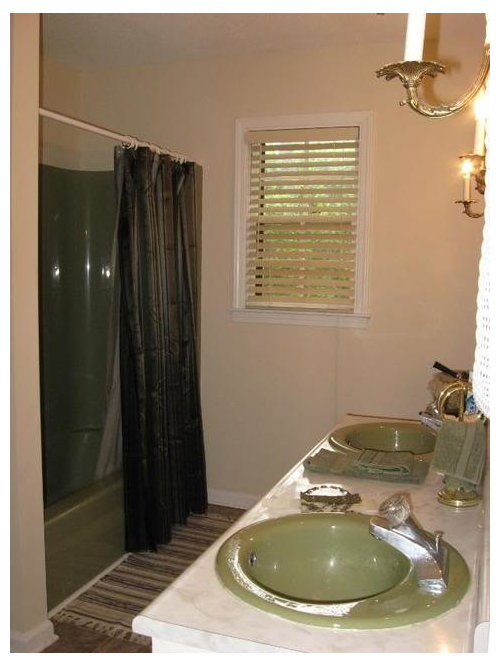
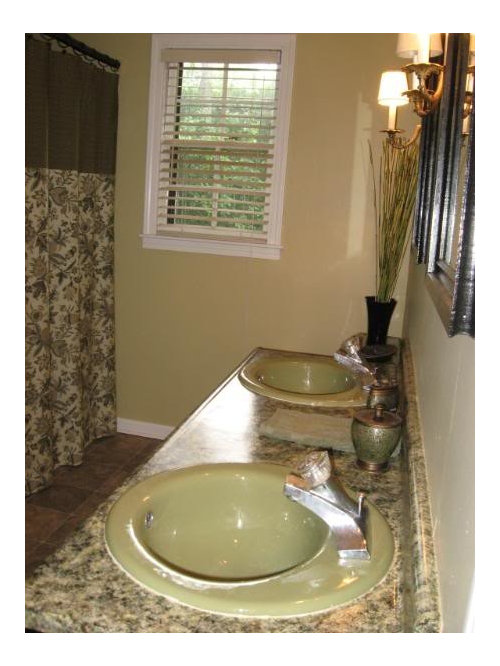
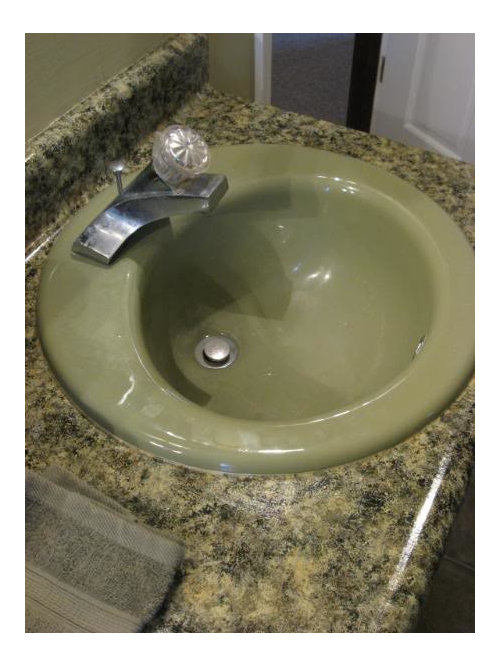
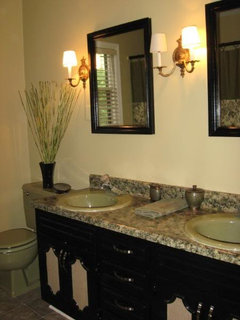
Some of you may remember my post regarding the guest bath in our 70s home. I like earthy, warm tones and the bath fixtures all function fine, so I wanted to work with the avocado colors and update on a budget. Well, I finished most of the work a few months ago, but since weÂre using the bath, I had to wait until my husband went out of town to complete the counter tops. I finally did, and hereÂs what I have so far. We havenÂt decided what to do about the floor yet, so I left the quarter round on the vanity white, but that will change eventually. I donÂt have many accessories and I havenÂt finished the matching window valance, but I was eager to take photos while everything was clean and tidy.

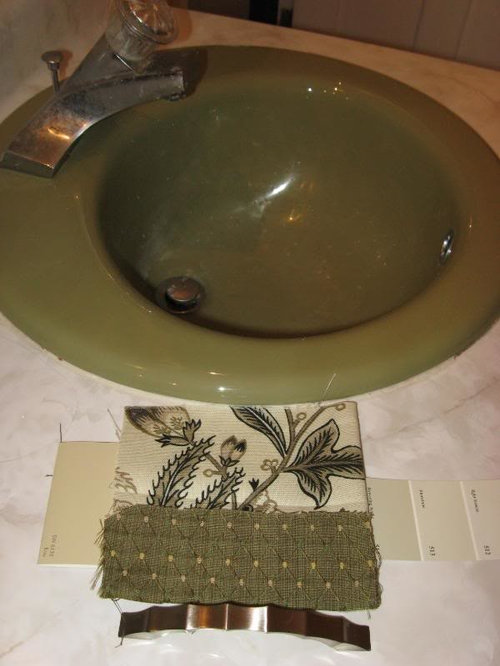
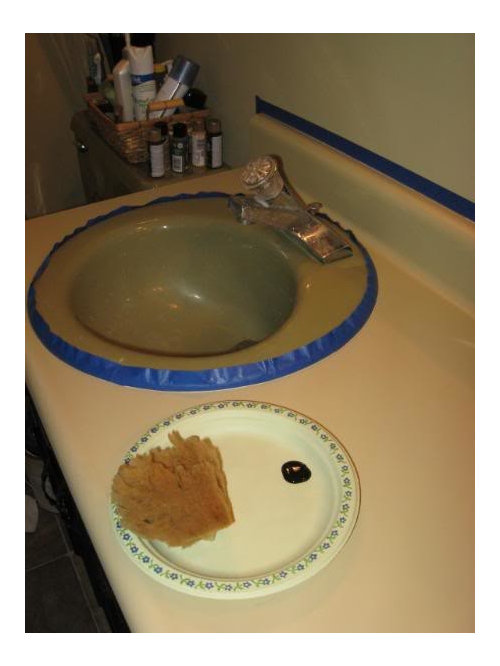
The walls are SW Ecru; the photos don't show it well, but it made a huge difference and I really love this shade. I primed and base coated the laminate counter with SW Harmonic Tan and sponged on various acrylic paints for a faux granite look. The fabric is Waverly Indienne on the bottom and just something I found to match at Hobby Lobby for the top. The curtain rod is a bamboo pole I cut to fit, and I have another matching one for the future window valance. I've since added trim to the shower curtain and may use the same trim on the paper shades I bought at the thrift store for $1 each. I'm still considering different sconces, but these look nice for now (one needs to be rewired, hence the unlit bulb). All in all, I've only spent about $75 since I repurposed several things, like the mirrors from another bath, leftover grasscloth wallpaper and paint, etc. The faucets will be changed out for brushed nickel, which will be the biggest expense.

Before

After

Before

After

Before

During

After

Comments (99)

  • nutsaboutplants
    14 years ago
    last modified: 9 years ago

    Another lurker who simply had to step out to say you did an incredible job.

  • justgotabme
    14 years ago
    last modified: 9 years ago

    I was going to add for a smoother look you need to sand between coats, but moonshadow beat me to it. It still looks amazing. I'm sure in real life it's not as noticable.

  • dilly_dally
    14 years ago
    last modified: 9 years ago

    equest17, it's too bad about the bedroom needing to be Blue, because you are right about the Blue/Yellow combo being unappealing. The photo of the Yellow sink looks more to be closer to Buttercup than Harvest Gold. That would make decorating around it rather difficult. I could see deep Navy walls and accesorries, with a browned out Harvest Gold fixtures set against a faux painted granite in Gold/Brown that could work. Not with that nursery pastel Yellow though. That pale Yellow was very popular back then also.

    Remember to try to donate the vintage fixtures that you are not going to keep, to ReStore or put it on CL or Freecycle. Someone will enjoy it.

  • speckledcat
    14 years ago
    last modified: 9 years ago

    I'm another lurker who had to come out of hiding to say WOW!

  • parma42
    14 years ago
    last modified: 9 years ago

    Very high praise to get all these lurkers to show their faces.

    To those who did, there's a post on the conversation side, that's just for you. :)

  • oceanna
    14 years ago
    last modified: 9 years ago

    Bravo! You are a very clever gal and you did a lovely job. I absolutely love the price tag on your amazing transformation.

    I'm wondering if you can get rid of the brush strokes on your counter by a light sanding and another coat of poly? Maybe ask at the paint store.

    The Spophisticated Finishes can be found at Michaels. I used "Blackened Bronze Metallic Surfacer" on my kitchen cabinet hardware, then sealed it with a few coats of water-based poly. It went from bright brass and white plastic (!) to looking like oil rubbed bronze. It was a very inexpensive fix!

  • justgotabme
    14 years ago
    last modified: 9 years ago

    equest, can you start another thread about your master bath and bedroom colors? I love decorating in blues (and yellows) and would love to see them.

  • abundantblessings
    14 years ago
    last modified: 9 years ago

    Absolutely superb transformation!

    I like your sconces. You might consider combo brushed nickel and brass faucets if you're worried about the two metals, but I don't think everything has to match anyway. Hard to tell from your pix, but the floor seems subtle enough not to require immediate attention, especially if you decide to glaze the inserts and paint the quarter round. Kudos!!!

    Love the idea about switching the MB toilet with the powder rm's.

  • Emily Peltz
    14 years ago
    last modified: 9 years ago

    VERY cool!!

    You should save all these details and notes somewhere - I've wished I could remember how I got a particular 'look' in the past...and this one is worth replicating!!

  • susanlynn2012
    14 years ago
    last modified: 9 years ago

    Equest17, that is the most amazing sponge painting I ever saw that made the counters look like real granite! I wish you lived near me to do that to my almond laminate counters in my kitchen. Thanks for sharing. I saved this post.

  • equest17
    Original Author
    14 years ago
    last modified: 9 years ago

    I'm really humbled by all your generous praise; thank you so much for taking the time to comment! My husband is always encouraging and complimentary of my projects, but since they take so long to complete sometimes, neither of us gets the full effect immediately of the makeover. It's like getting to see the room with new eyes when I post and hear your perspectives!

    Moonshadow, thank you for the tip on poly. I've used it a few times before and could never get rid of all the brush strokes, so it must be my technique. I'll have to try the pantyhose. Do you know if your husband uses water based or oil based poly? I'm wondering if oil based would be more self-leveling, as it is in paint. Since my counter is dark, I shouldn't have to worry about any slight yellowing, I think. I did try to sand lightly after the first coat of poly, but I was in a hurry. I'll try again with the right grit and use a better brush.

    ejmoore, I have to admit I actually didn't research my process very much. I had read in the past that you could paint laminate, and I know there are some special (but expensive) products out there for refinishing them. But since we had talked about replacing this counter in the future anyway, I knew I had nothing to lose by trying. When I found the bonding primer at SW, it sparked the idea again. I've picked up brochures about sponge painting at the paint store before, so I knew to use a sea sponge for the faux finish. That's about it. I already had the Harmonic Tan paint on hand and liked that it was just a shade different from the wall color, so I went with what I had and used my fabric and paint chip to select coordinating acrylics.

    I am not "artistic" at all (that's an understatement; my five year old niece once said what a bad artist I am ;-). I'm just handy and frugal, so I think this is definitely something anyone can do!

    Dilly, I love your ideas about working in harvest gold with some browns and navy. You've got my rethinking my MBA! The yellow fixtures upstairs are brighter than the sink was in the powder room; you may be right about not being "harvest gold" exactly, though. I wasn't born in the 70's, so that's the name I tend to stick on any of those yellowish sinks and toilets. Since justgotabme asked for a new thread and you have some great colors ideas, I'll start a new post with photos of the MBA/MBR. Maybe we can find a way to repurpose the yellow in there, too!

  • moonshadow
    14 years ago
    last modified: 9 years ago

    equest, DH and I both lean toward oil-based poly. I have had occasions where I used water based (when I didn't want ambering up to occur), but he's 100% oil-based. He said to tell you he just scrunches up the pantyhose legs and does a couple light strokes back and forth if necessary. Any more than that and bubbles will appear. He prefers to work in very thin coats, scuff sanding with 220 grit in between so the next coat has something to grab. The final coat obviously no sanding. He does 2 to 3 very light coats in all.

    I tend to agree with you that oil-based poly might be more self-leveling than water. And if it did amber, it certainly wouldn't fight your work, it might just add some extra richness and depth to it? Could be very cool looking. Tho it's hard to top what you've done there already, that's for sure!

    BTW, DH said of your counter, when I told him it wasn't granite "Wow, that's cool." A high compliment from my DH, a man of very few words. Most things just get a "hmmmph". ;D

  • cooperbailey
    14 years ago
    last modified: 9 years ago

    Amazing.Simply amazing. Showed my DH and he was all over it, asking questions and having me scroll back and forth! I usually don't show him photos on HD. I also love the sconces and was drooling over them.

  • haley_comet
    14 years ago
    last modified: 9 years ago

    I am completely impressed. Bravo. Most of all I love that you used what you had and made it total beautiful without just simply throwing it in the landfill and getting something new.

  • riverrat1
    14 years ago
    last modified: 9 years ago

    I had to go looking, on page 3, for this unbelievable transformation. I wanted to show my DH what a wonderful job you had done and he was like "We could do that". Um, yeah, maybe, I thought.

    I have a large expanse of black laminate in a second kitchen that I'm going to try this on. I'm just completly blown away by how wonderful yours looks. Not to mention that you saved your landfill!

    Great job and thanks for sharing with the detailed instructions!

  • rob333 (zone 7b)
    14 years ago
    last modified: 9 years ago

    Awesome. I am at a loss for words. I love it. As a matter of fact, I would consider this updated and quit. It's amazing.

  • moonshadow
    14 years ago
    last modified: 9 years ago

    Shoot, I wanted to add this post to My Clippings and it won't let me. Few I Clip but this one's a keeper!

  • wbgroovy
    14 years ago
    last modified: 9 years ago

    I must say I am impressed. And I agree with many other posters here, keep your sconces; they do give a rich look. We also live in a 70s house, and our master bath was all avocado before our remodel. It is now standard white. I wonder if I wouldn't have been more satisfied with color scheme like yours??

  • equest17
    Original Author
    14 years ago
    last modified: 9 years ago

    Riverrat, please post a photo of your kitchen counters once you're done! I'd love to see what it looks like in someone else's space.

    I have another laminate counter in the dressing area/walk in closet of the guest room attached to this bath, so I'm going to do the same technique on that counter after I paint the built-ins black. I hope it wasn't just beginner's luck in the bathroom! This redo will be free, though, since I already have all the supplies. Doesn't get any better than that!

    wbgroovy, it's funny you should say that. If we ever need to remodel another house on a budget, I think I might seriously consider getting some lovely avocado toilets and sinks from the Habi store just so I could have this scheme again. Not only would it be eco-friendly and cheap, I like the one-of-a-kind look it gives. But those old toilets are big water guzzlers, so that might cancel out the "green-ness" of it ;-)

  • gin2402
    14 years ago
    last modified: 9 years ago

    Impressive.. and for only $75? You sure got your money's worth! Great job girlie!

  • bettymnz4
    14 years ago
    last modified: 9 years ago

    Add me to your lost of awed admirers!!!

    The "granite" paint job looks like to real thing.

    You go girl!!

  • 2ajsmama
    14 years ago
    last modified: 9 years ago

    Great job on the "granite" - was this your 1st time sponge painting??? Since you said you had some brochures...

    Keep the white toilet in the small BA - it's right next to the white sink. Unless you swap out the sink at the same time with the MBA sink. But maybe you could use the antique brass sconce(s) in that BA? I hate to see you paint them.

  • moonshadow
    14 years ago
    last modified: 9 years ago

    But those old toilets are big water guzzlers, so that might cancel out the "green-ness" of it ;-)

    OK, don't take this as gospel, but I have heard from a relative that if you put a brick in the toilet tank of one of the older model water guzzlers it makes them more efficient. Shortly after that we were painting a rental bath and removed tank lid. There inside was a brick placed there by prior tenant. So there might be something to it?

  • equest17
    Original Author
    14 years ago
    last modified: 9 years ago

    Moonshadow, that makes a lot of sense. It only stops filling the tank when the water gets to a certain level, so putting something in there to take up space should cut down on the volume of water required. I wonder if it would still flush well, since the new reduced-water toilets seem to have a more powerful flush?

  • eldemila
    14 years ago
    last modified: 9 years ago

    AMAZING results! I'm so jealous, I have no vision at all, much less artistic abilities. I love the bathrooms! What's the next project???

  • Robin Henson
    14 years ago
    last modified: 9 years ago

    Another long time listener/first time caller here. Bravo on your great work! We have avocodo sinks, tub and commode at our weekend camp and wouldn't trade them for the world. Broke our hearts to have to replace the original green frig but still have the original stove. Additionally, I used to clean the home for a woman that had chocolate brown fixtures. After a good clean and dry to sink and commode, spray on furniture polish or for a longer lasting shine apply some Johnson's Paste Wax and buff the living daylights out of it. They will look brand spanking new and repel toothpaste splatters and the such while litterly wiping clean. Be proud of yourself!

  • sholland
    14 years ago
    last modified: 9 years ago

    Wow - so impressive. I want avocado green now too!

  • cth-1027
    14 years ago
    last modified: 9 years ago

    Another lurker to chime in that I think you did a fantastic job! A great inspiration for little money. You must be very proud of your creative achievement. Thanks for sharing.

  • NCSandyfeet
    14 years ago
    last modified: 9 years ago

    FANTASTIC!!!!

  • loribee
    14 years ago
    last modified: 9 years ago

    Truly amazing...good for you! :)

  • equest17
    Original Author
    14 years ago
    last modified: 9 years ago

    Thanks so much for the continued compliments. We are still enjoying the new look!

    Arjay, I really appreciate the cleaning tips. I haven't done anything other than just regular wiping. Do you mean furniture polish like Pledge or some similar product? I have never heard of that, but I can see how the film would repel water. I may try to wax, because my sink in particular is bad about toothpaste rings!

  • lisa_mocha
    14 years ago
    last modified: 9 years ago

    Wow, wow, wow!!!! What a transformation!

    You've done an amazing job...it's beautiful!
    I still can't get over the countertop either!

  • straitlover
    14 years ago
    last modified: 9 years ago

    About the brick in the toilet: I've read that it's not good for your plumbing. The brick starts to crumble and dissolve and can mess of the works. A better suggestion is some kind of plastic bottle (milk jug, soft drink bottle, etc). Fill the bottle w/ water, seal the top and put it in the tank.

    About the makeover: WOW! Love it! Maybe I'll get the nerve to do something like that to my white laminate countertop in the MBA if I don;t replace the whole vanity. I'll have to practice first. :) Or I have a talented decorator acquaintance who might could do it for me.

  • Robin Henson
    14 years ago
    last modified: 9 years ago

    equest17, Yes, Pledge will work just fine. A car/paste wax gives a harder longer lasting effect. Both work wonderfully on vanity tops (unpainted), too. Ramps up the color and sheen while repelling dust. Water beads right up.

    While you're at it, use the Pledge on the bathroom mirror glass. You won't have to use glass cleaner anymore. Just a quick swipe with a micro fiber or slightly damp cloth. Every mirror in our home is waxed. What a timesaver for me.

  • nicole__
    14 years ago
    last modified: 9 years ago

    I agree with trailrunner...just change the finish on the scones when you get the new faucets...ORB would be beautiful & fashionable! Trendy!

  • kjmama
    14 years ago
    last modified: 9 years ago

    amazing! Great creativity!

  • kjmama
    13 years ago
    last modified: 9 years ago

    Equest - How is your countertop holding up?... I'm thinking of doing a table.

  • rjinga
    12 years ago
    last modified: 9 years ago

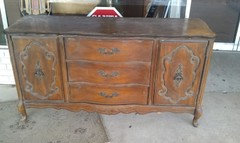
    Becky and I were just talking about this posting and after a long search, I found it. I am considering using this technique on a wooden French Provincial buffet (the top) that I am getting ready to redo,

    I tell you that I have referred to this make over so many times and continue to be inspired by it , so I thought I'd pop this up front so you all can also be INSPIRED and in awe too.

    I'd also love to know how the countertops are holding up and if you've had to do any touch ups etc.

  • rjinga
    12 years ago
    last modified: 9 years ago

    This is a test, Is this actually getting bumped up when you add a new response? And how long does it stay at the front page(s).

  • Olychick
    12 years ago
    last modified: 9 years ago

    I'm trying to bump this up for Rjinga...

  • Olychick
    12 years ago
    last modified: 9 years ago

    trying one more thing to bump this.

  • terezosa / terriks
    12 years ago
    last modified: 9 years ago

    Maybe it's not moving up because the original post if almost 18 months old??

  • lynxe
    12 years ago
    last modified: 9 years ago

    Testing....

  • equest17
    Original Author
    12 years ago
    last modified: 9 years ago

    Rjinga, I hope you see this, since it's not moving to the top. I was out of town for the holiday, but I found your posts in my email. Thanks so much for your lovely compliments!

    The painted top held up well. We sold the house a few months ago, and all the potential buyers thought it was granite! Even many Realtors (who have likely seen plenty of the real thing). I never did redo the poly to smooth out the brush strokes, and never even had to touch it up. My husband and I aren't hard on things, but I did have water, perfume, hairspray, curling irons, etc. on and around the counter with no problems. It wiped clean with a spritz of 409 and a soft cloth. If I ever do it again, I will try the oil poly with a pantyhose applicator, but I definitely recommend this easy technique if you want a faux granite top.

  • rjinga
    12 years ago
    last modified: 9 years ago

    I wonder how the adhesive primer that you used (SW) would compare to other primers. I'm not at all familar with this SW primer, so can you tell me was there anything special about it that maybe say Zinsser Bullseye 123 couldn't do?

  • equest17
    Original Author
    12 years ago
    last modified: 9 years ago

    I'm not sure how it compares, but I can say the SW adhesion primer is fabulous. It is specifically made to stick to difficult surfaces like metal and plastics. Our professional painters just finished the exterior of our latest house and the crew and I were comparing notes on how great it is. They've used it on metal conduit and other things and said it was much better than XIM primer or anything else they have tried.

    The SW primer isn't much more than their regular primer, I don't think. I bought a quart and it was far more than I needed. If you're just painting a wood top, you should be fine with another basic primer, but since mine had to stick to laminate, I went with the adhesion primer.

  • B H
    12 years ago
    last modified: 9 years ago

    OMG! THIS

    is a jaw-dropper!!!! What a transformation! My parents have those same exact sinks not to mention Harvest gold in their kitchen as well as their bathroom. You made that avocado green look fresh & hip!

    Thanks for including your step-by-step...I may have to experiment! Such an inspiration!

  • houseful
    12 years ago
    last modified: 9 years ago

    Wowza!! Fabulous job! Colored sinks and toilets are in now too!

  • meem1020
    8 years ago

    This is just beautiful. We are going to give it a try in our guest bath. I know you used the tan as the base and it looks like you used black ? as some of the sponge colors, or is it a dark brown and green? Hard to tell. Could you tell me what colors you used?

  • olychick
    8 years ago

    If you scroll up to equest17's post July 31, 2009 at 6:58PM the colors used are described.