Shop Products
Houzz Logo Print
moonkat99

Wallpapered Beadboard Ceiling - The process (lots of pics)

moonkat99
15 years ago

Before (it really looked much worse than this pic shows!):

After lots & lots of patching & sanding:

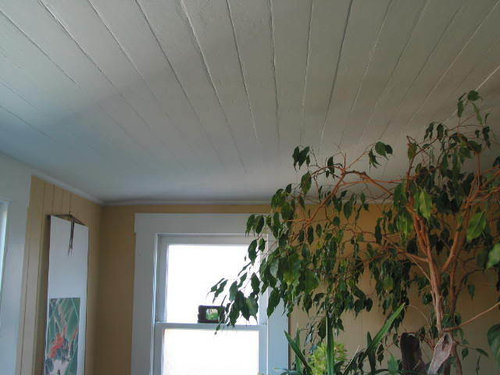
The Results (Still needs to be painted):

I got TONS of helpful hints from folks here - thanks so much for all the hints - nanny2a, equest17, oceanna, neverending, blubird :) - not to mention special thanks to farmhousebound for the inspiration in the first place. The wallpaper came from Graham & Browne - I ordered directly from them, but oceanna found it through Amazon as well.

Here is what I learned:

PREP - This WP covers imperfections fairly well, but bumps will show, as will deeper indents. If you have an uneven surface, measure where your seams will be, & try to have those areas nice & smooth. I primed the area - don't know how nedessary this is, but I felt it was important, even though the instructions only say to prime cinder block; doesn't mention priming anything else.

TOOLS: WP tray, scissors, fresh, sharp Xacto knives, long handled flat broom, WP brushes for smoothing on (I had a stiff one and a soft one - used both, but the softer one was kinder to the WP surface, which doesn't like rough treatment), ladders, drop cloths, plastic for the wetting & booking area, sponges & rags for wiping up excess goo, straight edge to help trim the edges, helpful friends & munchies to feed them ;-) This particular WP didn't need a seam roller.

THE PROCESS: I cut the first edge at one of the "beads", so that it looked like it was starting with a full board. Amazing enough, it actually ended up at a bead as well - & the full length of my ceiling only differed by 1/2" - a truly amazing detail in this house where nothing is square!

Cut the length you need, with a little bit of extra. roll it loosely & let it sit in the water tray for 30 seconds, then pull it out slowly & LET THE EXCESS WATER DRAIN as you pull it. We found that it was much easier to work with when it wasn't quite so loaded with water & goo to wipe up. I had a long sheet of plastic on the floor, & we laid it down to book it, with the glue sides folded over & touching, Don't worry if you get a little glue on the other side - you'll just wipe

it off during installation.

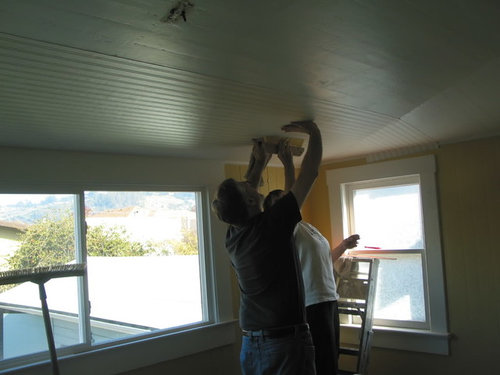
There were 3 of us, & we set up the ladders (& 'scaffolding' in the stairwell) so that we were each positioned to hold up the paper w/o it dropping too far. About 5' apart. We got the WP positioned roughly in place at one end, spent a few minutes getting it semi-stuck in place, the middle person held up the slack with a push broom, moving back & forth a bit while the other 2 adjusted it, & then the middle person leapfrogged to the far end & we could maneuver it more exactly into place.

This paper has a lot of wiggle room to adjust it back & forth - I think you have 15-20 minutes to play with it - we didn't need to spend nearly that long.

Then it was a matter of smoothing with the WP brushes, moving the excess goo to the ends & the edges, & mopping up the goo with sponges & rags.

We found that trimming the excess to 1/2" or so while it was drying was good, & then I went back & did the detail trim when it was a little drier. It does rip & tear pretty easily if you pull on it - use a SHARP cutter to do the final trimming. It's especially thin at the bead area.

When lining up the next piece, make sure the paper is facing in the right direction - it's obvious if you have it lined up wrong - but when you're dealing with 15' long pieces you don't want to have to walk around with it any more than necessary!

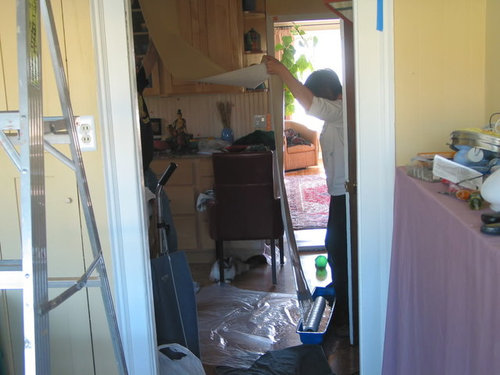
Pulling the roll out of the water tray, & letting the excess water drain a bit:

First piece going up!:

Second strip - note the pushbroom, & the brush to smooth out the WP & push the goo to the edge:

Last Piece! Short & narrow - note that we still were trying to hold it as flat as possible. Not a lot of pics of the antics we went through doing this while installing the longer, wider pieces, because we were all busy! 3 people was enough, but 4 would have been a bit easier. Oh! We ended up putting some wide boards on top of the ladders when we were first getting the WP ready to put up, because the edges at the top of the ladders created some creases - with a 4th person we wouldn't have needed to rest the WP anywhere. You can see a little bump in the ceiling in the center - there were 2 light fixutre holes in the ceiling - we removed the hanging bits & covered the holes with tape, papered over them, then went back & trimmed after it had dried for a little while.

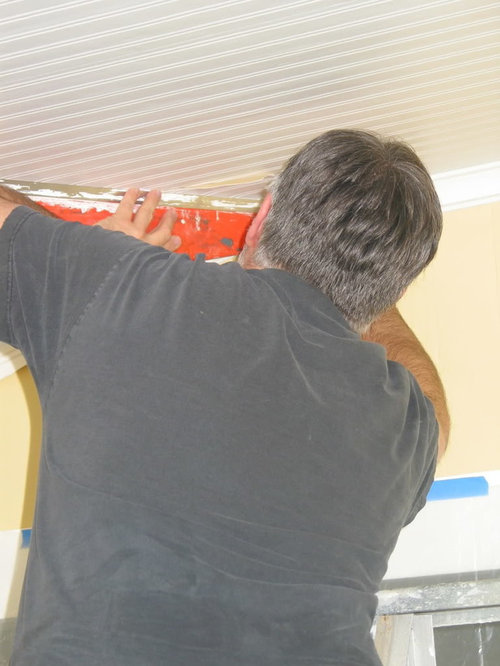
Using a straight edge to trim the edges:

The whole process took 3 of us under 4 hours. I'm a little bit sore today - more from all of the prep work than the installation, but I could not be happier with the results!

I've probably left a lot of bits of info out, so feel free to ask questions. I'll definitely be asking more of my own as I tweak the office decor.

Right now....just happily gazing at my new ceiling! :-D
Comments (37)

  • leahcate
    15 years ago
    last modified: 9 years ago

    Whoa! That looks wonderful. I am also so impressed that you took the time and made the effort to record with pics, and and text, to help the rest of us...thank you!

  • barb5
    15 years ago
    last modified: 9 years ago

    What a transformation!! The room takes on such a fresh look.
    I can't imagine trying to wallpaper a ceiling- I have done walls and that is hard enough. Great job!!!

  • rmkitchen
    15 years ago
    last modified: 9 years ago

    Thank you so much for your photo play-by-play. How did you decide which way to orient the "boards"?

    Gotta go play legos ....

  • moonkat99
    Original Author
    15 years ago
    last modified: 9 years ago

    Thanks for the comments :). Leah I've learned SO much from the helpful folks here - any way that I can return the favor makes me feel good :)

    rmkitchen there was never a question about laying the paper lengthwise, so that the lines would run the same way the old boards did. Less possibility for wavy, uneven-looking boards that way. Is that what you meant? Have fun with legos!

  • jejvtr
    15 years ago
    last modified: 9 years ago

    Moon

    Wow!!!!!!!! Still scrolling, can't believe that is not the real thing, does it even look more realistic irl?
    Overhead work, the worst! Good going, thank goodness for fortitude!

    Looks incredible
    Enjoy

  • reno_fan
    15 years ago
    last modified: 9 years ago

    Unreal! That looks amazing! I can't believe such a drastic change could be done in so little time. It looks like it would have taken *much* longer.

    Also, I so, so, so appreciate the "in progress" shots. I can totally mimic something if I see it done, but fall short if I have to read just plain directions. Your photos will surely help those who may want to try it.

    I always mean to try to take in-progress shots, but I'm usually alone, so I never end up with them.

  • creekylis
    15 years ago
    last modified: 9 years ago

    Looks spectacular! Would you say it looks like real beadboard in person?

  • brutuses
    15 years ago
    last modified: 9 years ago

    It looks fantastic.

  • equest17
    15 years ago
    last modified: 9 years ago

    Great job! Thanks for the wonderful write-up and photo documenting. It certainly brought back memories of our ceiling wallpaper project. I hope everything goes well when painting; I remember how hard it was to get paint in all the grooves!

  • cooperbailey
    15 years ago
    last modified: 9 years ago

    Amazing job! It looks just like wood! I may need to use some in a room that used to have beadboard ceiling but was too damaged to salvage. hmmm.

  • moonkat99
    Original Author
    15 years ago
    last modified: 9 years ago

    Thank you everyone :)

    This stuff absolutely looks like the real thing - it's pretty amazing. If you get right up to it you can tell that something's not quite right with the texture & the way the beads are cut, but I'm betting that most people wouldn't notice it at all. I'm not going to tell anyone from here on out; we'll see what the reaction is.

    I think it will look even more real once painted.

    equest you did the tin tile look ceiling, right? I think that, since the grooves in this all run in one direction, the paint should fill pretty easily. I'll probably do what I did on the wood walls - roll it on & then brush it out.

    Funny thing is that the ceiling looked soooo ratty & the walls looked pretty good after this last paint job. Now it's the walls that look ratty next to the ceiling lol! I definitely had a moment of thinking maybe I should do the walls too, but then sanity prevailed when I looked at all of the other projects still hanging fire :-D

    I am, however, thinking of doing...oh wait; that's another thread! ;-)

  • rmkitchen
    15 years ago
    last modified: 9 years ago

    I'm back. I tried to bribe my four year-old to play (by himself) so I could goof around online, but he got frustrated building his lego contraption so ... well, duty called.

    But now he and his little brother are in bed and I am back, astonished with these photos.

    That wallpaper looks incredible, and your prep work and teamwork absolutely paid off. I am tucking this away for happy, future use (fingers crossed!).

    And sorry I didn't pay better attention -- it makes total sense why you hung it in the direction you did! Wasn't thinking, and it wasn't the first time today. Enjoy!

  • kitchendetective
    15 years ago
    last modified: 9 years ago

    Unbelievable! That looks fantastic. (My cat finds safe spots like that when I start projects, too. LOL.)

  • totallyblessed
    15 years ago
    last modified: 9 years ago

    wow, that absolutely looks like wood beadboard. Fabulous job!! :o)

  • oceanna
    15 years ago
    last modified: 9 years ago

    I was wondering when you were going to recover sufficiently to post again - lol! It looks just marvelous, and really gives the room a tremendous facelift. Hooray for you and your dear friends!

    How did you do the "scaffolding" over the stairs? If there's any place I would want not to be working on the ceiling, it's over the stairs. My hands get sweaty just thinking about it.

    Rest up a bit before your nest project. You should just sit there and gloat for a bit. :)

  • estreya
    15 years ago
    last modified: 9 years ago

    What a hugely successful project! The results must be tickling you pink. Congratulations on a job well done.

    By the way, i'm also struck by how lovely you guys look together in the process pics. I can almost see little cartoon bubbles over your heads!

    Again, great work.

  • trailrunner
    15 years ago
    last modified: 9 years ago

    I can't imagine anyone not believing that is real wood !! It looks fantastic . What a great job you did.

  • oceanna
    15 years ago
    last modified: 9 years ago

    I was thinking about where the ceiling "bends" -- if I'm seeing it correctly on my monitor? Real beadboard wouldn't bend. So one idea might be to nail up a small trim piece of board across that bend, as you would do to hide the seam if you had a second piece of beadboard in there. Just a thought.

  • julienpete
    15 years ago
    last modified: 9 years ago

    Is this textured or smooth? Could it be painted to you think? It looks so realistic!

  • moonkat99
    Original Author
    15 years ago
    last modified: 9 years ago

    oceanna I'll definitely be putting some modling at the bend - for a number of reasons, that's necessary. I think a simple half round will do the trick, but I have to play with it a bit. This makes me glad that I opted to keep the 1/4 round at the ceiling, rather than go with new coving.

    I borrowed an extension ladder for the stairway scaffolding - it worked perfectly!:

    I have pretty good balance - years of doing things like Ropes Courses with kids as an outdoor guide, plus a Chi Gong practice, really helped with that! Especially now that I'm...ummm...older & physical strength is not on my side hehehe.

    julien this WP is meant to be painted. There is a little bit of texture on each "board", & the beades are indented - just like it would be on real wood. Once painted, I think it will look even more real; we'll see!

  • oceanna
    15 years ago
    last modified: 9 years ago

    Oh wow so that's how you did it. My balance isn't that good but I'm glad you're so nimble. Yeah, I think that moulding will be just the perfect finishing touch.

  • nanny2a
    15 years ago
    last modified: 9 years ago

    Moonkat, you did a bang up job!! That ceiling looks just sooooooo good now! Are you painting it white, and what type of paint are you using, flat, eggshell, satin or a semi-gloss?

    The reason I ask is that I'm getting ready to paint my beadboard wallpaper in the bedroom and bath, now that I got my bath done. I had to wait on another roll of paper from G&B to finish. It arrived today and I should finish up the bath tomorrow, and then I plan to paint all of it white. I read somewhere that flat paint was recommended in case there were lumps or bumps on the surface under the paper, but mine came out smooth as glass, so I don't know that this would be necessary.

    Your ceiling looks terrific and I'm so glad it turned out so well for you.
    Heidi

  • moonkat99
    Original Author
    15 years ago
    last modified: 9 years ago

    Thanks Heidi :) I'll be painting it flat white - I have a white I love that's on pretty much every ceiling in the house - it's an old Kelly Moore color called Pearl White that seems to go with everything. Since I need it for touch up on the other ceilings I may try to find something close to it for this, though.

    And yes, the flat definitely does a better job of hiding imperfections - 4 of my rooms have wood ceilings....well, I guess now it's 3, *grin* & I found that flat is definitely best.

    If I had it on smooth bath walls I would definitely go with more sheen there, though.

    I look forward to seeing your finished pics - you will show us, won't you?

  • mahatmacat1
    15 years ago
    last modified: 9 years ago

    Completely wonderful, moonkat. I'm so impressed with your walking horizontally on that ladder and working above your head. I probably would have been trying to rig some kind of board to go across the rungs so I wouldn't fall through by mistake LOL

  • moonkat99
    Original Author
    15 years ago
    last modified: 9 years ago

    hehehe....here's another shot, just for fun. I do look rather relaxed, don't I? I was probably too obsessively focused on what was going on over my head to remember to be afraid of falling!

  • phyl345
    15 years ago
    last modified: 9 years ago

    moonkat ~~ wow! ~

    i have been following your progress & i am truly impressed, to say the least ~~ you mentioned somewhere along the way that you were happy with a product you had used ~~ i think you called it MH ready patch ~ what does the MH stand for??

    congrats on a marvelous job!

  • zipdee
    15 years ago
    last modified: 9 years ago

    Wow .. Fantastic!!

  • iris16
    15 years ago
    last modified: 9 years ago

    Great job. It looks fantastic. Wish I had a place to use this idea!

  • moonkat99
    Original Author
    15 years ago
    last modified: 9 years ago

    phyl - I've no idea what MH stands for, that's just the name of the product & the can says nothing else. It's a Zinsser product; should be easy to find. I got it at Home Depot.

    HOWEVER..... I try to use all green, safe materials as much as possible, and this does not qualify. Since I had SO much patching to do, & this worked SO well, I kept using it, but I had wide open windows & wore a mask while applying & definitely while sanding. Questionable ingredients include Naphtha, barium sulphate, mineral spirits, & zinc sulphide. Practice good cleanliness & good air supply. But in all honesty, now that I've used it (& smelled it), I would only use it for jobs that required serious patching. I'll go back to something I feel a little better about for small jobs. The instructions just say to use a mask while sanding, but I didn't like working with the smell while applying it, so I started using a mask all the time with it.

  • awm03
    15 years ago
    last modified: 9 years ago

    Oh moonkat! That is just fabulous! It really, really looks great. Love the window trim, the painted paneling and the color too. What a beautiful room you've created.

    I'm so impressed with your DIY skills. Congrats & thanks for showing us how you did it.

  • gsciencechick
    15 years ago
    last modified: 9 years ago

    Wow, looks so awesome! Thanks for the great detail.

  • awm03
    15 years ago
    last modified: 9 years ago

    moonkat, what is the name of that paint color, please? And the name of that happy kitty too, if you don't mind :)

  • daisyadair
    15 years ago
    last modified: 9 years ago

    Wow, Moonkat - such a good idea and it looks perfect up. You should do a blog giving instructions for it.

    Are those the stairs you are renovating?

  • saltnpeppa
    15 years ago
    last modified: 9 years ago

    Looks great!!

    And the instructions with photos are great. Thanks so much for sharing this with us!

    Smiles:)

  • moonkat99
    Original Author
    15 years ago
    last modified: 9 years ago

    Gosh, thank you everyone - it feels really good to be able to give something back here; I've learned so much from y'all!

    awm the paint is my mix of RH Saffron & Butter, done in Aura paints. I really like it in every light - this room gets a LOT of light, but none of it is direct sun. I tried a ridiculous number of sample paints, & finally decided to have my mix custom done in Aura. Unfortunately I bought too many gallons of RH paints (I do love their colors!) before discovering Aura & Ellen Kennon)

    The kitty is Django. & yes, he is a happy kitty, except when he's hungry. He was rescued as a tiny baby, from a dumpster, hungry, & 12 years later I still haven't convinced him that he'll always have enough food.

    daisy yes - those are the infamous stairs.

    Doing projects like this does make me understand at least one good reason for blogging, but good heavens, if I started blogging I'd have to read other people's blogs, & I already know how lost you can get in them! I spend enough time on the internet as it is! I guess this IS my blog lol! Besides which, I appreciate the well-written blogs - here you can just pound out the words w/o paying too much attention to editing. Not always such a good thing, I guess ;-D

  • lissylee
    14 years ago
    last modified: 9 years ago

    moonkat99~thanks so much for the steps~it turned out fabulous! I covered my laundry room cabinets with the wallpaper~I love them now! I included the link~

    Melissa

    Here is a link that might be useful: laundry room cabinets

  • suejohnston444_yahoo_ca
    13 years ago
    last modified: 9 years ago

    I was thinking of doing the exact same thing when i found your post. and now i know i'm going to do it, and can only hope that it turns out half as good as your's looks.

    One question, would you recomment painting it, or can you just leave it as is? or maybe my real question is, should i hang the wallpaper and paint it first, or should i paint my walls first, since i'm redoing the whole room?

    thanks for providing the picture to go with my thoughts!