


Foodsaver 101 - help me please
loves2cook4six
13 years ago
Featured Answer
Comments (78)

grainlady_ks
12 years agolast modified: 9 years ago
annie1992
12 years agolast modified: 9 years agoRelated Discussions
Xeric gardening 101 help - Agave
Comments (2)Hi Mike. Southern Appalachian Mountains is home. Needing a good Agave - will protect from moisture...See Moreclematis feeding 101 - help ?
Comments (2)katie is right - there are many ways to approach this and no single correct answer. First, it is important to remember that when growing anything in the ground (containers are very different), fertilizing is never a requirement. Fertilizers are intended only to supplement soil nutrients that may be deficient or lacking. They are not really "food" - plants manufacture their own food through photosynthesis, utilizing these soil nutrients, sunlight and water. And if you've taken the time to improve your soil and add organic matter - usually through some form of a mulch - on a regular basis, you may never need to apply additional fertilizer. But not everyone has great soil and not everyone mulches regularly with a good organic mulch and so many DO resort to annual fertilization. Some clarification of terms may be in order :-) Compost is decomposed organic matter - plant or animal refuse. Most homemade compost is recycled garden trimmings and vegetative kitchen scraps. One can also purchase commercial compost, often from recycled yard waste. But there may be other, not so well-defined ingredients included as well. Manure is just that - animal manure. It is generally recommended that one stick to manures from herbivores. Manure can be fresh, aged or composted. Aged or composted manure is best and if you are growing edibles, composted manure is the safest with regard to any pathogens. And if you are making your own compost, there is no reason you can't add any appropriate manure to the mix as well, if you have it available. In my old garden, I spent many years and a lot of effort improving my soil and I mulched regularly with compost. I never used any fertilizers because there was no need - the plants got all the nutrients they needed for good, healthy growth and flowering from the soil. I also had rabbits as pets and I did use their manure for various plants that now and again looked like they could use a boost; roses primarily but sometimes lilies and clematis as well. Because of the heavy flowering capacity of these plants, they tend to have heavier nutrient demands than many other plant types. Any annuals or harvestable crops like veggies would benefit from this approach as well. If I were to use fertilizers (and my new garden may very well require some), I'd stick to organic ones as they nourish the soil. And too many different products can be confusing and can lead to over-fertilizing which is far more common and potentially far more damaging than not fertilizing at all. In your situation, I'd go with the rose fertilizer and mulch with compost, either from garden waste or well-composted manure or a combo of the two. That should be all your clematis ever needs....See MoreHomesteading in Maine 101- tips please!
Comments (4)Take it slow. Get one thing going at a time, and then move on to others. Obviously, in your situation, you want to get some things up and running that pay off, food producers. Get the greenhouse up so you maximize your seasons. Or, if that can't be done immediately, look into tunnels that will extend the season and can be made from PVC and plastic. Complete self-sufficiency is very hard, and few can achieve it. For one thing, you tend to trade dependence on WalMart for dependence on the hardware store. And there's a vast difference between self-sufficiently producing all you need yourself and becoming independent in the sense of not worrying about being laid off on account of a poor sales year. Many others have done that, and the growing desire to eat locally grown food makes it not a bad time. And others have done it without having much seed money. Consider Chino's in California. http://ahharsfnews.com/2010/06/22/food-in-the-shinto-spirit-chino-nojo-the-chino-familys-farm Japanese couple began before WWII. Were interned and their property stolen while they were being held. Got out and began sharecropping and eventually bought land. (Having a bunch of kids helped, even if some of them didn't farm.) You can read many stories of the Chino family on the 'Net, but remember that this isn't some corporate megafarm It's 47 acres, and they're known to every food writer and all the chefs in their area. They are consummate professionals and weren't born that way. And when you achieve what they did, you can charge two and three times grocery store prices and nationally famous selling out of a 30-foot shed. It doesn't happen overnight, but once you see just how much a single acre of land can produce, you see the potential....See MoreNeed help: Foodsaver Vacuum Sealer
Comments (22)Use only the bags meant for use with your model. Make sure the entire length of the open end is inside the sealing channel. Be sure there is no moisture or grease near where you are sealing .. if there is, clean it off and dry the bag well. Make sure there is a wide enough margin between where the bag seals and where the meat starts. Wait the extra 20 seconds between sealings. If your meat is moist, fold up a paper towel and place it between the meat and where you are sealing the bag .. the towel will absorb any moisture before it gets to the seal. Be sure to press down on the lid for several seconds before releasing. Do not re-use any bags that feel at all greasy after cleaning. Keep the sealing channel inside the machine clean, dry, and grease-free. Be sure the bag edge is all the way inside the sealing channel its entire length. Watch the Tilia website for sales and specials on the bags for your model and stock up then. IF I were buying another vacuum food saver system, I would buy only a unit that lets me use/reuse any plastic-type bag I want to. Did you know you can do about as good a job of sealing by using a freezer style ZipLock bag (available at any Dollar Stores) and a soda straw to suck out all the air yourself? The problems with these pricey vacuum systems is you sometimes do not get a tight seal and even when you do get a tight seal with all air removed, how long will that seal last? Gail R (WNY)...See Morepkramer60
12 years agolast modified: 9 years agograinlady_ks
12 years agolast modified: 9 years agoanoriginal
12 years agolast modified: 9 years agosally2_gw
12 years agolast modified: 9 years agonancyjane_gardener
12 years agolast modified: 9 years agoannie1992
12 years agolast modified: 9 years agoBrian910
9 years agolast modified: 9 years agograinlady_ks
9 years agolast modified: 9 years agoLaChap123
9 years agolast modified: 9 years ago
dcarch7 d c f l a s h 7 @ y a h o o . c o m
9 years agolast modified: 9 years agobellsmom
9 years agolast modified: 9 years agoarley_gw
9 years agolast modified: 9 years ago
Kristin Grabinski-Lieb
8 years agolast modified: 8 years agocaymandave
8 years agodonna92526
8 years agoannie1992
8 years agokarl_tn
8 years ago
Rusty
8 years agolast modified: 8 years agolizbeth-gardener
8 years agokarl_tn
8 years agograinlady_ks
8 years agoRusty
8 years agolizbeth-gardener
8 years agolast modified: 8 years agogardnpondr
8 years agograinlady_ks
8 years agogardnpondr
8 years agodonna_b435
8 years agograinlady_ks
8 years agoci_lantro
8 years agorgreen48
8 years agolast modified: 8 years ago
Islay Corbel
8 years ago
Jo
8 years agopkramer60
8 years agodcarch7 d c f l a s h 7 @ y a h o o . c o m
8 years agoJo
8 years agograinlady_ks
8 years agoJo
8 years agolast modified: 8 years agoci_lantro
8 years agoci_lantro
8 years agograinlady_ks
8 years agococo20006638
8 years agolast modified: 8 years agoJo
8 years agograinlady_ks
8 years agoJo
8 years agococo20006638
8 years agoJo
8 years agograinlady_ks
8 years agolast modified: 8 years agodcarch7 d c f l a s h 7 @ y a h o o . c o m
8 years ago

Related Stories

MOST POPULARDecorating 101: How Much Is This Going to Cost Me?
Learn what you might spend on DIY decorating, plus where it’s good to splurge or scrimp
Full Story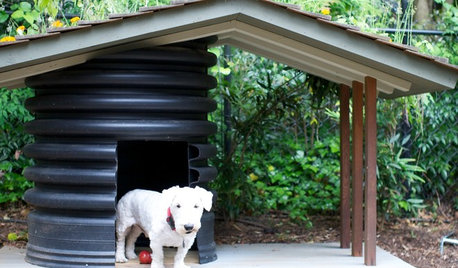
PETSHow to Help Your Dog Be a Good Neighbor
Good fences certainly help, but be sure to introduce your pup to the neighbors and check in from time to time
Full Story
UNIVERSAL DESIGNMy Houzz: Universal Design Helps an 8-Year-Old Feel at Home
An innovative sensory room, wide doors and hallways, and other thoughtful design moves make this Canadian home work for the whole family
Full Story
DECORATING GUIDESDecorating 101: Do It Yourself or Hire a Pro?
Learn the advantages and disadvantages of decorating alone and bringing in skilled help
Full Story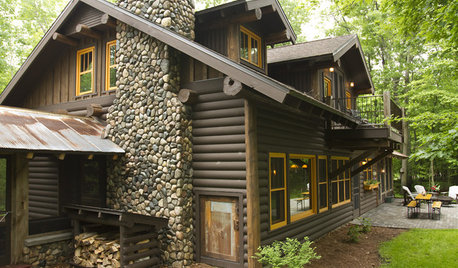
ARCHITECTUREStyle 101: The Birthplace of Today's Rustic Look
A look back to the beginning of cabin and lodge design can help you decide on a rustic look for your home today
Full Story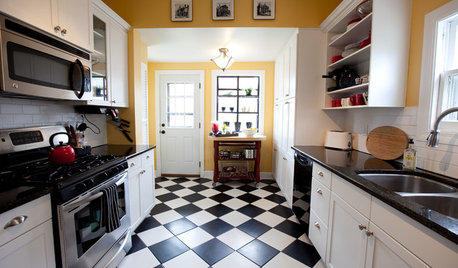
KITCHEN DESIGNKitchen Flooring 101: Find Your Material Match
From cork to concrete, our guide will help you pick the perfect surface for your kitchen floor
Full Story
DECORATING GUIDESDecorating 101: The ABCs of Arranging Vignettes
Learn how to make captivating displays with a few of your favorite things
Full Story

KITCHEN CABINETSCabinets 101: How to Choose Construction, Materials and Style
Do you want custom, semicustom or stock cabinets? Frameless or framed construction? We review the options
Full Story
LIFESlow Living 101: Tips for Turning Off the Chaos
It may feel as though you're too busy to slow down and enjoy life. But even little changes can have a big effect
Full Story

grainlady_ks