


New Sourdough 'Mother'...............
After we moved I neglected the sourdough starter I had been babying for almost two years. (They die when you don't feed them at least once in a while.)
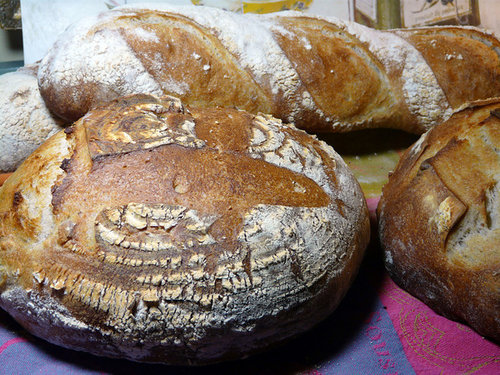
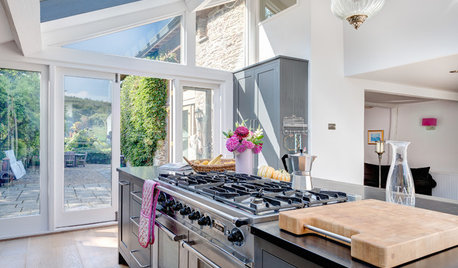
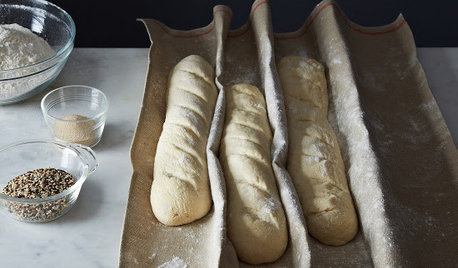
I finally got around to starting a new one last week. Again, I used the recipe from Amy's Breads. I love this starter because it is "pure" made only from rye flour and water. No additives. It was finally ready to use Wednesday. So I mixed up a Biga and a Levain using the starter and then yesterday morning kneaded up two different batches of bread. The levain went into Amy's Bread recipe for Country Sourdough Boule and the Biga into sourdough baguettes. The Dough had a slow 9 hour rise in the fridge and then late yesterday afternoon, when we got back from the movies, I put both doughs out on the counter to come to room temperature. The last loaf came out of the oven around 9:30 last night.
If anyone is thinking of growing a sourdough starter I can highly recommend the recipe from Amy's Breads. It is amazing how much better bread made with a sourdough starter is. More in depth flavour and a wonderful crust.
The starter is easy to make and requires very little attention. If you are interested , here are the directions:
Home Cookin Chapter: Recipes From Thibeault's Table
Amy's Bread Sourdough Starter
=============================
Sourdough
Amy's Bread Sourdough Starter
Amy Scherber & Toy Kim Dupree Cookbook
For artisan bakers, using a sourdough starter is the ultimate way to create a perfect loaf of bread with the most complex flavor, the best-textured crumbs, the crunchiest crust and the longest shelf life. By using a sourdough starter, you are going back to the source, using pure, wholesome ingredients to capture yeast in its wild state and then encouraging it to thrive and multiply by creating the most favorable environment for it. With regular feeding, you can eventually tame it enough to be used for leavening bread. Like all of the best things in life, this process requires patience and careful attention to detail, but the end result is definitely worth the effort.
When most Americans think of sourdough, they picture the crusty, assertively sour loaves that are produced in the bread mecca of America, San Francisco. But bread made from a sourdough starter doesn't have to be intensely sour. The level of acidity that produces the sour taste depends to a large extent on the consistency and maturity of the starter that is used. If you're one of those people who dislikes sourdough bread, don't stop reading here. We're going to show you how to make a starter that will produce a loaf as mild or as sour as you like.
These instructions are for making a quick and easy starter that begins as a rye culture and is then divided in half. One portion remains a rye culture that is refreshed with pumpernickel flour to become a "rye mother"; the other portion is transformed into a white culture, refreshed with unbleached white flour, to become a "white sourdough mother". You store the mothers in the refrigerator and feed them on a regular basis. Then, when you want to make bread you use part of one of the mothers to make a starter for the dough. Each time you remove part of the mother, it must be fed again so you'll always have enough when you need it.
Use organic flour and spring water to start, to ensure that the yeast and bacteria you are trying to cultivate haven't been damaged by pesticides and fungicides and that they won't be inhibited by the chemicals and/or fluoride in your tap water. Once you get your culture going, you can go back to non-organic flour and tap water to maintain it if you prefer.
Rye flour loves to ferment. Once you've completed Stage One, use containers that are large enough to let the batter quadruple in volume. Do not use containers with airtight lids, as the lids need to pop up easily to release pressure from the gases produced during the fermentation process. The first time we tested this recipe, one of our containers that was covered with a tight plastic lid literally exploded - that's why we call it "dynamite" sourdough starter. (We're still finding little globs of dried rye sour in unexpected places.). If necessary, cover your container with a double layer of cheesecloth, secured with a rubber band, or punch lots of little holes in the lid.
(This section is just to get you started. If you want more detailed information and some alternative methods for making sourdough starters, see page 168)
Stage One
cup (2 ounces generous) organic rye flour, at room temperature
½ cup ( 4 ounces) spring water
(equipment: one 1-pint clear plastic container with lid; instant read thermometer)
1. Put the flour and spring water in a 1-point clear plastic container and stir together vigorously until well combined. (The batter should be about the consistency of very thick pancake batter; if necessary, add more water or flour to achieve the desired consistency). Taste the batter now so you can appreciate how the taste changes as your sourdough culture develops. Check the temperature of the batter with an instant-read thermometer. Ideal temperature is 75°F to 77°F; a little cooler is okay, but a little warmer is not. If the temperature of the batter is over 80°F, you'll incubate the wrong kind of bacteria and your culture will have an unpleasant bitter taste. If the temperature is over 80°F, put the batter in the refrigerator for about 20 minutes, or until the temperature has dropped into the desired range.
2. Cover the container with a lid (At this early stage an airtight lid is okay, but don't use cheesecloth, because mold seems to grown more readily with a cheesecloth cover than it does with a plastic one. Once the batter really begins fermenting, cheesecloth is fine.) Use a marker or a piece of tape to mark the level of the batter on the outside of the container so you can tell when it has doubled in volume. Set it aside at room temperature (75°F to 77°F) to ferment for 36 to 48 hours. You should start to see tiny bubbles forming in the batter after about 24 hours. By the time it has doubled, there will be a noticeable network of small bubbles throughout the batter (you can see them through the sides of the clear plastic container), and it will be bubbling and foaming on top.
If mold forms on the top of the batter, discard it all and begin again. If the batter has not doubled within 48 hours, feed it with ¼ cup (2 ounces) spring water and ½ cup (2 generous ounces) rye flour (or more of either ingredient if necessary to achieve the consistency of thick pancake batter). Stir it vigorously, cover it, and let it sit for 24 hours, or until you see some definite activity. Proceed with Stage Two.
Stage Two
½ cup (2 ounces generous) organic rye flour, at room temperature
½ cup ( 4 ounces) spring water
Equipment: One 1-quart clear plastic container with lid
1. If there is a dry crust on top of the batter, carefully scrape it off and discard it. Stir the culture down with a wooden spoon. Notice how soupy it has become (water is one of the by-products of fermentation). The batter should have a noticeably sour smell and a mild tangy taste at this point. Add the additional flour and water to refresh it and stir vigorously until well combined. (The yeasts in the culture like the energetic stirring. It redistributes their food supply and provides them with fresh oxygen to help them multiply.
2. Transfer the refreshed culture to a 1-quart clear plastic container. The temperature should be under 80°F . It is not, refrigerate until it is 75°F to 77°F. Mark the outside of the container with a marker or tape to show the level of the culture, and cover it (not tightly) with a lid. The culture should be showing a fair amount of activity at this point. You should see lots of foaming and bubbling through the sides of the container, as well as on top if you lift the cover. Let it ferment for 12 hours to develop its acidity (sour taste). If it threatens to overflow the container, stir it down, transfer it to a larger container, and let it continue fermenting for the remainder of the 12-hour period. Don't be concerned if the culture deflates and loses volume. This means the yeast has exhausted its food supply, but it will continue to increase in acidity. Don't worry if your culture isn't dramatically active yet. As long as there is some noticeable activity going on and the mixture smells and tastes sour, you're on the right track.
Stage Three
¾ cup (6 ounces) cool spring water (75°F to 77°F)
2/3 cup (3 ounces) pumpernickel rye flour
2/3 cup (3 ounces) unbleached all-purpose flour
Equipment: Two 1 quart clear plastic containers with lids or cheesecloth and rubber bands.
1. The culture should now have a pronounced sour, fruity taste and smell; it should not taste musty or bitter (if it does, discard it and start again, paying close attention to the temperature of the culture at all times). Using a wooden spoon (the acid in the sourdough reacts with metal utensils, divide the culture between two 1-quart clear plastic containers, putting approximately 6 ounces in each one. The next step is to thicken the culture by increasing the proportion of lour to water, this time using equal weights of each ingredient. You're also going to "customize" the cultures by feeding one with pumpernickel rye flour (which has a coarser grind than regular rye flour) and the other with unbleached all purpose flour. (We prefer to maintain our rye sour with pumpernickel flour because we like the texture and flavour it gives to our breads). After repeated feedings with unbleached flour, the second culture will eventually be "all white", unless you choose to throw in an ounce of pumpernickel rye flour now and then again for extra flavour.
2. Add ¼ cup plus 2 tablespoons (3 ounces) each of the spring water and the pumpernickel flour to one of the cultures. Add the remaining ¼ cup plus 2 tablespoons (3 ounces) spring water and the unbleached flour to the other culture. Stir each one vigorously. Check the temperature, as in the preceding stages. Cover each container with a loose-fitting lid or a double layer of cheesecloth (secured with a rubber band), and mark the level of the cultures with a marker or tape. Let them ferment for another 12 hours.
3. You now have two healthy sourdough cultures, approximately 12 ounces in each container. At this point you need to refresh them again, setting up a maintenance level of 12 ounces for the rye culture and 8 ounces for the white sourdough culture. (You could maintain larger amounts but it's not necessary for the recipes in this book and they would only take up extra space in your refrigerator.) These will be the "mothers" that you use to build the sourdough starters needed in individual recipes. Each time you take part of the mother out to build a starter, you must refresh it with equal weights of flour and water to bring it back up to its maintenance level. We describe how to do this below. ( in recipes that include small amounts of a sour starter just for its flavour, you can use some of the mother instead of building a separate starter.)
Maintaining the Rye Mother
6 ounces (2/3 cup) rye culture
2/3 cups (3 ounces) pumpernickel Rye flour
¼ cup plus 2 tablespoons (3 ounces cool spring water (75°F to 77°F)
Equipment: One 1 quart clear plastic container with lid
1. Place 6 ounces (2/3 cup) of the rye culture in a clean 1-quart clear plastic container. Discard the rest of it. (Unless you plan to make larger batches of dough using the rye sourdough starter, you only need to maintain a mother with a total weight of 12 ounces- 6 ounces of mother, plus 6 ounces of fresh flour and water; any more is just surplus and takes up unnecessary space in the refrigerator). Add the flour and water and stir vigorously to combine. Cover the container and mark the level of the mother with a marker or tape. Let it sit at room temperature until it has doubled in volume. A strong mother will double in 8 hours. If yours doesn't do that , let it continue to sit out until it has a nice tangy taste and smell; discard all but 6 ounces and repeat this step again. (Flour that has been sitting on the shelf too long, or flour that has not been stored properly, does not contain as much potentially active yeast as fresher flour, so it takes a little longer for starters made with older flour to build up strength.) Repeat this procedure as many times as necessary until the mother doubles within 8 hours. It may take several days. Don't get discouraged, it's worth the effort.
2. Store the refreshed rye mother in the refrigerator. Repeat the refreshing procedure, using 6 ounces (2/3 cup) of the mother and 3 ounces each of flour (2/3 cup) and water (1/4 cup plus 2 tablespoons), at least once a week-twice a week is best - so the mother will be active when you need to use it. Be sure to refresh the mother the same way, with equal weights of flour and water, whenever you remove some of it to build a rye sour starter to use in a recipe.
Building a Rye Sour Starter
Generous ½ (5 ounces Rye Mother (Cold from the refrigerator)
2/3 cup (3 ounces) pumpernickel flour
¼ cup plus 1 tablespoon (2 ½ ounces) warm water (85°F to 90°F)
Equipment: One 1-quart clear plastic container
1. Place all the ingredients in a 1-quart clear plastic container and stir vigorously to combine. The mixture will be stiffer than the rye mother. Cover the container with a lid or plastic wrap and mark the level of the starter with a marker or tape. Let it sit at room temperature until it has doubled in volume. (If the starter hasn't doubled with 8 hours, discard all but 5 ounces (generous ½ cup) of it, and feed it again in the same manner. Sometimes it takes more than one feeding if you haven't been refreshing the rye mother often enough.)
2. When the starter has doubled, it is ready to use in a recipe. Measure out the amount needed and discard any that remains. If you're not ready to use the starter right away, you can store it for up to 24 hours in the refrigerator.
Maintaining the White Sourdough Mother
½ cup less 1 tablespoon (2 ounces) unbleached all-purpose flour
¼ cup (2 ounces) cool spring water (75°F to 77°F)
Equipment: One 1-quart clear plastic container with lid
1. Place 4 ounces (2/3 cup) of the white sourdough, culture in a clean 1-quart clear plastic container. Discard the rest of it. (Unless you plan to make large batches of dough using the white sourdough starter, you only need to maintain a mother with a total weight of 8 ounces - 4 ounces of mother plus 4 ounces of fresh flour and water; any more is just surplus and takes up unnecessary space in the refrigerator). Add the flour and water and stir vigorously to combine. Cover the container and mark the level of the mother with a marker or tape. Let it sit at room temperature until it has doubled in volume. A strong mother will double in 8 hours. If yours doesn't do that, let it continue to sit out until it has a nice tangy taste and smell; discard all but 4 ounces and repeat this step again. (Flour that has been sitting on the shelf too long, or flour that has not been stored properly, does not contain as much potentially active yeast as fresher flour, so it takes a little longer for starters made with older flour to build up strength). Repeat this procedure as many times as necessary to get the mother to double with 8 hours. It may take several days. Don't get discouraged; it is worth the effort.
2. Store the refreshed white sourdough mother in the refrigerator. Repeat the refreshing procedure using 4 ounces (2/3 cup) of the mother and 2 ounces each of lour (1/2 cup less 1 tablespoon) and water (1/4 cup) at least once a week-twice a week is best - so the mother will be active when you need to use it. Be sure to refresh the mother the same way, with equal weights of flour and water, whenever you remove some of it to build a starter to use in a recipe.
The White Sourdough Mother is used to build a Levain starter, which is used in the Country Sourdough Boule recipe on page 141.
Building a Levain Starter
¼ cup (2 ounces) White Sourdough Mother (cold from the refrigerator)
¼ cup (2 ounces) warm water (85° to 90°F)
1 cup plus 2 tablespoons (ounces) unbleached all-purpose flour
1/8 teaspoon kosher salt
Equipment: One 3-cup clear plastic container with lid
1. Combine all the ingredients in a small bowl and use your hand to stir and knead them together until a shaggy mass of dough has formed. It will be very dry and stiff.
2. Remove the mass from the bowl and knead it on a lightly floured worktable until you hae a smooth, cohesive ball of dough. This is your levain.
3. Place the levain in a 3-cup clear plastic container, and mark the level of the dough with a marker or tape. Cover with a lid or plastic wrap and let sit at room temperature until it has doubled in volume. (If the starter hasn't doubled within 8 hours, discard all but 2 ounces of it and feed it again in the same manner. If it is very stiff and dry, you may have to add another tablespoon of water. Sometimes it takes more than one feeding if you haven't been refreshing the mother often enough.)
4. When the starter has doubled, you have a levain that is ready to use in a recipe. Measure the amount needed and discard any that remains. If you're not going to use it right away, you can store it for up to 24 hours in the refrigerator.


jimster
caflowerluver
Related Discussions
Mother of Pearl - New Growth? RRD?
Q
MotherEarthNews says Dow & DuPont are poisoning American compost
Q
new: fotess may swap - mother's day
Q
Annie's Salsa Recipe is on Mother Earth News :)
Q
Lars
Ideefixe