Food Photo Tips: Part 9 - How to set up a Tripod
Hi again everyone. I'm back with another entry on how to use your digital camera for taking tabletop photos.
Sorry my tutorial is a few days late this time. It's been a busy week over here.
I wanted to give several camera tips today but once started on how to set up a tripod, I was carried away when creating the photos and diagrams, so it took longer than expected.
As there are many photos, some may be small size, but all will expand with a mouse click.
Setting up a tripod can be a little more confusing than one might first imagine. If you have tried it for the first time by turning all the knobs and flipping the locks, you may have ended up with legs that won't sit still and a top piece that hangs over and won't stay upright. Whatever you do, try these suggestions without a camera attached until you have got the hang of it.
Here below is a typical entry level lightweight tripod, shown in its folded position. Total length is 14 inches, weight just under 2 pounds. Price around $75.00.
Note that in this position the long handle, called the 'pan-handle' is bent downwards and the small crank handle is also folded down. First thing to do is lift up both to get them away from the legs (right).
The next step is to flip up a leg locking lever (below left), and extend one leg fully, being sure all lower sections have snapped open:
Close the leg lock lever and then do the same with the other two legs, being sure all sections are fully extended and the levers are locked:
Only then should you open the three legs. Press the leg braces down and tighten the leg brace nut. Now the tripod is open, turn it so one leg is the leading leg in front of the camera and the other two legs are on either side of you, so you are standing in the space between them.
Attaching the camera to the tripod:
Two ways to attach the camera to the tripod are 1. by a screw on the tripod head which screws up into the base of the camera or
- the quick-release plate, which comes in different forms, but is a fast way to put on and take off your camera from the tripod. The tripod I show here has a quick-release plate, which once screwed to the bottom of the camera, will enable the camera to be snapped into place on the quick-release platform of the tripod head by opening the lever.
Here below is a camera, the quick-release plate with its screw and a small coin. The coin is used to turn the screw, attaching the plate to the camera.
Here is the plate affixed to the bottom of the camera, and showing how to open the quick release lever:
By holding open the quick-release lever with one hand, you can slip the camera with the attached plate into the platform, and then press the lever closed:
By loosening the side tilt locking nut, you can then lift up the platform and your camera is ready to operate in a vertical position:
When you were first setting up your tripod, after extending the legs, you may have found the head is pointing in the wrong direction.
If the tripod head is pointing in the wrong direction, you need to loosen the panning lock nut and swivel the head until it is pointing forward and the pan-handle is at your left hand.
The following examples are with the legs withdrawn so the tripod is shorter and can be used on a table:
Panning or turning around the tripod head
Here you see that with the panning lock nut loosened, you are able to swivel the tripod head around.
You can also tilt the head down by turning the pan-handle a little as though it were a screwdriver which will release the tilt up/down of the head. When you have the right angle
for your photo, turn the pan-handle in the opposite direction to tighten the head at the chosen position:
Here are the names of the parts of this tripod, and the parts of the tripod head. Remember you can enlarge each photo with a mouse click:
Tabletop Tripod
Here is a small but sturdy tabletop tripod which I sometimes use. The legs will extend another 1 1/2 inches by twisting the black locks, and the central column may be raised
by loosening the centre twist lock. This tripod has both pan and tilt functions and uses a screw head to fasten it to the bottom of the camera.
Well I hope this will be a useful guide if you are using a tripod for the first time.
It is always advisable to practise setting up the tripod a few times without your camera attached just in case you are unlucky enough to have it fall over.
Set it up on a firm, level ground or floor and check that all levers are locked. If indoors be careful that small children or animals won't be tripping over the legs.
I hope you understand all and if you have questions please ask here or PM me.
So thanks for joining me. I'll be uploading the next installment soon. And please feel free to save the pages on your computer.
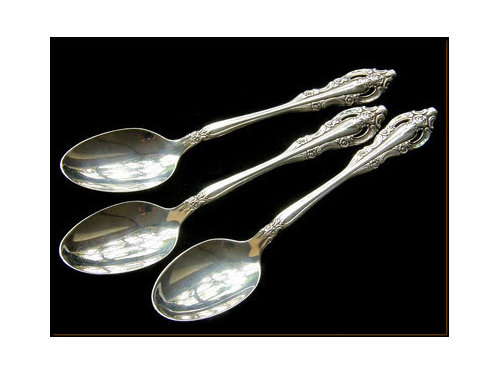
Next time I'll show a little about photographing silverware, the flash menu and self-timer.
Sharon (Canarybird) :-)
(All text and photos copyrighted)
Free for personal, non-commercial use


Lars
canarybird01Original Author
Related Discussions
Food Photo Tips: Part 3 - Lighten or Darken Photos with EV
Q
Food Photo Tips: Part 5 - Artificial Lighting
Q
Food Photo Tips: Part 10 Self-timer, Flash & Silverware
Q
Food Photo Tips: Part 9 - Setting up a Tripod
Q
Lars
canarybird01Original Author