


Kerdi Shower Part Deux
Here's Part Deux. The original Kerdi Shower thread lost virtually all of the photo links when the forum they were on changed their software and dumped the links. That forum's administrator doesn't know if they're recoverable, so I did a little editing and here's Part Deux. I may ask Gardenweb to delete the original thread.
This thread is to show a few techniques for working with Kerdi membrane.
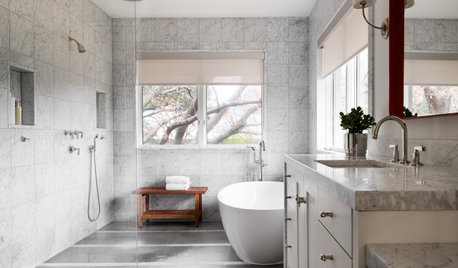
Shower is a walk-in, about 5' by 7'. Door is at a 45 degree angle in one of the corners.
Walk in to the shower and on the short wall to the immediate right are two supply valves, the lower one supplies the wall mounted handheld, the upper supplies an overhead 12" rainshower head.
Moving counterclockwise from that wall, the long wall to the left of the valve wall is an exterior wall and will get nothing but tile.
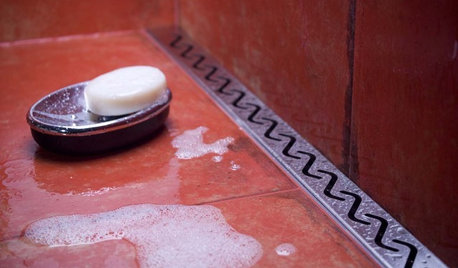
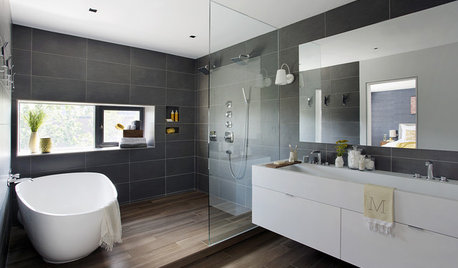
To the left of that long exterior wall is the shower's short back wall, it gets a 2-shelf niche. The niche is about 36" wide and 30" tall. The lower niche space is 15" high, the shelf itself is 4" thick, the upper niche space is 11" high.
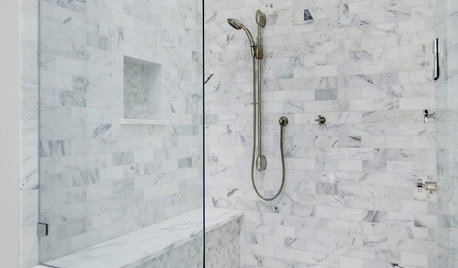
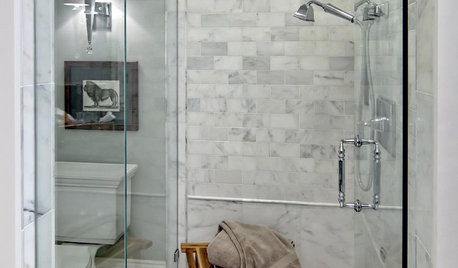
To the left of the short niche wall is another long wall, this wall has the wall-mounted hand-held. If I recall, the sliding bar is 40" tall.
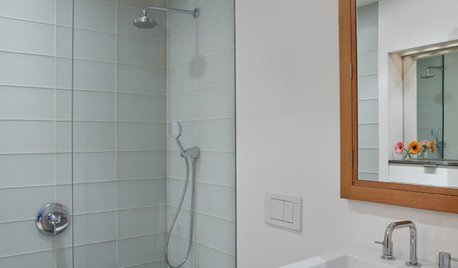
In the ceiling is a 12" rain shower head. Also four can lights for illimination and a fan for ventilation. Ceiling will be tiled.
The wall construction? Kerdi is a vapor barrier, so no barrier is needed on these walls. Tile backer? With Kerdi you can use drywall. I prefer cement board on the walls. Wonderboard or Durock. I used Wonderboard on these walls. The ceiling and niche is done in Hardie, which is a fiber-cement board. Hardie is less brittle, so for me it's easier to cut into narrow strips to trim out the niche, and not as prone to snapping when installing full sheets overhead. I work solo 95% of the time, so it's not uncommon to hold the sheet up with one hand and have the screw gun in the other.
ABOVE: Valve wall
ABOVE: Niche wall, and on the left you can see the stub out for the hand held
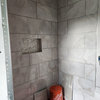
ABOVE: Shows the Wonderboard walls and the Hardie ceiling.
ABOVE: With Kerdi, you don't have to mesh tape and thinset the seams. You can fill the seams with thinset as you hang the Kerdi on the walls. No need for tape as the Kerdi will bridge the joint for you. Just make sure your walls are smooth. If you have any thinset blots or chunks of cement that mushroomed when you drove a screw, knock them down so the walls are smooth. Here I'm striking a pose with a carborundum stone.
ABOVE: Setting a plumb line to hang the first sheet. Just like...
Comments (52)

MongoCT
Original Author14 years ago
ABOVE: With the previous corner, I ran the membrane through the corner, from one wall to another. With this corner, I held the sheets on each wall about 1" or so off the inside corner.
â¨ABOVE: I cut a length of Kerdi about 8" wide, enough to span the two inches of naked cement board in the inside corner and then run 3" over the already hung membrane on each adjacent wall. This ensures that I meet the 2" minimum overlap. Regular Kerdi is 8 mils thick. Kerdi-Band, a product designed for just this purpose...spanning from one sheet to another...is 4 mils thick. Most of the time I use regular Kerdi for corners like this. It depends on your ability to cope with the thickness of additional layers of material as you set the tile. For the materials I was using in this shower, the added thickness of Kerdi would not be a problem. Remember 8 mils is 8/1000ths of an inch. You'd need to go crazy with the layers and use too much thinset between layers to get an adverse buildup of thickness. Anyhow...thinset the corner and comb it out like in the above photo...
â¨ABOVE: Crease the sheet down the middle, then hang it in the corner...
â¨ABOVE: Bed one side in the thinset, bringing the excess out through the overlap...
â¨ABOVE: Then the other side. Heck, this stuff is so easy even a Mongo can do it.MongoCT
Original Author14 years agoBack to the niche...When you buy a Kerdi Drain, a few preformed corners come included with the drain. Usually. Some resellers have been known to open the drain box and remove the corners and the installation DVD and sell them separately. The preformed corners can also be purchased from Schluter. Anyhows...
â¨â¨ABOVE: This shows one type of preformed corner dry set on the edge of the niche.
â¨ABOVE: And here's another type of preformed corner set on top of the previously set piece. Here it's used as an inside corner. Note that this corner piece could be flipped over to cover an outside corner, too.
â¨ABOVE: Trowel, then comb the thinset. Then the dreaded two-tool method strikes again, the edge of the trowel is used to hold the Kerdi piece in the corner while the drywall knife is used to bed the corner piece into the thinset. Note the thermally fused seam on this piece, the seam that runs away from the trowel at a 45-degree angle. The fused seam results in a slight ridge or bump along the length of the seam. That can sometimes catch on the trowel and it can pull the piece out of the thinet.
â¨ABOVE: Hallah-freakin-lu-yah. The niche is done.
One thing to note is that the preformed corners are essentially designed for perfect 90-degree corners, though they can be tweaked a bit. In the case of the niche, where the shelf is slightly pitched, you do have to work the corner piece a bit to get it to lay flat on all three walls.
Minor quibbles, but hey, it is what it is. Overall, the preformed corners are handy, but expensive. I cut my own corner pieces for the floor, I'll show those later on.Related Professionals
Cuyahoga Falls Kitchen & Bathroom Designers · Midvale Kitchen & Bathroom Designers · Auburn Kitchen & Bathroom Remodelers · Calverton Kitchen & Bathroom Remodelers · Durham Kitchen & Bathroom Remodelers · Mountain Top Kitchen & Bathroom Remodelers · Pearland Glass & Shower Door Dealers · Brea Cabinets & Cabinetry · Buena Park Cabinets & Cabinetry · Murray Cabinets & Cabinetry · National City Cabinets & Cabinetry · Wildomar Cabinets & Cabinetry · Chicago Window Treatments · Placerville Window Treatments · South Yarmouth Window TreatmentsMongoCT
Original Author14 years agoFast forward...the walls, niche and ceiling are tiled and grouted. Time for the drypack preslope...
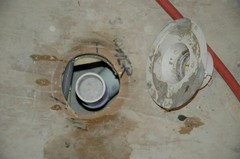
â¨ABOVE: Old 2-part clamping drain cut out, I bought a $3 cutoff wheel and fashioned a jig to cut the drain off the waste pipe from the inside of the pipe itself. Match your Kerdi drain material to your existing plumbing, ABS or PVC. You can see PEX for radiant floor heat underneath subfloor.
â¨ABOVE: Underlayment scewed, new drain location set. Though it depends on the height that the Kerdi Drain is set at, the bottom side of the Kerdi Drain flange is about 4-1/2" in diameter. I cut a 5" diameter hole in the underlayment and subfloor.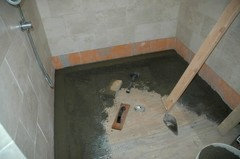
â¨ABOVE: Setting the perimeter elevation for the drypack preslope. I base this height on a 1-1/4" thickness of deck mud under the flange of the Kerdi Drain, plus an additional 1/4" rise per foot of run from the drain to the farthest wall. I actually pitched this floor slightly steeper, as the floor tile has a bit of texture to it, slightly hindering drainage.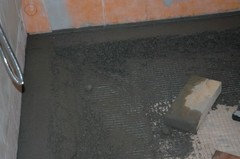
â¨ABOVE: More mud packing.
â¨ABOVE: I make the mix slightly looser for the ring of mud that goes under the drain's flange.
â¨ABOVE: I covered the fleece surface of the drain with masking tape so the fleece wouldn't get messed up during installation. I had previously dry fit the drain to the plumbing waste line. The white PVC coupling you see sitting on top of the drain is cut to length so the drain will be set at the proper height above the subfloor, 1-1/4" in this case.
With no access to the plumbing from below, I have to install the drain from above, so that means glueing it up and setting it into the mud all in one shot. The glue joints have to be secure and the flange has to be set at the proper height and set perfectly level. You get one chance. Well, you get one easy chance. If you mess up the first chance, you have to go through a lot of effort to get that second chance.
It's much easier if you have access to the plumbing from below. If so you can simply set the drain flange in the mud on Day One, then glue up the drain to the waste plumbing on Day Two after the mud has set.
â¨ABOVE: Fast forward, the preslope is completed. The drywall bucket is sitting over the drain.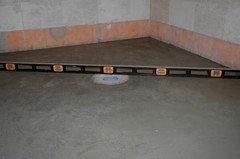
â¨ABOVE: A well set drain in a properly pitched preslope. Time for a beverage of my choice.MongoCT
Original Author14 years agoTime to Kerdi the preslope:
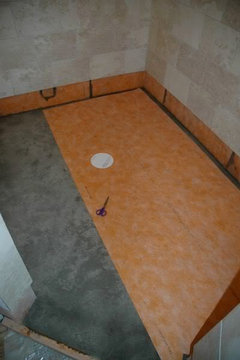
â¨ABOVE: First sheet is dry fit to the preslope. You don't want a membrane seam to fall on the flange, so plan accordingly. The wall-to-floor corners will be bridged with a strip of Kerdi so the floor Kerdi can stop short of the wall. It doesn't have to be a perfect fit.
â¨ABOVE: Drain kit comes with a template to cut a properly sized hole in the membrane.
â¨ABOVE: Hole is cut, I also used the ever-present Sharpie to make tick marks just off the edge of the sheet to show how far out to spread the thinset on the floor.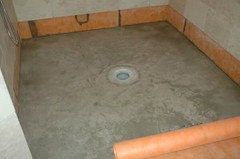
â¨ABOVE: Roll the sheet up...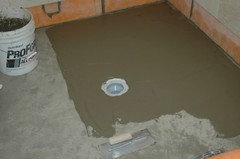
â¨ABOVE: Spread the thinset...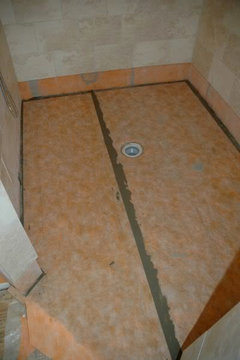
â¨ABOVE: Same bedding technique as used on the wall, and viola, the floor is done. Now time for the floor-to-wall transition.MongoCT
Original Author14 years agoThe floor-to-wall transition. When you have a lot of inside/outside corners, this is where layers of Kerdi can build up. Still, don't lose sight of the fact that Kerdi is 8/1000ths of an inch thick. Kerdi Band it half that thickness. It won't be the multiple layers of Kerdi that causes build-up problems, it'll be because you left too much thinset between the layers of Kerdi. The effect of thickness buildup, to me, is also dependent on the type of tile that you're installing. A small 1" mosaic, for example, would telegraph and mimic the height differentials that a larger tile could bridge and disguise. Still, any height variations can be feathered out with a skim coat of thinset. Is this something to be scared of? No. Because now that you're aware of it, you'll be careful about slobbering too much thinset between your layers of Kerdi.
Plus, in this section I'm showing several techniques to do corners. You can use the preformed corners that I used in the niche, or you can cut and layer your own.
â¨ABOVE: Starting with an inside corner. Pre-crease the material, snip, fold, and place. These inside 90's are easy. Move on to the next corner.
â¨ABOVE: I use the ever-present Sharpie to mark the inside or outside point of all corners, then use scissors to cut just shy of that point. Fold the material hard over on itself to the Sharpie mark, and it is sort of self-sealing, so to speak.
â¨ABOVE: Cutting to an inside 45 degree corner. Pretty much the same as a 90.
â¨ABOVE: You can see the previous 45 folded over on itself, I'm now marking an outside 90 degree corner. This requires an bit more detail.
â¨ABOVE: Here is the first piece for an outside 90. You sort of force this piece around the corner so the uncut inside edge rides up the wall a bit.
â¨ABOVE: Like this, but when installed it'll ride up the edge of the wall just a bit more.
â¨ABOVE: When the previous piece is installed, this part will go over it, layered on top. Whereas the previous piece sat on the floor and rode up the corner of the wall a bit, this piece cut will be on the wall and the cut will ride down on to the floor a bit. The two pieces will overlap, closing the hole so to speak.
Now, while I trust Schluter, I also want peace of mind, so I use a smear of Kerdi-Fix in these corners as well. Kerdi-Fix is Schluter's proprietary sealer. Comes in a tube like caulk and is dispensed...MongoCT
Original Author14 years agoNow for something a little different. I'll include this since it's Kerdied as well.
Instead of a simple curb at the entry to the shower, I fashioned a larger platform that serves as both the curb for the shower, a raised and tiled "drying off" area just outside of the shower, as well as a step up to facilitate getting into and out of the Jacuzzi tub.
â¨ABOVE: Platform is framed, covered with two layers of ply, and more of the wondrous Wonderboard.
â¨ABOVE: Platform is Kerdied, and platform Kerdi is lapped over the Kerdi on the shower floor.
â¨ABOVE: "Curb" and platform from inside the shower looking out.MongoCT
Original Author14 years agoTime to tile the floor...
â¨ABOVE: Grid layout is for floor tiles, each square is about 12" square. Each square is large enough to fit a 3-by-3 grid of ~4" tiles. Remember, the floor is sloped, so grout joint spacing needs to be adjusted ever-so-slightly to keep straight grout lines on a sloped surface.
The drain cover for the Kerdi Drain is about 4" square, so it matches this tile size quite well.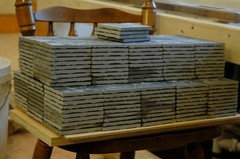
â¨ABOVE: Ah yes, a fun morning spent with the Felker wet saw...a couple of cups of coffee and a bit of time spent turning big tiles into small tiles.
â¨ABOVE: The 4" field tiles layed out and thinsetted.
â¨ABOVE: Filling the border tiles around the edge of the field of 4-inchers, right in front of the door.
â¨ABOVE: The floor along the opposite (niche) wall. You can see the drain. Sometimes the drain can be set as if it were a whole tile, replacing a single 4" square tile, or four 2" square tiles. For this floor layout I clipped the corners of the four adjacent tiles to fit the drain into the center of those four 4" tiles.
â¨ABOVE: Filling in the remainder of the floor tiles in front of the door opening, as well as the "baseboard", or bottom course of wall tile.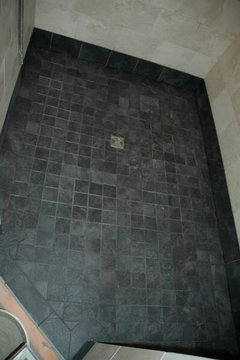
â¨ABOVE: The tiled floor.
â¨ABOVE: The fun part. If you find grouting easy, then your grout is too wet. Too much water in the mix, while making it easy to spread, can lead to a blotchy/uneven final color, a color that dries lighter than the sample strips, and drying cracks, etc.
â¨ABOVE: Done, from the inside looking out.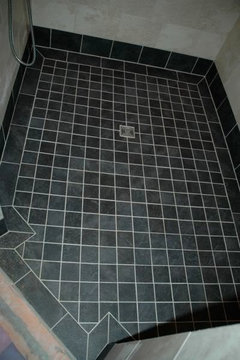
â¨ABOVE: Done, from the outside looking in.MongoCT
Original Author14 years ago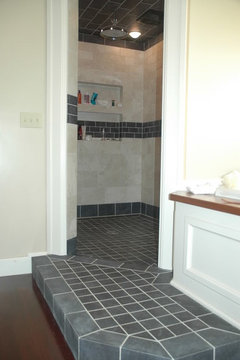
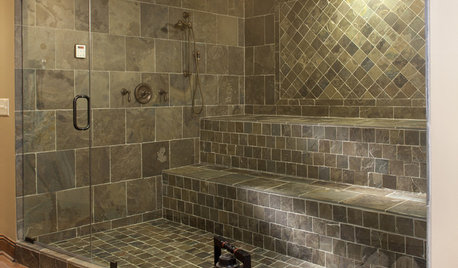
ABOVE: The 99% completed shower. There's not a singe piece of uncut tile in this shower. The dark colored tiles started as roughly 12" squares, the cream colored as roughly 13" squares. They are "through body" tiles, meaning the tile color is the same throughout the tile. The dark tiles have a dark body. Not a light bisque body with a dark glaze on top. After cutting the tile, the sharp cut edge doesn't always match the eased factory edge. While you can touch the edge with an angle grinder, I used a carborundum stone to ease the edges.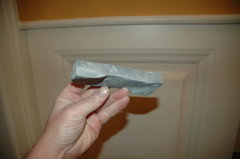
ABOVE: My over-used and worn away carborundum stone.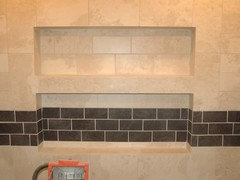
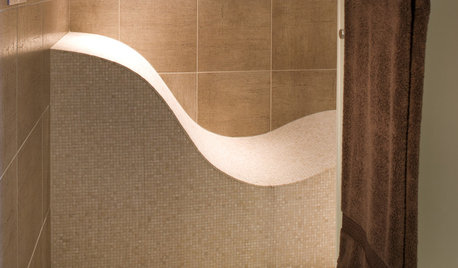
ABOVE: Niche with the deco border running through it.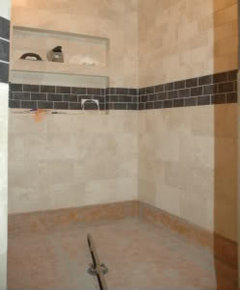
ABOVE: Walls and ceiling before floors. I'll do this fairly often with Kerdi. Tile the ceiling and walls while the floor is just subfloor. After the overhead and wall work is done, then do the deck mud preslope, then Kerdi and tile the floor, then fill in the bottom course of wall tile. It keeps me from possibly dinging up the finished floor when doing the wall and ceiling work.MongoCT
Original Author14 years agoDifferent ways to do tub surrounds. It can depend on the thickness of the tub's flange and the size of tile being used.
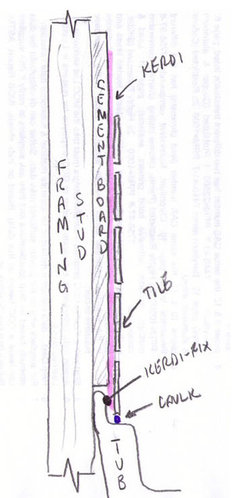
ABOVE: This shows 1/2" cement board held just above the top of the tub's flange. The tile then overhangs the bottom edge of the cement board, covering the flange. Hold the tile just off the tub.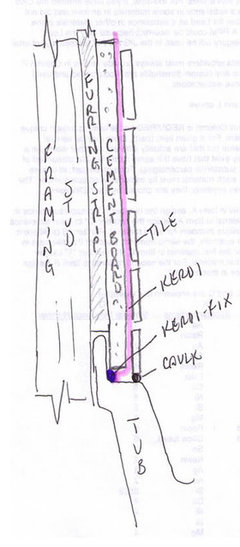
ABOVE: An alternative is to use furring strips the thickness of the tub flange and attach them to the faces of the wall studs. The cement board goes over the furring strips and overhangs the tub flange, the cement board is held just off the top of the tub. This could be used anytime, but especially if you're using small mosaic tiles on the wall.MongoCT
Original Author14 years agoFirst, credit for this photo goes to Joe, it was originally posted by him on his thread. On his thread I used MS Paint to "illustrate it" a bit, I'm going to repost the picture here due to the large number of emails I've gotten over the past few days regarding the drain. Hopefully this will consolodate things a bit...so the following is a sort of cut and paste from his thread:
The drain ring and the drain cylinder are two separate pieces that connect together. The fingers on the ring grip the cylinder, so you can slide the ring up and down the cylinder and that sliding up and down action allows you to adjust the height of the square metal drain grate.In Joe's picture, the Kerdi flange has already been installed and it's covered with Kerdi. The depression that the gray drain ring is sitting in is part of the already installed flange, the flange is covered with Kerdi.
Looking at the picture, if you pressed down on the square metal drain grate, the cylinder would slide downwards through the ring. You'll push down on the metal grate to set the top of the metal drain grate flush with the top surface of your floor tile.
So how to set the drain? If Joe's floor were tiled to just short of the drain, when it's time to set the drain and fill in the tiles surrounding the drain I would:
1) Remove the gray drain assembly, which when all snapped together includes the gray ring, the gray cylinder and the square metal plate. It's just what you see in the photo.
2) Lay a ring of thinset around the open drain hole, in the "depression" of the Kerdi flange. Don't let it slop down into the hole.
3) Place the gray drain assembly back in the depression in the drain flange, pushing it into the ring of thinset. Thinset will ooze through the trapedoidal-shaped holes in that gray ring. Notice in the photo that there is a gap between the edge of the gray ring and the edge of the flange depression that the ring sits in. The entire drain assembly can be moved around laterally in that depression. It allows you to fine tune the drain location to the tile that surround the drain.
4) If needed, at this time a little more thinset can be placed on TOP of that gray ring, right up against the gray cylinder, between the ring and the square metal plate. You won't need much.
5) Now set the tiles that will abut the drain grate. Remember you can adjust the drain laterally within the flange depression for a most excellent fit.
6) Now push down on the metal plate, gently. The pressure will force the cylinder down through the gray ring, causing the height of the metal plate to go lower. Keep pressing until the top of the metal plate is flush, or just slightly below, the height of the adjacent tiles. This may cause some thinset to squeeze out, that's desired, as it means you have complete thinset coverage and support underneath the square metal grate.
You...
 PRO
PROAvanti Tile & Stone / Stonetech
14 years agoExcellent treatise on a Kerdi shower install. Only suggestion would be to clarify the term "preslope." With a Kerdi shower, it's just the "slope." Preslope sorta indicates that there is also a final slope....which there is...in a regular vinyl liner-type shower, eh?
xoldtimecarpenter
14 years agoYou should contact Schluter and offer this post as a supplemental guide to Kerdi installation. This has some useful additons to the video and installation guidebook Schluter provides. For those who want the actual Schluter Installation Guide, here is the link. And here is the video.
There is also a ton of information available at John Bridge Tile Forum on all kinds of tiling issues.
The only disagreement I have with your install is that you did not cuff the membrane on the shower floor so that it wraps up the wall. This creates a pan that virtually guarantees no leaks. The border you use is not as certain since it relies on the proper application of thinset.
Otherwise, great work.
hautinglu
14 years agoxoldtimecarpenter - what's the correct way to wrap the wall?
Are you suppose to extend the floor member up the walls? If so, how high? Or is it better to do the floor first (extending up the wall) and have the wall kerdi overlap that?
MongoCT
Original Author14 years agooldtimecarpenter,
I understand what you're saying, but regardless of how I did the floor/wall intersection, there would be seams in the floor of the shower.
Had I shifted the first piece of floor membrane to the right and run it a couple of inches up the wall, the left edge would have fallen on the drain flange. Schluter prohibits that.
Had I shifted the left piece further left and run it up the wall, then the right edge of that piece would have fallen on the drain flange. Again, that's prohibited.
Had I centered the first piece on the floor I would have had two seams running down the floor instead of one.
Had I rotated the way the sheets are running 90-degrees, I again would have had 3 seams running across the floor.
Due to the size of this shower, there would be seams on the sloped floor no matter how the membrane was oriented on the floor. Plus with any Kerdi shower, there will be thinsetted seams in the corners.
Any Kerdi seam, or the integrity of any seam with any membrane material, is dependent on proper detailing of the seam.
If you're familiar with Kerdi you know that the seam details I used are proper and approved by Schluter, they are the same ones taught at "Kerdi School".
Best, Mongo
wrighthouse
14 years agoThanks so much for restoring this thread. I had the old one bookmarked and was really bummed when the photos wouldn't load.
This is even more helpful than John Bridge's Kerdi book, which is saying a lot. I was about to post a question about whether or not I need to cover all the sides of the 2x4 framing of the shower niche with hardibacker before installing the Kerdi. I can't tell from the picture whether this is the case in your shower.
If I can get away without the hardibacker, I wiIl be able to avoid using any cut tiles in my niche. Since the tile is ceramic, I want to avoid having cuts In such a visible place.
I know that we are only supposed to use unmodified thinset behind Kerdi. But don't we need to use a modified thinset over wood in the case of a plywood subfloor? John BrIdge says we can use Versa Bond wIth Kerdi (Yes, there would be that warranty issue.)
Once agaIn, thanks for all your examples. You and Bill are such wonderful teachers.
Deb
MongoCT
Original Author14 years agoI wouldn't try to adhere Kerdi directly to any wood; plywood or 2-by lumber. You need something to transition from the wood to the Kerdi.
If the thickness of the hardie will throw off your dimensions, then you could trim the wood by the thickness of the hardie. Another idea would be to use 1/4" hardie instead of 1/2". Not sure if that will help or just throw it off by less, but it's an idea. I'd never use 1/4" to span wall studs, but when fully backed (over a subfloor, on a contertop, or in this case to skin a piece of lumber) 1/4" hardie is fine.
Yes, in the niche I did in this thread, all surfaces of the niche are skinned with Hardie.
I've used lightly modified thinsets like VersaBond with Kerdi. If using large format tiles over Kerdi or Ditra, that's when I'd stick to unmodified. The latex modifiers in modified thinsets need air to fully dry.
Mongo
wrighthouse
14 years agoThanks Mongo, for the quick reply. I kind of feared that would be the case after my careful reading of the Kerdi documentation. Still, there was this hope...
But I had not thought of cutting away part of the 2x4 frame to fit the Hardibacker--another job for my favorite jigsaw. I only need a quarter inch--very frustrating after what I thought was careful planning when the thing was being framed.
I may still pick up a bag of VersaBond and use it to skimcoat my Hardi. Your suggestion of skimcoating the Hardi before installing the Ditra should be in the Schluter documentation. It made me feel better about my own Ditra problems. After my first attempt to install Ditra over Hardi failed to stick and I had to toss the Ditra and could only scrape off most of the thinset, I found it much easier to install the new Ditra over the now "sealed" Hardi---an expensive lesson I could have avoIded with the benefit of your advice.
Best,
Deb
johnfrwhipple
13 years agoMongo that is a nice looking Shower! I would like to know why it's clad in plywood - I'm assuming it's for multiple Grab bar placement.
Your overlaps and niches look rock solid. I still struggle a little keeping them as tight as you have shown. I like to ease the corners a little to give myself a little more room for build up.
Do you float the walls after or just set the tile off the wall a touch to account for build up in the corners?
Is this a steamer? Why do you have building paper in the door way?
johnfrwhipple
13 years agoHow long do you flood test for?
When we used the rubber liner method back in the day we flooded overnight but lately we have been flooding for 2- 4 hours. How long do you test out your installs for?
I still use a little Redguard, Hydroban etc in the corners. Do you?
MongoCT
Original Author13 years agoJohn,
A couple of the walls in this shower were skinned with ply. I wouldn't depend on just the thickness of the ply for screw purchase with a grab bar though. If I had to add grab bars to this that wouldn't hit the wall framing, I'd use something like Wing-It anchors. Wing-It's can be used with tile over cement board and they are fully approved as such, but the added thickness and strength that the ply lends to the wall would make the Wing-It connection very very secure. Wing-Its aren't simple toggle bolts. They're fully approved grab bar anchors, you can do chin-ups on those things.
The ply also increased the depth of the niche, an added bonus.
I didn't float or skim coat the walls at all. I did give the cement board covering the niche surfaces a light skim coating so all niche edges are nice and crisp and the dimensions of the niche are obvious and well-defined. But that's it. With standard wall tile I'll just use a 1/4" trowel to set the tile.
Nope, not a steamer. It could be converted to one as all surfaces are fully Kerdied, all plumbing penetrations are sealed, and the ceiling lights are fully sealed units. The ceiling vent fan would have to be changed though, as it's not dampered. And obviously a door would have to be installed.
Tar paper...There is indeed a remnant of felt wrapping the outside of the shower door in some of the photos, that was initially installed to appease the inspector who was new to Kerdi. The outside of the door was to eventually be trimmed out with wood, he wanted tar paper behind the wood. The tar paper was cut out and removed when the door was finally trimmed out. This was the inspector's first time seeing a Kerdi shower, so I had to do a couple of unconventional things for him that were later changed as he better understood things. Two steps forward one step back!
Flood test time, here it varies by town. Initially the inspectors required 24-72 hours when they were new to Kerdi. Our standard is 24 hours.
Redgard/Hydroban in corners? Nope. If I have the 2" overlap or preformed corner I'll use nothing but the overlap. If I have a simple folded corner and feel the need I'll use a smear of Kerdi-Fix.
Best, Mongo
sonepi
13 years agoHi Mongo,
Thank you for this thread. What state to you live and do you do any out of state work?? :-) What should I look for when having a tile person come it. You mentioned Kerdi School. Is there some type of certification that Kerdi provides to installers? If so, how can you check this certification? I guess I don't want to be the guinea pig for someone who has not really used this method.I love this tutorial with photos and all. I would never do this myself, but knowing what to look for really is wonderful for the layperson. I thank you for the time and effort you have taken to provide this information.
MongoCT
Original Author13 years agosonepi,
The Ceramic Tile Education Foundation (CTEF) puts on a little 2-day "Schluter" training class down in Clemson SC. Schluter is the company that manufactures Kerdi.
By no means is it required to attend the class, Kerdi material is pretty straightforward and simple to install. Any competent and caring person could install this material after reading this thread and/or watching the Schluter installation videos on their website.
If a tiler was uncomfortable or reluctant to try "something new" then it'd be best to not push him out of his comfort zone.
Realize that Kerdi membrane is a "topical membrane". It sits "on top" of the tile backer and the tile gets adhered directly to the membrane. You can achieve the same effect with topical roll-on or trowel-on membranes. HydroBan, RedGard, Mapei HPG, etc. There are a few out there.
Most roll-on membranes are just waterproof (not vaporproof too), but waterproof is all you need in a typical shower. For a steam shower you want waterproof and vaporproof. Kerdi is both, so it's an excellent choice for a steam shower too.
johnfrwhipple
13 years agoA word of caution!
I have been "Shopping the Box" and many 'box' employees will tell you that Kerdi is overkill and not worth it - don't believe them. It is.
And for the love of God follow Mongo's step by step and not "----" in Home Depot West Vancouver who just informed me that Omni Grip was OK to set Kerdi With. I know this is wrong. But let''s check with Mongo first people.
Hey Mongo? Any case study? Any testing? Any advise that we can offer. "Dude" says it doesn't matter that the mortar is pre mixed and White. Both can be used - Either Or! This I was told by the flooring expert.
He offered up some advice to the next lady and his advice on sealing was to spray on a few coats, roll the grout joints with a roller bottle applicator, allow to dry, and then buff.
What great advice - NOT!!!!
Be careful people - when you go into the "Box" go in with Bill's advice or Mongo's.
Not mine because I'm always working on crazy ideas, not Dude's, not your buddies. Go in with Bill and Mongo's advice and do a material shop.
Post your findings and then check local code. Decide on a path and get some quotes.
This is not rocket science and the "Box" is not hiring out of NASA.
It's your home - your job site. Understand this and take proper steps.
MongoCT
Original Author13 years agoI don't want this thread to turn into a "bad advice from the box store" thread too. The internet makes things too easy. Every manufacturer has installation instructions online. If someone can post in an internet forum, they can read up on the manufacturer's ".com" website and then ask follow up or clarification questions here.
And John, no, no "case studies" from me. There's no need for them, the manufacturer has done them all. Simply follow the manufacturer's installation instructions while complying with local building codes and you and everyone else will be safe and happy.
Some people in the trade may have tweaked things a bit here and there based upon repeated use of a certain product, but for the casual user the simplest and safest and least expensive thing to do is to simply follow the manufacturer's instructions.
johnfrwhipple
13 years agoI would like to add to this thread and mention that "flood testing" these Kerdi showers is so important. A number of things can go wrong with your first install and as I mentioned before this over view by Mongo is "Top Shelf".
The common errors clearly avoided by heading Mongo's advice above you. There is no better online description than this - I have checked...
That said - Kerdi is not a miracle product that does not need to be checked. Any thing can go wrong from a nail hole, dropped tool, bad thinset, course sand or stone in seams and on and on.
This is why you need to follow Mongo's advice very carefully and then pick up a 2" test plug and flood it out.
Schulter recommends letting the thin set dry for at least 24 hours before "Water Testing". They mention this in their "Other Consideration" section of the online PDF file on Kerdi (2010 issue).
Please confirm the steps needed to do a flood test and remember this is only one of three plumbing inspections needed by most cities codes when building a new shower or bathroom project.
The other inspections are the drain lines and vent lines flooded completely and the water lines all under 200 PSI pressure tests. This is one inspection.
Then the waterproofing or damp proofing inspection...
And then the final inspection.
Lots to learn - Mongo has spelled it all out above. Go to city hall or call and see if there is any other local Code that might come into play.
Good Luck.
JW
"Prior to setting tile, wait 24 hours minimum before water testing to allow for final set of thin-set mortar and ensure waterproof performance at seams and connections." *
Here is a link that might be useful: * quoted from the 2010 Kerdi Handbook
johnfrwhipple
13 years ago"Thinset. This is a little thicker than I want. I want it stiff enough so I can flat trowel it on the wall without it dripping all over or running down the wall, as well as it being able to hold a ridge after it's combed out. Not too stiff, though as you don't want it skinning over before you hang the sheet." Mongo (above).
Knowing the right mix is key. Mixing it right so important.
All most nobody these days works with Non Modified Thinset - Except those working with Kerdi (mostly). The base minimum standard around most towns is a product like "VersaBond" from Custom. "Versabond is modified thinset"
Make sure you understand the difference between "Modified" and "Unmodified" it can ruin the whole job - or can it? Do you know? Keeping reading. Call Schulter. Go pick up the Schulter install book or get it online for free.
Working with Kerdi you will need "Unmodified Thinset" or here in North America you have no warranty.
Make sure you use a large Low Speed drill like my Makita and a mortar mixing trowel. Don't use your 14.4 or 18 volt drill for this - you will kill the drill. You will not get the right mix by hand unless you mix it in smaller batches (this is doable but just not in the strength set of most people).
Insure as well before you even drive to your building store they even stock unmodified thinset. If they do chances are it's been sitting around 4-12 months. I would recommend buying this thinset no more than 4-5 months old. Check the date code. If you don't know how to read them - ask me.
Buy your thinset from a store that sells thin set - not nails and screws. Here in Vancouver anyone can purchase on my accounts at Fontile or Centanni - you will get a much better product than that 14 month old bag at the lumber yard. Check those dates.
Dry mix the bag first in a clean 5 gallon pail. Insure you have a mask and keep the kids away. We mix outside on the lawn on a tarp and not in the room. A full bucket is too much to handle and work with by yourself mix it up in 2-3 goes. Work with smaller sheets - it's easier for the average DIYer and I still set my kerdi in smaller sections.
Practice with some scrap Kerdi and make a test box. This will help you get a feel for spreading the material and give you practice so those 2-3 ply corners don't grow to 1/4" and throw all your bottom tile pieces out. If this happens we like to grind away the back side some what of the tiles with the angle grinder and a diamond blade. Dusty work but sure does help with this build up.
Test your thinsets.
Test your grout.
Test your tile.
24 hour Flood Test are required for your Schulter Kerdi Shower. Flood your work. Flood it for three days to test those corners and edges.
It's easy if you follow all the steps and all the rules...
Thanks again Mongo! What issue of Fine Home Building was this photo shoot in? Is that you on the tools or your "Setter"?
MongoCT
Original Author13 years ago"Practice with some scrap Kerdi and make a test box. This will help you get a feel for spreading the material and give you practice so those 2-3 ply corners don't grow to 1/4" and throw all your bottom tile pieces out. If this happens we like to grind away the back side some what of the tiles with the angle grinder and a diamond blade. Dusty work but sure does help with this build up."
A properly done 3-ply overlap will only be about 1/16th to 3/32nds of an inch thick. If you're coming up with 1/4" thick seams, you're leaving way too much thinset in the seam.
If that happens, don't grind down the tile to make it thinner. Tear out your work and rebuild the seam properly.
Too much thinset in an overlapped seam of Kerdi can allow the thinset to wick water right through the overlapped seam, rendering the integrity of the waterproof membrane ineffective.
Don't cover up your poor worksmanship.
Eliminate it.
MongoCT
Original Author13 years agoI make a post. You can't repeat it, so you call out the Mythbusters?
Using your numbers for Kerdi and thinset and squeezeout:
Three plies of Kerdi = 1.278mm or 0.0503"
Three layers of thinset = 4.5mm, less 20% = 3.6mm = 0.142"0.0503" + 0.142" = 0.1923", or 3/16th of an inch.
Now that's with your numbers and using this mm - to - inch converter.
Now I don't have a "real world sample" of three layers of Kerdi and three layers of thinset. But real world, when I measure a real world sample cross-section of 4 layers of Kerdi bound by three layers of thinset, it measures .079" when I let the caliper's drag tighten the jaws up on the sample, it slips out of the caliper's jaws at .093".
Using the larger measurement of 0.093", that is a tad less than 3/32". And again, that's for four layers of Kerdi and three layers of thinset.
So my measurement stands for my work. If your work is bulkier and you leave so much thinset in the seams where they may leak water, well then, so be it. I simply encourage you to improve your techniques and your methods of construction.
I don't think I'm overly aggressive in removing thinset from the seams. I use a drywall taping knife and a fair amount of pressure, it seems quite natural and easy to me.
And if I might add...this thread was intended for homeowners and DIYers who have questions about how to install Kerdi. It's not meant as a "gallery thread" for "professionsals" to post photos of their finished showers. When threads hit 150 posts, the forum software closes the thread down to new posting. That happened on the original Kerdi thread.
I'm going on vacation for a few days.
Best to all...
johnfrwhipple
13 years agoMongo this thread is for people asking questions right? So how do you do the vortex fold? The magic fold?
Here is a video showing some
I have reviewed your post very carefully and had a couple others tell me by email that their tests don't work either. What are we doing wrong?
Can you post a video? I'm sure I'm missing a step...
Thanks Mongo - Where did you go?
Sainte-Anne-de-Bellevue? I heard it's raining. Hope you have a nice meeting...
MongoCT
Original Author13 years agoI don't know how to write this delicately, so I'll just write it. I just read a few of your other posts on some of the other threads. Some of the things you've inferred are quite insulting.
No, I am not "shaughnn". And yes, I was actually on a little mini-vacation. Not in a meeting. My wife and I went to Germany for a few days.
And that written, I bet you probably think I was off meeting with Schluter folk back in the homeland.
Sorry to disappoint.
My wife and I simply took a couple of days to drink a little beer, enjoy a little wine, and eat a little schnitzel. With our youngest now out of the house, our kids are in college now and we're empty-nesters for the first time in...well, it seems like forever. So we ran away for a few days to enjoy each other's company without the distractions of home life.
Not everything is a conspiracy.
It's obviously hard for you to understand this, but the reason I spend a fair amount of time replying to you is I'm trying to help you. Not hurt you.
I'm just terribly offended at some of the things you've inferred.
salmon_slayer
13 years agoJust read this thread - you were right to be pissed at this guy. I have personally learned a lot from you and have done several showers now for myself and others that have all come out great. If your ever looking for a "vacation" in California, I am going to remodel our master bath at our vacation house in Pebble Beach. Might be a good trade....
Steve
moparmaniac
13 years agoGreat post. Can I confirm one thing with our bathroom situation?
Our old shower was a 1 piece fiberglass shower stall. There is one wall that is an exterior wall. When we pulled it out, there was no paneling around the shower installation. There was drywall above the shower to the ceiling.
On the exterior wall there was kraft faced fiberglass insulation.
I have purchased Roxul insulation which I am going to use on the exterior wall. Roxol has no vapor barrier facing.
If I'm reading this thread correctly, you do not recommend any additional barriers on the external wall?
This means the install would be Roxol, CBU, Thinset, Kerdi membrane?
Would it be unwise to use drywall instead of CBU or is this acceptable?
If you did use drywall, would a decision on using a vapor barrier be the same?
We're at the starting point of bathroom reassembly and don't wanna mess things up.
Thanks for your input!
Mike
johnfrwhipple
12 years agoIf you call Schluter they will tell you there is no issue with using Kerdi and 6Mill Poly in the same wall assembly.
I think you should use the 6Mil Poly and the Kerdi in the shower up to 6'.
As a vapour barrier Kerdi does not perform as well as 6mil poly. Close but not quite.
If you only Kerdi the shower you still invite vapour in through your exterior wall around the tub or at he ceiling elevation.
Mongo any insight into what this plastic is on this Kerdi Drain?
I found this Orange Mold infested Kerdi Shower just the other day and no one has any idea what the plastic is for or how they could have installed a Kerdi drain so tight to the wall with out bending it.
Most of the guys I have asked think the Orange Mold is from some kind of Iron deposit or perhaps "Organic Soap".
genamaranto
12 years agoMongo please tell me about your sealed lights? By the way I think your awsome!
Gena
MongoCT
Original Author12 years agoI'm especially awesome today, it's my birthday! lol
Generally recessed lights in showers will have shower trim kits, the trim kit has a simple gasket between the trim can and the trim ring. It provides a "light duty" seal.
Regular showers will have little steam. Some, but not much. And it's usually being evacuated by the shower vant.
Steam showers, the steam is significant, and the vapor drive can result in the steam getting past that gasket on a basic shower trim kit.
So in a steam shower you'd want "vapor proof" light housings. They also have a gasket, but the gasket is compressed by screws.
They are expensive. Here's a sampling.
napagirl
11 years agoI'm bumping this thread to the top after searching for it and finding it on page 65 (ready to fall off in a day or two). Mongo very graciously re-posted his photos and instructions back on December 19, 2009. Thank you, Mongo!
FYI, mine is the 48th post to this thread, and after 150 postings the thread is closed and will drop off when it reaches the last page (pg. 67) .... we don't want that to happen ..... so please
DO NOT POST ANY QUESTIONS HERE. Start a new thread. You will get better responses and not have to sift through a lot of other questions & answers.
Perhaps Mongo could occasionally post any additional info he thinks might be helpful.SO .... P L E A S E, ... DO . NOT . POST . QUESTIONS . HERE .... start a new thread
MongoCT
Original Author10 years agoKerdi Update:
I've gotten a couple of emails regarding the newer "Kerdi-DS".
First, emails. I often get emails sent to me through the G'web email system, and because of the sender's setting on his/her G'web account, those emails can not be replied to. So don;t think I'm rude for not replying to your question. More often than not, it's literally impossible for me to reply to your email due to your account settings.
Kerdi-DS. What is it?
It's simply a thicker version of plain ole Kerdi. Kerdi is 8-mil, Kerdi-DS comes in at 20-mils thickness.
Why is -DS now getting attention here in North America?
Because TCNA has changed their recommendations for membranes used in commercial or heavy use steam showers. Recommendations for residential use steam showers have not changed at all.
What or who is TCNA?
TCNA is the Tile Council of North America. You might see references to TCNA when it comes to installing tile. TCNA publishes "best practice" guidelines for tile installation.
You have an organization like TCNA which is fairly nimble when it comes to changing recommendations for installing tile. Then you have "building code", which only gets updated every few years, and updates are subject to influence from various interest groups; be they trade groups (plumbers, electricians, etc) or large corporations that make building materials.
TCNA will often make tile/shower/bath recommendations that improve building practices several years ahead of those changes being implemented into state or national building codes.
Blah blah blah. So what is this about?
We have water barriers, which limit the penetration of liquid water. Then we have vapor barriers, which limit moisture vapor penetration. At a minimum, a water barrier is needed in a shower or tub surround. A more robust barrier, or a vapor barrier, is needed in a steam shower.
Protection from vapor penetration has been typically defined by a product's "perm rating". Previously, if a product had a perm rating of less than 1.0, it was considered a vapor barrier.
Example, a topical membrane that I use often is Hydroban. Hydroban has a perm rating greater than 1.0, so it can be used as a waterproof membrane in a shower, but it won't suffice as a vapor barrier in a steam shower. A product like RedGard has a perm rating of less than 1.0, so it can be used as a waterproof barrier in a regular shower, or as a vapor barrier in a steam shower.
Kerdi? "Regular" Kerdi, the "standard" 8-mil thick Kerdi, has a perm rating of around .90, so it can be used as a water barrier in a regular shower, or as a vapor barrier in a residential steam shower.
TCNA has revised their recommendations for vapor barriers used in heavy use or commercial use steam showers. Health clubs, spas, etc. Whereas the old recommendation was to use a material that simply had a perm rating of less than 1.0, for commercial installations like listed above the recommendation has been...
Newfiebern
10 years agoThis information is great but realize it was posted years ago. Hope I'm not too late to get some advice. Will be doing mud base with drain that has no access from below. I'm very good DIYer. I've done about 6 ceramic tile showers but all had fiberglass bases. This will be first time doing a mud base and using Kerdi. Seems like this is the most complicated scenario but I have no choice. The post confirmed my hope that I could put down some mud around the drain opening and then glue the drain in place while simultaneously embedding it in mortar. Seems like a better idea than trying to pack mud under the flange after its been glued. Has anyone else tried this technique? I was also concerned about the way kerdi recommends overlapping the membrane. I've always tried to have water flowing on top of seems not under but I guess this works OK because of the thinset. Has that been everyone's experience? Finally,has anyone spoken directly with Kerdi technicians to get some one -on-one answers to questions as needed?
Many thanks for your help!
Newfiebern
 PRO
PROMint tile Minneapolis
9 years agolast modified: 9 years agoI had to call schluter last week. The Tech/service rep took my question and put me on hold.
a minute later told me she doesnt know and referred me to my Local Field rep.
he had the answers immediately as he is an ex tile contractor with actual experience.
Like John said , Schluter seems to have in house tech support that just puts you on hold while they search a database or ask someone else.
You need to talk to just the right people.
 PRO
PROBy Any Design Ltd.
9 years agolast modified: 9 years agoTundra be careful what advice the field rep gives you by word of mouth. Schluter's warranty clearly states that the printed instructions need to be followed. And get the plumber's and framer's address - you will need that if you ever needed fill a warranty claim.
I have learned on a side not the equivalent to Kerdi Coll is Ardex 8+9. This confirmed by both company's Ardex and Schluter.
That should make anyone wanting to build a Kerdi shower feel safer. I know when I used Kerdi I certainly wanted a little added protection on the corners. Now you can do it with out breaking any rules - you can now get a 10 year warranty for a Kerdi shower using modified thin-set (from Ardex). The kicker is you need to use Ardex setting materials. You can get the warranty info by calling Ardex and they will email it out.
X5 is a great thin-set to install Kerdi with - Laticrete's new Hydro Ban Sheet Membrane for that matter too.
If you need a hand with the Ardex Kerdi Warranty info email Mark at Ardex: Mark.Eslamloov@ArdexAmericas.com
- PRO
Mint tile Minneapolis
9 years agoArdex X5 and 8+9 work well as does Bostik Ditraset.
I choose not to use products that would require me to worry about the installation and lean on or count on any warranty.If I build the shower my clients will see the best warranty money can buy.
A Flood tested shower.
MongoCT
Original Author9 years agonewfiebern,
You can glue the drain and then pack mud, or set a ring of mud then set the drain into it. Both work fine. When the drain is set, you'll usually have about a 1-1/4" gap between the flange and the subfloor. Easy enough to pack mud under there should you chose to go that route.
Overlapping seams? Sure, if you can lap it "correctly", no worries. But if you have to lap it "backwards", again, no worries. You want a minimum 2" overlap at the seam, and water won't wick through the seam even if it's fully submersed in water.
Haven't tried to talk to a rep about Kerdi in several years, so I'm not sure how their tech support is these days. The last time I talked was about Ditra-Heat, they answered my questions with no problems.
A lot of the photos in this thread got deleted in the move to Houzzzzzz. Here's the shot of the ring of mud inder the drain flange: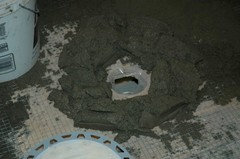
- PRO
By Any Design Ltd.
9 years agolast modified: 9 years agoTundra there is only one tech to call. That is Dale Kempster. If it does not come from his email it does not mean _______.
Any verball instriuctions are worthless.
Any instruction from Schluter must come via email from the top of the food chain. It says so in every single manual.
The last time I called tech support at Schluter I was placed on hold. Then told someone would call me back. Then told I should not talk to the phone support and that all my inquires hsould go through Dale.
I think this is becasue Schluter wants to make sure everythign I'm told id right. And I ask the hard questions.
Most times Dale emails me back in 2 days - sometimes it's weeks but he is always good about getting back to me.
If you ever talk to a local field rep always ask for an email follow up. Cover your back side with this.
Many people find out to late when building a Kerdi shower that the system requires un-modifeid thin-set. The secret in todays supplier list is a company called Ardex. They are the only ones making a modified thin-set approved for use with the Kerdi system.
If your kerdi shower installer is using a modfied thin-set from a company not called Ardex you should ask them why.... - PRO
Avanti Tile & Stone / Stonetech
8 years agoThanks for the link. Mongo had a FAR longer photo session with the Kerdi.....but when HOUSS took ofer, it seems that much of that was lost. Pity, as it was very thorough. Still, this covers most of it.
MongoCT
Original Author7 years agoFor those interested...the photos that were dropped during the transition from G-web to Houzzz have been reloaded on this post: Kerdi Shower Part Three

By Any Design Ltd.