Dear Fellow Remodelers:
Thanks for all of the help in getting this bathroom remodeling together. I think Garden Web is absolutely
the best resource out there. I learned so much from everybody else who has gone before me. I bow to the wisdom of the hive! This is small recompense, but here are the pictures of my bathroom reno.
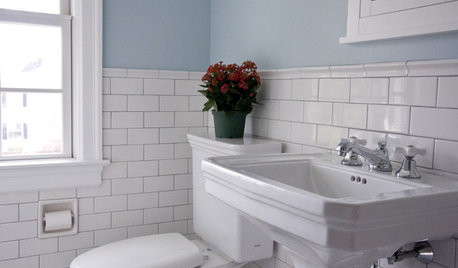
Here's where we started. The original space was about 5 by 5. The house is 1880, 1450 square feet, but reads much larger, due to the somewhat open floor plan. The wainscoting tile was actually made of plastic, sold in sheets. The wallpaper I originally chose -- let's just say I could have won an ugly wallpaper contest. The toilet was ancient, with the stains to prove it. The tiny wall-hung sink barely had enough space to put down a toothbrush. No shower.
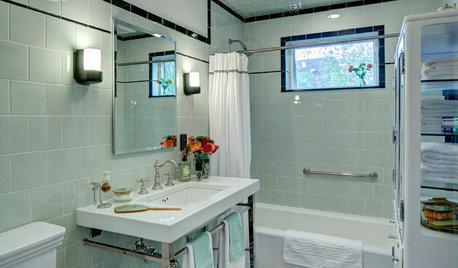
What we did: We stole some space from a useless hallway, and added three feet in length so we could shove a shower in there. We gutted the room, but did not move any plumbing to save money. The wainscoting tile was my one splurge in a three-project deal (kitchen, bathroom and second-floor laundry space). It is a 3 by 10 crackle tile by Ceramiche Grazia, color Laguna. I e-mailed the company in Italy, and this is apparently only sold in the U.S. by The Tile Shop in California. I live in Rhode Island. The price was $13.52 per sqf. ; the shipping wasn't too bad, and I got it quickly. (Didn't matter. The pace of the job was much, much slower.)
Even though our house is a Victorian, I went with a 1930s, Art-Deco-ish feel. At Old House Interiors magazine, they would call this "re-muddling." I don't care. Let them be slavish to an era on their own dimes. This is the view from the den.
We saved some hallway to preserve a coat closet. (You don't give up a closet in an old house.) I found an old leaded glass window to use as a fixed transom above the bathroom door. It did not fit the space -- it was too tall, and not long enough. But our talented stained glass artist in town lopped off the top and added a simple design to the side to make it fit. ($50!) I love this little guy.
The fixture is old, but refurbished by JF Pegan Company on ebay.
The toilet is a Toto Promenade; the marble sink console is from Signature Hardware; the floor is white 1-inch hex with black diamonds. It's a small space, so I went with a simple, open pattern. The fixtures were Kohler Memoirs. The lighting was by Hudson Valley Lighting. The medicine cabinet was a cheap metal deal by Kohler. I had my local frame shop re-frame it with an inexpensive frame. Wooden medicine cabinets were around $500. I thought that was ridiculous. My frame job was $80 and the cabinet was about $120.00. The wall-hung towel cabinet reflected in the mirror was constructed from an old French-door style window that was elsewhere in the house. This window was very energy-inefficient, so I replaced it, and had the two window doors stripped. I didn't have enough wall space to use both doors, so one it was, 8 inches deep. Wall color was SW Dewey.
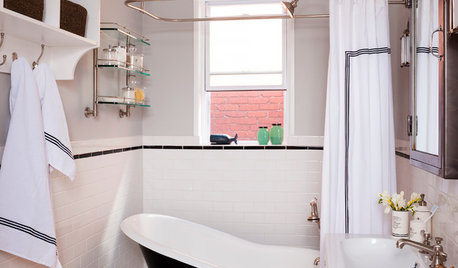
The shower became a funky hybrid. We had designed a 3 by 3 shower, but since it was practically up against the exterior door, we wouldn't be able to fit any molding around the door frame. Well, that's just not Old House. I came up with a rectangular back and a neo-angled front. By cutting the corners, we were able to fit in the door casing.
We went frameless to give the small shower a more open feel. Man, those shower doors are expensive! We also installed a light. The tile is good, ole Lowe's pinwheel, black pencils and 4 by 4 white field tiles.
I love my new bathroom! Thank you to every Garden Web poster who shares his or her renovation triumphs, disasters, anxieties, budgets, smokin' deals and above all, pictures! Now, onto the new roof. (Definitely no fun, but necessary.)


enduring
yayagal
Related Professionals
Clarksburg Kitchen & Bathroom Designers · Frankfort Kitchen & Bathroom Designers · Kendale Lakes Kitchen & Bathroom Remodelers · Newberg Kitchen & Bathroom Remodelers · Omaha Kitchen & Bathroom Remodelers · Tempe Kitchen & Bathroom Remodelers · Walnut Creek Kitchen & Bathroom Remodelers · Plant City Kitchen & Bathroom Remodelers · Albany Glass & Shower Door Dealers · Ossining Glass & Shower Door Dealers · Greentown Glass & Shower Door Dealers · Forest Hills Cabinets & Cabinetry · Key Biscayne Cabinets & Cabinetry · Rockford Window Treatments · Rolling Meadows Window TreatmentsOlychick
wakefieldremodelerOriginal Author
sas95
pricklypearcactus
cat_mom
Fori
ellenm08
karena_2009
lisa0527
wakefieldremodelerOriginal Author
sergeantcuff